GPU Programming (3/6) - Writing High Performance GPU Kernel using Triton Overview (+Fused Softmax and Fused Xent Examples)
03 May 2024< 목차 >
- Motivation (Why Triton?)
- Vector Addition
- Softmax
- Matrix Multiplication
- Memory Efficient Cross Entropy Loss
- Scaled Dot Product Attention (SDPA)
- Some Example Code-bases
- References
Motivation (Why Triton?)
Triton은 2021년 OpenAI에서 개발한 tool로, GPU programming 전문가가 아니더라도 high performance kernel을 짤 수 있도록 해주는 library 이다.

Nvidia사에서 개발한 동명의 library가 존재하지만, 이는 opensource inference server이며 OpenAI의 triton과는 아예 다르다. Triton이라는 이름이 흔해보이진 않아서 어원을 찾아보려 했지만 도대체 왜 OpenAI에 이어 NVIDIA가 triton이라는 이름이 붙혀졌는지 모르겠다. 아마 computer graphics분야의 polygon이 삼각형 모양이라 tri- 가 붙은것 같은데, triton을 개발한 Philippe Tillet에 따르면 본인이 먼저 naming을 했고 (여전히 어원은 모르겠다..), NVIDIA가 triton inference server로 renaming을 했을 때에도 이 이름을 바꾸지 않은 이유는 자신의 지도교수와의 유일한 연결점이었기 때문이라고 한다.

그런데 왜 Triton에 대해서 배워야 할까?
Deep Neural Network (DNN)을 학습하기 위해서는 matrix multiplication같은 job을 sequential하고 정교하게 처리하는 CPU보다는 parallel하게 처리하는 GPU를 사용해야 한다. 그리고 GPU kernel은 보통 NVIDIA가 개발한 Compute Unified Device Architecture (CUDA) kernel을 사용하게 되는데, 우리가 평소에 쓰는 Pytorch도 python으로 보이지만 모든 internal은 사실 cpp과 CUDA 언어로 짜여져 있으며, cuBLAS (CUDA Basic Linear Algebra Subprograms)나 cuDNN (CUDA Deep Neural Network)의 kernel 들을 사용한다.
그런데 이런 구조는 user가 직접 수정하기가 매우 까다롭다. 이런 저런 idea가 떠올라 실험을 하고 싶은데, CUDA kernel을 직접 ‘잘 짜는 것’은 굉장히 리소스가 많이 든다. python이 아니기 때문에 compile도 해줘야 하고, 사용자가 어떤 환경 (GPU의 종류 등)에서 어떤 input (예를 들어 text data같은 경우 length가 input마다 다르다) 쓰는지에 따라 가장 빠른 최적의 kernel을 쓰도록 되어있는데 이런 magic number (?) 들은 open-source가 아니기 때문에 직접 kernel을 high performance로 짜는 것은 매우 어렵다고 한다. 하지만 triton을 쓰면 CUDA programming 경험이 없는 사람도 CUDA expert가 짠 것에 준하는 kernel을 구현할 수 있게 해준다고 한다.

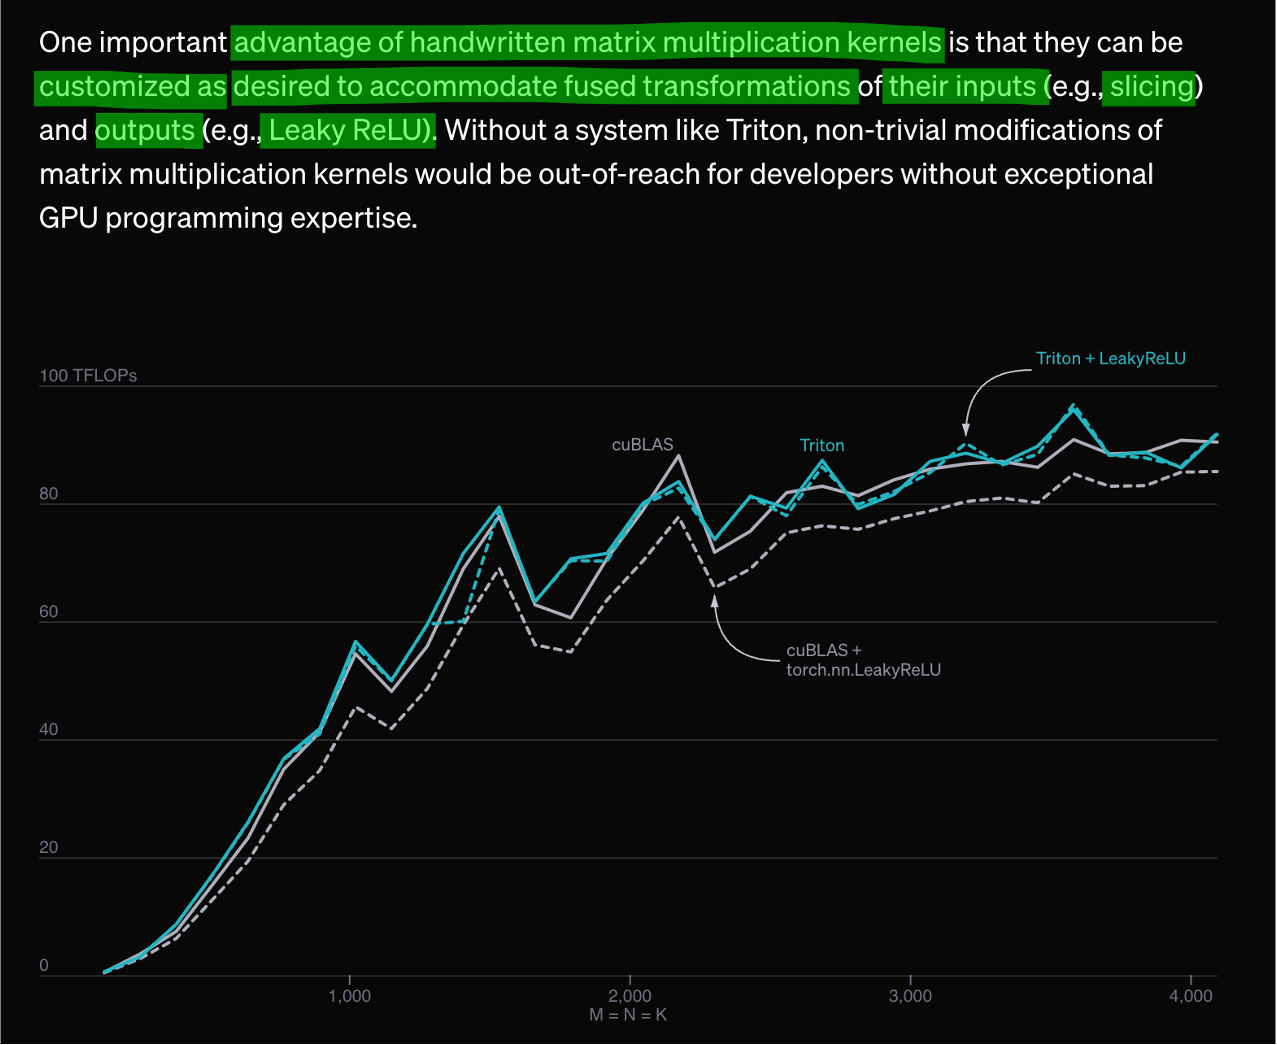
예를 들어 FP16으로 행렬 곱 (matrix multiplication)을 구현한다고 생각해보자. 이미 cuBLAS에 이를 위한 kernel이 어떤 GPU, 어떤 input에 대해 어떤 kernel을 call해야 하는지가 있지만 user는 이를 알 수 없다. 이 때 triton을 사용하면 거의 cuBLAS에 준하는 kernel을 단 25줄로 작성할 수 있다고 한다.

이것이 가능한 이유는 뭘까? 앞서 말한 것 처럼 GPU programming을 위해서는 크게 세 가지를 고려해야 한다고 blog는 말하고 있는데, 이는 다음과 같다.
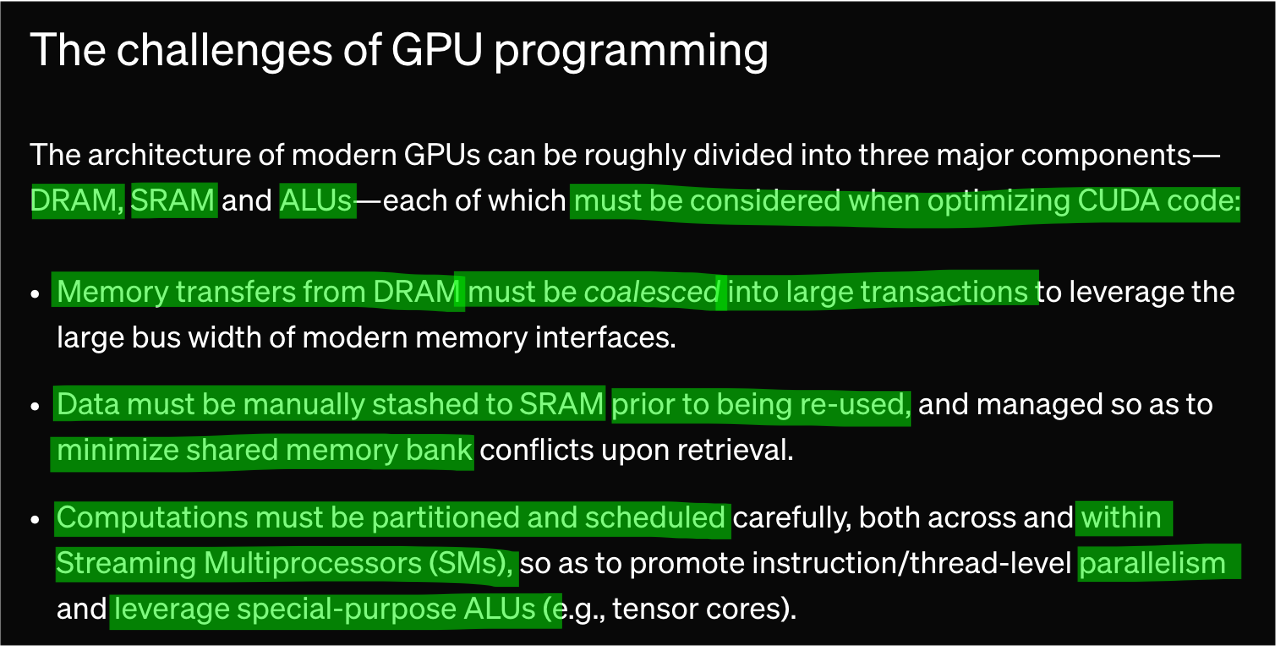
Static Random Access Memory (SRAM), Dynamic Random Access Memory (DRAM), Arithmetic Logic Unit (ALU) 그리고 Streaming Multiprocessor (SM) 같은 얘기가 나오는데, GPU architecture, system에 친숙하지 않은 사람이면 우선 넘어가도 된다. 요지는 서로다른 memory로 tensor data를 옮기는 것 자체가 시간이 많이들기 때문에 얼만큼 모아서 데이터를 보낼 것인가?를 고려하거나, 최대한 parallelism을 활용하기 위해 경우의 수를 찾아야 하는데 triton은 이를 자동화했기 때문에 단 25줄로 효율적인 cuBLAS수준의 kernel을 구현할 수 있다는 것이다.

(아래는 A100같은 modern GPU의 architecture이다.)

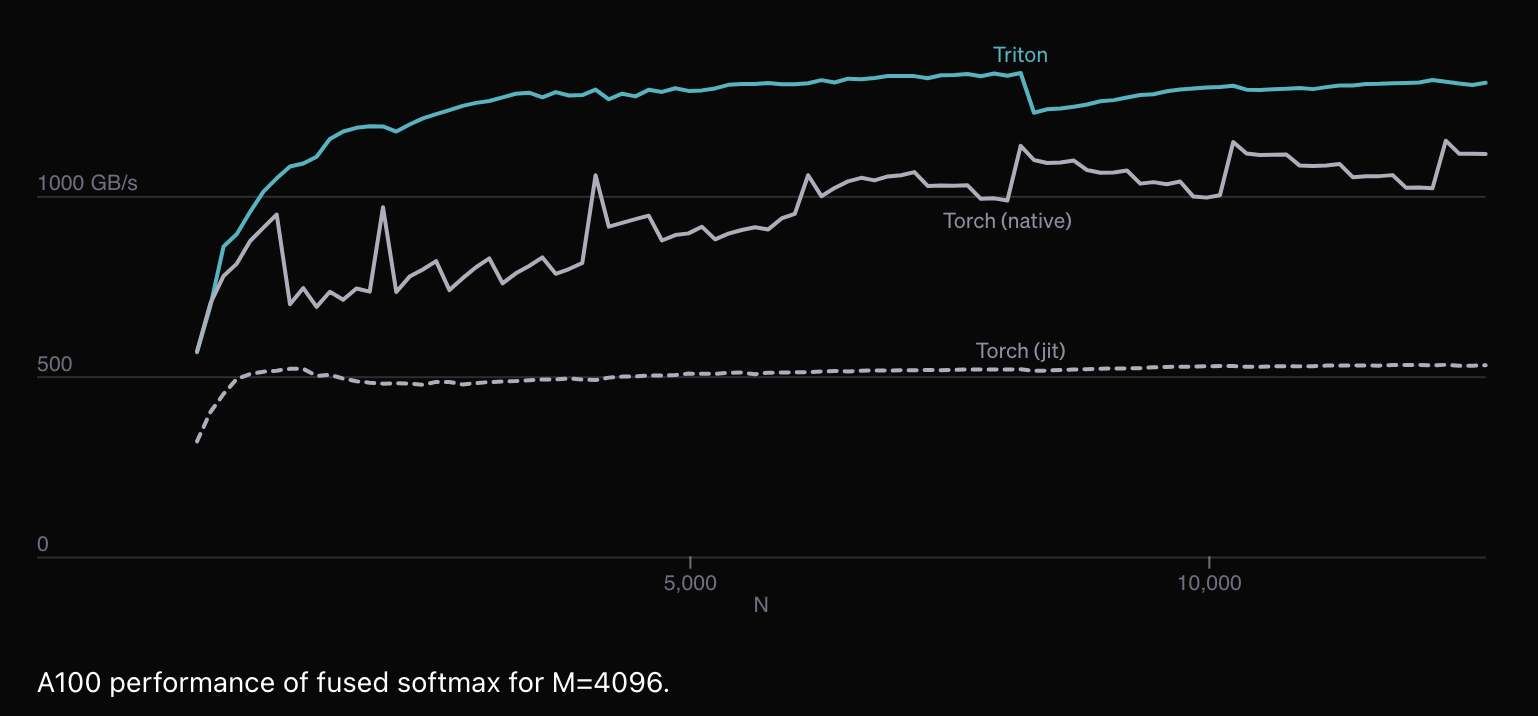
이는 심지어 연산 자체가 torch native보다 빠를 수도 있다고 하며,
우리가 matrix multiplication에 ReLU같은 activation을 섞어서 한번에 처리하는 fused kernel을 구현한다면 이점은 배가 될수도 있다.
Kernel을 합친다는게 무엇이며 왜 이것이 working하는지에 대해서는 아래 blog post의 문단이 잘 설명하고 있는데, 보통 training wall clock time이란 실제 tensor를 조작하는데 (처리하는데) 쓰이는 CUDA time과 data를 CPU 와 GPU로 옮기는 시간, 그리고 CUDA kernel을 launch하는데 드는 시간으로 이루어져 있으며 data를 옮기는데 드는 시간을 줄임으로써 wall clock time에 contribution을 하게 되는 것이다.
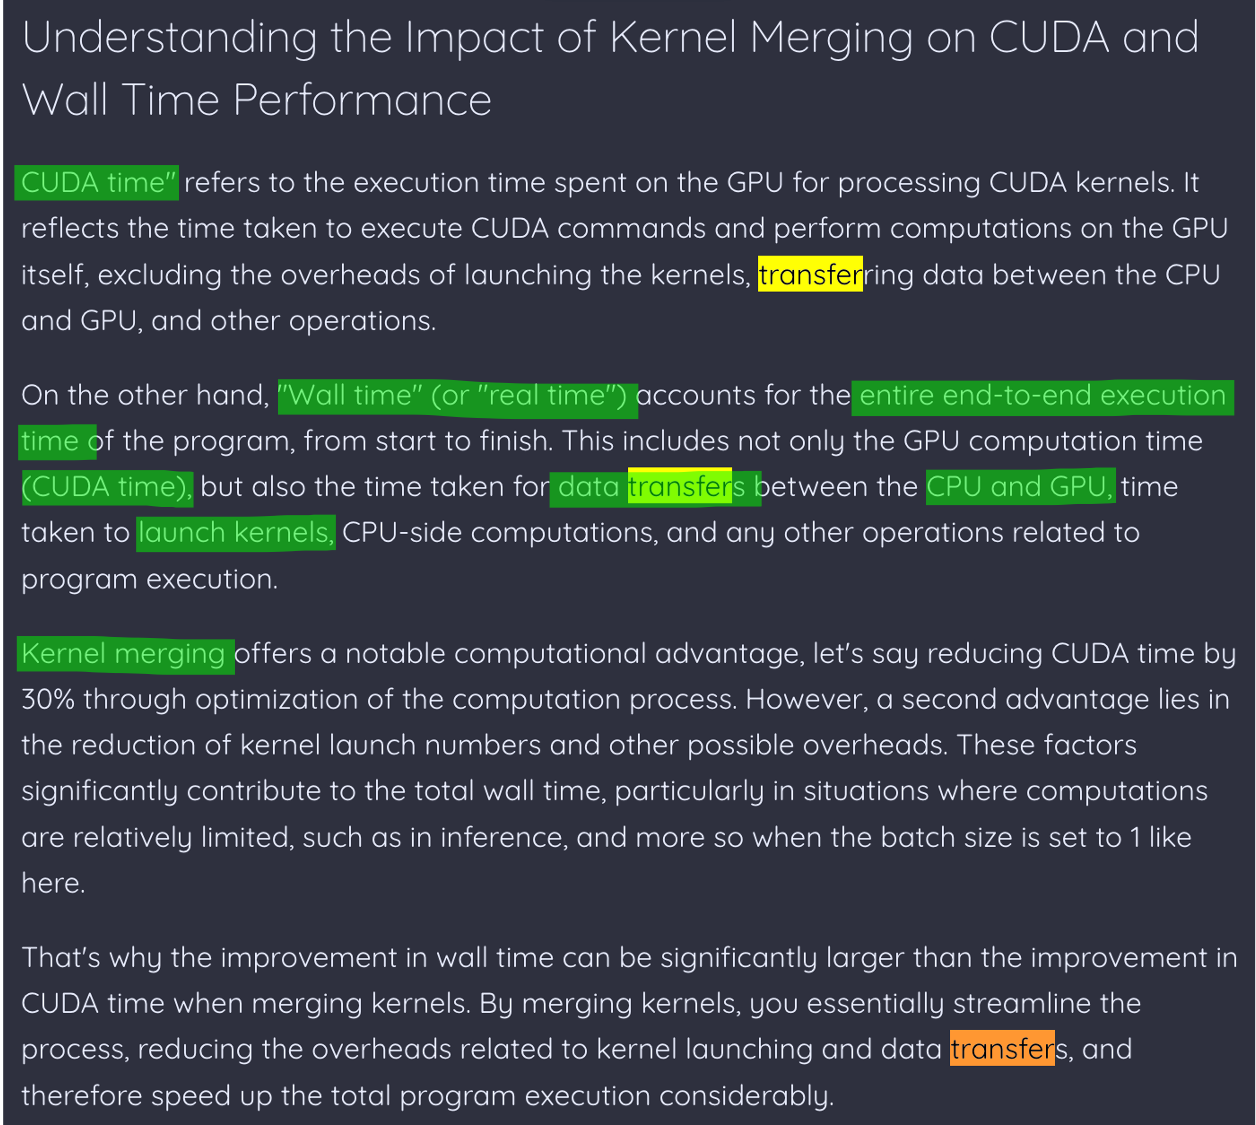 Fig. Source from Deep Dive into Kernel Fusion: Accelerating Inference in Llama V2

우리가 익히 잘 알고있는 Flash Attention 같은것도 간단하게는 이 철학을 이용했다고 할 수 있다.
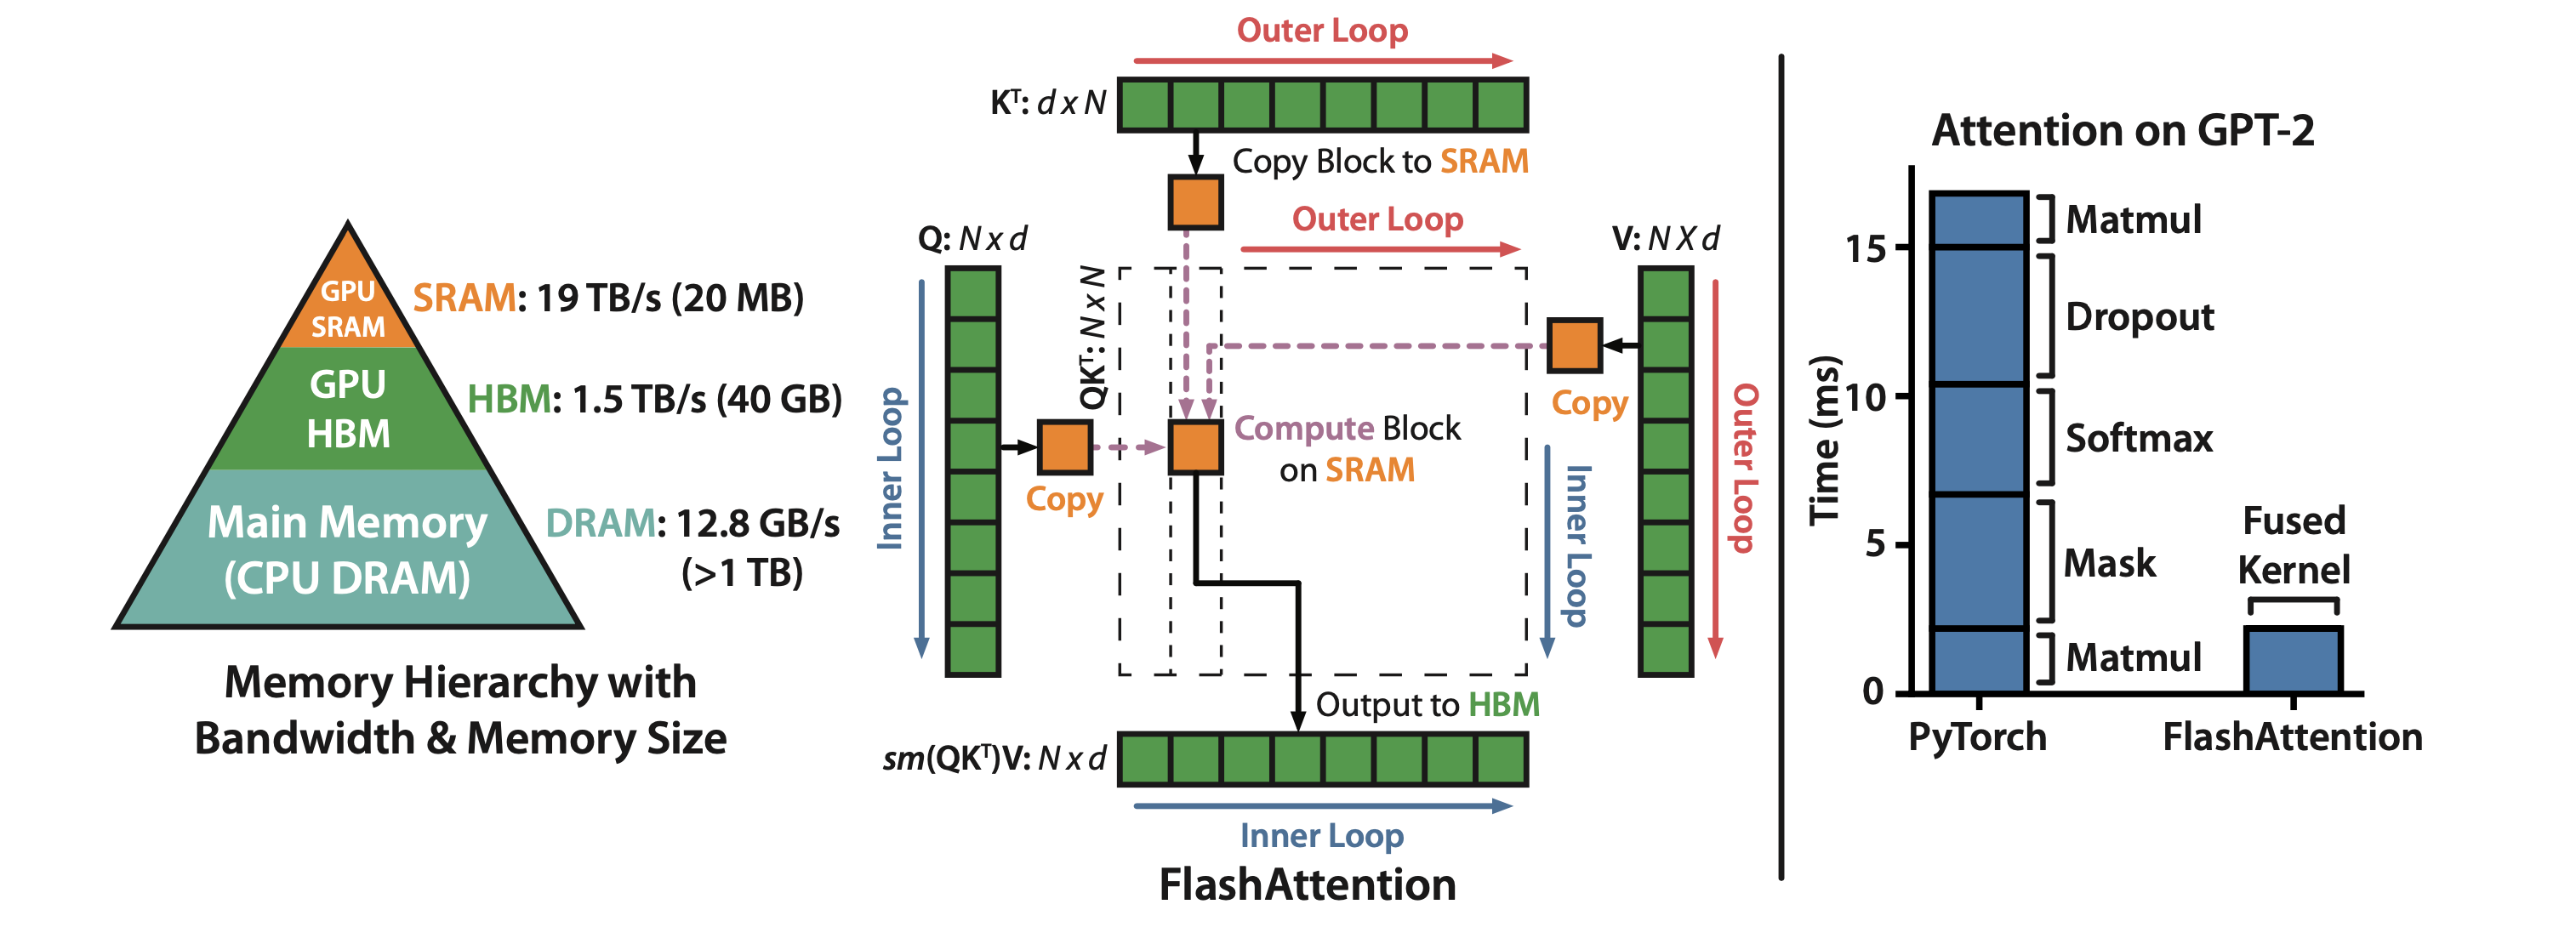 Fig. Flash Attention의 철학은 online softmax + kernel fusion이라고 볼 수 있다.
사실 Machine Learning Engineer (MLE)가 이것까지 알아야 하는가? 어디까지 알아야 하는가? 하는 생각이 들 수 있다. 필자도 CUDA level code는 본 적도 없으며 볼 엄두도 나지 않지만 triton은 우선 그렇게 까지 어려워 보이지는 않는다. 그럼에도 불구하고 System Engineer도 아닌데 이것까지 봐야하는가? 라고 하면 trtion는 어느정도 다룰 줄 아는게 LLM시대에 필수인 것 같다고 말하고 싶다.
사실 나는 이번에 triton으로 구현된 kernel을 발견해서 patch를 하지 않았다면 학습이 불가능한 상황에 놓여 있었다. 가령 Llama3 model에 대해서 long context corpus를 fine-tuning한다고 생각해보자. 내가 겪은 상황은 정확히 이 issue와 같았는데, 결론부터 말하자면 logit tensor를 구하고 loss를 계산하는 과정에서 memory가 폭발하는 것이 문제이다.
우리가 transformer model을 학습할 때 필요한 GPU memory는 얼마나 될까? 먼저 80GB A100 GPU 1개로 Full Fine-tuning 실험을 한다고 생각해보자. 8B Llama3를 bfloat16으로 학습한다고 하면 벌써 model memory만 16GB이며, distributed training을 위한 cuda context가 1~2GB정도 더 먹는다고 치면 17~18GB가 소요된다. 남은 60GB에서 module별 activation tensor를 저장하고 loss를 계산해야 한다.
그렇다면 activation에 드는 memory는 얼마일까? 아래 문구를 보면 transformer architecture가 소비하는 activation에 대한 memory는 다음과 같다.
- \[\text{num layers} \times \text{hidden dim} \times \text{seq len} \times \text{batch size}\]
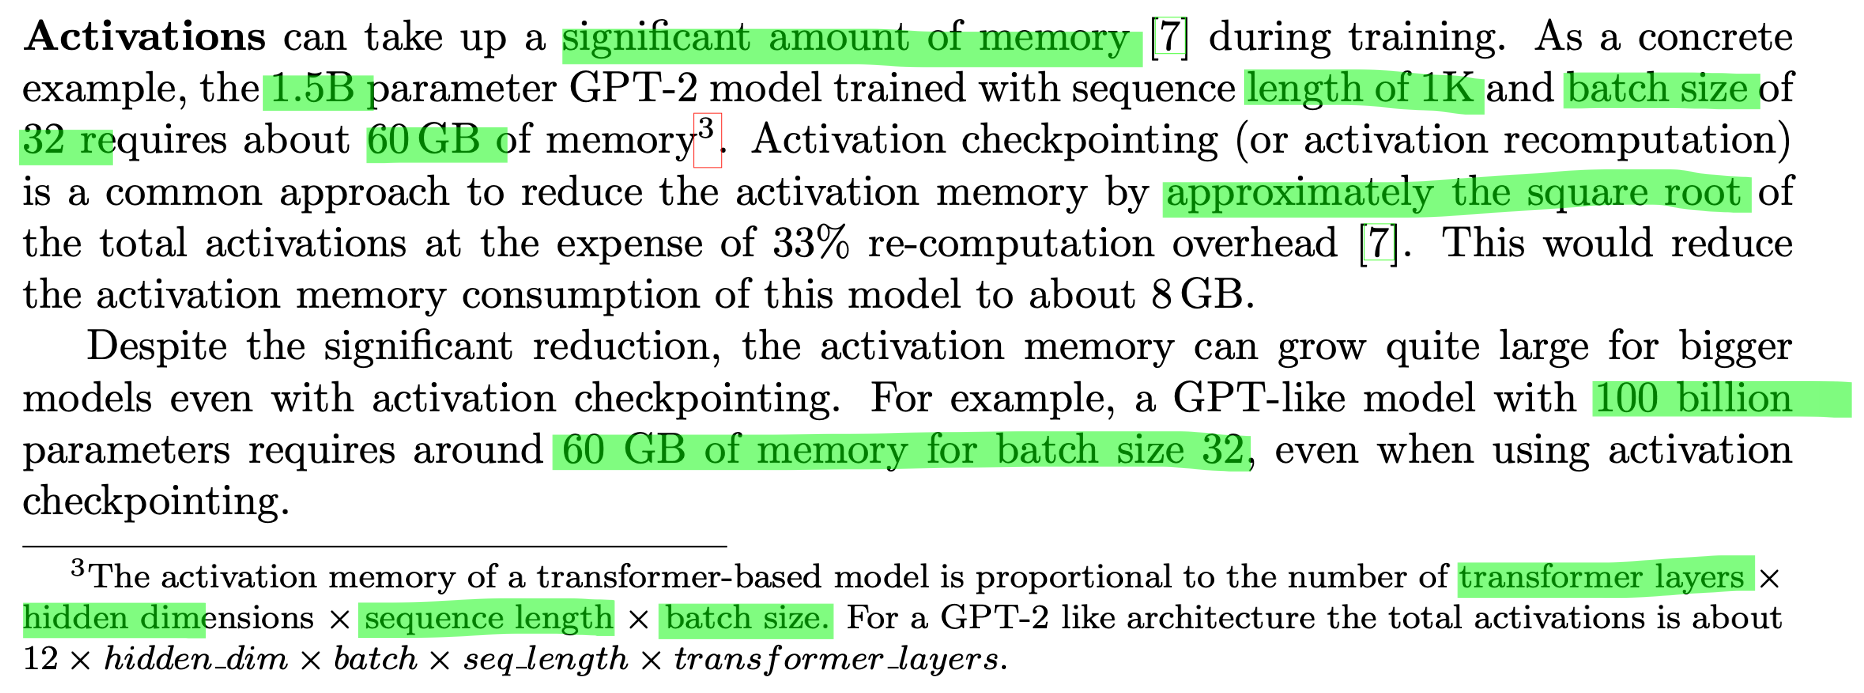 Fig. Source from ZeRO paper
당연하게도 대부분의 LLM은 activation에 드는 GPU memory가 너무 크기 때문에 checkpointing을 해야하며,
이는 이상적인 경우 최대 sqrt만큼 으로 memory cost를 줄일 수 있다.
대충 우리가 B=1 이고 sequence length, T=32678 (32k)의 long context sequence를 8B model에 대해 학습하는 경우를 생각해보자.
대부분의 opensource library는 sqrt만큼 save하기 위한 selective checkpointing이 적용되어 있지 않기 때문에 훨씬 memory를 많이 먹는데,
llama3 8b의 arch는 다음과 같기 때문에 GPT-2처럼 계수를 대충 12로 생각하면 \(\approx 12 \times 1 \times 32768 \times 4096 \times 32 = 48GB\)정도가 소요된다고 볼 수 있다.
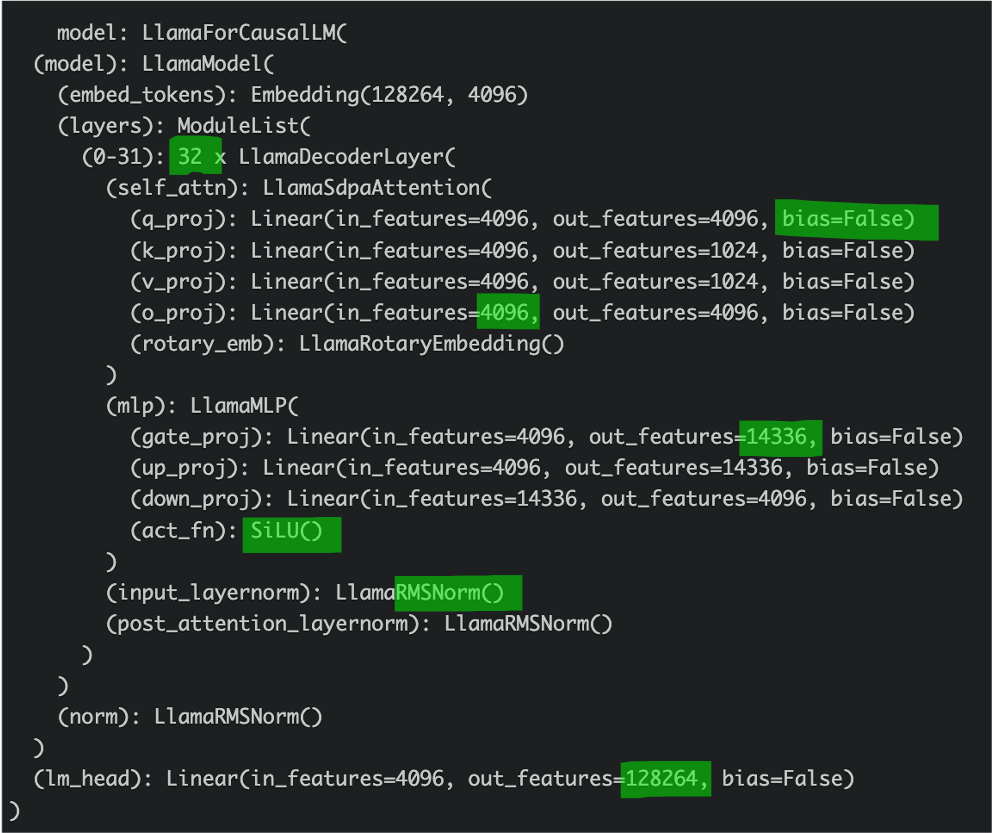 Fig.
Fig.
여기에 여차저차 activation을 CPU로 offloading을 적용해보자. 모든 transformer block output activation을 CPU로 보낸 뒤 backprop시 GPU로 memory copy를 하기 때문에 느려지지만 이렇게하면 매우 많은 GPU memory를 save할 수 있다. 하지만 이렇게 하더라도 memory profiling을 해보면 model end부분에서 엄청난 memory를 요구하는걸 볼 수 있다.
 Fig.
Fig.
아무리 Flash attention을 적용하고, training wall clock time을 포기하고 activation checkpointing을 매 layer별로 CPU offloading 하더라도 peak memory는 forward, backward recomputation에 있지 않다.
왜 그럴까?
그건 바로 마지막 transformer hidden output을 vocab dimension으로 projection해서 logit을 만들고,
Cross Entropy (CE) loss를 계산하고 gradient를 구하는 부분이 매우 큰 memory를 요구하기 때문이다.
마지막 transformer block을 통과하고 난 뒤의 hidden states tensor는 batch size, B=1 이고 sequence length, T=32678 (32k)일 경우 [B, T, hidden] = [1, 32678, 4096]이지만 logit은 llama3의 vocab size가 128264이므로 [1, 32678, 128264]가 된다.
게다가 일반적으로 softmax 계산, loss 계산을 하는 부분에서는 higher precision을 사용하기 때문에 logit을 위해서는 \(1 \times 32678 \times 128264 \times 4 bytes = 15.6 GB\)가 요구된다.
여기서 그치지않고 log softmax를 통과시킨 중간 결과도 저장해야 하고, gradient를 계산하기 위한 matrix size만한 empty tensor 등을 포함하면 peak memory는 그림에서처럼 67GB를 찍게 되는 것이다.
그런데 200줄 정도의 triton 으로 쓰여진 이 kernel을 사용하면 peak memory를 12GB수준으로 줄일 수 있다.
 Fig.
Fig.
어떻게 이게 가능할까?
곧 다른 subsection에서 code level로 분석을 하겠으나, 간단히 말해서 hidden -> logit -> loss 를 하나로 합쳤다는 점 (fusing)과 code author의 novel idea가 조금 더해 엄청난 memory reduction을 달성한 것이다. 그것도 wall clock은 늘어나지도 않았다.
만약 CUDA programming 을 아예 할 줄 모르고, 할 줄 안다고 하더라도 원래 loss 를 계산하는 routine과 같거나 그 이상의 효율을 내는 kernel을 짜지 못하면 long context training은 아예 불가능 한 것이 었을 것이다. 그렇기에 triton을 조금이라도 할 줄 알아야 한다고 말하고 싶다.
이제 어떻게 triton code를 작성하는지 알아보자.
Vector Addition
먼저 triton을 install 해야 하는데,
pip install triton해도 되고 요즘 torch가 triton를 채택했기 때문에 torch version이 높다면 자동으로 깔려있다.
이제 torch, triton, 그리고 triton.language를 import하는데, 이 때 triton.language는 tl로 import하는것이 convertion이다.
import torch

import triton
import triton.language as tl
triton.language는 kernel을 구성하는데 중요한 함수들이 정의되어 있는데 대표적으로 아래 같은 것들이 자주 쓰인다.
- program_id: Returns the id of the current program instance along the given axis.
- arange: Returns contiguous values within the half-open interval [start, end).
- load: Return a tensor of data whose values are loaded from memory at location defined by pointer:
- store: Store a tensor of data into memory locations defined by pointer.
- cdiv: Computes the ceiling division of x by div
이제 tutorial에 있는 vector addition kernel을 보자.
@triton.jit
def add_kernel(x_ptr,  # *Pointer* to first input vector.
               y_ptr,  # *Pointer* to second input vector.
               output_ptr,  # *Pointer* to output vector.
               n_elements,  # Size of the vector.
               BLOCK_SIZE: tl.constexpr,  # Number of elements each program should process.
               # NOTE: `constexpr` so it can be used as a shape value.
               ):
    # There are multiple 'programs' processing different data. We identify which program
    # we are here:
    pid = tl.program_id(axis=0)  # We use a 1D launch grid so axis is 0.
    # This program will process inputs that are offset from the initial data.
    # For instance, if you had a vector of length 256 and block_size of 64, the programs
    # would each access the elements [0:64, 64:128, 128:192, 192:256].
    # Note that offsets is a list of pointers:
    block_start = pid * BLOCK_SIZE
    offsets = block_start + tl.arange(0, BLOCK_SIZE)
    # Create a mask to guard memory operations against out-of-bounds accesses.
    mask = offsets < n_elements
    # Load x and y from DRAM, masking out any extra elements in case the input is not a
    # multiple of the block size.
    x = tl.load(x_ptr + offsets, mask=mask)
    y = tl.load(y_ptr + offsets, mask=mask)
    output = x + y
    # Write x + y back to DRAM.
    tl.store(output_ptr + offsets, output, mask=mask)
먼저 triton을 위한 decorator가 보일 것이다.
@triton.jit
def add_kernel(x_ptr,  # *Pointer* to first input vector.
Decorator는 보통 함수를 직접 수정하지 않고도 함수의 동작을 바꾸기 위해 사용되는데,
import time

def timeit_decorator(func):
    def wrapper(*args, **kwargs):
        start_time = time.time()
        result = func(*args, **kwargs)
        end_time = time.time()
        print(f"{func.__name__} took {end_time - start_time:.4f} seconds")
        return result
    return wrapper

@timeit_decorator
def example_function(n):
    total = 0
    for i in range(n):
        total += i
    return total

# function call
example_function(1000000)
@triton.jit은 앞으로 앞으로 이 함수를 GPU에서 사용할 것이고,
triton를 사용해서 compile하겠다는 의미를 갖는다.
Just-In-Time (jit)이란 run time에 compile을 하겠다는 의미로,
그 때 그 때 병목인 부분을 찾아서 최적의 kernel로 변환해 쓰겠다는 의미를 갖는 것 같다.
당연히 c++ 처럼 미리 compile된 code (Ahead-of-Time, AOT)가 낮지 않냐는 질문을 할 수 있지만 그런 경우도 있고,
성능이 예측 가능하다는 점 등 여러 장점이 있으나 결과적으로 JIT이 더 좋은 것 같다.
이제 함수의 입력 인자를 살펴보자.
@triton.jit
def add_kernel(x_ptr,  # *Pointer* to first input vector.
               y_ptr,  # *Pointer* to second input vector.
               output_ptr,  # *Pointer* to output vector.
               n_elements,  # Size of the vector.
               BLOCK_SIZE: tl.constexpr,  # Number of elements each program should process.
               # NOTE: `constexpr` so it can be used as a shape value.
               ):
먼저 두 개의 vector를 더할 것이므로 두 개 vector의 주소 (pointer)와 vector의 크기 n_elements를 알려줘야 한다.
그리고 저장될 output vector, c=a+b의 pointer도 알려준다.
마지막으로 BLOCK_SIZE라는 것을 알려줘야 하는데, 이는 tl.constexpr로 constexpr의 뜻은 constant expression의 약자로 compile time 상수 (constant)를 의미한다고 한다.
“compile time에 constant로 평가된다”는 표현은 program이 실행되기 전에, 즉 컴파일 과정에서 그 값이 이미 결정된다는 의미로,
runtime에 그 값을 계산하거나 평가할 필요가 없다는 것을 뜻한다고 한다.
이를 통해 program의 실행 속도를 높이고, memory 사용을 최적화할 수 있다고 하는데 아래 cpp code의 예시를 보면 일반 변수를 사용할 시
int square(int x) {
    return x * x;
}

int main() {
    int value = square(5); // 이 값은 runtime에 계산됨
    return 0;
}
square(5)의 값은 program이 실행되는 동안 계산이 된다. 즉, compile 과정에서는 square 함수 호출만 기록되고, 실제 값은 runtime에 계산된다. 반면 아래처럼 constexpr를 사용하면 compiler는 value가 25라는 것을 알고 있으며, runtime에 추가 계산을 수행할 필요가 없다고 한다.
constexpr int square(int x) {
    return x * x;
}

int main() {
    constexpr int value = square(5); // 이 값은 compile time에 계산됨
    return 0;
}
즉 triton에서 BLOCK_SIZE: tl.constexpr가 되는 이유는 예를 들어 우리가 매우 큰 matrix (or tensor) 두 개를 multiplication같은 연산을 하기 위해서는 일반적으로 구역을 나눠서 여러 gpu core로 나눠 처리하게 되는데 이를 blocking (tiling)이라고 하는데 미리 이를 결정하겠다는걸 의미한다고 한다.
이는 runtime constant와 비교해서 아래의 장점을 갖는다고 한다.
-
최적화: compile time constant를 사용하면 compiler가 반복문 언롤링(loop unrolling), constant 전파(constant propagation), 조건문 제거(condition elimination) 등의 최적화를 쉽게 수행할 수 있다. runtime constant를 사용하면 이러한 최적화 기회가 줄어든다.
-
코드 복잡성 감소: compile time constant를 사용하면 많은 코드 경로가 컴파일 시점에 결정될 수 있다. runtime constant를 사용하면 더 많은 분기(branch)가 필요할 수 있으며, 이는 코드 복잡성을 증가시키고 예측 불가능성을 높힌다.
-
메모리 접근 (memory access) 효율성: compile time constant는 메모리 접근 패턴을 최적화할 수 있다. 예를 들어, 특정 블록 크기를 알고 있다면, 메모리 할당과 접근 패턴을 최적화하여 캐시 히트 비율을 높일 수 있다. runtime constant의 경우 이러한 최적화가 어려워질 수 있다.
CUDA로 짜여져있는 cuBLAS의 kernel같은 걸 보면 행렬(matrix)나 벡터(vector) 연산 시 input data를 block size로 잘라서 연산을 수행하는데,
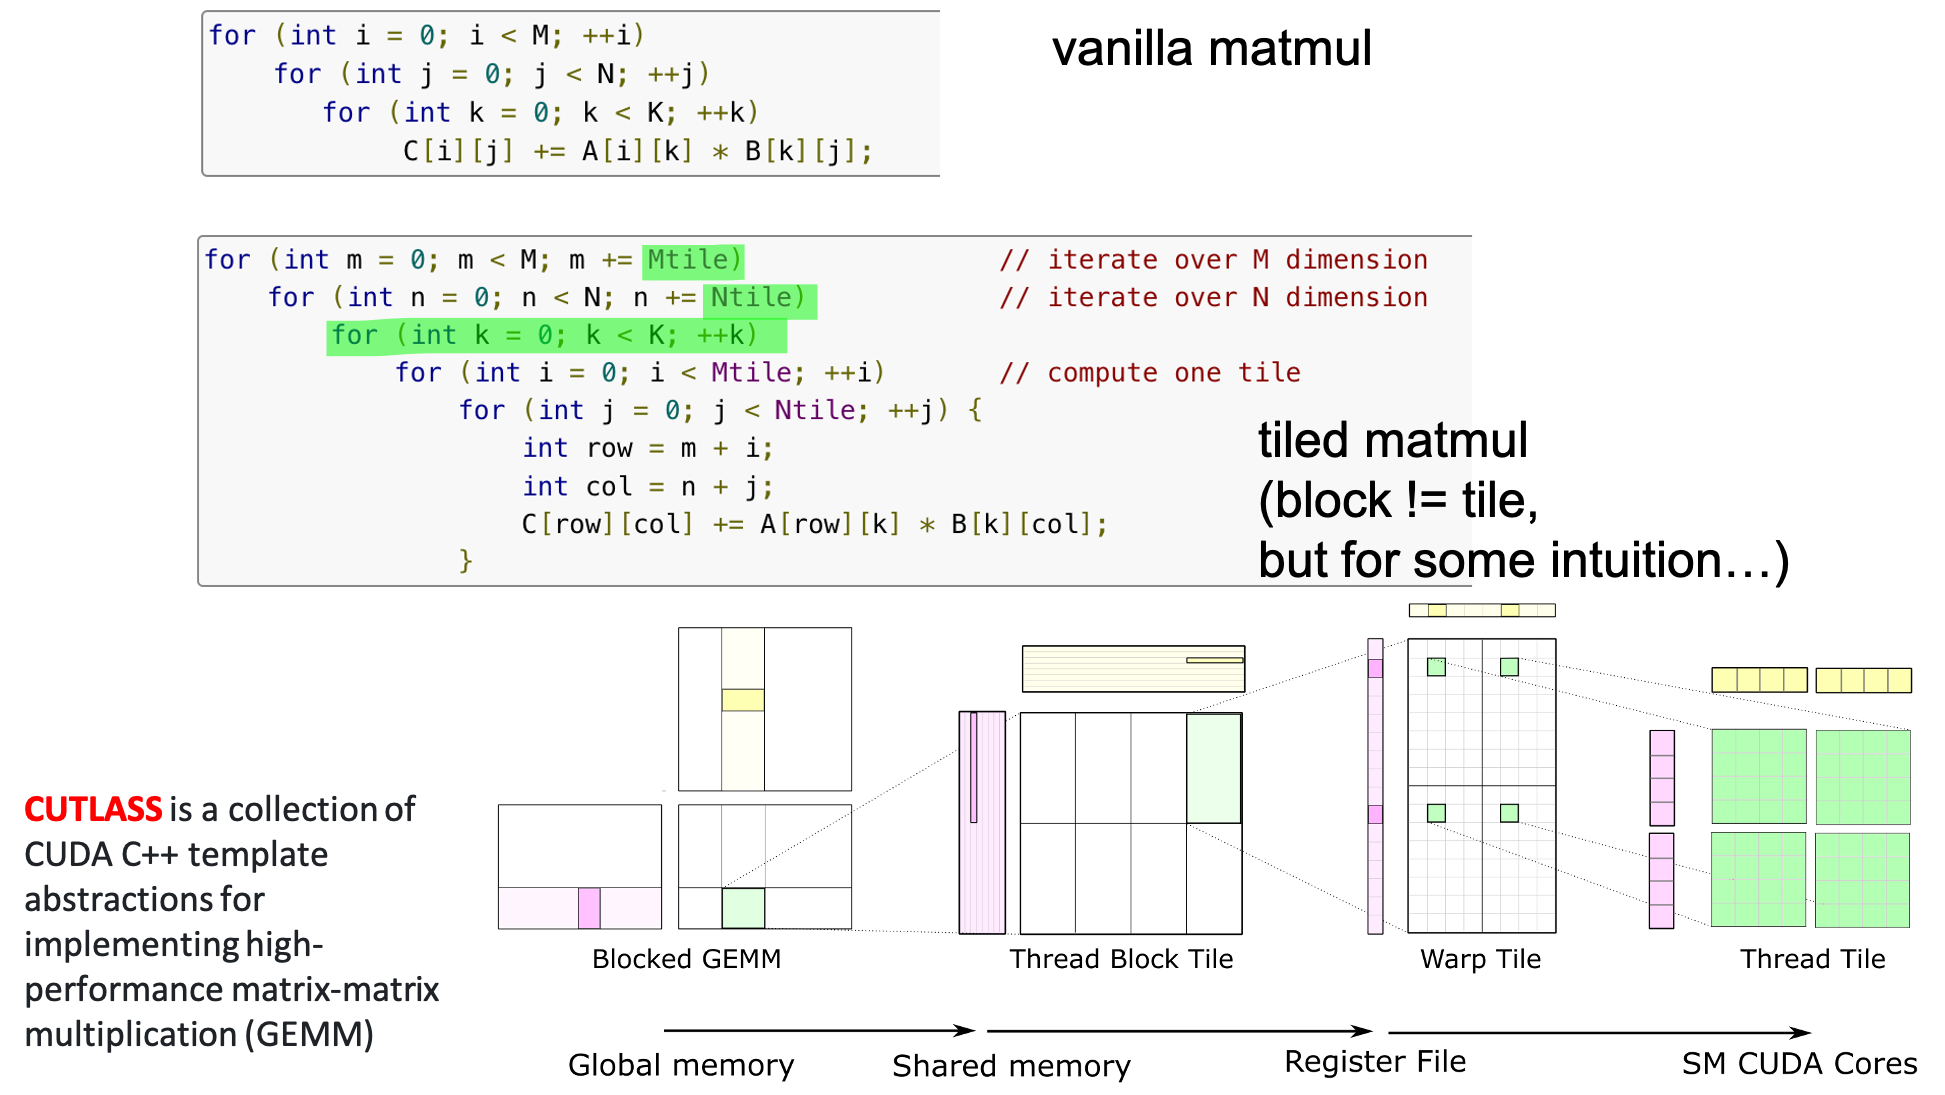 Fig.
Fig.
이는 메모리 접근 패턴 (memory access pattern) 등을 최적화하여 효율적인 병렬 처리를 통해 성능을 극대화하기 위해서이다. Memory access pattern에 대해서는 cache 효율성같은게 있는데, block 단위로 data를 load, save하면 연속적인 메모리 접근 패턴이 생성되어 cache hit rate이 증가한다. 이는 memory access 지연 시간 (latency)을 줄이고 성능을 향상시킨다고 한다. 또한 block 내의 shared memory도 효율적으로 사용할 수 있다고 하는데, 사실 우리가 kernel을 극한까지 최적화 하는 것이 아니라면 이런 것 까지 당장 알 필요는 없을 것 같다.
- 그리드 (Grid): 여러 블록 (Block)으로 구성됨. Grid는 1차원, 2차원 또는 3차원 배열로 구성될 수 있으며, 각 차원에서의 크기는 programmer 지정할 수 있음.
- 블록 (Block): 여러 워프 (Warp)로 구성됨. 각 block 내의 thread는 서로 협력하여 작업을 수행할 수 있음. 각 block은 독립적으로 실행되며, 같은 블록 내의 thread들은 공유 메모리 (shared memory)를 통해 데이터를 공유할 수 있습니다. block은 1차원, 2차원 또는 3차원 배열로 구성될 수 있습니다.
- 워프 (Warp): 여러 스레드 (Thread)로 구성됨. 일반적으로 NVIDIA GPU에서는 하나의 워프가 32개의 thread로 이루어짐.
- 스레드 (Thread): Thread는 GPU에서 실행되는 가장 작은 실행 단위. 각 thread는 자신만의 register와 local memory를 가지고 있으며, 같은 block 내의 다른 스레드들과 shared memory를 통해 상호작용할 수 있습니다.
왜냐하면 보통 block size는 어떤 matrix (or tensor)의 hidden dim에 대해서 아래처럼 계산하는 것이 일반적이기 때문이다.
# The block size is the smallest power of two greater than the number of columns in `x`
n_rows, n_cols = x.shape
BLOCK_SIZE = triton.next_power_of_2(n_cols)
Warp나 Grid도 matmul, activation function등에 대해서 설정하는 방법이 있는데, 어쨌든 주어진 processor에 대해서 이는 크게 우리가 건드릴 필요가 없는 것으로 보이니 적당히 개념만 알고 넘어가면 될 것 같다.
# The number of WARPs
num_warps = 4
if BLOCK_SIZE >= 2048:
    num_warps = 8
if BLOCK_SIZE >= 4096:
    num_warps = 16
이제 실제로 add를 수행할 함수를 정의할 차례이다. 우린 앞서 runtime에 GPU kernel로 변환될 triton decorated kernel을 짠 것이고, 이 kernel을 호출할 함수는 다음과 같이 작성할 수 있다.
def add(x: torch.Tensor, y: torch.Tensor):
    # We need to preallocate the output.
    output = torch.empty_like(x)
    assert x.is_cuda and y.is_cuda and output.is_cuda
    n_elements = output.numel()
    # The SPMD launch grid denotes the number of kernel instances that run in parallel.
    # It is analogous to CUDA launch grids. It can be either Tuple[int], or Callable(metaparameters) -> Tuple[int].
    # In this case, we use a 1D grid where the size is the number of blocks:

    grid = lambda meta: (triton.cdiv(n_elements, meta['BLOCK_SIZE']), )
    # NOTE:
    #  - Each torch.tensor object is implicitly converted into a pointer to its first element.
    #  - `triton.jit`'ed functions can be indexed with a launch grid to obtain a callable GPU kernel.
    #  - Don't forget to pass meta-parameters as keywords arguments.
    add_kernel[grid](x, y, output, n_elements, BLOCK_SIZE=1024)
    # We return a handle to z but, since `torch.cuda.synchronize()` hasn't been called, the kernel is still
    # running asynchronously at this point.
    return output
특별할 것 없이 input vector 2개와 이를 합친 결과물을 담을 output vector를 선언해주고 kernel에 넘겨줄 것이다.
vector의 크기는 n_elements = output.numel()로 간단히 얻을 수 있다.
그 다음은 grid인데 앞서 설명한 것 처럼 grid는 병렬로 실행될 kernel instance (block)의 수 이다.
여기서 triton.cdiv는 앞에 있는 값을 뒤에 있는 값으로 나눠 반올림 하는 것으로 예를 들어, n_elements가 10000이고 BLOCK_SIZE가 1024라면, grid는 10이 된다 (10000 / 1024의 반 올림).
각 block은 최대 1024개의 원소를 처리하지만 마지막 block은 10000 - 9 * 1024 = 936개의 원소만 처리하게 된다.
Sanity Check
이제 이를 torch 구현체와 비교해보자.
torch.manual_seed(0)
size = 98432
x = torch.rand(size, device='cuda')
y = torch.rand(size, device='cuda')
output_torch = x + y
output_triton = add(x, y)
print(output_torch)
print(output_triton)
print(f'The maximum difference between torch and triton is '
      f'{torch.max(torch.abs(output_torch - output_triton))}')
Input들이 GPU device에 올라가 있고 output_torch = x + y를 통해 계산되는 경우,
torch는 아마 cuBLAS, cuDNN, 혹은 CUTLASS 같은 CUDA library를 call할 것이다.
이를 triton으로 손수 작성한 것과 비교하면 output vector의 결과물은 거의 (완전 exactly same 인지는..?) 같음을 확인할 수 있다.
tensor([1.3713, 1.3076, 0.4940,  ..., 0.6724, 1.2141, 0.9733], device='cuda:0')
tensor([1.3713, 1.3076, 0.4940,  ..., 0.6724, 1.2141, 0.9733], device='cuda:0')
The maximum difference between torch and triton is 0.0
Benchmark
triton에는 pytorch native와 비교해서 vector의 element수에 따른 performance를 비교해서 plot할 수 있는 기능이 있는데, 다음과 같이 함수를 작성하면 된다.
@triton.testing.perf_report(
    triton.testing.Benchmark(
        x_names=['size'],  # Argument names to use as an x-axis for the plot.
        x_vals=[2**i for i in range(12, 28, 1)],  # Different possible values for `x_name`.
        x_log=True,  # x axis is logarithmic.
        line_arg='provider',  # Argument name whose value corresponds to a different line in the plot.
        line_vals=['triton', 'torch'],  # Possible values for `line_arg`.
        line_names=['Triton', 'Torch'],  # Label name for the lines.
        styles=[('blue', '-'), ('green', '-')],  # Line styles.
        ylabel='GB/s',  # Label name for the y-axis.
        plot_name='vector-add-performance',  # Name for the plot. Used also as a file name for saving the plot.
        args={},  # Values for function arguments not in `x_names` and `y_name`.
    ))
def benchmark(size, provider):
    x = torch.rand(size, device='cuda', dtype=torch.float32)
    y = torch.rand(size, device='cuda', dtype=torch.float32)
    quantiles = [0.5, 0.2, 0.8]
    if provider == 'torch':
        ms, min_ms, max_ms = triton.testing.do_bench(lambda: x + y, quantiles=quantiles)
    if provider == 'triton':
        ms, min_ms, max_ms = triton.testing.do_bench(lambda: add(x, y), quantiles=quantiles)
    gbps = lambda ms: 12 * size / ms * 1e-6
    return gbps(ms), gbps(max_ms), gbps(min_ms)
그리고 아래처럼 benchmark.run을 하면 plot을 얻을 수 있다고 한다.
benchmark.run(print_data=True, show_plots=True)
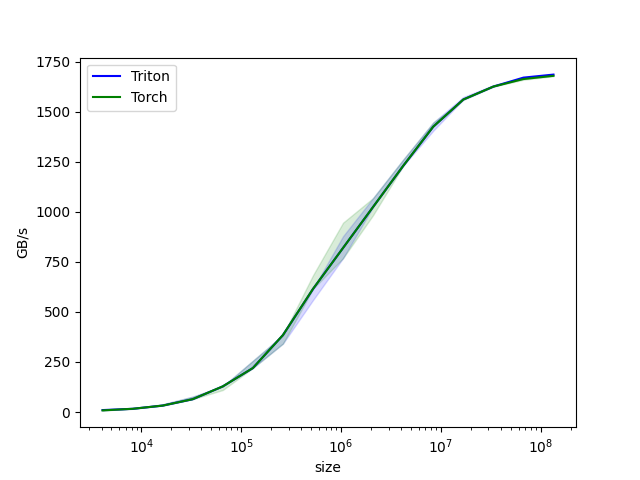 Fig. 사실 vector addition은 특별할 게 없으므로 성능 차를 보이기 쉽지 않을 것 같다.
vector-add-performance:
           size       Triton        Torch
0        4096.0     9.600000     8.000000
1        8192.0    15.999999    15.999999
2       16384.0    31.999999    31.999999
3       32768.0    63.999998    63.999998
4       65536.0   127.999995   127.999995
5      131072.0   219.428568   219.428568
6      262144.0   384.000001   384.000001
7      524288.0   614.400016   614.400016
8     1048576.0   819.200021   819.200021
9     2097152.0  1023.999964  1023.999964
10    4194304.0  1228.800031  1228.800031
11    8388608.0  1424.695621  1424.695621
12   16777216.0  1560.380965  1560.380965
13   33554432.0  1624.859540  1624.859540
14   67108864.0  1669.706983  1662.646960
15  134217728.0  1684.910539  1678.616907
(아 나는 그동안 손수 loop를 짜서 비교했었는데, 왜 이걸 몰랐을까…)
Softmax
이제 Fused Softmax를 구현해보자. Softmax는 아래의 수식을 따르는데,
\[Softmax(x_i) = \frac{ \exp(x_i) }{ \sum_{j=1}^n \exp(x_j) }\]attention mechanism 이나 Cross Entropy (CE) loss를 계산하기 전 logit을 합이 1이 되도록 normalize 해서 probabilistic distribution으로 변환하는데 쓰인다.
Eager
먼저 pytorch standard version (eager mode)으로 구현해보자.
import torch

@torch.jit.script
def naive_softmax(x):
    """Compute row-wise softmax of X using native pytorch

    We subtract the maximum element in order to avoid overflows. Softmax is invariant to
    this shift.
    """
    # read  MN elements ; write M  elements
    x_max = x.max(dim=1)[0]
    # read MN + M elements ; write MN elements
    z = x - x_max[:, None]
    # read  MN elements ; write MN elements
    numerator = torch.exp(z)
    # read  MN elements ; write M  elements
    denominator = numerator.sum(dim=1)
    # read MN + M elements ; write MN elements
    ret = numerator / denominator[:, None]
    # in total: read 5MN + 2M elements ; wrote 3MN + 2M elements
    return ret
각 logit을 row-wise로 normalize를 하기 위해 모든 element에 exponential을 취하고, row dimension으로 더한 것을 모든 elements에 나눠주지만 한 가지 특이한 점이 있다면 numerical stability를 위해서 logit matrix의 element들 중 max인 값을 공통적으로 빼준다는 것이다.
\[Softmax(x_i) = \frac{ \exp(x_i - x_{max}) }{ \sum_{j=1}^n \exp(x_j - x_{max}) }\]수식을 전개해보면 알겠지만 이렇게 해도 아무런 결과물엔 차이가 없다. 단지 exponential을 취하면서 발생할 수 있는 overflow를 피하는 것이다. (nn.softmax도 이렇게 구현되어 있는 걸로 알고있다.)
여기에 naive_softmax함수는 torch.jit.script decorator가 붙어 있는 걸 알 수 있는데,
이는 연산 그래프 (computational graph) 최적화나 kernel fusion을 torch 내부적으로 해준다는 걸 의미한다.
무슨말이냐면 개별적으로 행렬 곱 연산을 구성했어도 torch가 보기에 한 번에 묶어서 처리할 수 있으면 그렇게 해준다는 것이다.
이 eager mode 구현체가 얼마나 비효율적일지 먼저 살펴보자면,
주석에도 나와있듯 이 함수는 input, \(x \in \mathbb{R}^{M \times N}\)에 대해서 logit의 max값을 구하기 위해서 MN 만큼의 elements를 DRAM에서 읽고 (read) row-wise로 max인 값이 있을 것이기 때문에 M만큼을 다시 DRAM에 써야 (write) 한다.
그리고 x_max를 뺀 logit을 쓰기 위해서 MN+M을 읽고 다시 MN만큼을 써야 한다.
그 다음 softmax의 denominator는 모든 값에 exponential을 취하고 row wise로 sum해야 하므로 MN만큼 다시 읽고 M만큼 써야 한다.
마지막으로 return할 logit size의 normalized logit output은 MN+M을 읽고 MN크기를 다시 써야 하므로,
우리는 총 이 연산에서 5MN + 2M elements를 읽고 3MN + 2M 만큼 써야 한다는 걸 알 수 있다.
우리가 원하는 것은 이를 종합해서 DRAM에서 SRAM으로 data를 읽는 건 MN만큼만 하고 나머지 연산을 모두 on-chip에서 해결하는 것이다. 읽는 것도 마찬가지로 MN만 하는 것이다. 이렇게 하면 이론적으로 (8MN + 4M) / 2MN = 4 이므로 4배 정도 빠른 속도를 달성할 수 있을 것이다.
Fused Softmax (Triton version)
이제 kernel을 작성해보자.
import torch

import triton
import triton.language as tl

@triton.jit
def softmax_kernel(output_ptr, input_ptr, input_row_stride, output_row_stride, n_cols, BLOCK_SIZE: tl.constexpr):
    # The rows of the softmax are independent, so we parallelize across those
    row_idx = tl.program_id(0)

    # The stride represents how much we need to increase the pointer to advance 1 row
    row_start_ptr = input_ptr + row_idx * input_row_stride

    # The block size is the next power of two greater than n_cols, so we can fit each
    # row in a single block
    col_offsets = tl.arange(0, BLOCK_SIZE)
    input_ptrs = row_start_ptr + col_offsets

    # Load the row into SRAM, using a mask since BLOCK_SIZE may be > than n_cols
    row = tl.load(input_ptrs, mask=col_offsets < n_cols, other=-float('inf'))

    # Subtract maximum for numerical stability
    row_minus_max = row - tl.max(row, axis=0)
    # Note that exponentiation in Triton is fast but approximate (i.e., think __expf in CUDA)
    numerator = tl.exp(row_minus_max)
    denominator = tl.sum(numerator, axis=0)
    softmax_output = numerator / denominator

    # Write back output to DRAM
    output_row_start_ptr = output_ptr + row_idx * output_row_stride
    output_ptrs = output_row_start_ptr + col_offsets
    tl.store(output_ptrs, softmax_output, mask=col_offsets < n_cols)
먼저 softmax 연산은 row-wise 로 진행되고 각 row의 연산은 다른 row와 독립이기 때문에 각 program이 row를 각자 읽어서 이를 병렬화 한다고 한다.
stride도 주석에 써 있는 것 처럼 pointer를 1 row 전진시키는 데 얼마나 늘려야 하는지를 의미한다.
그 다음 column offsets (col_offsets)가 있는 걸 알 수 있는데,
아래 나오겠지만 컴파일 상수인 BLOCK_SIZE가 row를 이루는 column 개수가 예를 들어 200이라면 이것의 다음으로 가장 작은 2의 제곱수인 256으로 설정되며 이에 따라 tl.arange를 하는데 이 부분이 triton의 한계라고 한다.
왜냐하면 구현상 block은 무조건 2의 배수가 되어야 하기 때문에 256과 200의 차이인 56만큼 padding을 해서 연산을 해야 하기 때문이다.
이제 row_start_ptr와 col_offsets를 통해 input pointer를 정의해주고 DRAM에서 data를 읽는다.
이 때 block size가 column갯수보다 큰 경우를 대비해서 softmax를 하면 0이 될 수 있도록 -inf 만큼의 값을 채워준다 (masking or padding이라고 함).
이제 softmax 연산을 실제로 진행하면 되는데, 주의할 점은 triton의 exponentiation이 CUDA보다 빠르지만 근사치를 쓴다고 한다. 마지막으로 tl.store를 통해 연산 결과를 저장하면 되겠다.
마지막으로 실제 kernel을 호출할 함수를 만들어주면 되는데,
얘기한 것 처럼 block size는 triton.next_power_of_2를 사용하여 256, 512, 1024 같은 값을 할당해 준다.
def softmax(x):
    n_rows, n_cols = x.shape

    # The block size is the smallest power of two greater than the number of columns in `x`
    BLOCK_SIZE = triton.next_power_of_2(n_cols)

    # Another trick we can use is to ask the compiler to use more threads per row by
    # increasing the number of warps (`num_warps`) over which each row is distributed.
    # You will see in the next tutorial how to auto-tune this value in a more natural
    # way so you don't have to come up with manual heuristics yourself.
    num_warps = 4
    if BLOCK_SIZE >= 2048:
        num_warps = 8
    if BLOCK_SIZE >= 4096:
        num_warps = 16

    # Allocate output
    y = torch.empty_like(x)
    # Enqueue kernel. The 1D launch grid is simple: we have one kernel instance per row o
    # f the input matrix
    softmax_kernel[(n_rows, )](
        y,
        x,
        x.stride(0),
        y.stride(0),
        n_cols,
        num_warps=num_warps,
        BLOCK_SIZE=BLOCK_SIZE,
    )
    return y
Vector addition에서 얘기한 것 처럼 grid > block > warp > thread 의 관계 처럼 warp가 모여 block이 되며,
grid가 (n_rows, )로 설정 된 것은 1D grid 설정으로,
입력 row의 각 column에 대해 하나의 kernel instance를 실행할 것을 의미한다.
Warp는 GPU의 thread group이며 일반적으로 32개의 thread로 구성되는데,
num_warps가 늘어나면 한 block 내에 동시에 실행될 thread 수를 더 많이 할당한다는 것이 된다.
예를 들어 class갯수가 200개이면 block size가 256이 되고, 기본적으로 warp수가 4개 이므로 한번에 사용되는 thread수는 128이다. 각 thread는 각 element에 대해 exponentiation같은 연산을 수행하는데, softmax에서는 row-wise로 max값을 구하거나 sum을 해야 하므로 나머지 200-128=72개 elements에 대해서는 한번 더 thread가 할당돼서 계산이 되어야 한다. 이 때 torch.distributed.reduce 같은 연산이 사용되는데, 위 code에서 triton이 명시적으로 reduce를 하지는 않지만 과정이 포함되어 있다고 한다.
Benchmark
이제 benchmark 결과를 살펴보자.
@triton.testing.perf_report(
    triton.testing.Benchmark(
        x_names=['N'],  # argument names to use as an x-axis for the plot
        x_vals=[128 * i for i in range(2, 100)],  # different possible values for `x_name`
        line_arg='provider',  # argument name whose value corresponds to a different line in the plot
        line_vals=[
            'triton',
            'torch-native',
            'torch-jit',
        ],  # possible values for `line_arg``
        line_names=[
            "Triton",
            "Torch (native)",
            "Torch (jit)",
        ],  # label name for the lines
        styles=[('blue', '-'), ('green', '-'), ('green', '--')],  # line styles
        ylabel="GB/s",  # label name for the y-axis
        plot_name="softmax-performance",  # name for the plot. Used also as a file name for saving the plot.
        args={'M': 4096},  # values for function arguments not in `x_names` and `y_name`
    ))
def benchmark(M, N, provider):
    x = torch.randn(M, N, device='cuda', dtype=torch.float32)
    quantiles = [0.5, 0.2, 0.8]
    if provider == 'torch-native':
        ms, min_ms, max_ms = triton.testing.do_bench(lambda: torch.softmax(x, axis=-1), quantiles=quantiles)
    if provider == 'triton':
        ms, min_ms, max_ms = triton.testing.do_bench(lambda: softmax(x), quantiles=quantiles)
    if provider == 'torch-jit':
        ms, min_ms, max_ms = triton.testing.do_bench(lambda: naive_softmax(x), quantiles=quantiles)
    gbps = lambda ms: 2 * x.nelement() * x.element_size() * 1e-9 / (ms * 1e-3)
    return gbps(ms), gbps(max_ms), gbps(min_ms)


benchmark.run(show_plots=True, print_data=True)
우리는 naive_softmax 함수와 fused_softmax 외에 torch.nn.functional.softmax라는 native version도 비교해 볼 것이다. 이게 naive_softmax 구현한 것 보다 훨씬 최적화가 잘되어 있어 빠를 것으로 보인다.
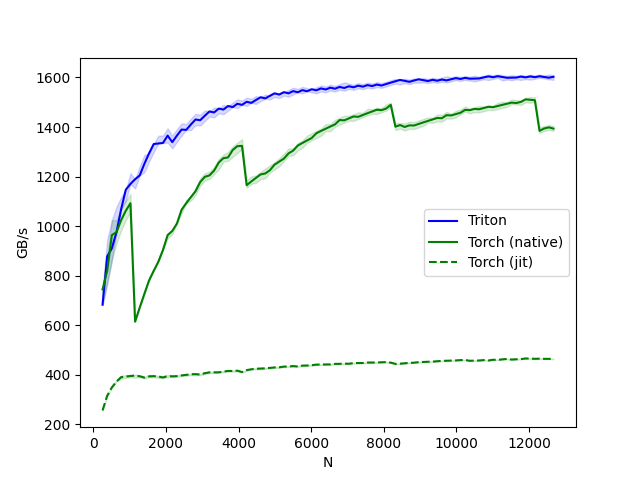 Fig.
Fig.
softmax-performance:
          N       Triton  Torch (native)  Torch (jit)
0     256.0   682.666643      744.727267   256.000001
1     384.0   877.714274      819.200021   315.076934
2     512.0   910.222190      963.764689   348.595735
3     640.0   975.238103      975.238103   372.363633
4     768.0  1068.521715     1023.999964   390.095241
..      ...          ...             ...          ...
93  12160.0  1601.316858     1508.217139   464.343688
94  12288.0  1604.963246     1384.563337   464.794337
95  12416.0  1602.064538     1394.077255   464.149533
96  12544.0  1599.235121     1398.634134   464.055486
97  12672.0  1602.782573     1393.484517   463.963376

[98 rows x 4 columns]
결과는 매우 충격적인데, torch.jit compiler가 연산 최적화를 하나도 안해줘서 속도차이가 4배나 난다는 것을 알 수 있다. 하지만 저자는 pyTorch softmax operation 이 더 general하며, 모든 종류나 shape의 tensors에 대해서 더 잘 작동하므로 유의하라고 한다.
Matrix Multiplication
Efficient Matmul 구현은 생략하도록 하겠으나, cuBLAS 등에서 쓰는 tiled matmul 같은 걸 (super-grouping) triton으로 구현한다고 생각하면 될 것 같다.
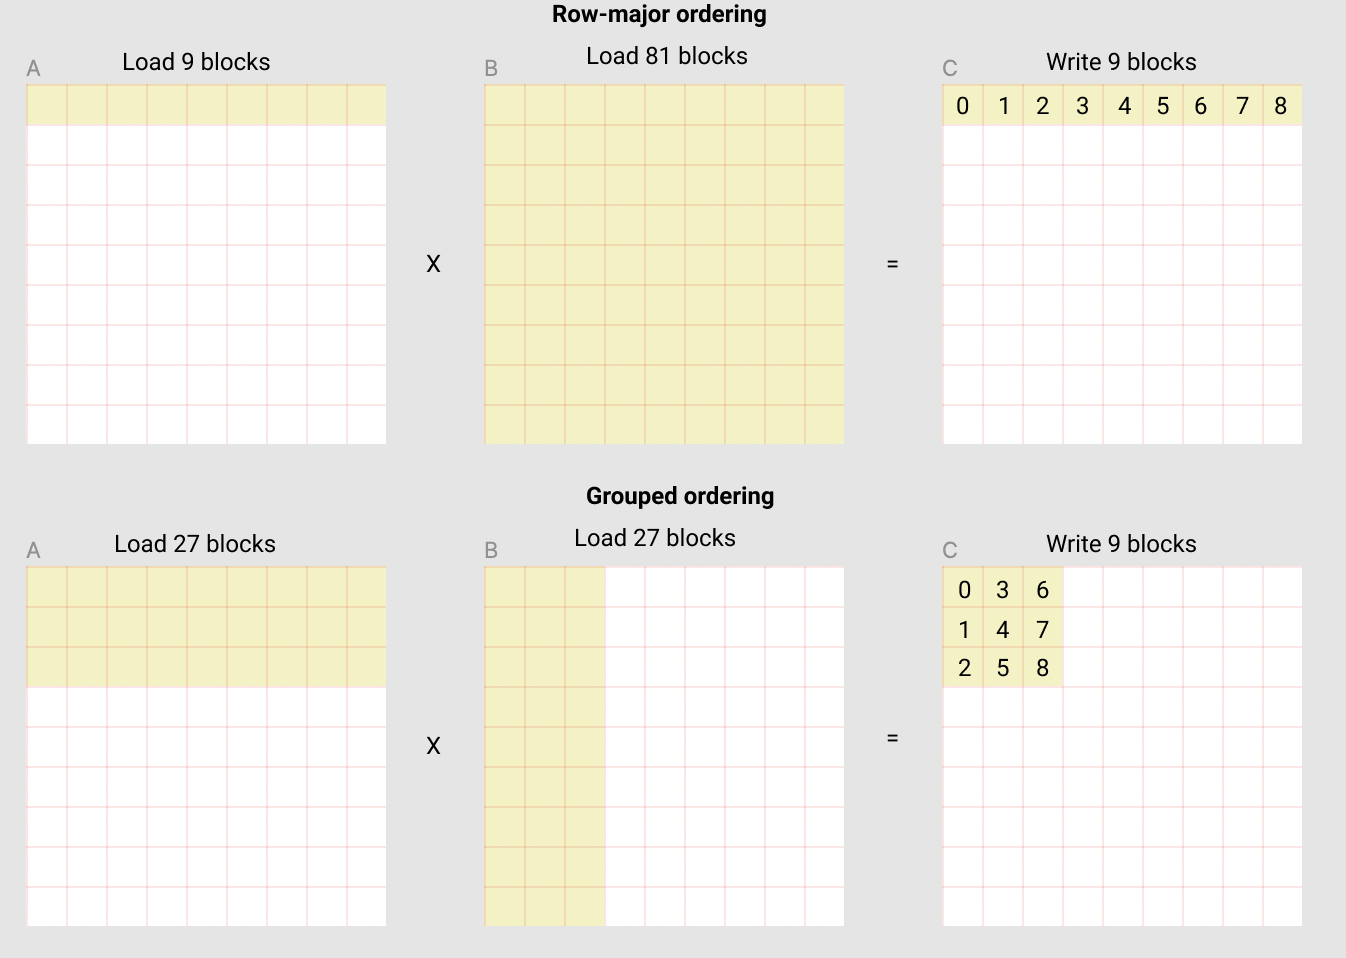 Fig. 언제나 memory access를 최대한 덜 해야 주어진 시간 내 연산을 더 할 수 있을텐데, (위) row-major ordering로 연산하는 경우, output matrix의 row 1줄, 즉 element 9개를 채우기 위해서 90개 block을 읽어야 하지만, (아래) grouping ordering을 쓰는 경우 54개 block만 loading하면 된다.
관심있는 분들은 tutorial을 확인하길 바란다.
Memory Efficient Cross Entropy Loss
Overview
이번에는 Fused Cross Entropy (CE) Loss를 살펴보자. 앞서 이를 이해하는 것이 이번 post의 goal이라 밝혔었다. Target module은 mgmalek/efficient_cross_entropy이다. 우리가 구현하고자 하는 것의 vanilla (inefficient) version은 아래와 같다.
class PyTorchProjectionPlusCrossEntropyLoss(nn.Module):
    """Simple PyTorch implementation of linear projection + cross entropy loss. Intended only for testing and benchmarking."""

    def __init__(self, dim: int, n_classes: int, ignore_index: int = -100, reduction: str = "mean"):
        super().__init__()
        self.proj = nn.Linear(dim, n_classes, bias=False)
        self.loss = nn.CrossEntropyLoss(ignore_index=ignore_index, reduction=reduction)

    def forward(self, x, targ):
        logits = self.proj(x)
        return self.loss(logits, targ)
이 함수의 forward pass는 아래의 절차를 따른다.
- hidden tensor -> logit 으로 변환 (unembedding)
- loss 계산
- loss.backward()를 선언할 경우 input hidden tensor와 weight matrix에 대한 gradient를 얻음 (vector-tensor multiplication)
반면 우리가 원하는 구현체 (아래)는 이 세 가지를 한 번에 처리하는 것이다.
핵심은 우리가 원하는것이 input hidden, weight matrix에 대한 gradient일 뿐이지 이를 위한 중간 결과물인 logit을 명시적으로 생성해서 DRAM에 갖고있지 않는 것이다.
이를 materializing하지 않는다고 얘기하는 것 같다.
class FusedProjectionPlusCrossEntropyLoss(nn.Module):
    """Fused implementation of linear projection + cross entropy loss"""

    def __init__(
        self,
        dim: int,
        n_classes: int,
        n_loop_iters: int = 1,
        ignore_index: int = -100,
        reduction: str = "mean",
    ):
        super().__init__()
        self.n_loop_iters = n_loop_iters
        self.ignore_index = ignore_index
        self.reduction = reduction
        self.proj_weight = nn.Parameter(torch.empty(n_classes, dim))
        self.reset_parameters()

    def reset_parameters(self):
        nn.init.kaiming_uniform_(self.proj_weight, a=sqrt(5))

    def forward(self, x, targ):
        return FusedCrossEntropyLossFunction.apply(
            x,
            self.proj_weight,
            targ,
            self.n_loop_iters,
            self.ignore_index,
            self.reduction,
        )
어떻게 원하는 바를 달성할 수 있을까?
먼저 logit 전체를 materializing 하는 일은 당연히 하지 않는다.
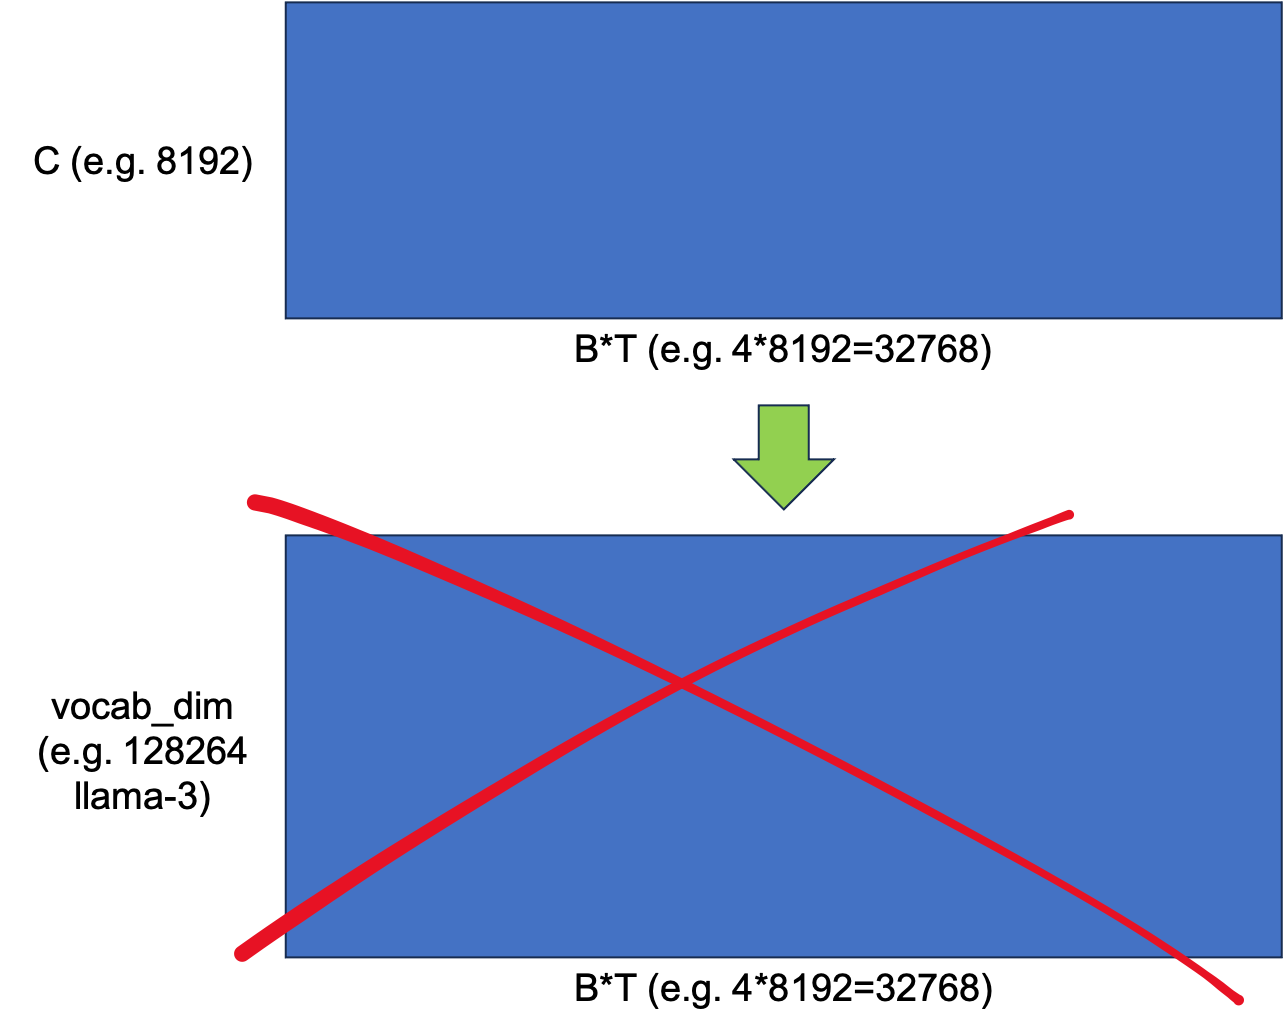 Fig.
Fig.
대신 이를 n_loop_iters 갯수만큼 잘라준다.
예를 들어 B*T=32768인데 n_loop_iters=8이라면 4096개씩 잘라서 loss를 구하고 gradient를 구한다.
전체 과정을 요약하면 다음과 같다.
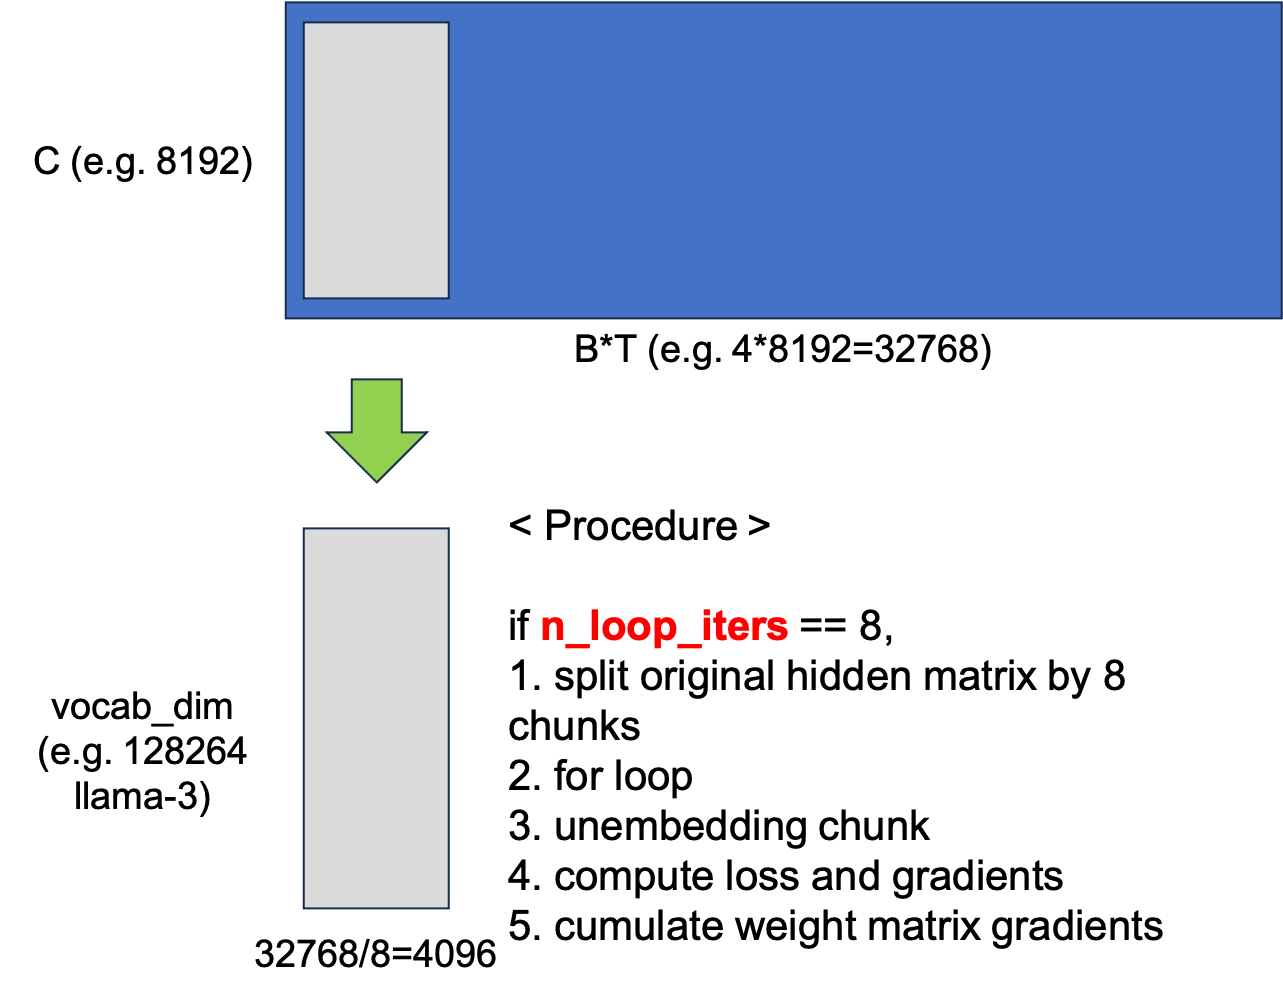 Fig.
Fig.
이 kernel의 input은 hidden tensor이며, 우선 이를 8등분 해서 맨 처음 자른 chunk matrix를 vocab dimension으로 unembedding한다. 그리고 8등분에 대해 loop를 도는데 그 chunk에 대해서 loss를 구하고 hidden tensor, weight matrix 각각에 대해 gradient를 구한다. 어떻게 gradient를 구하는지는 error backpropagation을 제대로 공부했다면 너무 쉬운데, 이 과정은 다음 figure와 같다.
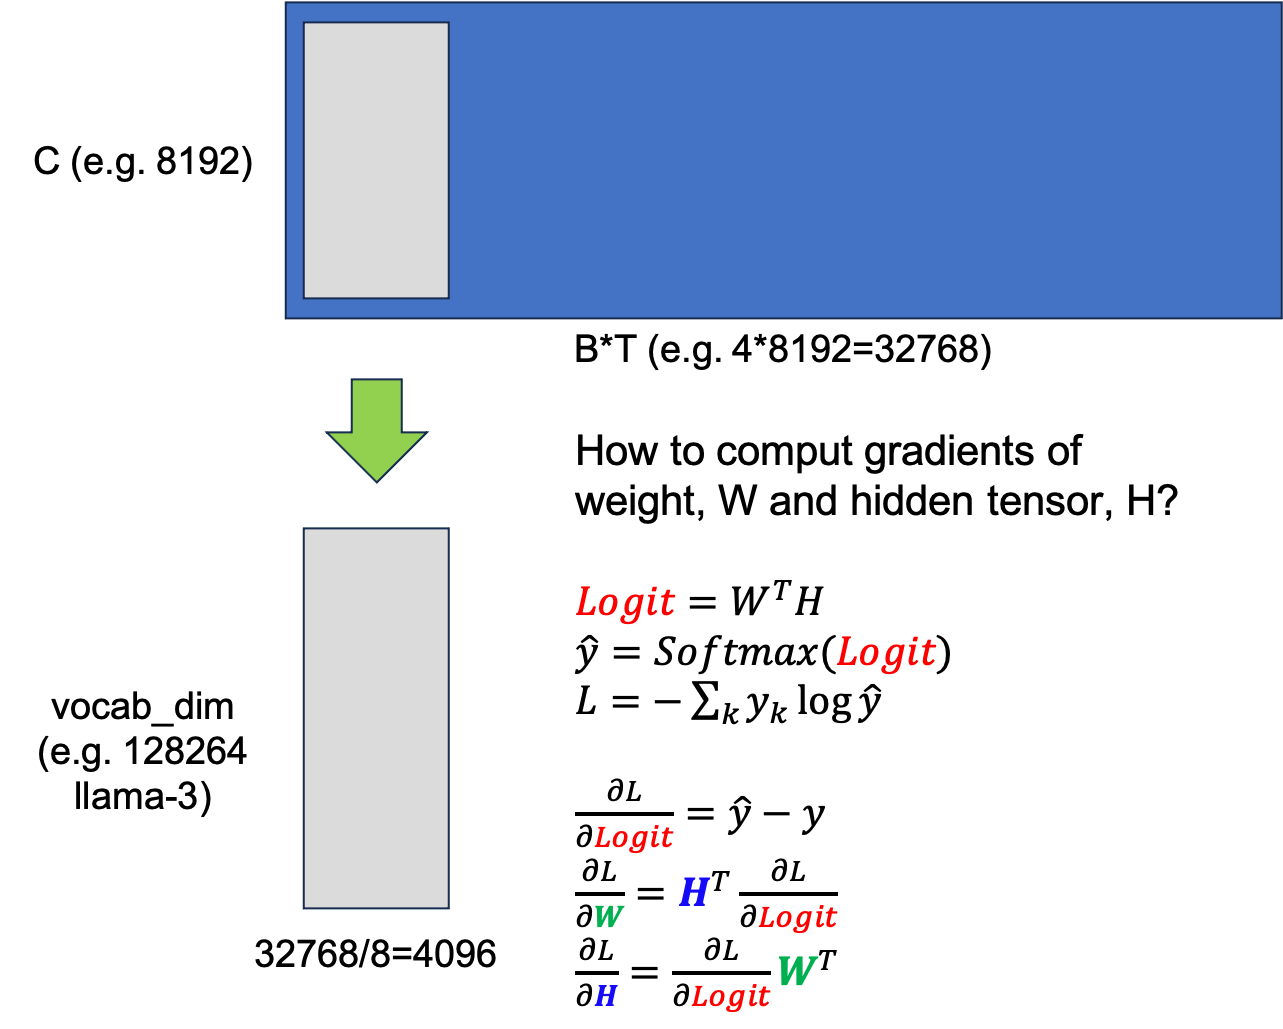 Fig.
Fig.
먼저 target label과 prediction, \(\hat{y}\)과의 CE loss를 계산하고, 위의 수식에 따라 logit에 대한 gradient를 구한다. 그리고 이를 upstream gradient 할 때, hidden, weight matrix의 gradient는 위와 같이 upstream과 서로의 input을 외적한 것과 같다.
후에 code를 보면 알겠지만 code author는 여기서 굉장히 기발한 idea를 사용하는데, 원래라면 logit을 저장할 placeholder와 logit의 gradient를 저장할 placeholder를 각각 선언해야 할 것 같지만 우리는 어차피 last hidden이 필요 없기 때문에 gradient를 logit에 덮어 씌워 이중으로 logit chunk 만큼을 또 할당하는 일을 하지 않는다. 이런 발상 하나하나가 time complexity는 손해 보지 않으면서도 memory save를 할 수 있게 해 주는 것이다.
Forward Pass
이제 본격적으로 구현체를 살펴보자. 먼저 triton, torch 관련 library들을 선언해준다.
from math import sqrt

import torch
import torch.nn as nn
import triton

import triton
import triton.language as tl
이제 FusedCrossEntropyLossFunction을 정의할 건데,
이는 torch.autograd.Function를 상속받는다.
class FusedCrossEntropyLossFunction(torch.autograd.Function):
    # NOTE: We put the linear projection in the same autograd Function as the loss computation
    # because we overwrite the logits with their gradients inplace to avoid allocating more
    # memory for the gradients, and so we keep the logits completely contained within this
    # Functionto avoid possible side-effects if they were exposed.

    @staticmethod
    def forward(
        ctx,
        in_feat: torch.Tensor,
        proj_weight: torch.Tensor,
        targ: torch.Tensor,
        n_loop_iters: int,
        ignore_index: int,
        reduction: str,
    ):
        n_tokens = in_feat.shape[0]
        n_classes = proj_weight.shape[0]

        assert in_feat.ndim == 2, in_feat.ndim
        assert proj_weight.ndim == 2, proj_weight.ndim
        assert targ.ndim == 1, targ.shape
        assert in_feat.shape[0] == targ.shape[0], f"Number of tokens in in_feat and targ is not equal: {(in_feat.shape, targ.shape) = }"
        assert reduction in ("mean", "sum"), reduction
        assert n_loop_iters > 0, n_loop_iters
        assert n_tokens % n_loop_iters == 0, (n_tokens, n_loop_iters)

        NUM_WARPS = 16
        BLOCK_SIZE = triton.next_power_of_2(n_classes)
왜냐하면 torch로 NN학습을 할 때에는 자동 미분 (automatic differentiation)이 되도록, 즉 forward, backward가 정의되어 있어서 model forward를 했을 시 하나의 computational graph가 생성되고, backprop을 했을 때에도 gradient가 끝까지 다 전파되도록 구현을 해야 하기 때문이다.
forward function을 보면 ctx라는 게 있는데,
정의에 따르면 이는 backward시 가져올 (stash pop) information을 담고 있는 context object라고 한다.
autograd engine을 custom하려면 필수이며,
모든 pytorch의 nn.Module 구현체는 내부적으로 이렇게 구현되어 있을 것이다.
그리고 sanity check을 한 뒤,
NUM_WARPS, BLOCK_SIZE를 선언하는데 앞서 얘기했던 것 처럼 channel dimension의 그 다음 가장 작은 power of 2로 block size를 설정한다.
그런데 llama-3의 경우 이게 class 갯수가 120k가 넘는데 이는 너무 크지 않나? 하는 생각이 들 수 있다.
실제로 Tri Dao의 flash attention repo에도 Fused CE Loss 구현체가 있는데,
여기서는 아래처럼 block size에 한계를 둔다.
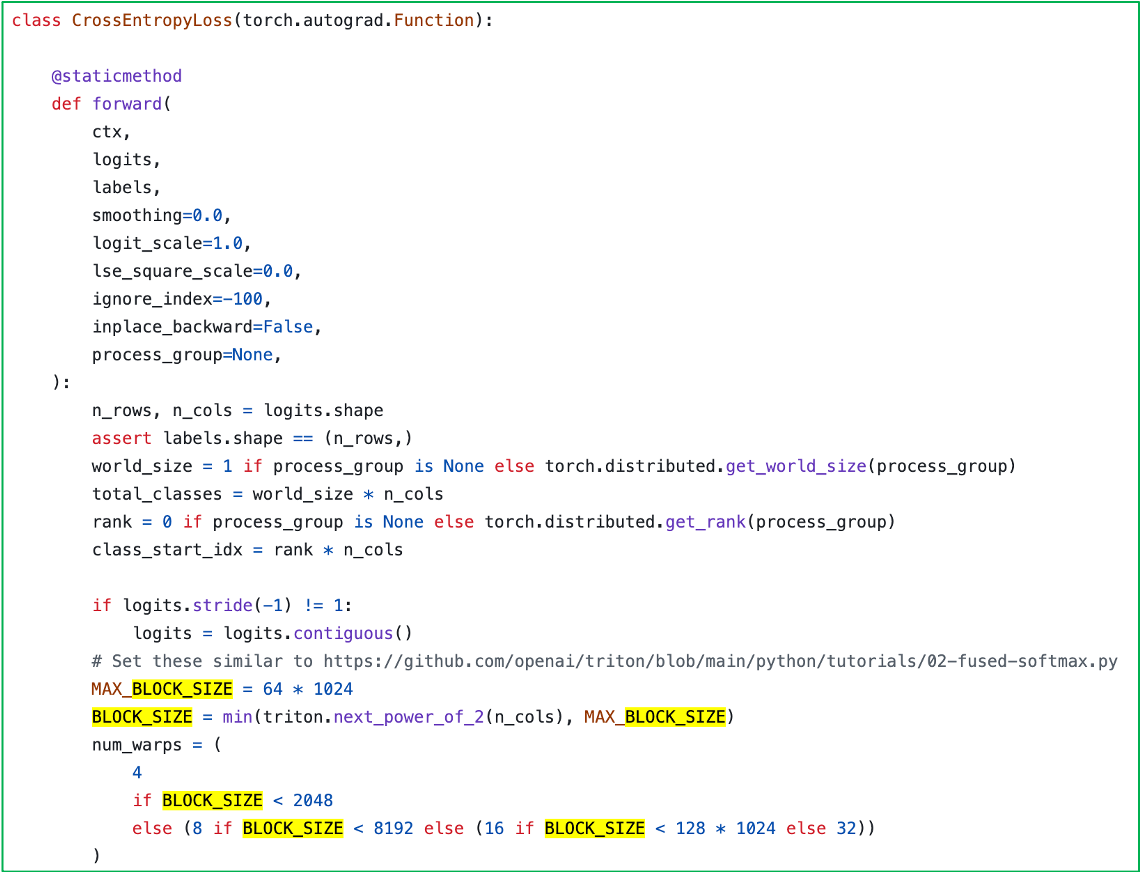 Fig. Tri Dao’s Fused CE Loss
아무튼 이부분은 일단 넘어갈건데, 한 가지 얘기하자면 Tri Dao의 CE Loss kernel의 경우 input tensor가 transformer last hidden이 아닌 logit 이다. 즉 뭔가 최적화가 되어있겠지만 이미 logit을 만들었기 때문에 memory save를 공격적으로 할 순 없다는 점을 알아둬야 한다.
계속 forward 문을 보면 아래처럼 함수의 끝에 loss를 return하기 위해 이를 담을 empty tensor를 할당하고, Automatic Mixed Precision (AMP)인지에 따라 dtype을 fp32로 선언하는 걸 볼 수 있다. 그게 아니라면 input hidden의 type을 넣는다.
    def forward(...

        loss = torch.empty(n_tokens, dtype=in_feat.dtype, device=in_feat.device)
        dtype = torch.get_autocast_gpu_dtype() if torch.is_autocast_enabled() else in_feat.dtype

        if proj_weight.requires_grad:
            grad_proj_weight = torch.zeros_like(proj_weight, dtype=dtype)
        else:
            grad_proj_weight = None

        if in_feat.requires_grad:
            grad_in_feat = torch.zeros_like(in_feat)
        else:
            grad_in_feat = None

        divisor = (targ != ignore_index).sum().to(dtype) if reduction == "mean" else torch.ones(1, dtype=dtype, device=in_feat.device)
그리고 grad_proj_weight, grad_in_feat도 input hidden, weight matrix 크기 만큼의 empty matrix를 생성하는데,
여기서 이 크기 만큼 gpu memory가 증가하게 될 것이다.
code에 보면 proj_weight의 requires_grad가 true인지? hidden tensor의 requires_grad가 true인지 검사하는 부분이 있는데,
일반적인 full fine-tuning 상황의 경우 이는 무조건 true가 될 것이니 넘어가도 된다.
(LoRA를 쓴다거나 부분적은 tuning을 한다면 모를까, 이게 false면 backprop이 안 된다)
계속해서 최종 loss 결과를 sum 할지 mean 할지 두 경우로 나뉠 수 있기 때문에,
loss sum한 것을 1로 나눌지 (이러면 sum이나 다름없다),
아니면 ignore_index가 아닌 token의 수로 나눌지 (이러면 mean),
divisor를 정한다.
이제 본격적으로 loop를 돌면서 gradient를 계산할 건데,
앞서 얘기한 것 처럼 32k input을 8등분 한다면 loop_chunk_size라는 인자는 4096이 된다.
그리고 logits_chunk_cast는 앞으로 등분된 chunk를 unembedding한 logit을 담을 empty matrix이다.
    def forward(...

        # Divide the input into chunks of size num_tokens // n_loop_iters, then compute the loss for each of these groups
        proj_weight_cast = proj_weight.to(dtype)
        loop_chunk_size = triton.cdiv(n_tokens, n_loop_iters)
        logits_chunk_cast = torch.zeros((loop_chunk_size, n_classes), dtype=dtype, device=in_feat.device)

        for i, in_feat_chunk in enumerate(torch.split(in_feat, loop_chunk_size)):
            token_start_idx = i * loop_chunk_size
            token_end_idx = (i + 1) * loop_chunk_size

            in_feat_chunk = in_feat_chunk.to(dtype)

            # Compute logits
            torch.matmul(in_feat_chunk, proj_weight_cast.T, out=logits_chunk_cast)
            logits_chunk = logits_chunk_cast.float()

            # Compute loss
            loss_chunk = loss[token_start_idx:token_end_idx]
            targ_chunk = targ[token_start_idx:token_end_idx]
그리고 for loop을 돌 건데, triton kernel을 통과하기 전에 matmul (unebmedding)을 통해 자른 chunk를 vocab dimension을 갖는 logit으로 변환한다.
다음으로 아래 code를 보면 grid를 설정하고 grad_logits_chunk라는 변수를 선언하는데,
이 때 중요한 점이 grad_logits_chunk는 chunk를 logit으로 변환한 kernel의 input, logits_chunk가 된다는 것이다.
이렇게 하는 이유는 우리가 gradient를 위한 empty matrix를 또 선언하지 않고 logits_chunk를 gradient 값으로 덮어 씌워 memory를 절약하기 위힘이다.
왜냐면 logit값은 forward를 끝까지 끝내 loss를 구하기 위해 필요한 것이지 실제로 우리가 필요한건 projection weight, hidden tensor의 gradient일 뿐이기 때문이다.
    def forward(...
        ...

        for i, in_feat_chunk in enumerate(torch.split(in_feat, loop_chunk_size)):
            ...

            n_tokens_chunk = logits_chunk.shape[0] # 32k/8 = 4k
            grad_logits_chunk = logits_chunk  # NOTE: we override the logits with their gradients

            fused_cross_entropy_fwd_bwd_kernel[(n_tokens_chunk,)](
                loss_chunk,
                grad_logits_chunk,
                logits_chunk,
                targ_chunk,
                divisor,
                loss_chunk.stride(0),
                grad_logits_chunk.stride(0),
                logits_chunk.stride(0),
                targ_chunk.stride(0),
                n_classes,
                ignore_index,
                num_warps=NUM_WARPS,
                BLOCK_SIZE=BLOCK_SIZE,
            )

            grad_logits_chunk = grad_logits_chunk.to(dtype)

            if in_feat.requires_grad:
                grad_in_feat[token_start_idx:token_end_idx] = grad_logits_chunk @ proj_weight_cast

            if proj_weight.requires_grad:
                torch.addmm(
                    grad_proj_weight,
                    grad_logits_chunk.T,
                    in_feat_chunk,
                    out=grad_proj_weight,
                )
Kernel은 어떻게 짜여져 있는지 곧 살펴보도록 하고, 그래서 현재 4096길이의 logit chunk에 대한 gradient를 구했으면 hidden과 weight matrix의 gradient를 구해야 하는데 이는 앞서 설명한 것 처럼 계산하면 된다.
 Fig.
Fig.
(만약 Error Backpropagation을 까먹었다면 Backprop post를 다시 보도록 하자.)
계속해서 위 code snippet을 보면 grad_in_feat는 hidden matrix의 크기와 동일한 empty tensor이므로,
chunk를 잘라서 계속 계산할 테니 그 chunk가 시작하는 부분부터 끝까지 ([chunk_start:chunk_end]) 해당하는 부분에 이어 붙혀주기만 하면 되는 것을 알 수 있다.
반면 grad_proj_weight는 weight matrix만한 크기인데,
이는 chunk를 잘라서 계산한 weight matrix gradient를 계속해서 누적시켜줘야 한다.
그리고 마지막이 highlight인데,
우리는 지금 forward pass에서 gradient를 다 구해버렸다는 것을 알고 있어야 한다.
즉 끝까지 loss를 계산하는 것을 forward 에서 하고,
backward시에 다시 matrix, input hidden 등을 SRAM에 올려 계산해야 하는 (?) 일을 할 필요가 없는 것이다.
우리는 context object, ctx에 아래처럼 gradients를 저장해주기만 하면 된다.
    def forward(...

        # NOTE: if reduction == "mean" we already divide by an appropriate normalization factor in the kernel so we can alway sum here
        loss = loss.sum()

        # Save data for backward
        ctx.in_feat_requires_grad = in_feat.requires_grad
        ctx.proj_weight_requires_grad = proj_weight.requires_grad

        if proj_weight.requires_grad and in_feat.requires_grad:
            ctx.save_for_backward(grad_in_feat, grad_proj_weight)
        elif proj_weight.requires_grad and not in_feat.requires_grad:
            ctx.save_for_backward(grad_proj_weight)
        elif not proj_weight.requires_grad and in_feat.requires_grad:
            ctx.save_for_backward(grad_in_feat)

        return loss
Bakcward Pass
그러면 backward에서는 어떻게 해야할까? 그냥 저장된걸 가져와서 사용하기만 하면 된다.
    @staticmethod
    def backward(ctx, grad_output):
        if ctx.in_feat_requires_grad and ctx.proj_weight_requires_grad:
            grad_in_feat, grad_proj_weight = ctx.saved_tensors
        elif not ctx.in_feat_requires_grad and ctx.proj_weight_requires_grad:
            grad_proj_weight, = ctx.saved_tensors
        elif ctx.in_feat_requires_grad and not ctx.proj_weight_requires_grad:
            grad_in_feat, = ctx.saved_tensors

        assert grad_output.shape == tuple(), grad_output.shape
        grad_in_feat *= grad_output
        grad_proj_weight *= grad_output

        return grad_in_feat, grad_proj_weight, None, None, None, None
이 때 6개 인자가 return되는 이유는 forward의 arguments가 6개 여서 그렇고, backward function이 받는 grad_output은 원래는 다음 layer의 upstream gradient여야 하는데, 지금의 custom autograd module은 backprop이 시작되는 맨 끝단이므로 1로 가득찬 vector이거나 아무런 의미가 없을 것이다.
Fused CE FWD + BWD Kernel
이제 triton kernel 내부를 확인해보자. 역시나 jit compile decorator를 붙혀주고, 코드는 거의 50줄이면 된다.
@triton.jit
def fused_cross_entropy_fwd_bwd_kernel(
    output_loss_ptr,

    output_logit_grad_ptr,
    input_logit_ptr,
    input_targ_ptr,
    input_divisor_ptr,

    output_loss_stride,
    output_logit_grad_stride,
    input_logit_stride,
    input_targ_stride,

    n_cols,
    ignore_index,
    BLOCK_SIZE: tl.constexpr,
):
    # Get pointers to current row for all inputs/outputs
    row_idx = tl.program_id(0)
    logit_grad_row_start_ptr = output_logit_grad_ptr + row_idx * output_logit_grad_stride
    logit_row_start_ptr = input_logit_ptr + row_idx * input_logit_stride
    targ_ptr = input_targ_ptr + row_idx * input_targ_stride
    loss_ptr = output_loss_ptr + row_idx * output_loss_stride

    col_offsets = tl.arange(0, BLOCK_SIZE)
    logit_row_ptrs = logit_row_start_ptr + col_offsets
    logit_grad_row_ptrs = logit_grad_row_start_ptr + col_offsets
Input logit과 output이 될 gradient와 CE loss를 계산해야 하므로 target label (Long tensor)와 divisor (sum이면 1) 의 pointer를 넣어주고 stride와 n_cols (vocab size), block size등을 입력으로 받는다. row_idx는 현재 kernel instance가 처리할 row의 index 이다. 그리고 column offset (col_offsets)이 있는데, 이는 vector addition에서도 봤던 것 처럼 block_size로 나누어 병렬처리 하기 위해 선언해주는 것이다.
다음으로 실제 loss를 계산하고 gradient를 계산하는 부분은 아래 주석처럼 총 4부분으로 이루어져 있다.
def fused_cross_entropy_fwd_bwd_kernel(...):
    ...

    # Load data into SRAM
    logit_row_unnormalized = tl.load(
        logit_row_ptrs, mask=col_offsets < n_cols, other=float("-Inf")
    )
    targ = tl.load(targ_ptr)
    divisor = tl.load(input_divisor_ptr)

    # Normalize logits and compute some useful intermediate values
    logit_row = logit_row_unnormalized - tl.max(
        logit_row_unnormalized, axis=0
    )  # Subtract max value for numerical stability
    exp_logit_row = tl.exp(logit_row)
    sum_exp_logit_row = tl.sum(exp_logit_row, axis=0)
DRAM에 있는 data를 SRAM으로 load하고, loss를 계산하기 위해 logit을 softmax로 normalization 해주고 log를 붙혀 log softmax를 만들어야 한다. 이 때 numerical stability를 위해서 해주는 작업이 있는데 (nn.softmax는 실제로 이렇게 되어있다), 아래와 같이 전체 component의 max값을 빼주는 것이다.
\[Softmax(x_i) = \frac{ \exp(x_i - x_{max}) }{ \sum_{j=1}^n \exp(x_j - x_{max}) }\]이렇게 해줘도 softmax의 결과는 변하지 않지만, 이런 간단한 trick으로 exponential을 취한 값이 overflow가 나는 것을 방지할 수 있다. (flash attention같은 걸 구현할 때도 필수다)
계속해서 보도록 하자.
def fused_cross_entropy_fwd_bwd_kernel(...):
    ...

    # Compute loss
    log_sum_exp_logit_row = tl.log(sum_exp_logit_row)
    logit_gt_logit = tl.sum(tl.where(targ == col_offsets, logit_row, 0.0))
    loss = log_sum_exp_logit_row - logit_gt_logit
    loss = loss / divisor
    loss = tl.where(targ == ignore_index, 0.0, loss)
    tl.store(loss_ptr, loss)

    # Compute gradients
    targ_one_hot = tl.where(targ == col_offsets, 1.0, 0.0)
    grad = (exp_logit_row / sum_exp_logit_row - targ_one_hot)
    grad = grad / divisor
    grad = tl.where(targ == ignore_index, 0.0, grad)
    tl.store(logit_grad_row_ptrs, grad, mask=col_offsets < n_cols)
사실 여기서 loss 를 계산하는 것은 loss를 logging하기 위함이다. 왜냐면 우리가 실제로 학습을 위해 원하는 부분은 logit도 loss도 아닌 gradient이기 때문에 실제로 우리가 원하는건 grad이다. 그래도 loss 계산 되는 부분을 보자면, 실제 CE loss는 logit을 \(z\)라 할 때, 아래처럼 negative log likelihood를 계산하게 된다.
\[\begin{aligned} & L = - \sum_k y_k \log \hat{y_k} & \\ & = - \sum_k y_k \log Softmax(z_k) & \\ & = - \sum_k y_k \log \frac{ \exp(z_k - z_{max}) }{ \sum_{j=1}^n \exp(z_j - z_{max}) } & \\ & = \log (\sum_j \exp (z_j - z_{max}) - (z_{\text{ground truth}}-z_{max})) & \\ \end{aligned}\]그렇기 때문에 log sum exponential을 한 log_sum_exp_logit_row와 정답 label의 logit값만 parsing한 logit_gt_logit를 빼서 loss를 구하게 되는 것이다.
Logit, \(z\)에 대한 gradient는 앞서 여러번 말한 것 처럼 아래처럼 단순하게 구할 수 있다.
Benchmark Results
저자의 benchmark result를 보면 train wall clock time을 전혀 손해보지 않고도 엄청난 memory saveing을 달성했다는 걸 볼 수 있다. (이렇게 GPU kernel을 짤 줄 알는 것이 매우 중요하다…)
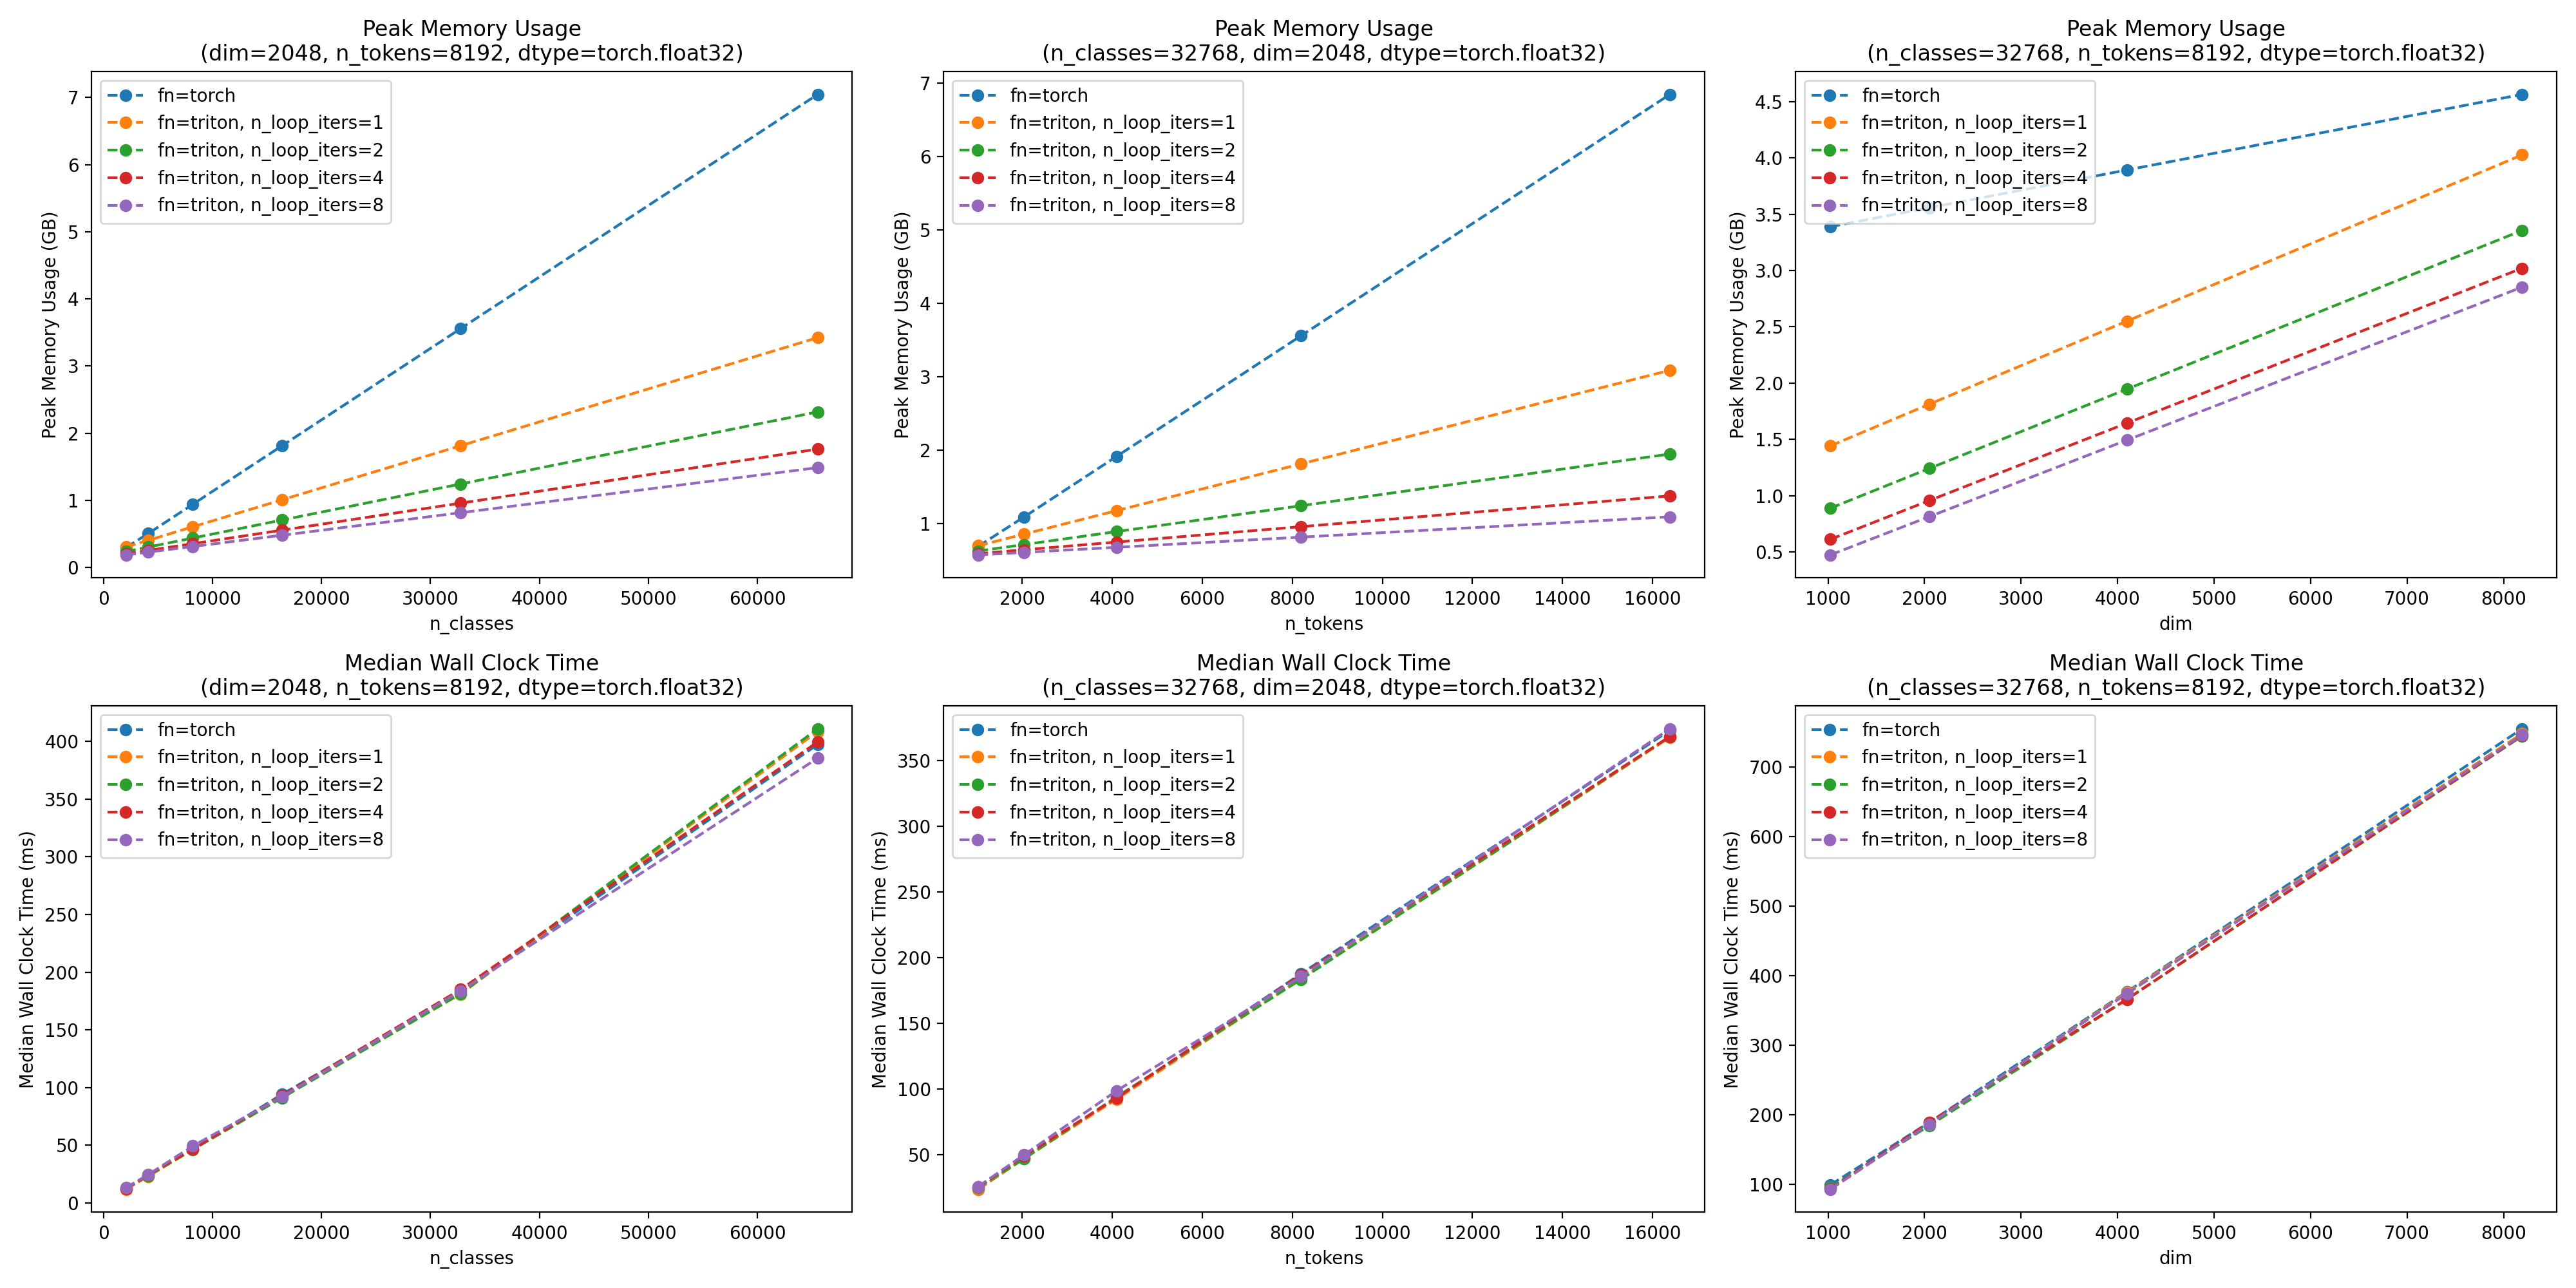 Fig.
Fig.
Scaled Dot Product Attention (SDPA)
Transformer의 building block의 핵심 중 하나인 Scaled Dot Product Attention (SDPA)를 더 빠르고 효율적이게 구현하는 방법에 대해서는 다음 psot에서 다루려고 하니 관심있는 분들은 참고하길 바란다. Fused Attention (a.k.a Flash Attention)도 사실 별게 없는 것이 memory saving을 위해서 chunk단위로 attention을 하되, 이걸 SRAM에서 DRAM으로 보내지않고 한번에 처리하면 된다. 그리고 이걸 triton으로 해도 flash attention의 원저자인 Tri Dao이 작성한 CUDA kernel과 비교해 꿀리지 않거나 더 좋을 수도 있다.
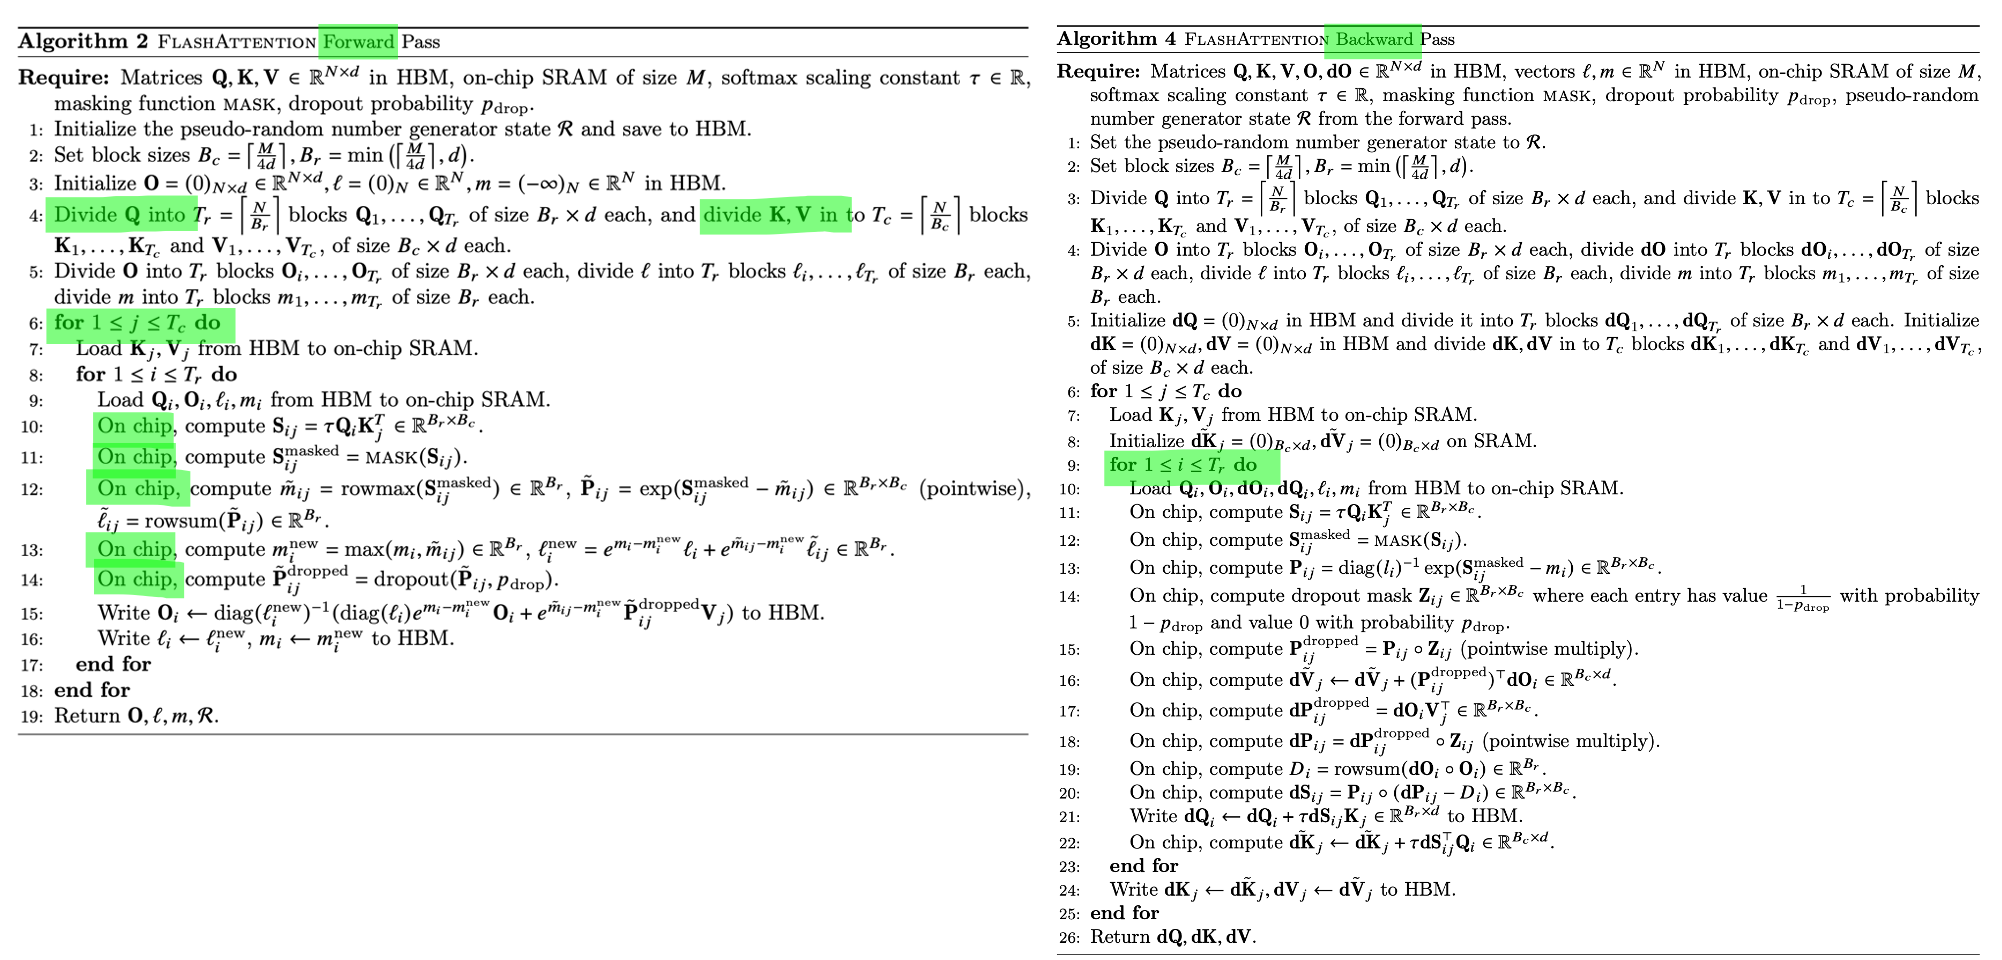 Fig. Flash Attention paper에 있는 algorithm
Some Example Code-bases
Unsloth
마지막으로 Unsloth라는 opensource package에 대해 소개하고 글을 마치려고 한다. 이는 hugginface transformers의 유명한 model class들 (llama, mistral, gemma 등)의 내부 함수를 triton kernel로 대체한 것이다.
 Fig.
Fig.
Unsloth를 쓰면 llama3 같은 model에 대해서 2~5배 빠르지만 gpu memory는 80%나 덜 쓴다고 한다. flash attention 같은 것이 적용되어 있으며, fused layernorm, fused CE loss등이 적용되어 있다. 아마 같은 dataset에 대해 finetuning할 때 GPU memory를 덜 먹으므로 batch size를 키울 수 있어서 속도가 2~5배 빨라졌다고 하는 것 같다. (자세히 못봤지만 kernel만으로 2~5배는 좀 그렇지 않나… 싶다)
 Fig.
Fig.
사용법이 굉장히 간단한데 pip install로 간단하게 설치할 수 있으며, 내부적으로 본인들이 구현한 (혹은 알려져있는) triton kernel을 쓰도록 다 patch를 해놨기 때문에 아래처럼 간단히 쓸 수 있다.
from unsloth import FastLanguageModel
model, tokenizer = FastLanguageModel.from_pretrained(
    model_name = "meta-llama/Meta-Llama-3-8B",
    max_seq_length = max_seq_length,
    dtype = None,
    load_in_4bit = True,
)
Fused CE Comparison
그런데 Unsloth에도 Fused CE Loss kernel이 triton으로 작성된 것이 있다. 그리고 이를 앞서 설명한 mgmalek의 CE loss kernel과 비교한 tweet이 있는데,
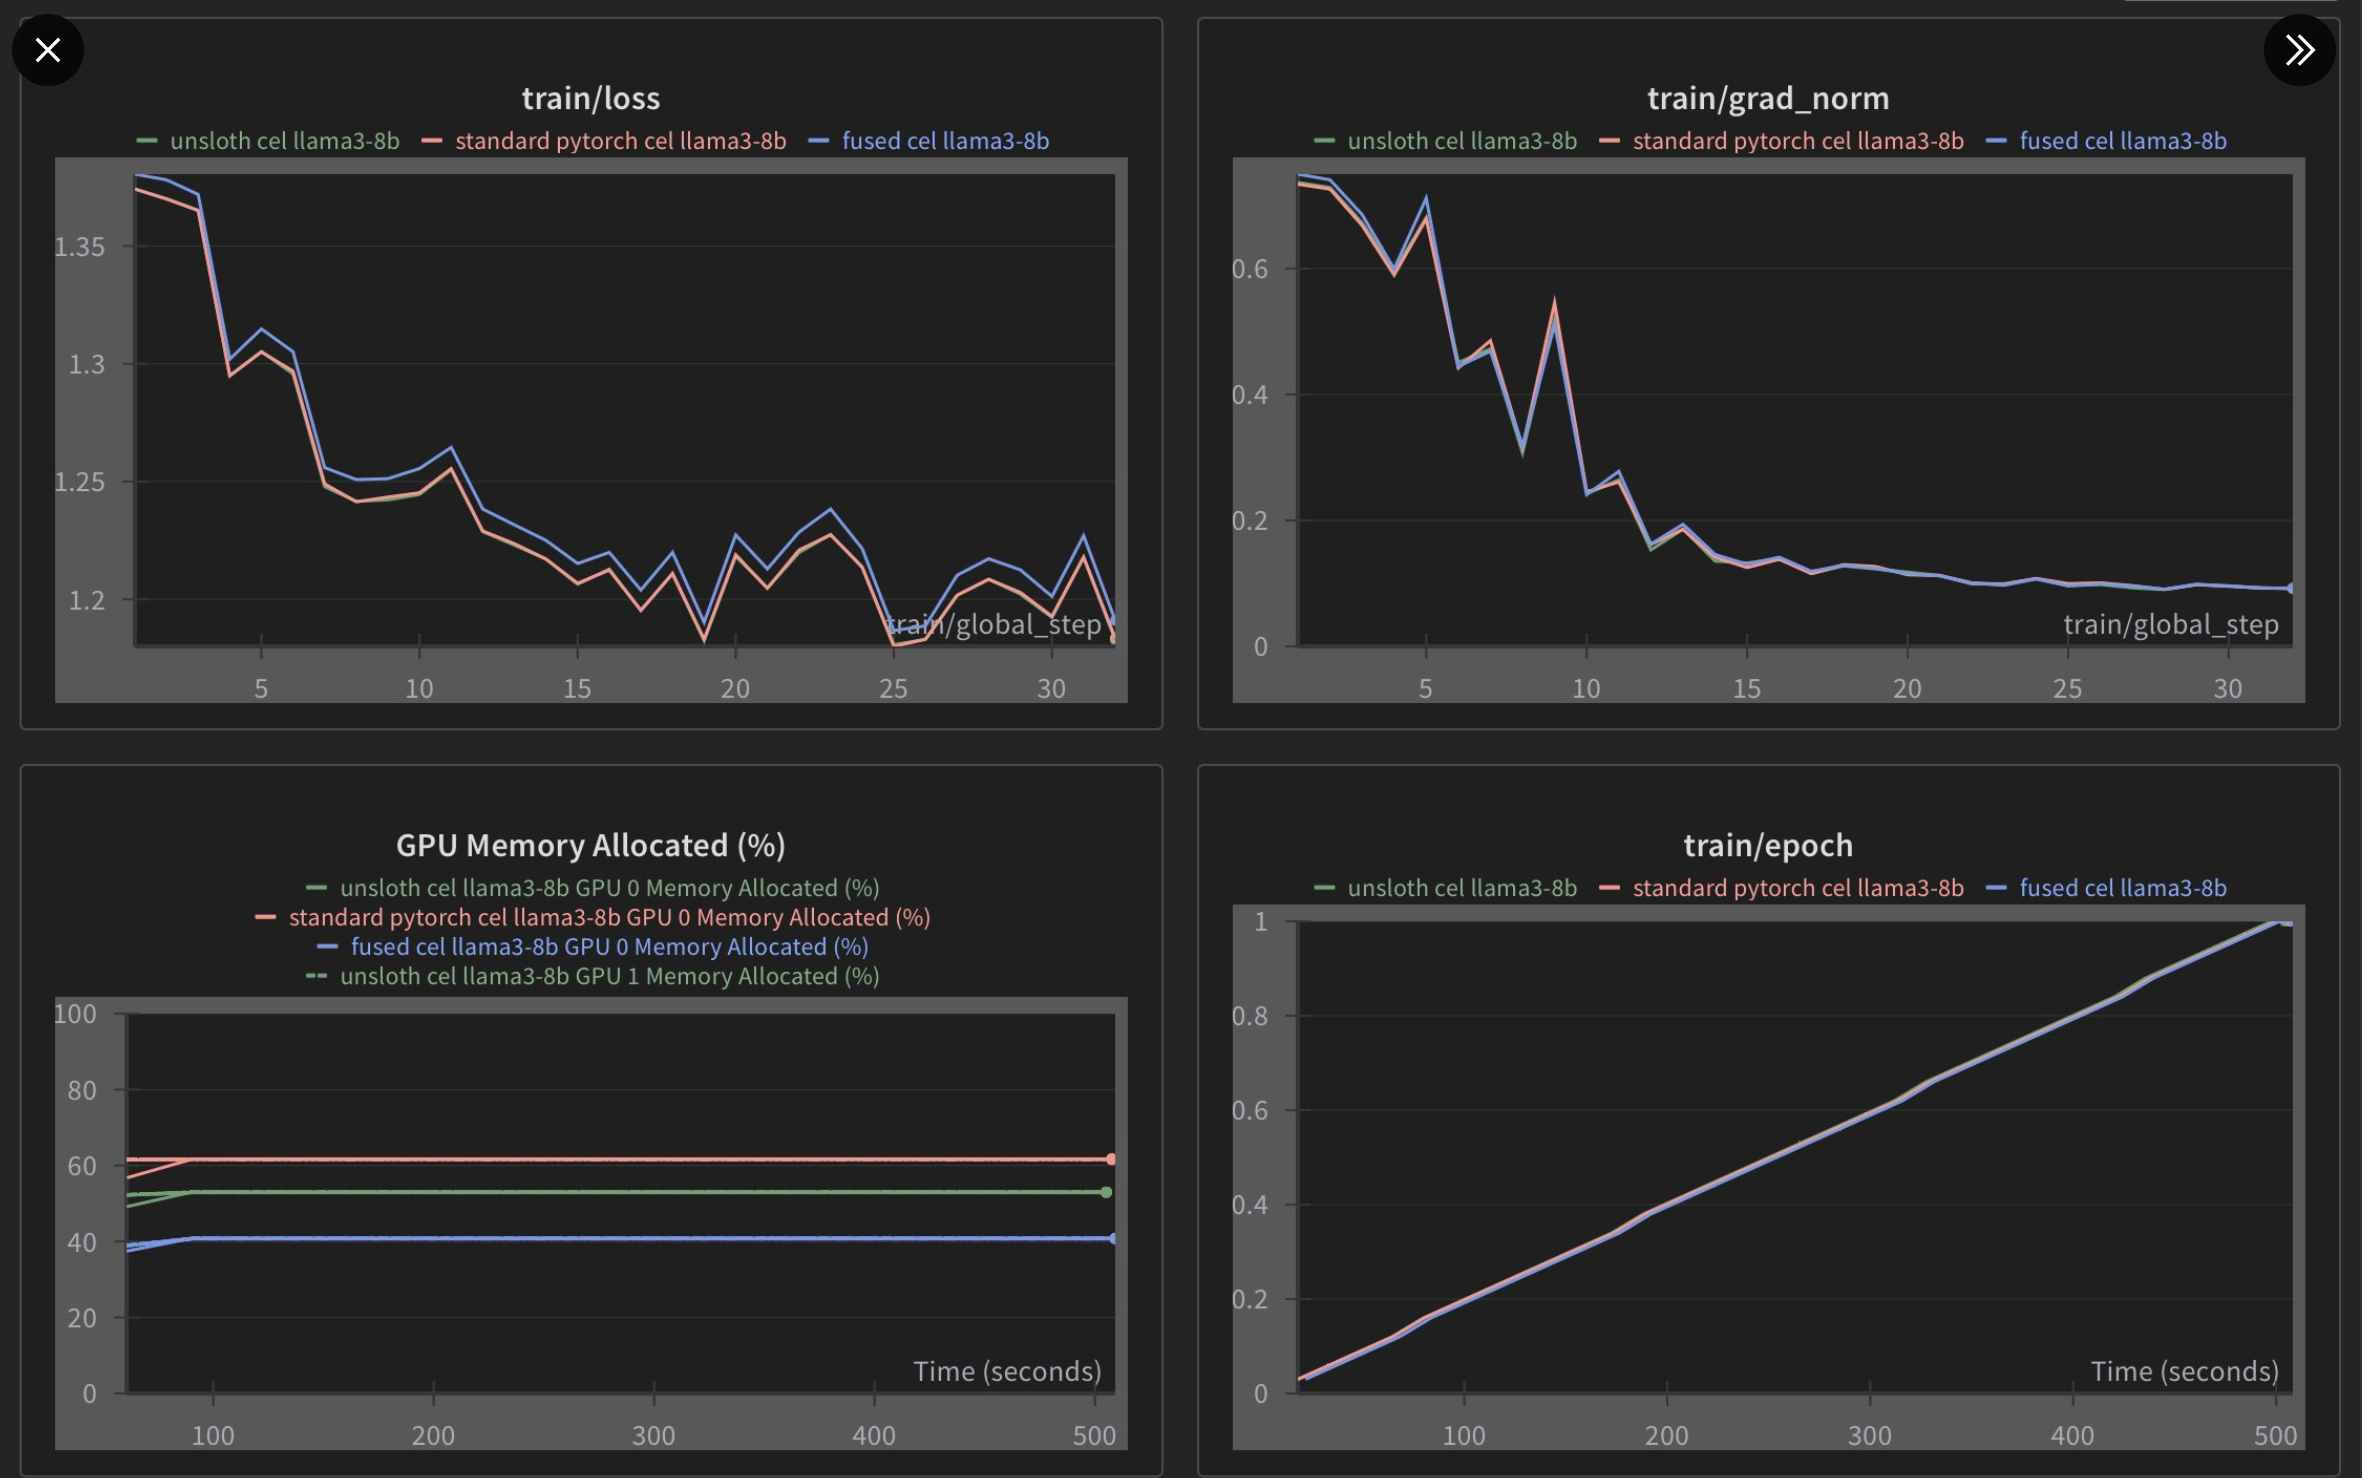 Fig. related tweet link
결과적으로 memory saving에서 압도적인 면을 보이지만 완벽히 pytorch standard와 일칠하는 unsloth의 kernel과 다르게 loss부분에서 regress가 안되는 부분이 있어보인다. 또한 필자가 확인했을 때에도 torch 2.2.0 version에서 gradient가 allclose가 안 되는 것을 보였기 때문에 좀 더 확인을 해봐야 할 것 같다는 생각이 들었다.
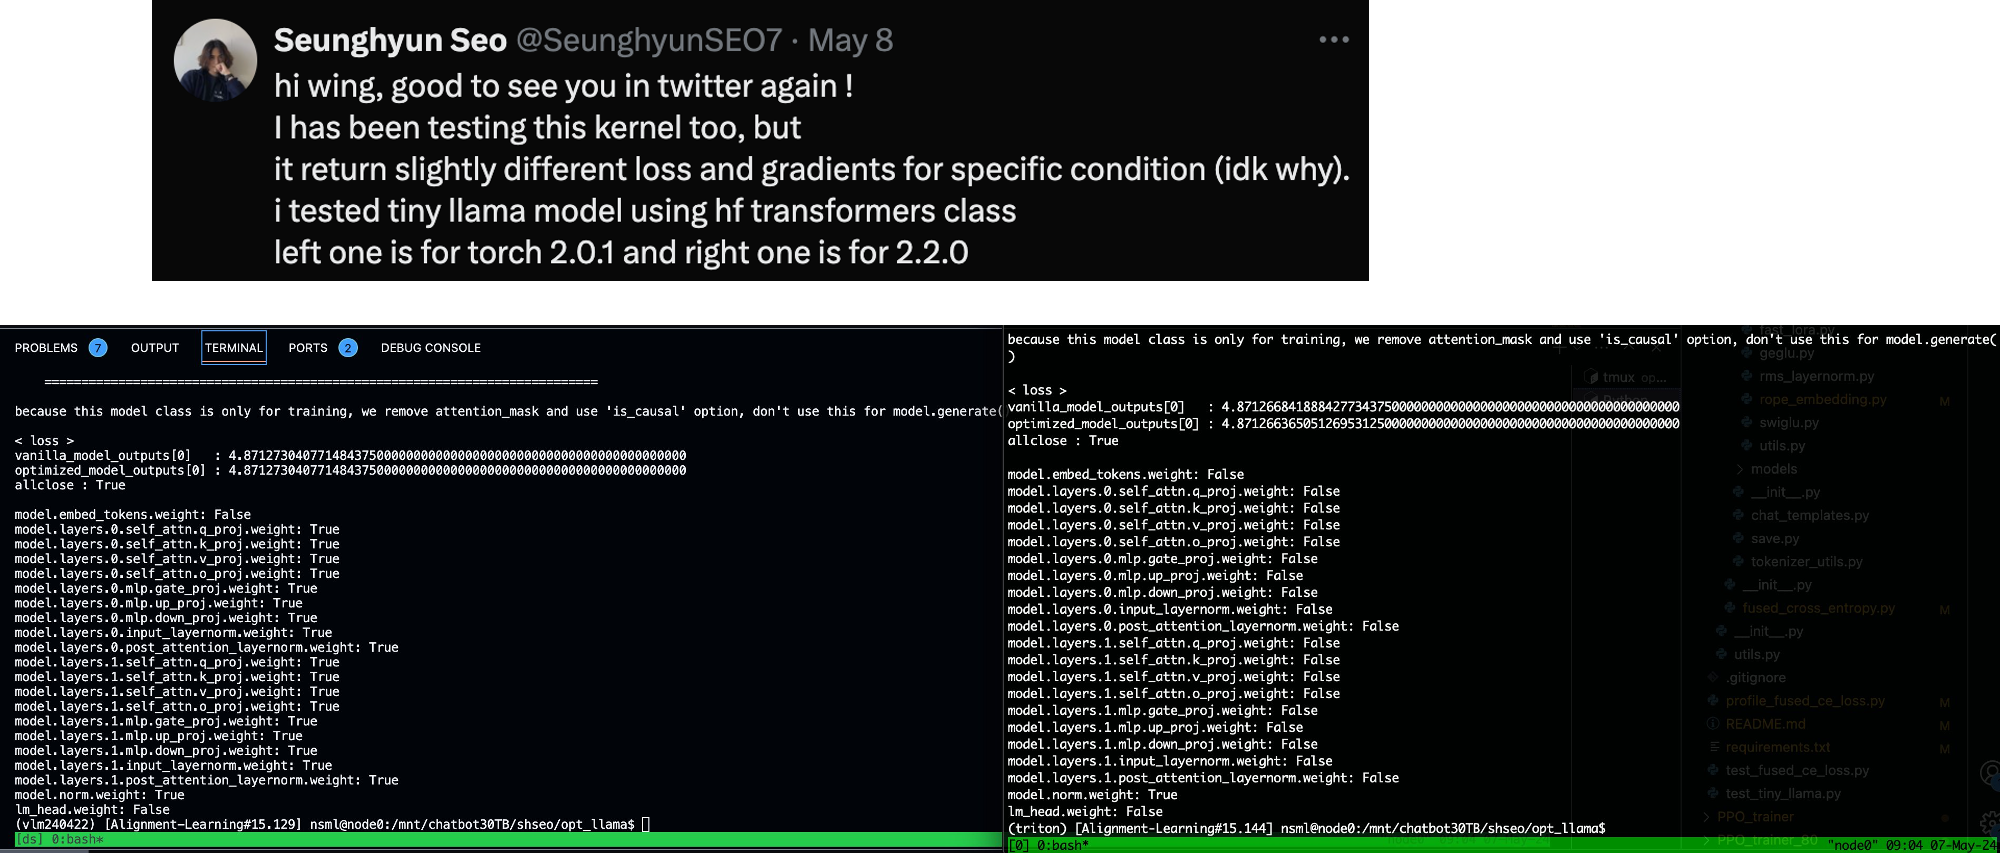 Fig. related tweet link
+Updated) Liger and My project
최근 Linkedin team에서 Liger라는 fully triton based project를 공개했다. 대부분의 kernel이 unsloth와 비슷하고 fused CE도 malek과 거의 유사하다. main contribution은 huggingface project에 바로 integration을 했기 때문에 누구나 memory efficient, faster kernel을 쓸 수 있다는 것이다.
여기에 나도 unsloth와 malek등의 kernel, 그리고 gradient checkpointing을 cpu offload하여 patch한 hf llama를 작업한 적이 있어 공개하기로 했으니 관심있는 사람들은 참고하면 좋을 것 같다. 내 project의 경우 gpu 1개로 lora나 4bit quatization training등의 Parameter Efficient Finetuning (PEFT) method 없이 131k length input을 처리할 수 있는데, 이를 달성하기 위해 가장 중요한것은 cpu offload와 fused CE였다. 하지만 매우 큰 activation을 cpu offloading하여 cpu <-> gpu간 memory copy를 계속 해야 하기때문에 throughput은 당연히 좋지 않지만 tensor parallel (TP), context parallel (CP)등을 구현하기 귀찮은데 long context를 학습하길 원하는 이들은 시도해봐도 좋다.
References
- Triton related
- Videos
- Triton Tutorial Video from SOTA Deep Learning Tutorials
- Intro to Triton: A Parallel Programming Compiler and Language, esp for AI acceleration (updated)
- Triton Compiler Reserved Keywords, or … what happened to all my params?
- Intro to Triton: Coding Softmax in PyTorch
- Coding a Triton Kernel for Softmax (fwd pass) Computation
- Coding Online Softmax in PyTorch - a faster Softmax via reduced memory access
- OpenAI Triton 초급: Triton 소개 from 장대명님
- Triton Tutorial Video from SOTA Deep Learning Tutorials
- Other Resources
- torch issue for efficient CE loss
- mgmalek/efficient_cross_entropy
- flash-attention/flash_attn/ops/triton/cross_entropy.py
- flash-attention/flash_attn/losses/cross_entropy.py
- lucidrains/triton-transformer
- unsloth/unsloth/kernels/cross_entropy_loss.py
- srush/Triton-Puzzles
- How to Implement an Efficient Softmax CUDA Kernel— OneFlow Performance Optimization
- Performance with Triton and PyTorch — tensor add example with Intermediate Representations