Educational Implementation of Tensor Parallel (TP)
22 Jun 2024< 목차 >
이번 post에서는 Tensor Parallel (TP)의 작동 원리를 이해하기 위해 MLP, Transformer에 대해서 TP를 구현해보고, loss가 일치하는지에 대한 regression과 memory requirements를 torch profiler하는 것 까지 해보려고 한다. Implementation은 link에 있으니 참고하길 바란다.
Simple MLP
Transformer에서의 TP를 이해하기 위해서는 먼저 MLP에 TP를 적용할 줄 아는 것이 좋다. 2 layer MLP는 단순히 weight matrix를 쪼개는것을 넘어 activation function가 중간에 존재하기 때문에 column-wise parallel과 row-wise parllel을 번갈아 해줘야 한다고 앞선 post에서 얘기했다.
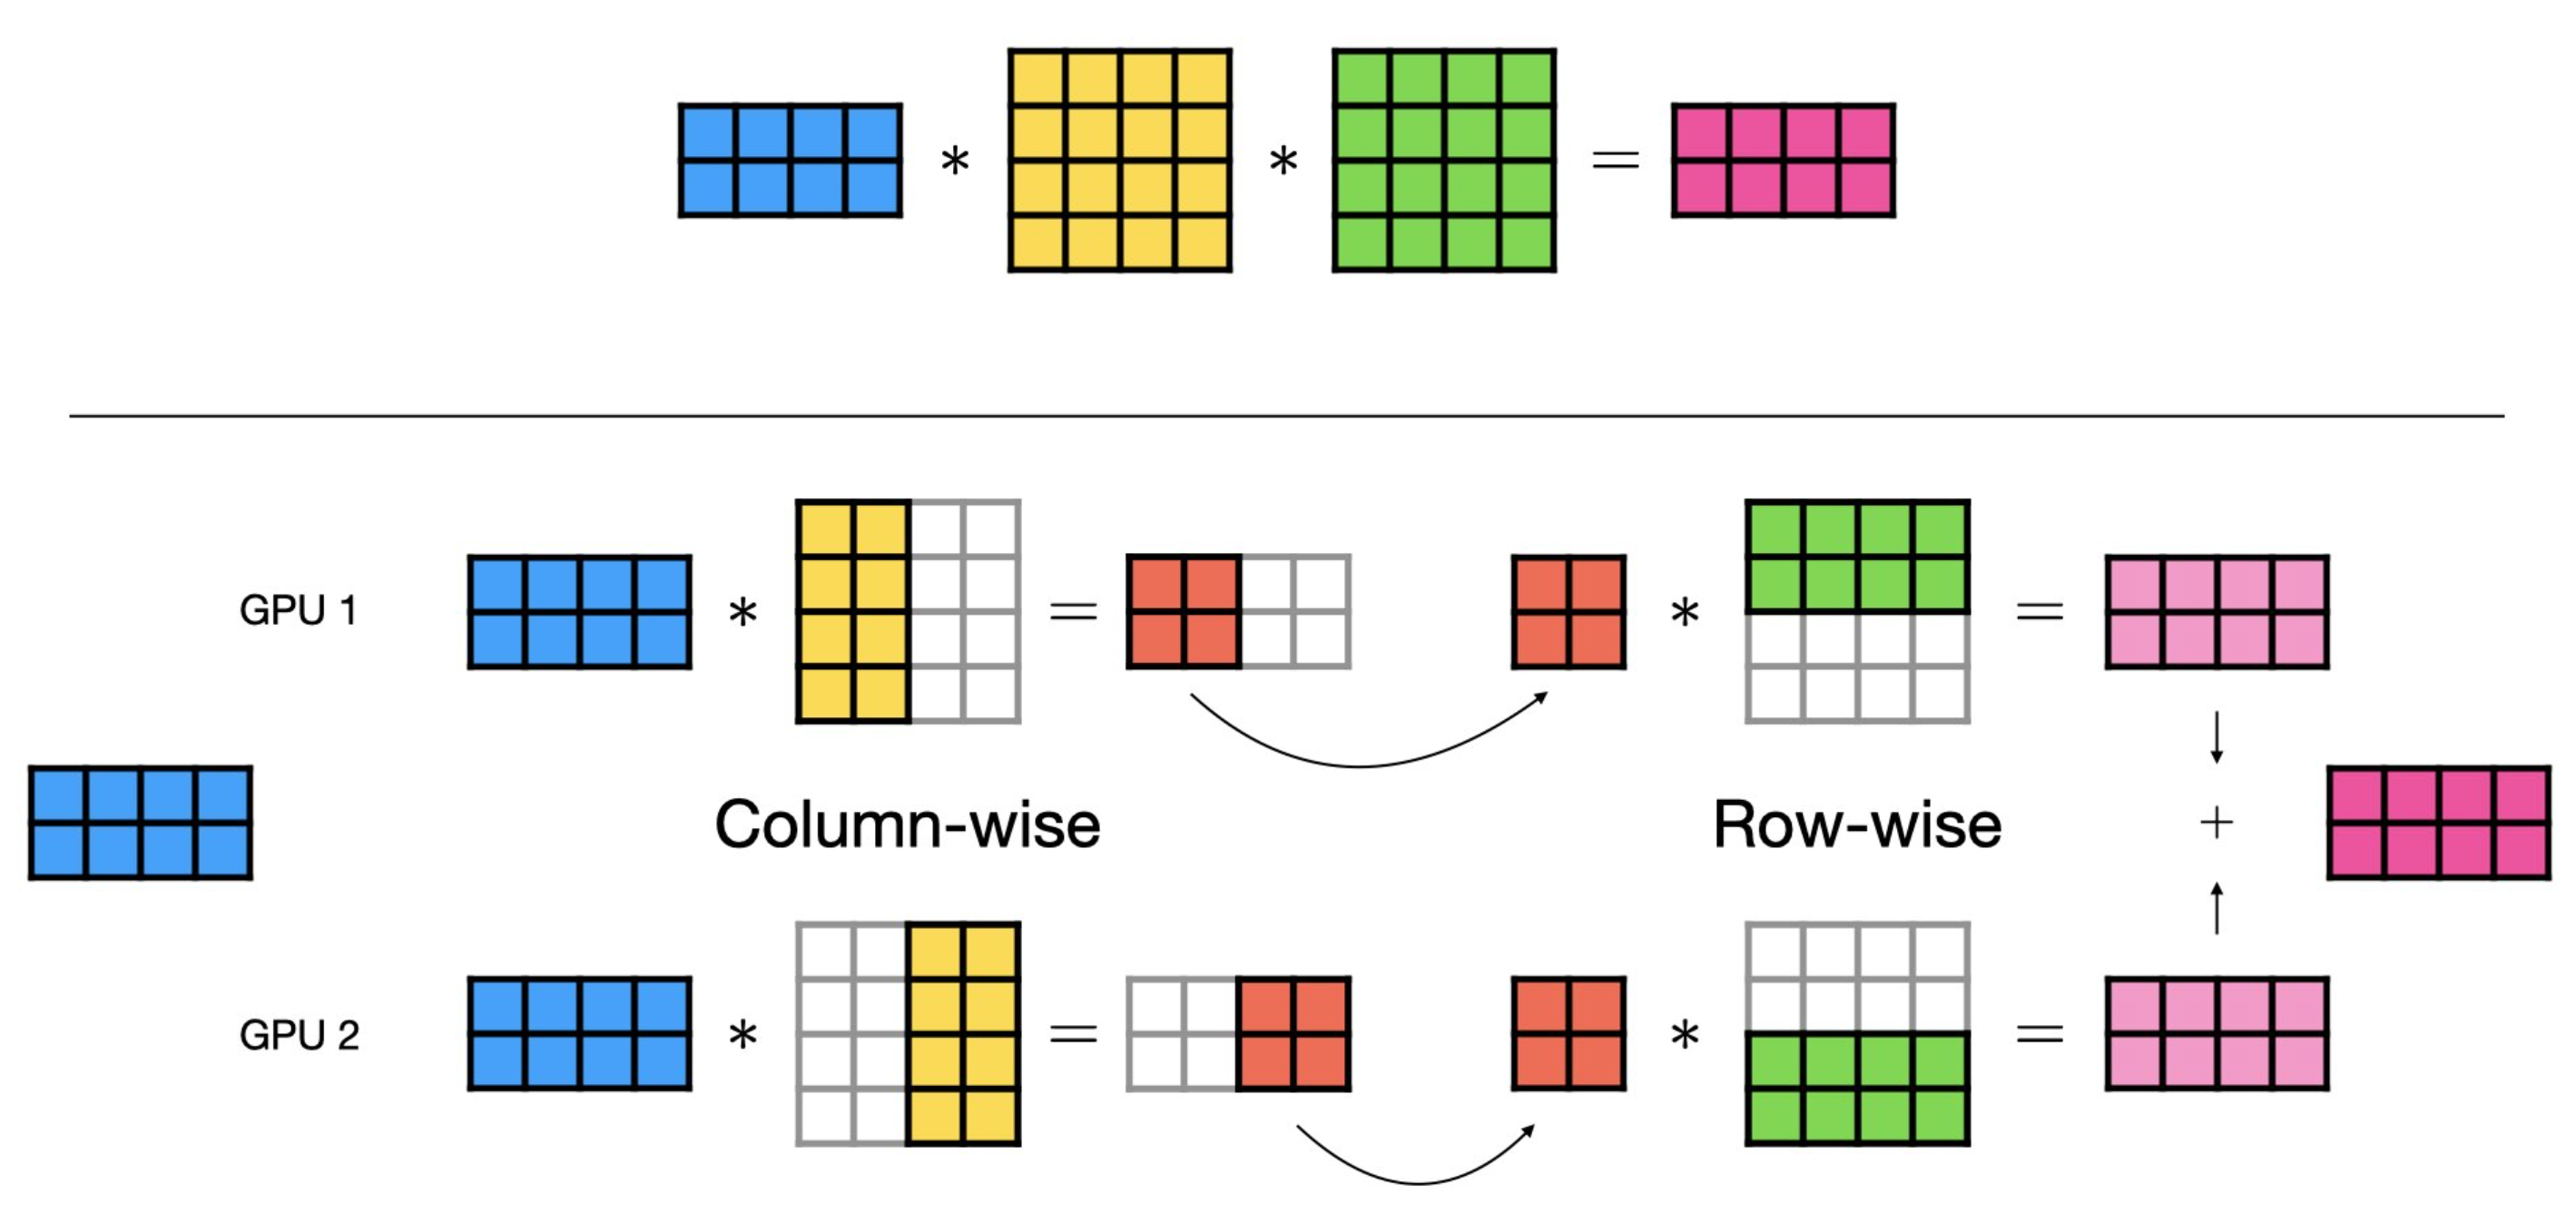 Fig.
Fig.
먼저 필요한 library들을 import하고 distributed training을 위한 함수들을 작성해주고,
2 layer MLP (dummy model)을 선언해준다.
import os
import math
import random
import numpy as np
from copy import deepcopy
from typing import List, Dict
import argparse

import torch
import torch.nn as nn
import torch.nn.functional as F
import torch.distributed as dist


def set_seed(seed=1234):
    random.seed(seed)
    np.random.seed(seed)
    torch.manual_seed(seed)
    torch.cuda.manual_seed_all(seed)

def init_dist():
    rank = int(os.environ["LOCAL_RANK"])
    world_size = int(os.environ["WORLD_SIZE"])
    dist.init_process_group(backend="nccl", init_method="env://", rank=rank, world_size=world_size)
    print(f"rank: {rank}, world size: {world_size}")
    return rank, world_size

def print_message_with_master_process(rank, message):
    if rank==0:
        print(message)
class DummyModel(torch.nn.Module):
    def __init__(self, hidden, bias=False):
        super(DummyModel, self).__init__()
        assert bias == False, "currently bias is not supported"
        self.fc1 = torch.nn.Linear(hidden, hidden, bias=bias) # for Colwise, 128, 128
        self.fc2 = torch.nn.Linear(hidden, hidden, bias=bias) # for Rowwise, 128, 128

    def forward(self, x):
        return self.fc2(torch.relu(self.fc1(x)))
이제 작성한 함수들을 바탕으로 distributed backend등을 init을 해주고 reproduction을 위해 seed 설정도 한 뒤, model과 Adam optimizer를 선언해준다.
def main(args):
    rank, world_size = init_dist()
    device = f"cuda:{rank}"
    bsz, hidden = 8, 128
    num_iter, lr = 2, 0.01

    ## create model and parallelize if TP
    set_seed()
    model = DummyModel(hidden).to(device).train()
    if args.TP:
        layer_tp_plan = {
            "fc1": 'colwise',
            "fc2": 'rowwise',
        }
        parallelize_module(model, world_size, rank, layer_tp_plan)
    optimizer = torch.optim.Adam(model.parameters(), lr=lr, betas=(0.9, 0.95), eps=1e-8, weight_decay=0.1)
    print_message_with_master_process(rank, f'model: {model}')
여기서 TP option, args.TP을 키면 TP가 적용되게 되는데 이는 잠시후에 알아보도록 하고,
우리가 TP를 잘 구현했는지 알아보기 위해서 할 일은 고정된 seed에 대해서 randomly generattion된 dummy tensor에 대해서
model을 5번 forward+backward하여 Adam optimization step을 5번 했을 때 서로 loss가 같은지를 보는 것이다.
    ## create dummy input
    set_seed()
    x = torch.randn(bsz, hidden).to(device)

    ## for loop
    for iter in range(num_iter):
        output = model(x)
        loss = output.sum()
        loss.backward()

        ## get gathered gradient results
        if args.TP:
            fc1_grad = [torch.zeros_like(model.fc1.weight, dtype=torch.float32) for _ in range(world_size)]
            dist.all_gather(fc1_grad, model.fc1.weight.grad)
            fc1_grad = torch.cat(fc1_grad, dim=0)
        else:
            fc1_grad = model.fc1.weight.grad

        optimizer.step()
        optimizer.zero_grad()

        ## print outputs
        message = f'''
        iter: {iter+1}
        output: {output}
        loss: {loss}
        fc1_grad = {fc1_grad}
        '''
        print_message_with_master_process(rank, message)
이제 parallelize_module에 대해서 알아보자.
parallelize_module는 nn.Module과 총 gpu 갯수 (world size), 그리고 현재 device가 몇번째 device인지에 대한 정보를 나타내는 rank,
마지막으로 어떻게 model을 쪼갤지를 정의한 dictionary를 인자로 받는다.
def parallelize_module(
    model: torch.nn.Module,
    world_size: int,
    rank: int,
    layer_tp_plan: Dict
):
    assert world_size > 1, "need at least two devices for TP"
당연히 world size가 2이상이여야 weight을 자를 수 있기 때문에 args.TP=True라면 world size가 1이면 에러가 난다.
다시, model이 우리는 아래와 같이 생겼음을 기억해야 한다.
linear layer가 2개 있고 중간에 ReLU activation을 한 번 수행한다.
class DummyModel(torch.nn.Module):
    def __init__(self, hidden, bias=False):
        super(DummyModel, self).__init__()
        assert bias == False, "currently bias is not supported"
        self.fc1 = torch.nn.Linear(hidden, hidden, bias=bias) # for Colwise, 128, 128
        self.fc2 = torch.nn.Linear(hidden, hidden, bias=bias) # for Rowwise, 128, 128

    def forward(self, x):
        return self.fc2(torch.relu(self.fc1(x)))
우리는 model parameter를 정말 단순하게 아래처럼 slicing하면 되는데, hidden size가 256이라면 gpu가 2개일 때 128로 잘라서 각 0, 1번 device가 이를 나눠가지면 된다.
def parallelize_module(...):
    ...
    for name, module in model.named_children():
        if name in layer_tp_plan:
            assert layer_tp_plan[name] in ['colwise', 'rowwise'], "plan should be colwise or rowwise"

            '''
            for example, weight of column wise parallel linear layer should be splitted into row-wise
            because pytorch implementation of linear layer is X = XW^T (F.linear(x, self.weight, bias))
            '''
            if layer_tp_plan[name] == 'rowwise':
                assert module.weight.size(1) % world_size == 0
                chunk_size = module.weight.size(1)//world_size # e.g. world_size = 2, rank = 0, 1
                module.weight.data = module.weight.data[:, chunk_size*rank: chunk_size*(rank+1)].contiguous() # weight 128, 16 // input 10, 128
                module.forward = rowwise_forward.__get__(module)

            elif layer_tp_plan[name] == 'colwise':
                assert module.weight.size(0) % world_size == 0
                chunk_size = module.weight.size(0)//world_size
                module.weight.data = module.weight.data[chunk_size*rank: chunk_size*(rank+1), :].contiguous() # weight 16, 128  // input 10, 16
                module.backward = colwise_backward.__get__(module)
굉장히 단순하게 구현했는데, 첫 번째 layer는 colwise로 자르고 두 번째 layer는 rowwise로 잘라야 elementwise operation인 ReLU를 중간에 적용하기 위해서 gather나 reduce를 하지 않아도 되므로, 이 순서대로 잘랐다. 여기서 주의해야 할 점이 하나 있는데, 문헌에서는 rowwise, colwise를 할 때 rowwise는 input feature dimension을 즈록 colwise는 output feature dimension을 잘라야 하는 것 처럼 얘기했으나 pytorch는 linear operation을 수행할 때 아래처럼 되기 때문에, 실제로는 colwise의 경우 0번째 dimension으로 잘라야 하고, rowwise는 그 반대로 1번 dimension으로 잘라야 한다는 것이다.
\[y = W^T x\]각 nn.Module의 self.weight을 colwise, rowwise rule에 따라서 자른 뒤, forward, backward method를 내가 새로 정의한 걸로 swap을 해줘야 하는데, 그 이유는 colwise의 경우 forward시에는 아무것도 안해줘도 되지만 backward시 input x에 대한 local gradient를 all-reduce해줘야 하기 때문이고 rowwise는 forward를 끝내고 layer output y를 all-reduce해줘야 하기 때문이다 (반대로 rowwise는 backward시 아무것도 안해줘도 된다).
def colwise_backward(self, grad_output):
    grad_input = grad_output.mm(self.weight.t())
    dist.all_reduce(grad_input, op=dist.ReduceOp.SUM) # addmm
    return grad_input

def rowwise_forward(self, x):
    bias = self.bias if self.bias else None
    x = F.linear(x, self.weight, bias)
    dist.all_reduce(x, op=dist.ReduceOp.SUM)
    return x
이렇게하면 MLP에서의 TP는 간단하게 끝난다.
Results Comparison
이제 결과를 비교해보자.
나는 loss와 gradient를 모두 포함해서 print하도록 했다.
원래 baseline vs TP를 하기 위해서 한 process에서 두 model을 띄워 연산 한 뒤 결과를 torch.all_close로 비교해도 되지만,
편의상 이렇게 했다.
- w/o TP (1 GPU)
export MASTER_ADDR=node0 &&\
export MASTER_PORT=23458 &&\
torchrun --nproc_per_node=1 --master_addr=$MASTER_ADDR --master_port=$MASTER_PORT \
0_naive_tensor_parallel.py
rank: 0, world size: 1
model: DummyModel(
  (fc1): Linear(in_features=128, out_features=128, bias=False)
  (fc2): Linear(in_features=128, out_features=128, bias=False)
)

        iter: 1
        output: tensor([[-0.0446,  0.0869,  0.2034,  ...,  0.0353, -0.2906,  0.0388],
        [-0.0149,  0.3999,  0.0187,  ...,  0.1280, -0.1074,  0.2212],
        [ 0.0592,  0.2287,  0.2629,  ..., -0.3098,  0.3747,  0.1021],
        ...,
        [-0.1120,  0.1608,  0.1155,  ...,  0.0570, -0.0458,  0.3998],
        [-0.0837,  0.1127,  0.1840,  ..., -0.0339,  0.3072,  0.6933],
        [ 0.1525,  0.2822, -0.0211,  ...,  0.1974,  0.0768,  0.2375]],
       device='cuda:0', grad_fn=<MmBackward0>)
        loss: 0.969451904296875
        fc1_grad = tensor([[-0.7231,  0.7115, -0.2774,  ..., -0.6077, -0.0960,  0.1508],
        [-0.0553, -0.4548, -0.0235,  ...,  0.1630, -0.1945, -0.1485],
        [ 1.4298, -1.3797,  1.5428,  ...,  2.0844, -0.6803,  0.3992],
        ...,
        [-1.3434,  1.1863, -0.8411,  ..., -0.6940,  0.9600,  0.8013],
        [-0.1506,  0.7074, -0.3786,  ..., -1.2123,  1.7474,  1.8508],
        [-0.5859,  0.4911, -0.4167,  ..., -0.0043,  0.1661,  0.3382]],
       device='cuda:0')


        iter: 2
        output: tensor([[-0.5817, -0.0260, -0.5679,  ..., -0.5887, -0.6975, -0.1548],
        [-0.2621,  0.1407, -0.4802,  ..., -0.1570, -0.2467,  0.1012],
        [-0.2493,  0.1170, -0.3523,  ..., -0.7328,  0.1866, -0.3034],
        ...,
        [-0.3621, -0.0533, -0.3692,  ..., -0.4276, -0.2218,  0.1831],
        [-0.4475,  0.1047, -0.7256,  ..., -0.5500, -0.0167,  0.1446],
        [-0.1938, -0.2023, -0.7151,  ..., -0.1744, -0.3086, -0.0498]],
       device='cuda:0', grad_fn=<MmBackward0>)
        loss: -445.4638671875
        fc1_grad = tensor([[ 2.4085,  1.6419,  0.8216,  ...,  2.0955,  0.7012, -1.0162],
        [-0.7059, -5.8104, -0.3002,  ...,  2.0821, -2.4854, -1.8969],
        [ 4.1235, -3.9789,  4.4493,  ...,  6.0115, -1.9621,  1.1513],
        ...,
        [ 0.2301, -1.8097, -0.5846,  ...,  1.1556, -0.6764, -0.2249],
        [ 0.0000,  0.0000,  0.0000,  ...,  0.0000,  0.0000,  0.0000],
        [ 1.4045, -0.0199,  0.4096,  ...,  0.3518, -0.3399, -1.3144]],
       device='cuda:0')
- w/ TP (2 GPU)
export LOCAL_RANK=1 &&\
export WORLD_SIZE=2 &&\
export MASTER_ADDR=node0 &&\
export MASTER_PORT=23458 &&\
torchrun --nproc_per_node=$WORLD_SIZE --master_addr=$MASTER_ADDR --master_port=$MASTER_PORT \
0_naive_tensor_parallel.py --TP
rank: 0, world size: 2
rank: 1, world size: 2
model: DummyModel(
  (fc1): Linear(in_features=128, out_features=128, bias=False)
  (fc2): Linear(in_features=128, out_features=128, bias=False)
)

        iter: 1
        output: tensor([[-0.0446,  0.0869,  0.2034,  ...,  0.0353, -0.2906,  0.0388],
        [-0.0149,  0.3999,  0.0187,  ...,  0.1280, -0.1074,  0.2212],
        [ 0.0592,  0.2287,  0.2629,  ..., -0.3098,  0.3747,  0.1021],
        ...,
        [-0.1120,  0.1608,  0.1155,  ...,  0.0570, -0.0458,  0.3998],
        [-0.0837,  0.1127,  0.1840,  ..., -0.0339,  0.3072,  0.6933],
        [ 0.1525,  0.2822, -0.0211,  ...,  0.1974,  0.0768,  0.2375]],
       device='cuda:0', grad_fn=<MmBackward0>)
        loss: 0.9694492816925049
        fc1_grad = tensor([[-0.7231,  0.7115, -0.2774,  ..., -0.6077, -0.0960,  0.1508],
        [-0.0553, -0.4548, -0.0235,  ...,  0.1630, -0.1945, -0.1485],
        [ 1.4298, -1.3797,  1.5428,  ...,  2.0844, -0.6803,  0.3992],
        ...,
        [-1.3434,  1.1863, -0.8411,  ..., -0.6940,  0.9600,  0.8013],
        [-0.1506,  0.7074, -0.3786,  ..., -1.2123,  1.7474,  1.8508],
        [-0.5859,  0.4911, -0.4167,  ..., -0.0043,  0.1661,  0.3382]],
       device='cuda:0')


        iter: 2
        output: tensor([[-0.5817, -0.0260, -0.5679,  ..., -0.5887, -0.6975, -0.1548],
        [-0.2621,  0.1407, -0.4802,  ..., -0.1570, -0.2467,  0.1012],
        [-0.2493,  0.1170, -0.3523,  ..., -0.7328,  0.1866, -0.3034],
        ...,
        [-0.3621, -0.0533, -0.3692,  ..., -0.4276, -0.2218,  0.1831],
        [-0.4475,  0.1047, -0.7256,  ..., -0.5500, -0.0167,  0.1446],
        [-0.1938, -0.2023, -0.7151,  ..., -0.1744, -0.3086, -0.0498]],
       device='cuda:0', grad_fn=<MmBackward0>)
        loss: -445.4638671875
        fc1_grad = tensor([[ 2.4085,  1.6419,  0.8216,  ...,  2.0955,  0.7012, -1.0162],
        [-0.7059, -5.8104, -0.3002,  ...,  2.0821, -2.4854, -1.8969],
        [ 4.1235, -3.9789,  4.4493,  ...,  6.0115, -1.9621,  1.1513],
        ...,
        [ 0.2301, -1.8097, -0.5846,  ...,  1.1556, -0.6764, -0.2249],
        [ 0.0000,  0.0000,  0.0000,  ...,  0.0000,  0.0000,  0.0000],
        [ 1.4045, -0.0199,  0.4096,  ...,  0.3518, -0.3399, -1.3144]],
       device='cuda:0')
2GPU TP vs 1GPU baseline에서 아무 문제가 없음을 확인할 수 있다.
Transformer
그 다음은 Transformer model을 TP해보도록 하자.
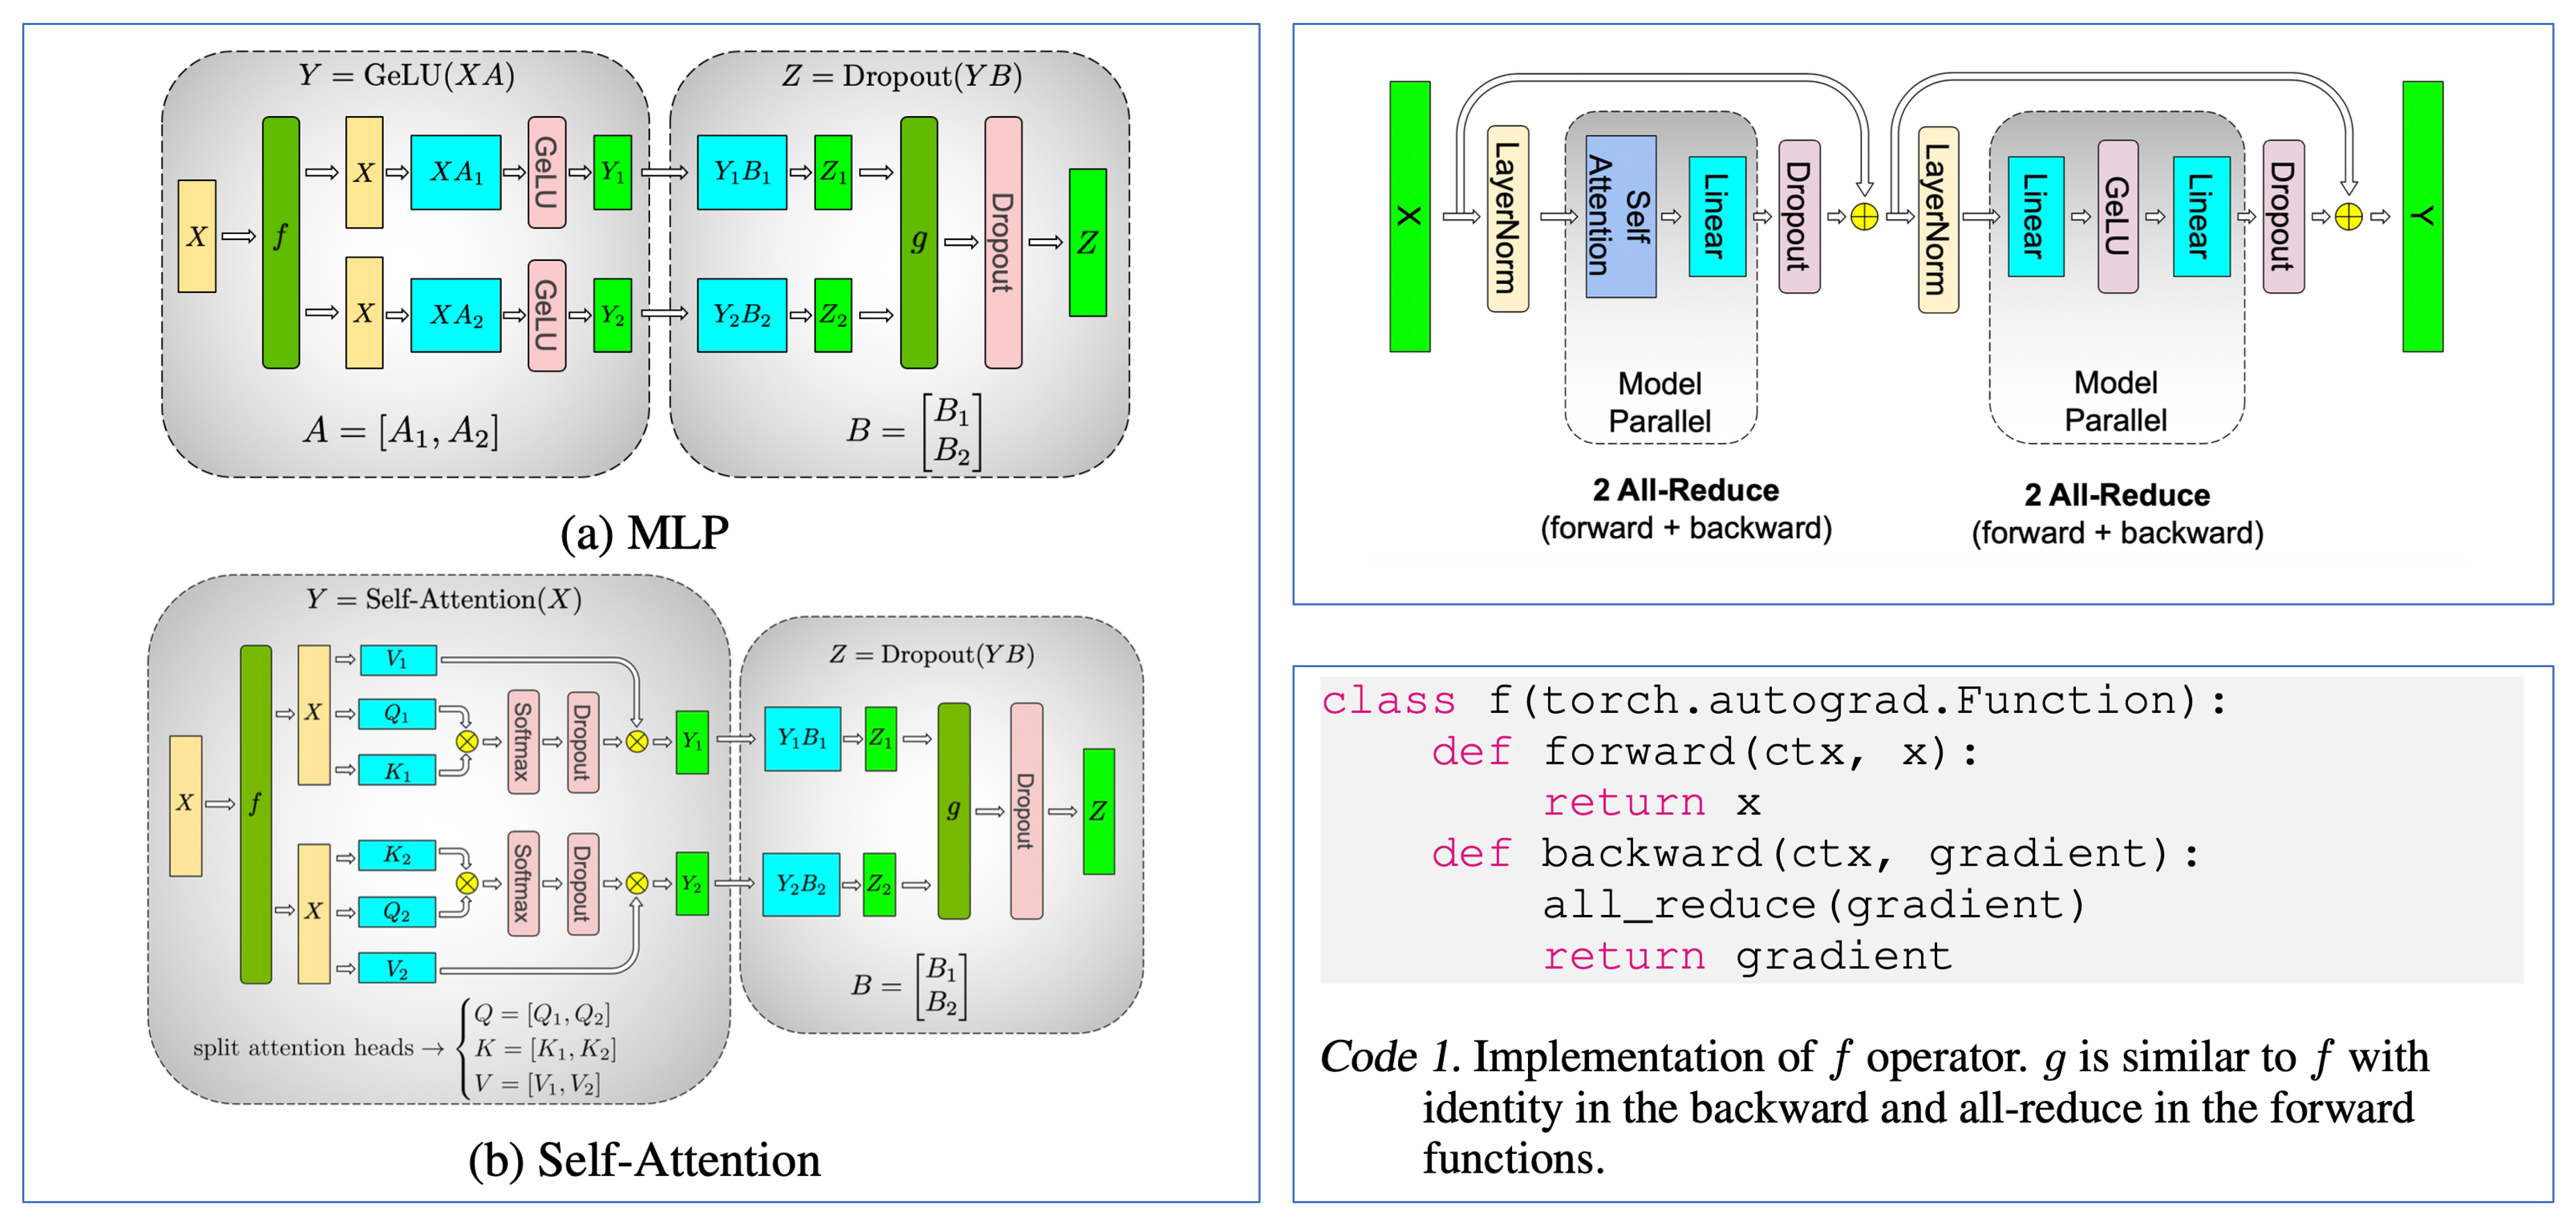 Fig.
Fig.
MLP에서와 같이 colwise-rowwise 순서를 지켜주면 되는데, 앞선 post에서 알 수 있듯이 ffn1, 2사이의 activation과 self attention의 중간단계에서의 softmax등을 위해 MLP에서와 같은 맥락으로 이 rule을 지켜줘야 communication을 줄일 수 있다. 구현을 위해 간단하게 Transformer를 만들어보자. Code는 대충 nanoGPT를 참고했다.
'''
adapted from karpathy
https://github.com/karpathy/nanoGPT/blob/master/model.py
'''
class Attention(nn.Module):
    def __init__(self, hidden, nhead, bias=False):
        super(Attention, self).__init__()
        assert hidden % nhead == 0, "hidden size should be divisible by nhead"
        self.dhead = hidden // nhead
        self.q_proj = nn.Linear(hidden, hidden, bias=bias)
        self.k_proj = nn.Linear(hidden, hidden, bias=bias)
        self.v_proj = nn.Linear(hidden, hidden, bias=bias)
        self.o_proj = nn.Linear(hidden, hidden, bias=bias)

    def forward(self, x):
        B, T, C = x.size()
        q = self.q_proj(x).view(B, T, -1, self.dhead).transpose(1, 2).contiguous() # B, nhead, T, dhead
        k = self.k_proj(x).view(B, T, -1, self.dhead).transpose(1, 2).contiguous() # B, nhead, T, dhead
        v = self.v_proj(x).view(B, T, -1, self.dhead).transpose(1, 2).contiguous() # B, nhead, T, dhead
        x = torch.nn.functional.scaled_dot_product_attention(q, k, v, attn_mask=None, dropout_p=0.0, is_causal=True)
        x = x.transpose(1, 2).contiguous().view(B, T, -1)
        return self.o_proj(x)

class MLP(nn.Module):
    def __init__(self, hidden, bias=False):
        super(MLP, self).__init__()
        self.ffn1 = nn.Linear(hidden, 4*hidden, bias)
        self.act = nn.GELU()
        self.ffn2 = nn.Linear(4*hidden, hidden, bias)

    def forward(self, x):
        return self.ffn2(self.act(self.ffn1(x)))

class LayerNorm(nn.Module):
    def __init__(self, hidden, bias=False):
        super(LayerNorm, self).__init__()
        self.weight = nn.Parameter(torch.ones(hidden))
        self.bias = nn.Parameter(torch.zeros(hidden)) if bias else None

    def forward(self, x):
        return F.layer_norm(x.float(), self.weight.shape, self.weight, self.bias, 1e-5).type_as(x)

class ResidualBlock(nn.Module):
    def __init__(self, hidden, nhead, bias=False):
        super(ResidualBlock, self).__init__()
        self.ln1 = LayerNorm(hidden, bias)
        self.attn = Attention(hidden, nhead, bias)
        self.ln2 = LayerNorm(hidden, bias)
        self.mlp = MLP(hidden, bias)

    def forward(self, x):
        x = x + self.attn(self.ln1(x))
        return x + self.mlp(self.ln2(x))
class Transformer(nn.Module):
    def __init__(self, vocab_size, block_size, hidden, nhead, nlayer, bias=False):
        super(Transformer, self).__init__()
        assert bias == False, "currently bias is not supported"
        self.vocab_size = vocab_size
        self.nhead = nhead
        self.model = nn.ModuleDict(
            dict(
                wte = nn.Embedding(vocab_size, hidden), # long tensor -> 3d tensor -> channel dim 쪼개
                wpe = nn.Embedding(block_size, hidden),
                h = nn.ModuleList([ResidualBlock(hidden, nhead, bias) for _ in range(nlayer)]),
                ln = LayerNorm(hidden, bias=bias),
            )
        )
        self.lm_head = nn.Linear(hidden, vocab_size, bias=bias)
        self.model.wte.weight = self.lm_head.weight # for pure megatron implementation, we automatically tie embedding

    def compute_loss(self, z, y, ignore_index=-100, reduction='mean'):
        return F.cross_entropy(z, y, ignore_index=ignore_index, reduction=reduction)

    def forward(self, x, y):
        B, T = x.size()
        pos = torch.arange(0, T, dtype=torch.long, device=x.device)
        x = self.model.wte(x) + self.model.wpe(pos)
        for block in self.model.h:
            x = block(x)
        x = self.model.ln(x)
        z = self.lm_head(x).float() # projection to logit space and upcast
        z = z[..., :-1, :].contiguous().view(B*(T-1), -1) # B*T, C
        y = y.view(-1) # B*T, 1
        return self.compute_loss(z, y), z
이제 마찬가지로 model과 Adam optimizer를 선언해주고,
parallelize_module과 loss_parallel등의 함수를 정의해주면 되는데,
loss_parallel는 나중에 설명하도록 하고 이번에는 parallelize_module에만 집중해보자.
아 그리고 GPT-2 like model을 test하는 상황이기 때문에 어떤 string data를 LongTensor로 mapping해줄 tokenizer도 정의해줘야 하는데,
이는 huggingface tokenizer를 사용했다.
def main(args):
    rank, world_size = init_dist()
    device = f"cuda:{rank}"

    from transformers import AutoTokenizer
    tokenizer = AutoTokenizer.from_pretrained('gpt2')
    vocab_size = len(tokenizer)
    block_size = tokenizer.model_max_length
    hidden, nhead, nlayer = args.hidden, 8, 2

    set_seed()
    model = Transformer(vocab_size, block_size, hidden, nhead, nlayer).to(device).train()
    if args.TP:
        assert model.nhead % world_size == 0, "nhead should be divisible by TP degree"
        parallelize_module(args, model, world_size, rank)
    else:
        if args.loss_parallel:
            def loss_parallel(x, y, ignore_index=-100, reduction='mean'):
                return LossParallel.apply(x, y, 0, vocab_size, ignore_index, reduction)
            model.compute_loss = loss_parallel
    lr = 0.01
    optimizer = torch.optim.Adam(model.parameters(), lr=lr, betas=(0.9, 0.95), eps=1e-8, weight_decay=0.1)
이번에는 더이상 layerwise TP plan을 받지 않도록 구현했다. 그 이유는 Transformer의 경우 megatron에서 정의한대로 자르는 것 외에 더 좋은 방법이 없을 것 같기 때문이다. (우리는 megatorn을 구현하는 것이 목적이므로)
def parallelize_module(
    args,
    model: nn.Module,
    world_size: int,
    rank: int,
):
    assert world_size > 1, "need at least two devices for TP"
    colwise_list = ['q_proj', 'k_proj', 'v_proj', 'ffn1']
    rowwise_list = ['o_proj', 'ffn2']

    for name, module in model.named_children():
        if isinstance(module, nn.Module):
            parallelize_module(args, module, world_size, rank)

        '''
        pytorch impl matmul with transposed weight matrix,
        so you should slice weight matrix counter-intuitively.
        '''
        for _ in rowwise_list:
            if _ in name.lower():
                assert module.weight.size(1) % world_size == 0
                chunk_size = module.weight.size(1)//world_size
                module.weight.data = module.weight.data[:, chunk_size*rank: chunk_size*(rank+1)].contiguous()
                module.forward = rowwise_forward.__get__(module)
        for _ in colwise_list:
            if _ in name.lower():
                assert module.weight.size(0) % world_size == 0
                chunk_size = module.weight.size(0)//world_size
                module.weight.data = module.weight.data[chunk_size*rank: chunk_size*(rank+1), :].contiguous()
                module.forward = colwise_forward.__get__(module)
어떤 residual branch에서 output쪽은 rowwise로 자르고, input쪽은 colwise로 자른 다는 부분은 동일하고
각 forward, backward의 method를 바꿔주는 것도 같은데,
이번에는 아까와 다르게 colwise, rowwise 모두 forward의 method를 각각 colwise_forward, rowwise_forward로 바꾸도록 했다.
그 이유는 megatron paper에서 처럼 (위 figure) forward시 identity, backward시 all-reduce인 f function와, 그 반대인 g function을
torch.autograd로 구현했기 때문이다.
class g(torch.autograd.Function):
    def forward(ctx, x):
        dist.all_reduce(x, op=dist.ReduceOp.SUM)
        return x
    def backward(ctx, dx):
        return dx

class f(torch.autograd.Function):
    def forward(ctx, x):
        return x
    def backward(ctx, dx):
        dist.all_reduce(dx, op=dist.ReduceOp.SUM)
        return dx

def rowwise_forward(self, x):
    bias = self.bias if self.bias else None
    x = F.linear(x, self.weight, bias)
    return g.apply(x)

def colwise_forward(self, x):
    bias = self.bias if self.bias else None
    x = f.apply(x)
    return F.linear(x, self.weight, bias)
torch.autograd.Function을 상속받아 x = f.apply(x)같은 식으로 적용을 해주게 되면,
특정 nn.Module의 forward, backward시 어떻게 작동해야 되는지를 쉽게 정의해줄 수 있다.
Results Comparison
여기까지 하고 일단 아래의 문장을 tokenization해서 model에 넣어 5번 optimization 해보도록 하자.
    sent = "i love tensor parallelism."
    input_ids = tokenizer(sent, return_tensors='pt').to(device)
    input_ids['labels'] = input_ids['input_ids'][:, 1:]

    with ContextManagers(context) as p:
        for iter in range(num_iter):
            loss, z = model(input_ids['input_ids'], input_ids['labels'])
            z.retain_grad()
            loss.backward()

            message = f'''
            iter: {iter+1}
            loss: {loss}
            '''
            # message += f'''
            # z.grad: {z.grad}
            # '''

            optimizer.step()
            optimizer.zero_grad()

            print_message_with_master_process(rank, message)
            if args.use_torch_profiler:
                p.step()
- w/o TP
export MASTER_ADDR=node0 &&\
export MASTER_PORT=23458 &&\
torchrun --nproc_per_node=1 --master_addr=$MASTER_ADDR --master_port=$MASTER_PORT \
1_transformer_tensor_parallel.py
rank: 0, world size: 1

        iter: 1
        loss: 10.939807891845703


        iter: 2
        loss: 3.437135934829712


        iter: 3
        loss: 1.5810130834579468


        iter: 4
        loss: 0.453738808631897


        iter: 5
        loss: 0.1264963299036026
- w/ TP
export LOCAL_RANK=1 &&\
export WORLD_SIZE=2 &&\
export MASTER_ADDR=node0 &&\
export MASTER_PORT=23458 &&\
torchrun --nproc_per_node=$WORLD_SIZE --master_addr=$MASTER_ADDR --master_port=$MASTER_PORT \
1_transformer_tensor_parallel.py --TP
rank: 1, world size: 2
rank: 0, world size: 2

        iter: 1
        loss: 10.939807891845703


        iter: 2
        loss: 3.4371347427368164


        iter: 3
        loss: 1.58101224899292


        iter: 4
        loss: 0.45373836159706116


        iter: 5
        loss: 0.12649638950824738
결과가 거의 같은 것을 알 수 있다.
Profiling Memory With Torch Profiler
이번에는 Torch Profiler를 사용해 어떻게 memory와 latency가 줄어들었는지 확인해보도록 하자. 우리는 2개 GPU당 model하나를 띄워 연산하는 것이니 all-reduce같은 communication이 문제가 되지 않는다면 이론적으로 memory, latency가 모두 줄어야 함을 알 수 있다.
export MASTER_ADDR=node0 &&\
export MASTER_PORT=23458 &&\
torchrun --nproc_per_node=1 --master_addr=$MASTER_ADDR --master_port=$MASTER_PORT \
1_transformer_tensor_parallel.py --use_torch_profiler --hidden=2048
이를 위해 args.use_torch_profiler option을 켜주면 되는데,
이를 킬 경우 code상의 ContextManagers에 아래와 같이 get_torch_profiler가 return한 context를 appending하게 된다.
    ...
    if args.use_torch_profiler:
        num_wait_steps, num_warmup_steps, num_active_steps, num_repeat = 1, 2, 3, 1
        num_iter = int((num_wait_steps + num_warmup_steps + num_active_steps)*num_repeat)
        context = [
            get_torch_profiler(
                num_wait_steps=num_wait_steps,
                num_warmup_steps=num_warmup_steps,
                num_active_steps=num_active_steps,
                num_repeat=num_repeat,
                save_dir_name=f'TP_{args.TP}_world_size_{world_size}_hidden_{hidden}'
            )
        ]
    else:
        num_iter = 5
        context = []

    with ContextManagers(context) as p:
        for iter in range(num_iter):
            ...
여기서 ContextManagers와 get_torch_profiler는 각각 아래처럼 작성되어 있다.
import os
import torch
import socket
from datetime import datetime, timedelta
from contextlib import contextmanager, ExitStack
from typing import Any, ContextManager, Iterable, List, Tuple


class ContextManagers:
    """
    Wrapper for `contextlib.ExitStack` which enters a collection of context managers. Adaptation of `ContextManagers`
    in the `fastcore` library.
    """

    def __init__(self, context_managers: List[ContextManager]):
        self.context_managers = context_managers
        self.stack = ExitStack()

    def __enter__(self):
        entered_contexts = [
            self.stack.enter_context(cm) for cm in self.context_managers
        ]
        # Assuming you want to return the first context manager, adjust as needed
        return entered_contexts[0] if entered_contexts else None

    def __exit__(self, *args, **kwargs):
        self.stack.__exit__(*args, **kwargs)
def get_torch_profiler(
    use_tensorboard=True,
    root_dir="./assets/torch_profiler_log",
    save_dir_name="tmp",

    num_wait_steps=1, # During this phase profiler is not active.
    num_warmup_steps=2, # During this phase profiler starts tracing, but the results are discarded.
    num_active_steps=2, # During this phase profiler traces and records data.
    num_repeat=1,  # Specifies an upper bound on the number of cycles.

    record_shapes=True,
    profile_memory=True,

    with_flops=True,
    with_stack = False, # Enable stack tracing, adds extra profiling overhead. stack tracing adds an extra profiling overhead.
    with_modules=True,
):
    save_path=os.path.join(root_dir, save_dir_name)
    os.makedirs(save_path, exist_ok=True)

    '''
    https://pytorch.org/tutorials/recipes/recipes/profiler_recipe.html#using-profiler-to-analyze-long-running-jobs
    https://pytorch.org/tutorials/intermediate/tensorboard_profiler_tutorial.html
    https://github.com/pytorch/kineto/blob/main/tb_plugin/README.md
    https://oss.navercorp.com/seunghyun-seo1/seosh_fairseq/blob/main/toward_iclr/cuda_profile_speech_encoder.py

    https://pytorch.org/blog/accelerating-generative-ai-2/
    https://www.deepspeed.ai/tutorials/pytorch-profiler/
    https://ui.perfetto.dev
    chrome://tracing/

    https://pytorch.org/blog/introducing-pytorch-profiler-the-new-and-improved-performance-tool/
    https://pytorch.org/tutorials/intermediate/tensorboard_profiler_tutorial.html
    https://pytorch.org/blog/pytorch-profiler-1.9-released/

    231214 added
    https://pytorch.org/blog/understanding-gpu-memory-1/
    https://github.com/pytorch/pytorch.github.io/tree/site/assets/images/understanding-gpu-memory-1
    '''

    def trace_handler(prof: torch.profiler.profile):
        TIME_FORMAT_STR: str = "%b_%d_%H_%M_%S"

        host_name = socket.gethostname()
        timestamp = datetime.now().strftime(TIME_FORMAT_STR)
        file_prefix = f"{host_name}_{timestamp}"
        prof.export_chrome_trace(f"{save_path}/{file_prefix}.json.gz")

    return torch.profiler.profile(
        activities=[
            torch.profiler.ProfilerActivity.CPU,
            torch.profiler.ProfilerActivity.CUDA,
        ],
        record_shapes=record_shapes,
        profile_memory=profile_memory,

        with_flops=with_flops,
        with_stack = with_stack,
        with_modules = with_modules,

        schedule=torch.profiler.schedule(
            wait=num_wait_steps,
            warmup=num_warmup_steps,
            active=num_active_steps,
            repeat=num_repeat,
        ),
        on_trace_ready = trace_handler if not use_tensorboard else torch.profiler.tensorboard_trace_handler(save_path),
    )
Torch profiler는 documentation을 보면 어떤 부분을 monitoring할 수 있는지 등을 쉽게 확인할 수 있는데, CUDA kernel operation, communication등에 얼마나 시간을 썼는지? 내가 지정한 iteration step동안 forward, backward시 각각 memory는 어떻게 되는지? 등을 확인할 수 있다.
 Fig. 1GPU baseline Overview
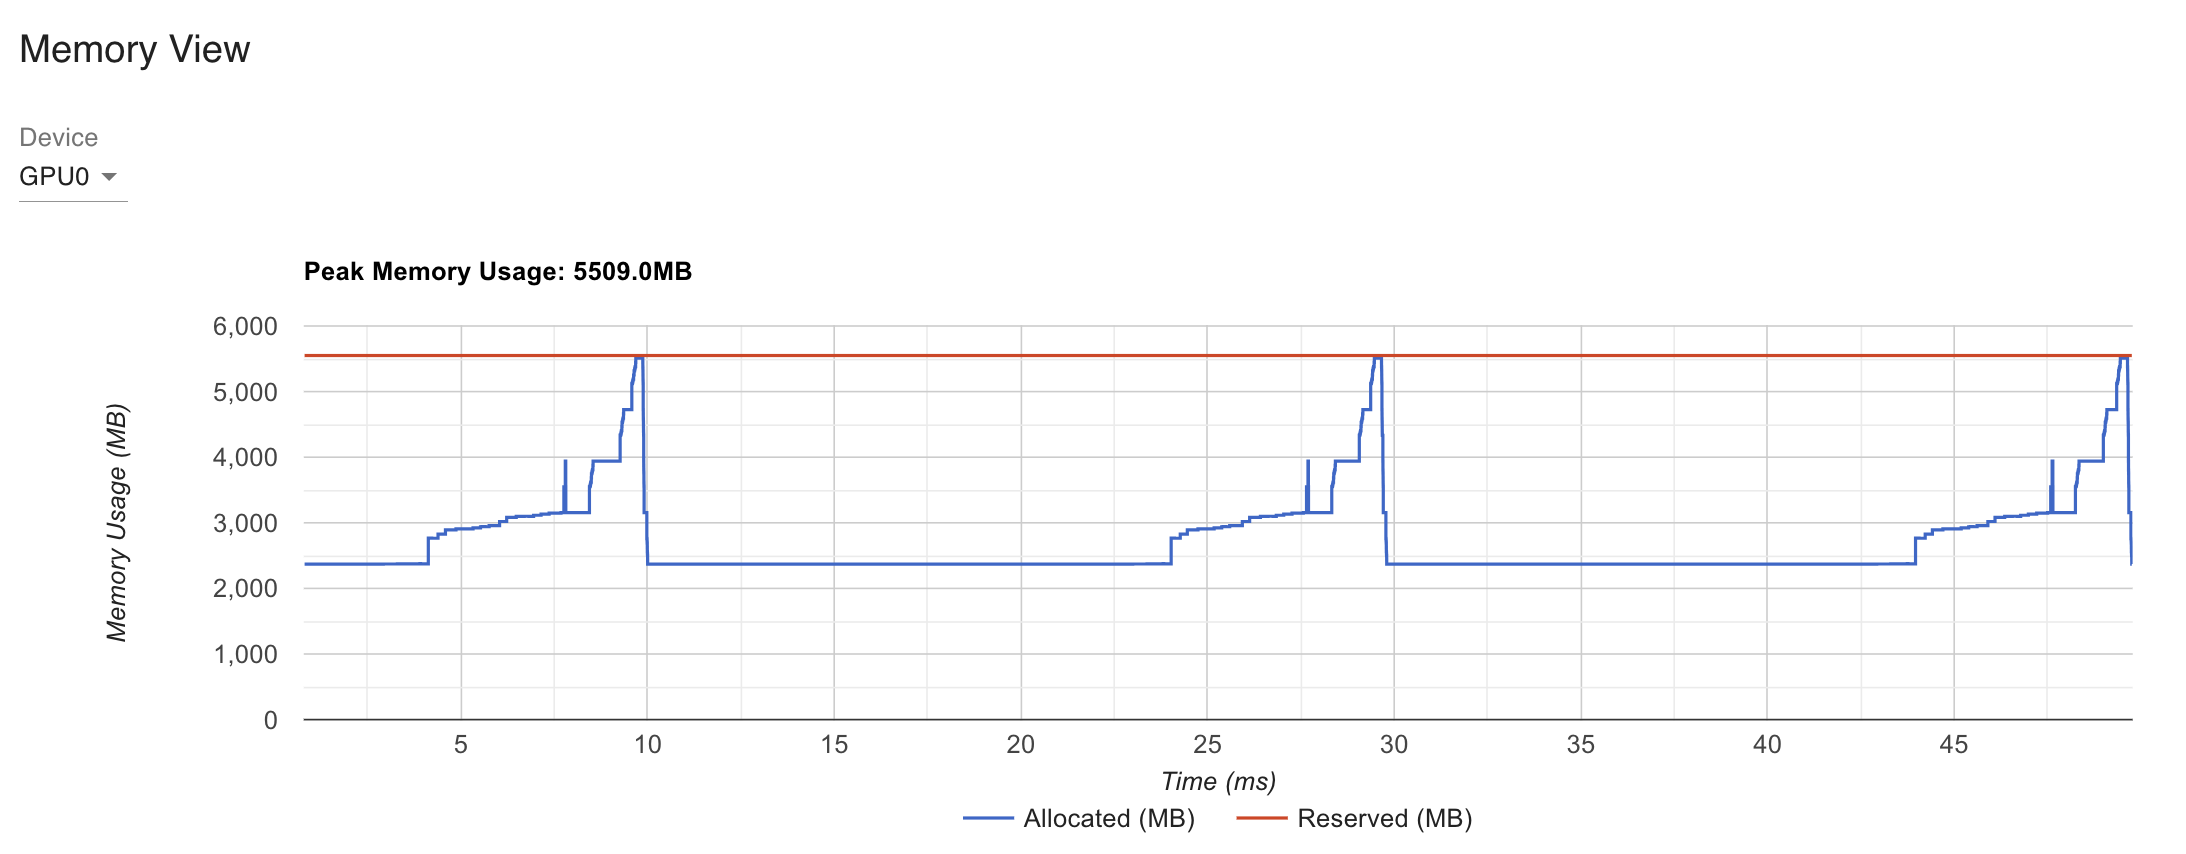 Fig. 1GPU baseline Memory View
 Fig. 2GPU TP Overview
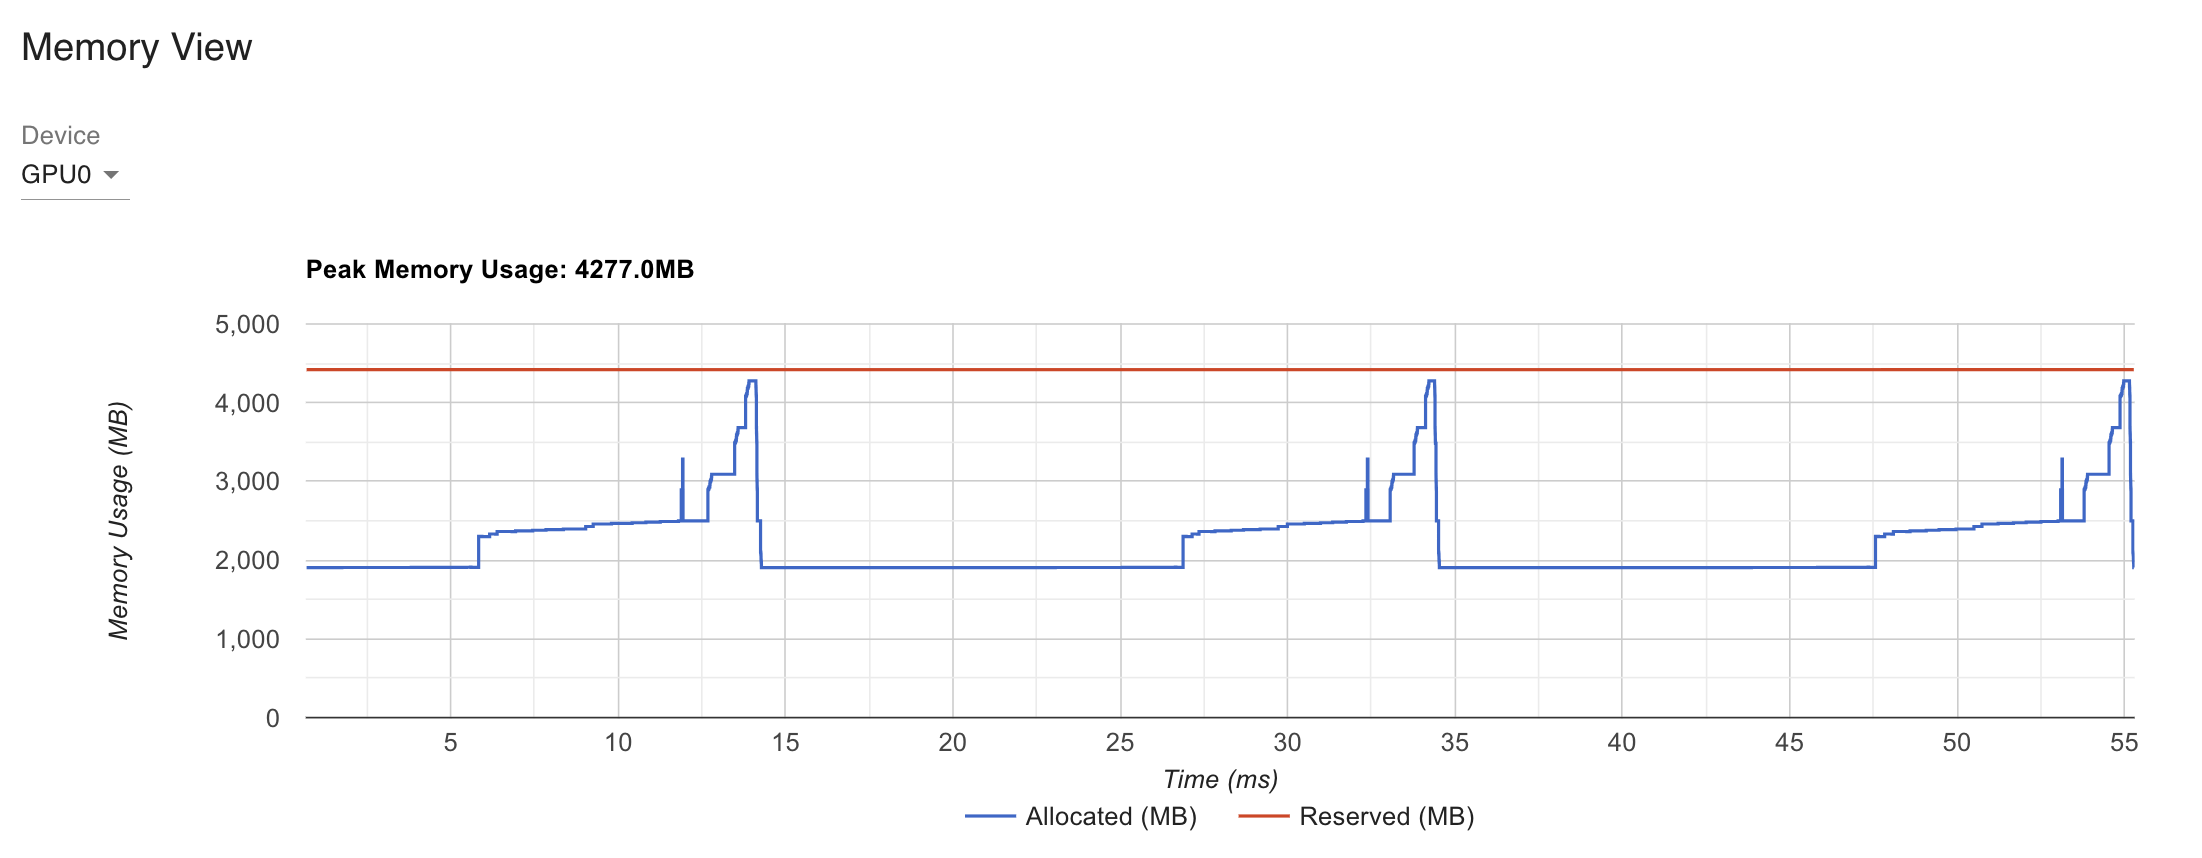 Fig.2GPU TP Memory View
device별로 model을 나눠가졌고 activation도 나눠가졌기 때문에 peak memory는 줄어들었지만 안타깝게도 latency는 늘어난 것을 볼 수 있는데, 지금은 batch와 model size가 너무 작고 최적화가 안되어 있어 그렇다고 생각할 수 있을 것 같다.
Vocab Parallel (Loss Parallel)
이제 megatron의 또 하나의 key feature인 vocab parallel에 대해서 구현해보자.
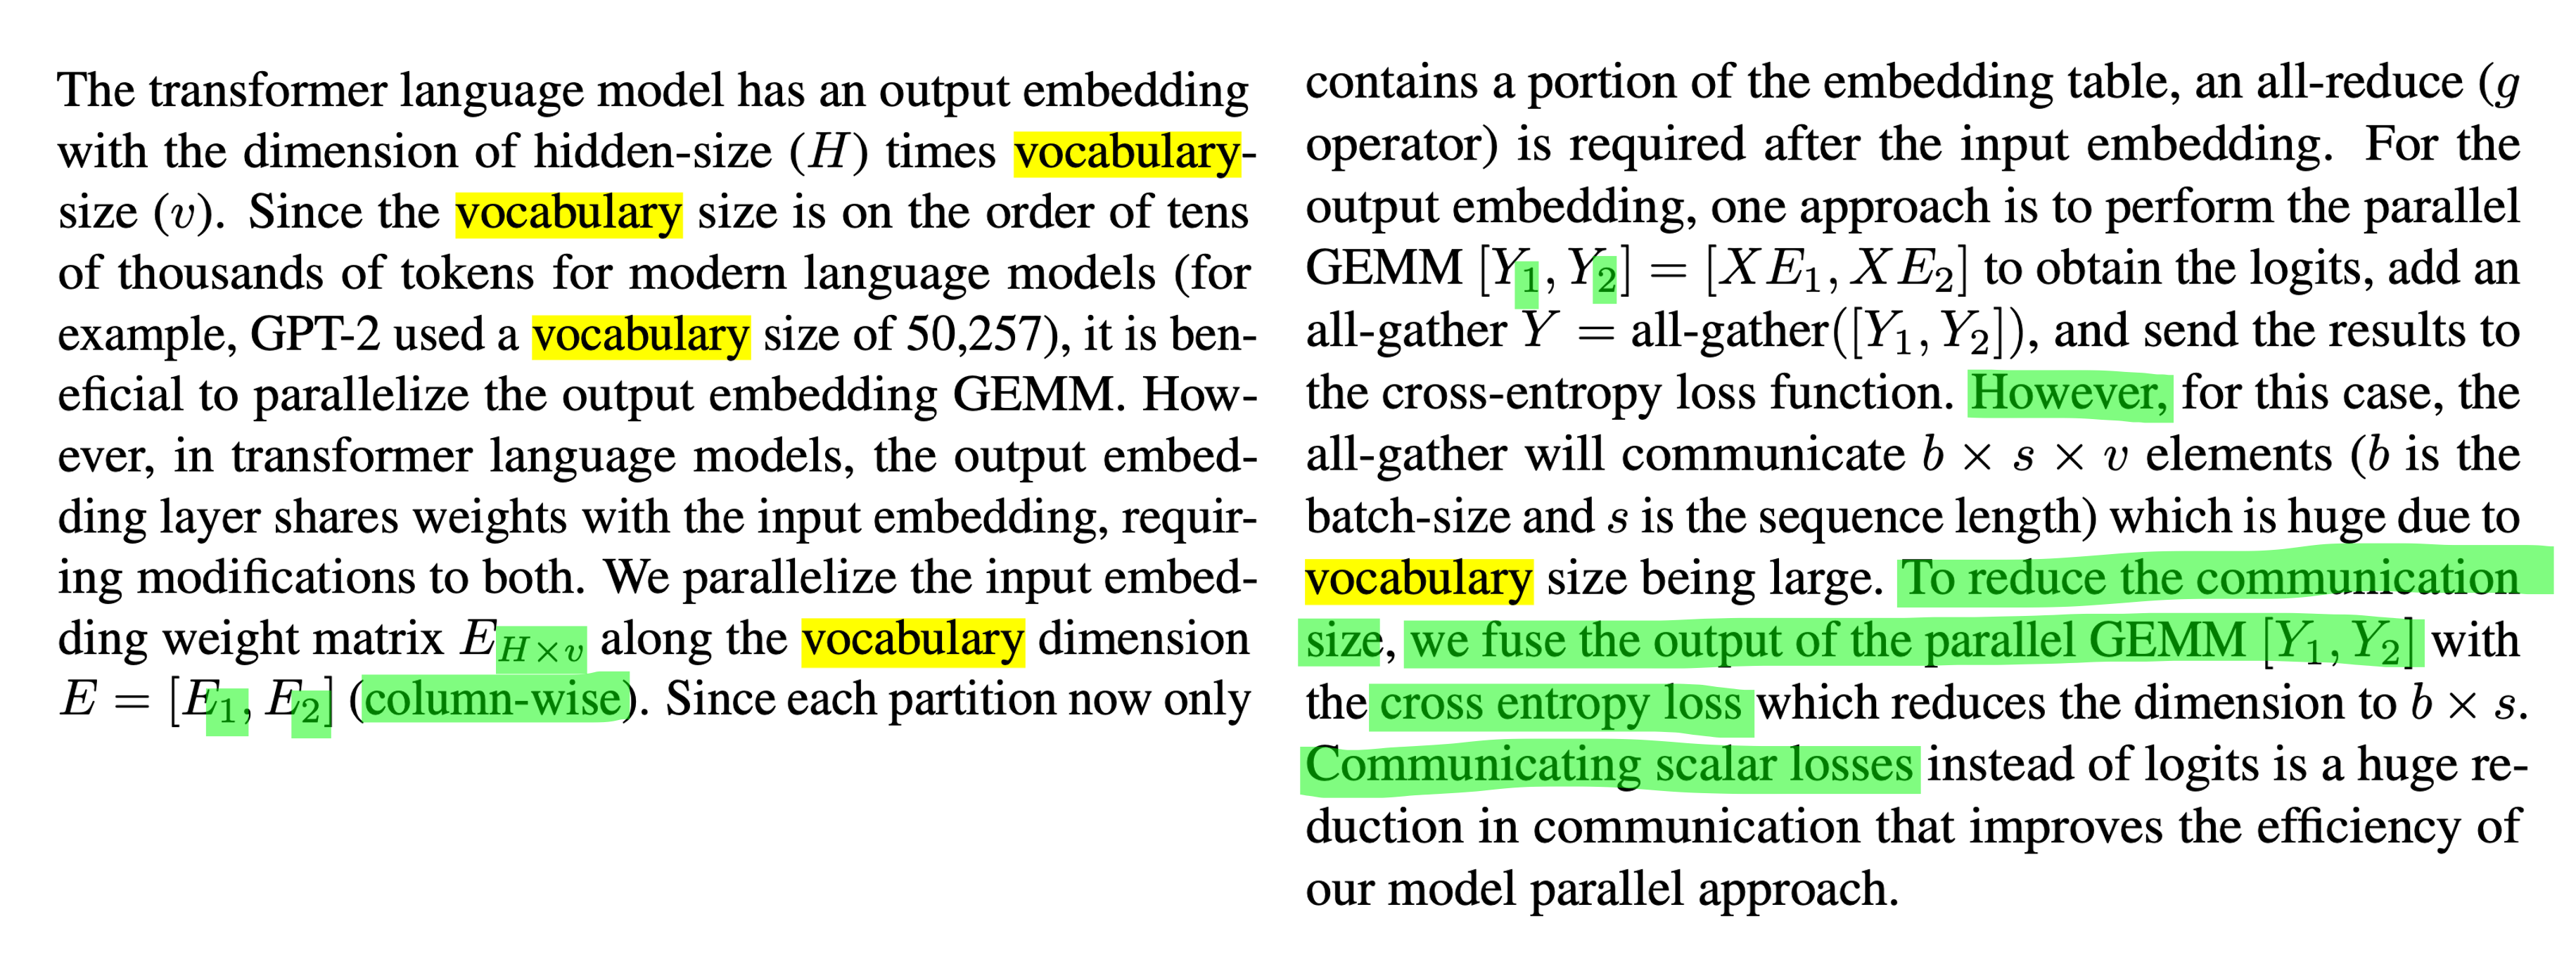
Vocab parallel은 unembedding matrix가 vocab size, V와 hidden dim, H에 대해서 \(W_{unemb} \in \mathbb{R}^{H \times V}\)로 정의될 때, V dimension 차원으로 weight matrix를 자르게 된다. 여기서 구현시 주의해야 할 점이 몇 가지가 있다.
- embedidng, unembedding (lm head) layer가 tie 되어 있기 때문에 unembedding matrix를 colwise로 자르면 자연스럽게 embedding layer는 rowwise가 된다.
- vocab dimension으로 자르기 때문에 softmax시 vocab dimension으로 normalization하기 위해 communication을 해야 한다.
- loss계산 시 특정 device는 특정 vocab index에 대한 weight 정보가 없기에 계산할 수 없다.
이제 이 부분에 유의해서 구현을 해보도록 하자.
parallelize_module에 embedding layer와 lm_head layer를 detect해서 TP를 적용해주는 code를 넣어줘야 하는데,
lm_head의 weight을 colwise로 자르게 하고 GPT-2 model의 compute_loss method를 loss_parallel로 교체하기 전에 먼저 embedding_parallel method에 대해서 알아보도록 하자.
Vocab parallel을 위해서 우리는 GPT-2 model에 현재 device가 가지고 있는 model weight은 vocab dimension으로 slicing된 weight이기 때문에 특정 range의 index 정보만 있을 것이므로,
이를 유념해서 계산하기 위해 vocab_start_index, vocab_end_index를 model에 instance로 추가해주도록 한다.
def parallelize_module(
    args,
    model: nn.Module,
    world_size: int,
    rank: int,
):
    ...
    for name, module in model.named_children():
        ...

        '''
        you should slice embedding weight matrix col-wise (vocab dimension),
        so you need to perform softmax operation across sliced vocab dim.
        and because original megatron paper tie embedding and unembedding matrices, you should care this too.
        '''
        if args.loss_parallel:
            if 'lm_head' in name.lower() or 'wte' in name.lower():
                ## TODO: need vocab padding
                chunk_size = module.weight.size(0)//world_size
                vocab_start_index = chunk_size*rank
                vocab_end_index = chunk_size*(rank+1)

                if 'lm_head' in name.lower():
                    module.weight.data = module.weight.data[vocab_start_index:vocab_end_index, :].contiguous()
                    module.forward = colwise_forward.__get__(module)
                    def loss_parallel(x, y, ignore_index=-100, reduction='mean'):
                        return LossParallel.apply(x, y, vocab_start_index, vocab_end_index, ignore_index, reduction)
                    model.compute_loss = loss_parallel

                elif 'wte' in name.lower():
                    module.vocab_start_index = vocab_start_index
                    module.vocab_end_index = vocab_end_index
                    module.forward = embedding_parallel.__get__(module)
각 device가 sliced weight matrix를 갖고 있기 때문에, 예를 들어 embedding size (vocab size)가 50266이라고 하면 cuda:0 device는 0~25133만 가지고 있을 것이고,
cuda:1은 25133~50266만 가지고 있게 된다 (그런데 device 1도 index는 0부터 시작한다는 점에 주의하자).
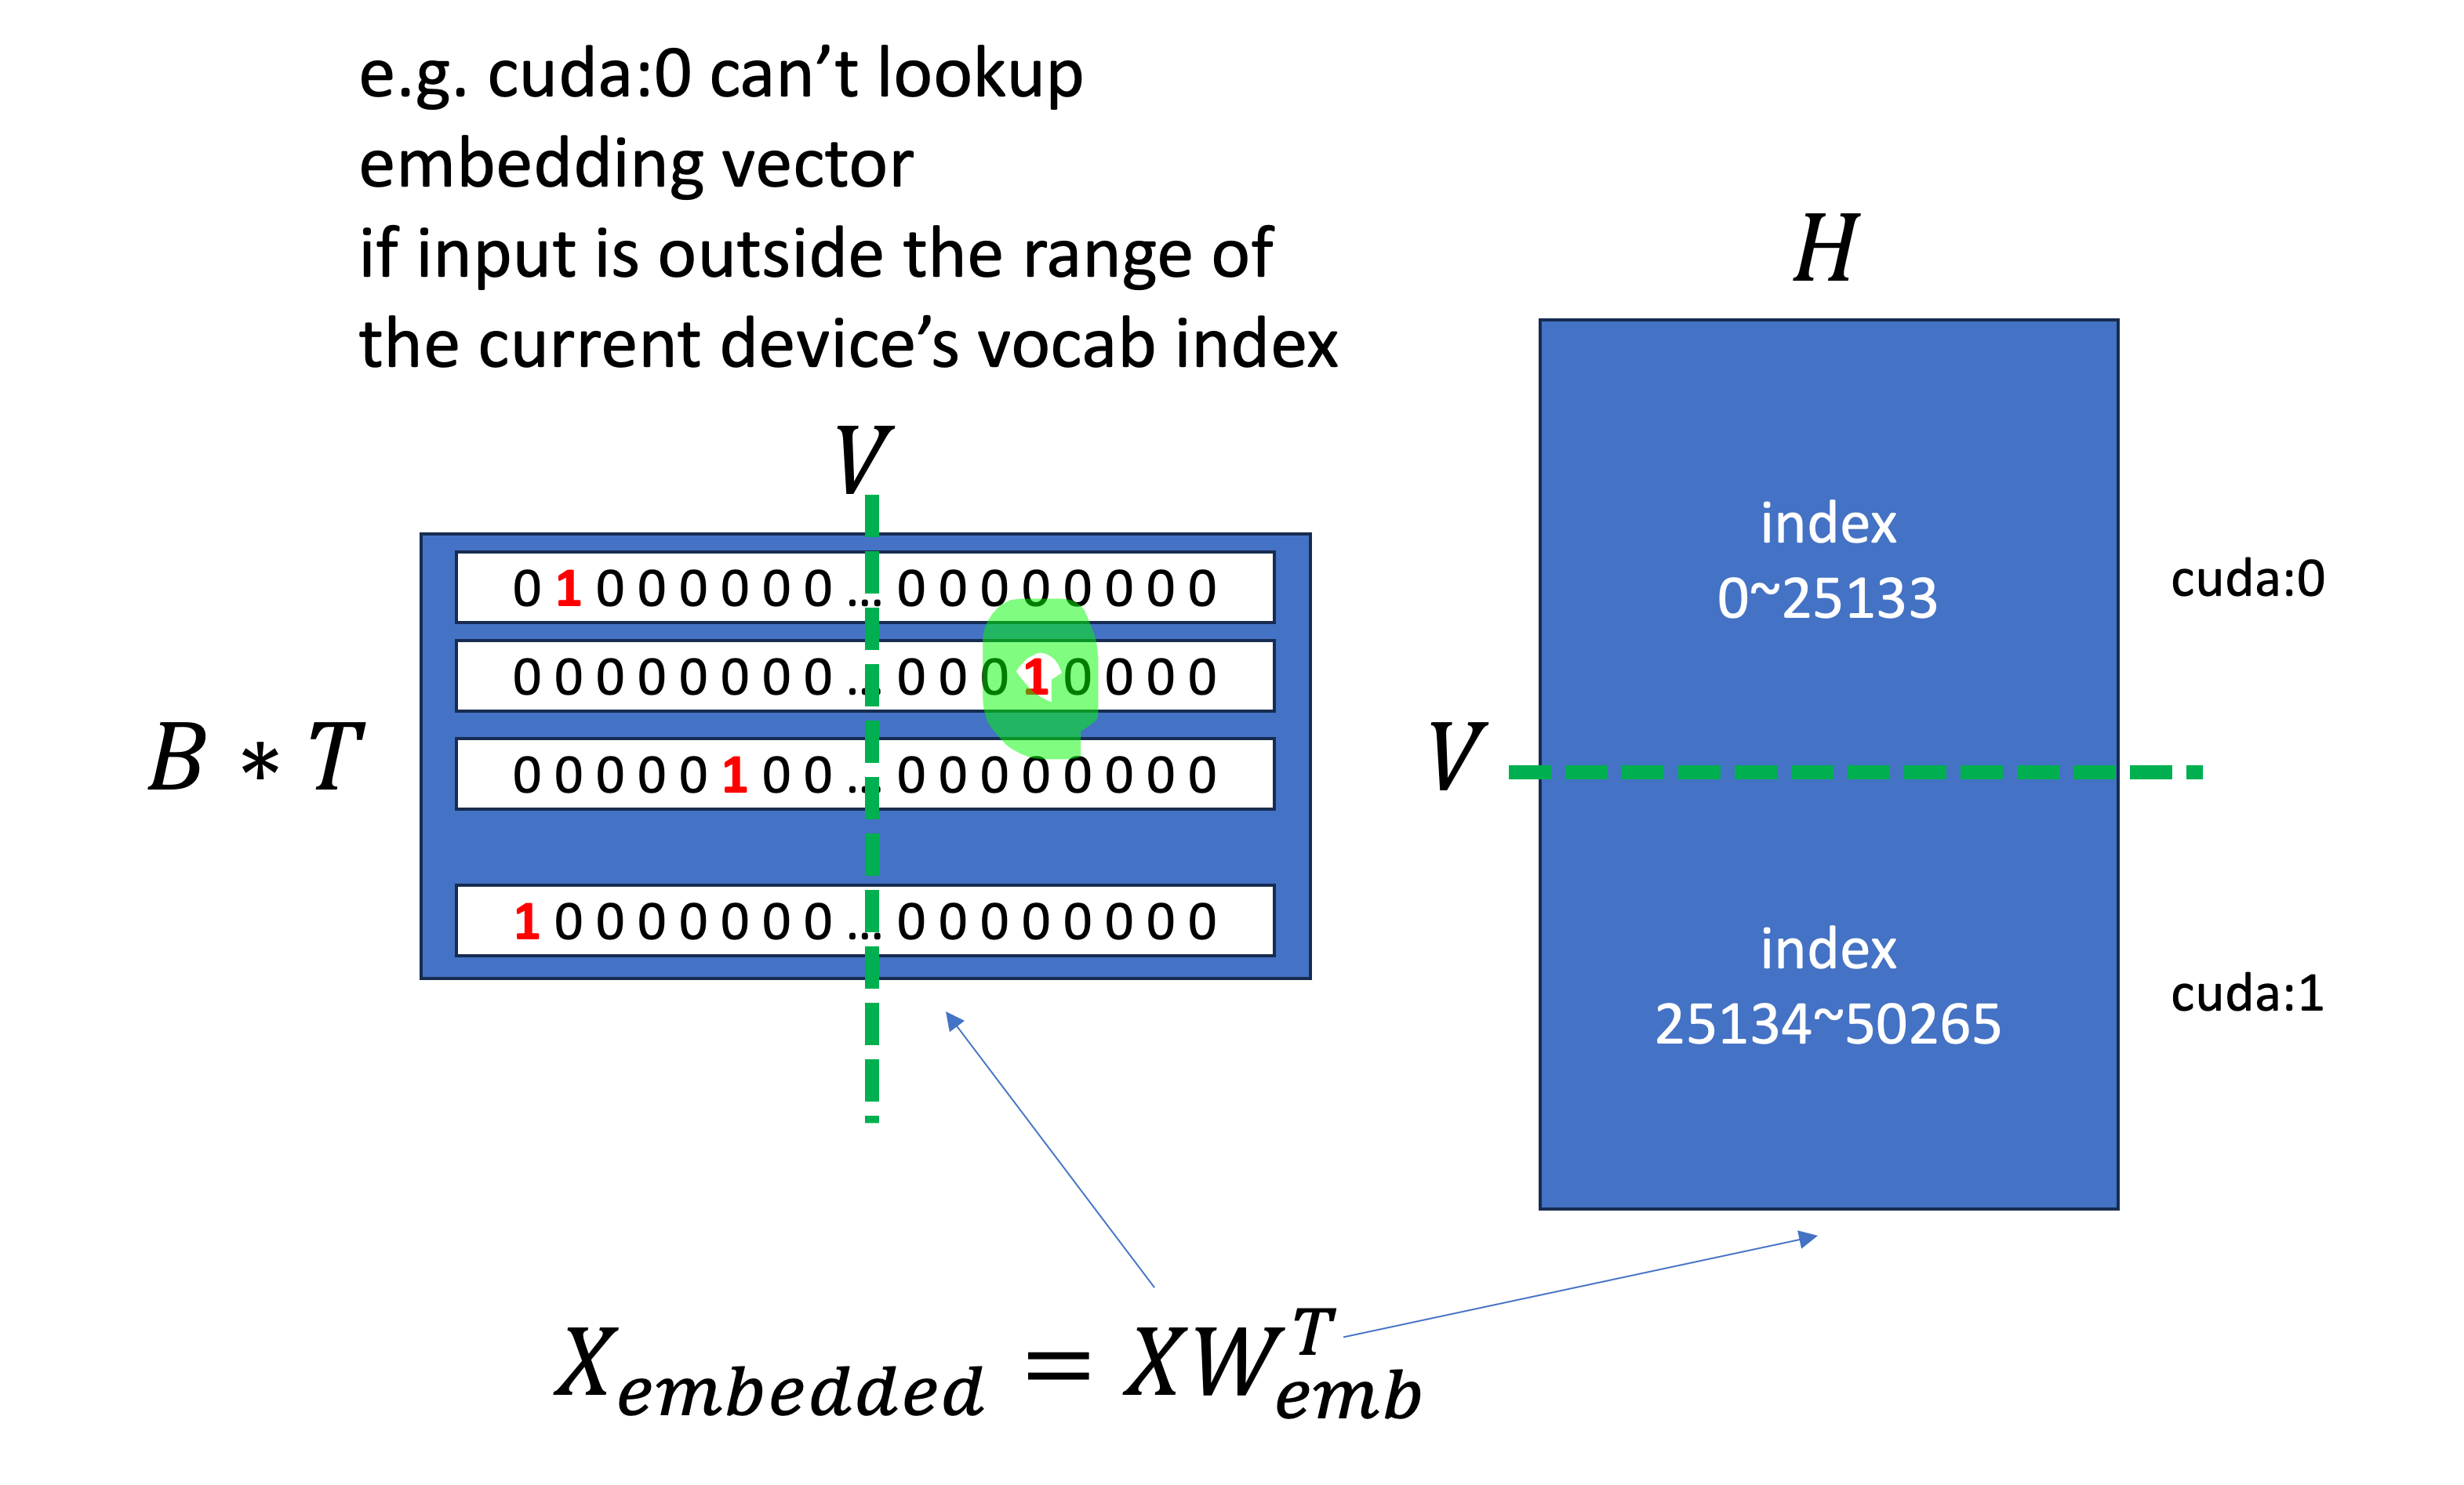
그러므로 우리는 먼저 input x를 받아 각 device가 가지고 있는 range로 x의 index를 옮겨주는 작업을 할 것인데, 먼저 현재 device의 vocab index를 벗어나는 token은 추후 masking해주기 위해서 boolean mask를 생성해준다. 그리고 현재 device의 vocab offset인 vocab_start_index를 빼주고 mask가 돼야하는부분은 0을 처리해준다. 이렇게하면 현재 device가 가지고 있는 embedding matrix는 device순서를 불문하고 0~25133의 vector만 가지고 있기 때문에 out of index error는 피할 수 있게 된다. 하지만 문제는 mask된 token이 0 index로 mapping됐기 때문에 실제로는 0 index가 아닌데도 그 embedding vector를 사용하는 것 처럼 된다. 당연히 이는 잘못됐으므로 mask됐어야 하는 부분은 F.embedding을 무사히 통과한 뒤 0 vector로 masking해준다.
def get_mask_and_masked_input(x, vocab_start_index, vocab_end_index):
    x_mask = (x < vocab_start_index) | (x >= vocab_end_index)
    x = x.clone() - vocab_start_index
    x[x_mask] = 0
    return x, x_mask

def embedding_parallel(self, x):
    x, x_mask = get_mask_and_masked_input(x, self.vocab_start_index, self.vocab_end_index)
    x = F.embedding(x, self.weight)
    x.masked_fill_(x_mask.unsqueeze(-1), 0.0)
    return g.apply(x) # because readout layer is col-wise, embedding layer is row-wise
unembedding 입장에서 weight을 colwise parallel했으므로 embedding layer입장에서는 rowwise라고 했기 때문에, 우리는 forward시 all-reduce를 하는 g function을 마지막에 적용해주면, 모든 device가 부분적으로 계산한 embedding vector를 all-reduce해서 완성된 embedding을 self attention으로 전해줄 수 있게 된다.
이제 unembedding 부분을 보자. 이는 torch.autograd.Function로 구현했는데, gradient를 계산하는 backward 까지 정교하게 구현해줘야 하기 때문에 그렇다 (pytorch에 integration하기 위해서는 distributed training 가 됐든 triton kernel가 됐든 대부분 autograd engine을 상속받아 사용한다).
class LossParallel(torch.autograd.Function):
    def forward(ctx, z, y, vocab_start_index, vocab_end_index, ignore_index=-100, reduction='mean'):

        # communicate max logit value for numerical stability
        z_max = LossParallel_.get_logit_max(z) # B*T, C
        dist.all_reduce(z_max, op=dist.ReduceOp.MAX) # max

        # get numerical stable exponentiated vectors
        z, exp_z, sum_exp_z = LossParallel_.get_exp(z, z_max)
        dist.all_reduce(sum_exp_z, op=dist.ReduceOp.SUM)

        # compute loss and reduce all
        y_one_hot, y_mask = LossParallel_.get_one_hot(y, z, vocab_start_index, vocab_end_index)
        loss, divisor = LossParallel_.get_nll_loss(z, y, exp_z, sum_exp_z, y_one_hot, y_mask, ignore_index, reduction)
        dist.all_reduce(loss, op=dist.ReduceOp.SUM) # mean and sum loss

        # store results for backward
        ctx.save_for_backward(exp_z.div_(sum_exp_z), y_one_hot, divisor)
        return loss

    def backward(ctx, grad_output):
        y_hat, y_one_hot, divisor = ctx.saved_tensors
        dz = y_hat - y_one_hot # logit gradient
        dz /= divisor # dL/dLogit
        dz *= grad_output # 1.0 because it's end
        return dz, None, None, None, None, None # No gradients needed for y, ignore_index, or reduction parameters
LossParallel module은 아래의 흐름으로 구현됐다.
- vocab dimension 으로 projection하여 부분적인 logit을 얻은 뒤 numerical softmax softmax 계산을 위해
logit의 max값을 계산한다. - logit의 max값을 communication을 한다 (dist.all_reduce의 MAX operation을 사용해야함)
- numerical stable softmax를 계산하기 위해 각 logit, z의 element값을 comm으로 얻은 z_max로 뺀다.
- 각 element를 exponentiate 한다.
- sum of exponential values를 계산하고 마찬가지로 device별로 통신하여 전체 vocab dimension에 대한
sum of exponential를 얻는다. (즉 softmax의 분모) - embedding layer에서 처럼 target label (long tensor)를 one hot vector로 만드는데 이 과정에서 device가 가지고 있는 index를 벗어나지 않도록 처리를 해준다.
Log Sum Exponential (LSE)을 통해 loss를 계산한다.- backward를 위해 autograd context에 tensor들을 저장하고 softmax + Cross Entropy (CE) Loss의 backward를 구현해준다.
여기서 numerical stable softmax에 대해 얘기하자면,
보통 softmax 계산을 위해 channel dim의 모든 element를 exponentiate하는 과정에서 underflow나 overflow가 나는 것을 방지하기 위해 softmax dim의 가장 큰 value (max value)를 계산해서 빼주는데,
이렇게 해도 normalized vector 결과물은 차이가 없다.
그런데 이렇게 하기 위해서는 TP가 embedding matrix를 vocab dim으로 잘라버렸기 때문에 communication을 해야 한다는 점에 주의해야 한다.
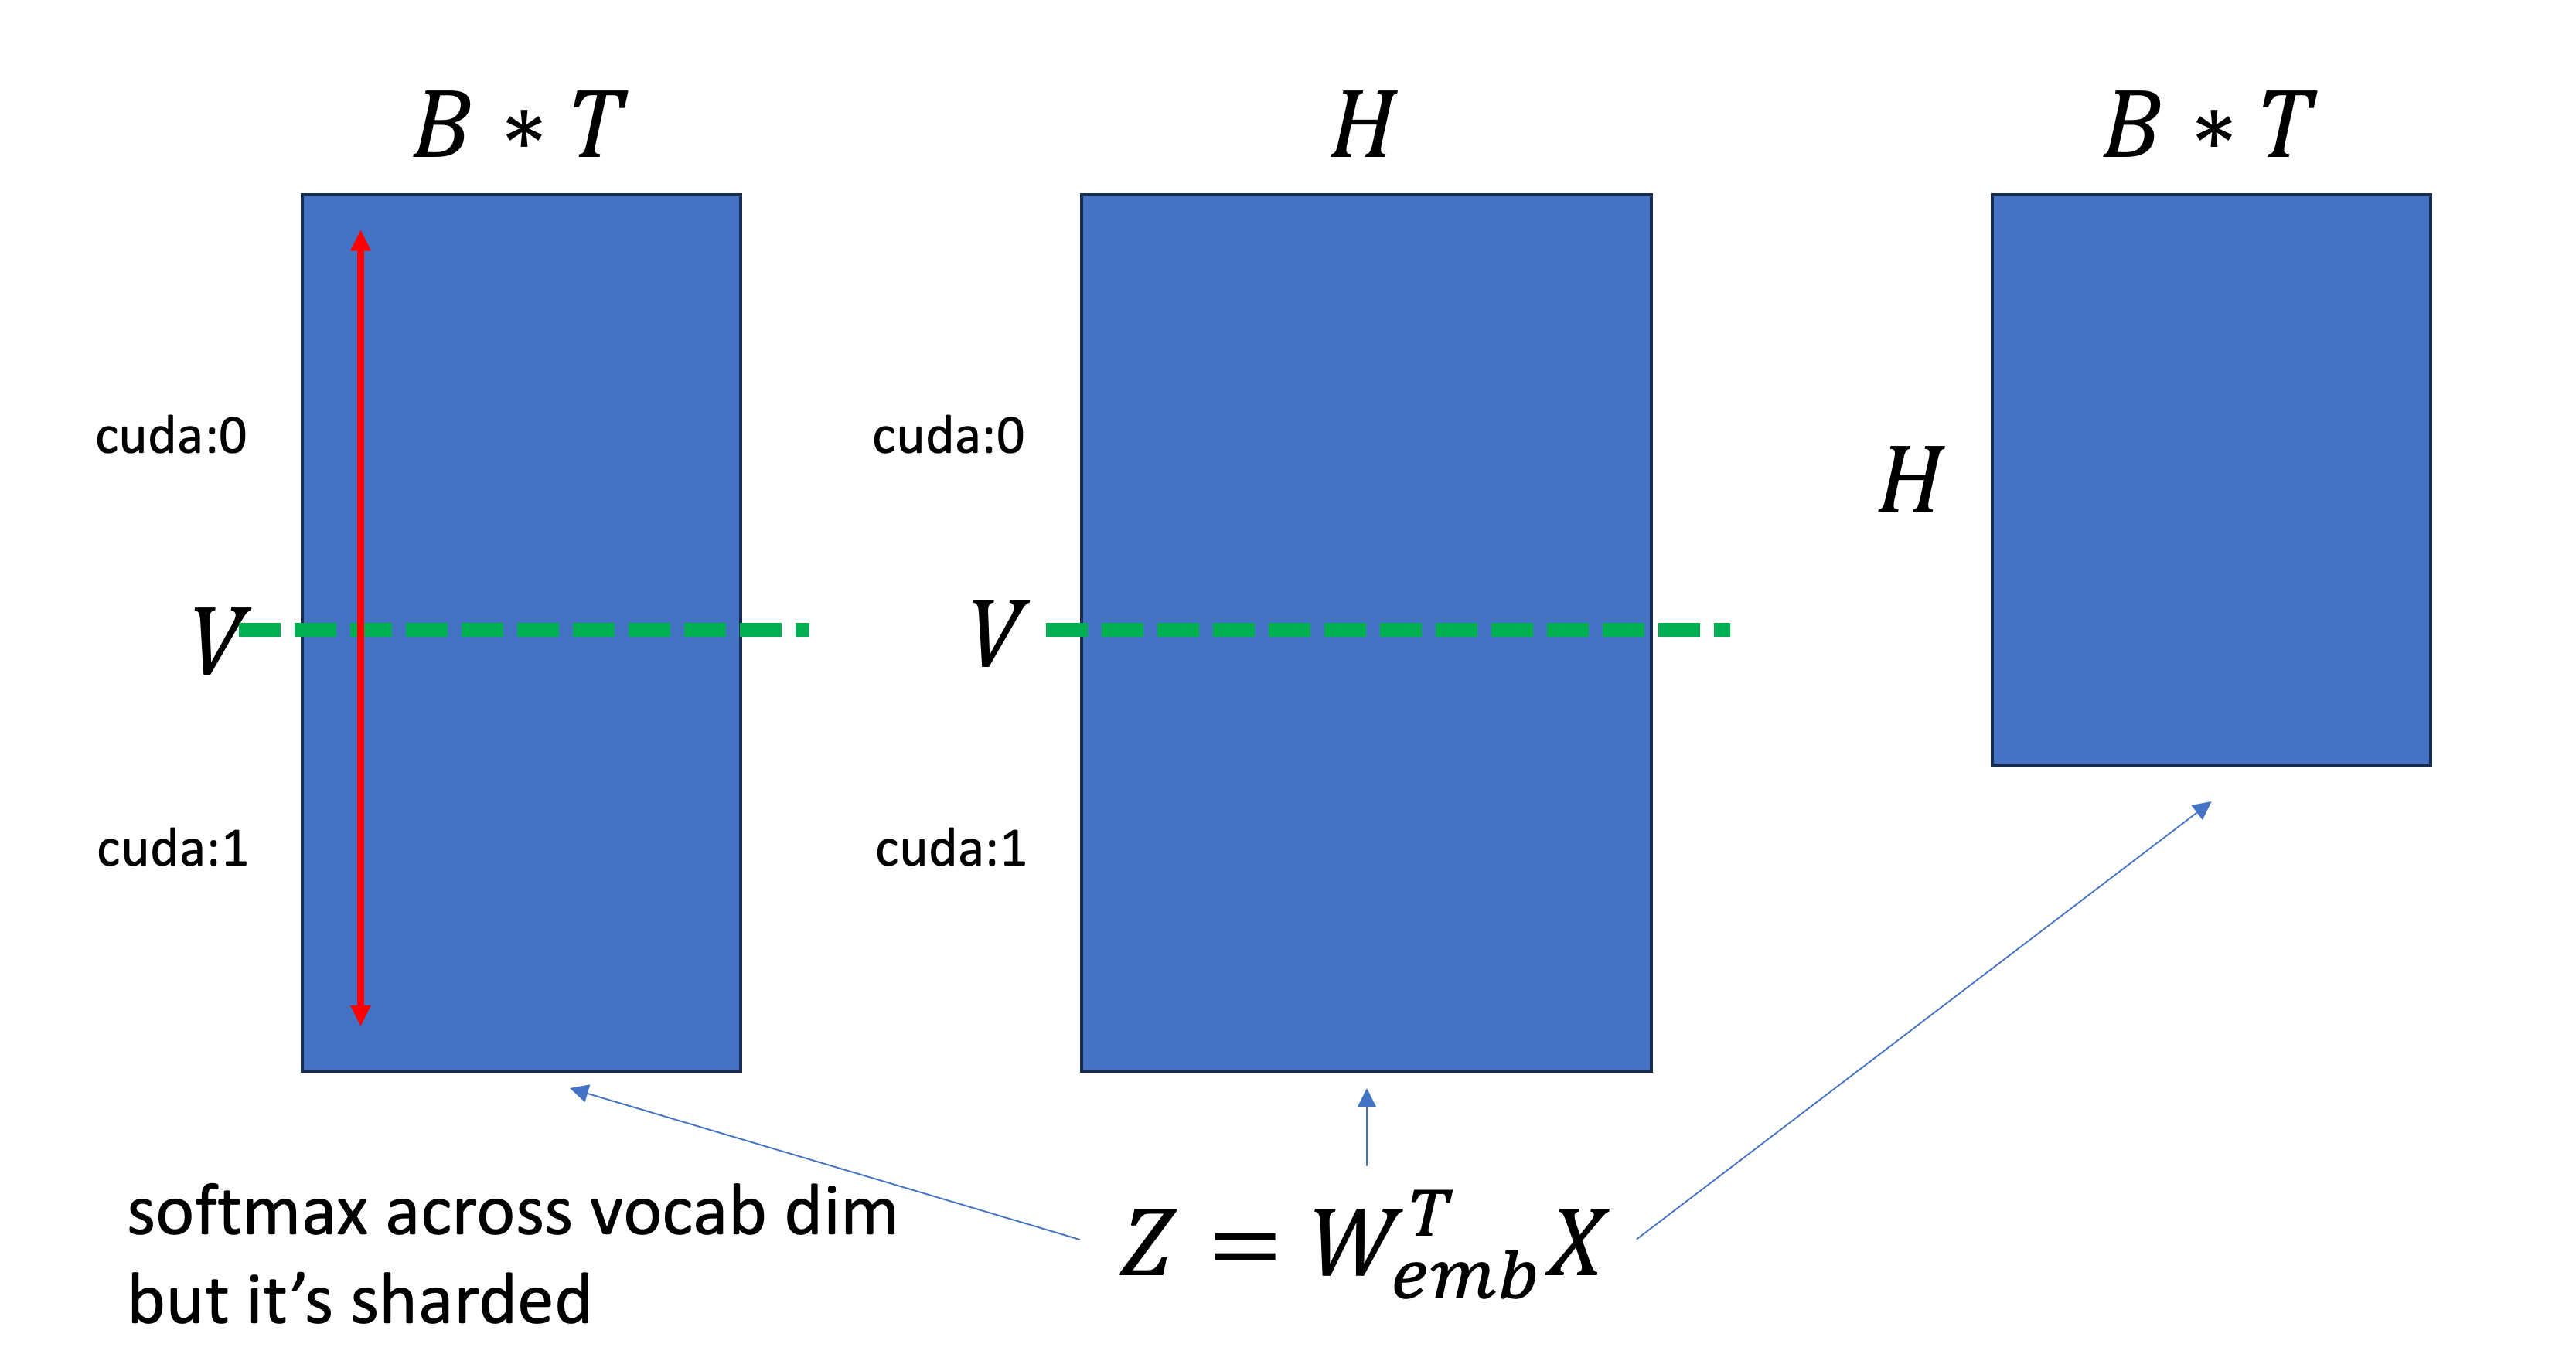
logit max와 이를 이용한 softmax의 분모 분자를 계산하는 것은 아래 LossParallel_를 정의하여 사용하도록 했다.
loss를 계산하는 부분은 먼저 target label, \([1, 34422, 20511, 0]\)같은 Long tensor를 one hot vector로 먼저 만들어줘야 하는데,
이는 앞서 embedding layer에서 했던 것 처럼 각 device가 vocab matrix의 일부분만 갖고 있기 때문에 out of index error가 나지 않도록 하는 일을 해준다.
class LossParallel_:
    def get_logit_max(z):
        return torch.max(z.float(), dim=-1)[0]

    def get_exp(z, z_max):
        z -= z_max.unsqueeze(dim=-1)
        exp = torch.exp(z) # B*T, C
        sum_exp = torch.sum(exp, dim=-1, keepdim=True) # B*T, 1
        return z, exp, sum_exp

    def get_one_hot(y, z, vocab_start_index, vocab_end_index):
        y, y_mask = get_mask_and_masked_input(y, vocab_start_index, vocab_end_index)
        y = F.one_hot(y, num_classes=z.size(1))
        y.masked_fill_(y_mask.unsqueeze(-1), 0.0)
        return y, y_mask

    def get_nll_loss(z, y, exp, sum_exp, y_one_hot, y_mask, ignore_index, reduction):
        # compute loss using log sum exponential trick # https://gregorygundersen.com/blog/2020/02/09/log-sum-exp/
        log_sum_exp = torch.log(sum_exp) # normalizer
        log_sum_exp.masked_fill_(y_mask.unsqueeze(-1), 0.0)
        gt_z = torch.sum(z * y_one_hot, dim=1)

        # Compute the loss
        divisor = 1 if reduction == 'sum' else (y!=ignore_index).sum()
        loss = (log_sum_exp.squeeze(1) - gt_z) / divisor
        loss = torch.where(y == ignore_index, torch.tensor(0.0, device=z.device), loss) # token-level loss
        loss = loss.sum()
        return loss, divisor
이제 get_nll_loss method를 사용해 loss를 계산하면 되는데,
Log Sum Exponential (LSE)를 사용해서 Cross Entropy (CE) Loss를 계산했으며,
이것도 over- or under- flow를 막기 위한 numerical stable trick이다.
여기서 주의할 점이 있는데, 두 개의 GPU device 0, 1에 대해서, LSE를 계산하고 ground truth z를 빼는 것은 ground truth label이 있는 device에서만 해줘야 한다는 점이다. 내가 했던 실수는 해당 vocab index가 없는 device에서는 ground truth z값이 0.0이 되도록 처리를 해주긴 했지만 loss를 계산할 때 LSE가 device갯수만큼 더해져서 loss가 이상하게 나왔었다. 이에 주의해주고나면 마지막으로 divisor를 계산하면 되는데, 이는 loss reduction이 mean이면 padding token (ignore index)을 제외한 token 갯수를 의미하고 sum이면 1로 두고 all reduce로 다 더한 loss를 나눠주면 되고, ignore index인 label에 대해서는 loss를 더할 필요가 없기 때문에 해당 부분은 0.0으로 masking하고 loss를 더해줘야 한다는 점에 주의하자.
마지막으로 backward는 아래처럼 구현해주면 되는데, autograd의 경우 forward시 context에 tensor들을 저장해 backward시 꺼내쓸 수 있다. Softmax + CE loss를 한 경우 Loss에 대한 logit의 미분 값은 아래와 같기 때문에 우리는 target one hot vector, \(y\)와 softmax normalized vector, \(\hat{y}\), 그리고 divisor를 전달해주면 된다.
\[\frac{\partial L}{\partial Z} = \hat{y} - y\]class LossParallel(torch.autograd.Function):
def forward(ctx, z, y, vocab_start_index, vocab_end_index, ignore_index=-100, reduction='mean'):
...
# store results for backward
ctx.save_for_backward(exp_z.div_(sum_exp_z), y_one_hot, divisor)
return loss
def backward(ctx, grad_output):
y_hat, y_one_hot, divisor = ctx.saved_tensors
dz = y_hat - y_one_hot # logit gradient
dz /= divisor # dL/dLogit
dz *= grad_output # 1.0 because it's end
return dz, None, None, None, None, None # No gradients needed for y, ignore_index, or reduction parameters
여기서 divisor로 나눠주는 것도 잊으면 안되는데, 왜냐하면 loss와 마찬가지로 reduction이 mean일 경우 token별로 계산한 gradient를 mean (average) 해줘야 하기 때문이다. 또 하나 주의할 점이 있다면, ignore index에 해당하는 one hot vector는 code를 보면 0으로 만들어버렸기 때문에 gradient가 발생하지 않는다는 것이다.
이제 마지막으로 dummy input을 생성하여 결과를 비교해보려고 하는데, 필자는 padding token이 있을 경우 ignore index에 따라 loss계산을 잘 했는지? batch dimension, sequence length가 클 때 vocab parallel (loss parallel)이 얼마나 memory save를 해주는지 궁금하기 떄문에 충분히 큰 random tensor를 만들어 feeding했다.
def get_dummy_input(
    vocab_size,
    device,
    batch_size=256,
    seq_len=1024,
):
    num_pad_tokens = seq_len//10
    input_ids = torch.randint(vocab_size, (batch_size, seq_len))
    labels = torch.cat((input_ids[:, 1:seq_len-num_pad_tokens], torch.full((batch_size, num_pad_tokens), -100)),1)
    return {
        'input_ids': input_ids.to(device),
        'labels': labels.to(device),
    }

def main(args):
    ...
    if args.batch_size and args.seq_len:
        input_ids = get_dummy_input(vocab_size-1, device, args.batch_size, args.seq_len)
    ...

    with ContextManagers(context) as p:
        for iter in range(num_iter):
            loss, z = model(input_ids['input_ids'], input_ids['labels'])
            z.retain_grad()
            loss.backward()

            message = f'''
            iter: {iter+1}
            input size: {input_ids['input_ids'].size()}
            num padding toekns: {(input_ids['labels'] == -100).sum()}
            loss: {loss}
            '''
            # message += f'''
            # z.grad: {z.grad}
            # '''

            optimizer.step()
            optimizer.zero_grad()

            print_message_with_master_process(rank, message)
            if args.use_torch_profiler:
                p.step()
아래는 먼저 (B, T = 2, 64)이며 전체의 10%가 ignore index로 padding된 1 GPU baseline의 경우이다.
export MASTER_ADDR=node0 &&\
export MASTER_PORT=23458 &&\
torchrun --nproc_per_node=1 --master_addr=$MASTER_ADDR --master_port=$MASTER_PORT \
1_transformer_tensor_parallel.py --batch_size 2 --seq_len 64
        iter: 1
        input size: torch.Size([2, 64])
        num padding toekns: 12
        loss: 11.14531421661377


        iter: 2
        input size: torch.Size([2, 64])
        num padding toekns: 12
        loss: 7.8605475425720215


        iter: 3
        input size: torch.Size([2, 64])
        num padding toekns: 12
        loss: 6.055154800415039


        iter: 4
        input size: torch.Size([2, 64])
        num padding toekns: 12
        loss: 4.597280502319336


        iter: 5
        input size: torch.Size([2, 64])
        num padding toekns: 12
        loss: 3.266993761062622
그 다음은 1 GPU baseline인데 loss parallel을 킨 경우이다. 이는 manually 작성한 softmax + CE loss module이 잘 작동하는지 확인하기 위함이다.
export MASTER_ADDR=node0 &&\
export MASTER_PORT=23458 &&\
torchrun --nproc_per_node=1 --master_addr=$MASTER_ADDR --master_port=$MASTER_PORT \
1_transformer_tensor_parallel.py --batch_size 2 --seq_len 64 --loss_parallel
        iter: 1
        input size: torch.Size([2, 64])
        num padding toekns: 12
        loss: 11.145313262939453


        iter: 2
        input size: torch.Size([2, 64])
        num padding toekns: 12
        loss: 7.860340595245361


        iter: 3
        input size: torch.Size([2, 64])
        num padding toekns: 12
        loss: 6.054848670959473


        iter: 4
        input size: torch.Size([2, 64])
        num padding toekns: 12
        loss: 4.597006320953369


        iter: 5
        input size: torch.Size([2, 64])
        num padding toekns: 12
        loss: 3.2667441368103027
마지막으로 2 GPU TP를 한 경우이다.
export LOCAL_RANK=1 &&\
export WORLD_SIZE=2 &&\
export MASTER_ADDR=node0 &&\
export MASTER_PORT=23458 &&\
torchrun --nproc_per_node=$WORLD_SIZE --master_addr=$MASTER_ADDR --master_port=$MASTER_PORT \
1_transformer_tensor_parallel.py --batch_size 2 --seq_len 64 --loss_parallel --TP
        iter: 1
        input size: torch.Size([2, 64])
        num padding toekns: 12
        loss: 11.145294189453125


        iter: 2
        input size: torch.Size([2, 64])
        num padding toekns: 12
        loss: 7.860313415527344


        iter: 3
        input size: torch.Size([2, 64])
        num padding toekns: 12
        loss: 6.0548553466796875


        iter: 4
        input size: torch.Size([2, 64])
        num padding toekns: 12
        loss: 4.596996307373047


        iter: 5
        input size: torch.Size([2, 64])
        num padding toekns: 12
        loss: 3.2667508125305176
세 경우 모두 loss가 거의 동일한 것을 확인할 수 있었고, 마지막으로 torch profiler를 사용해 비교해본 memory view는 아래와 같다.
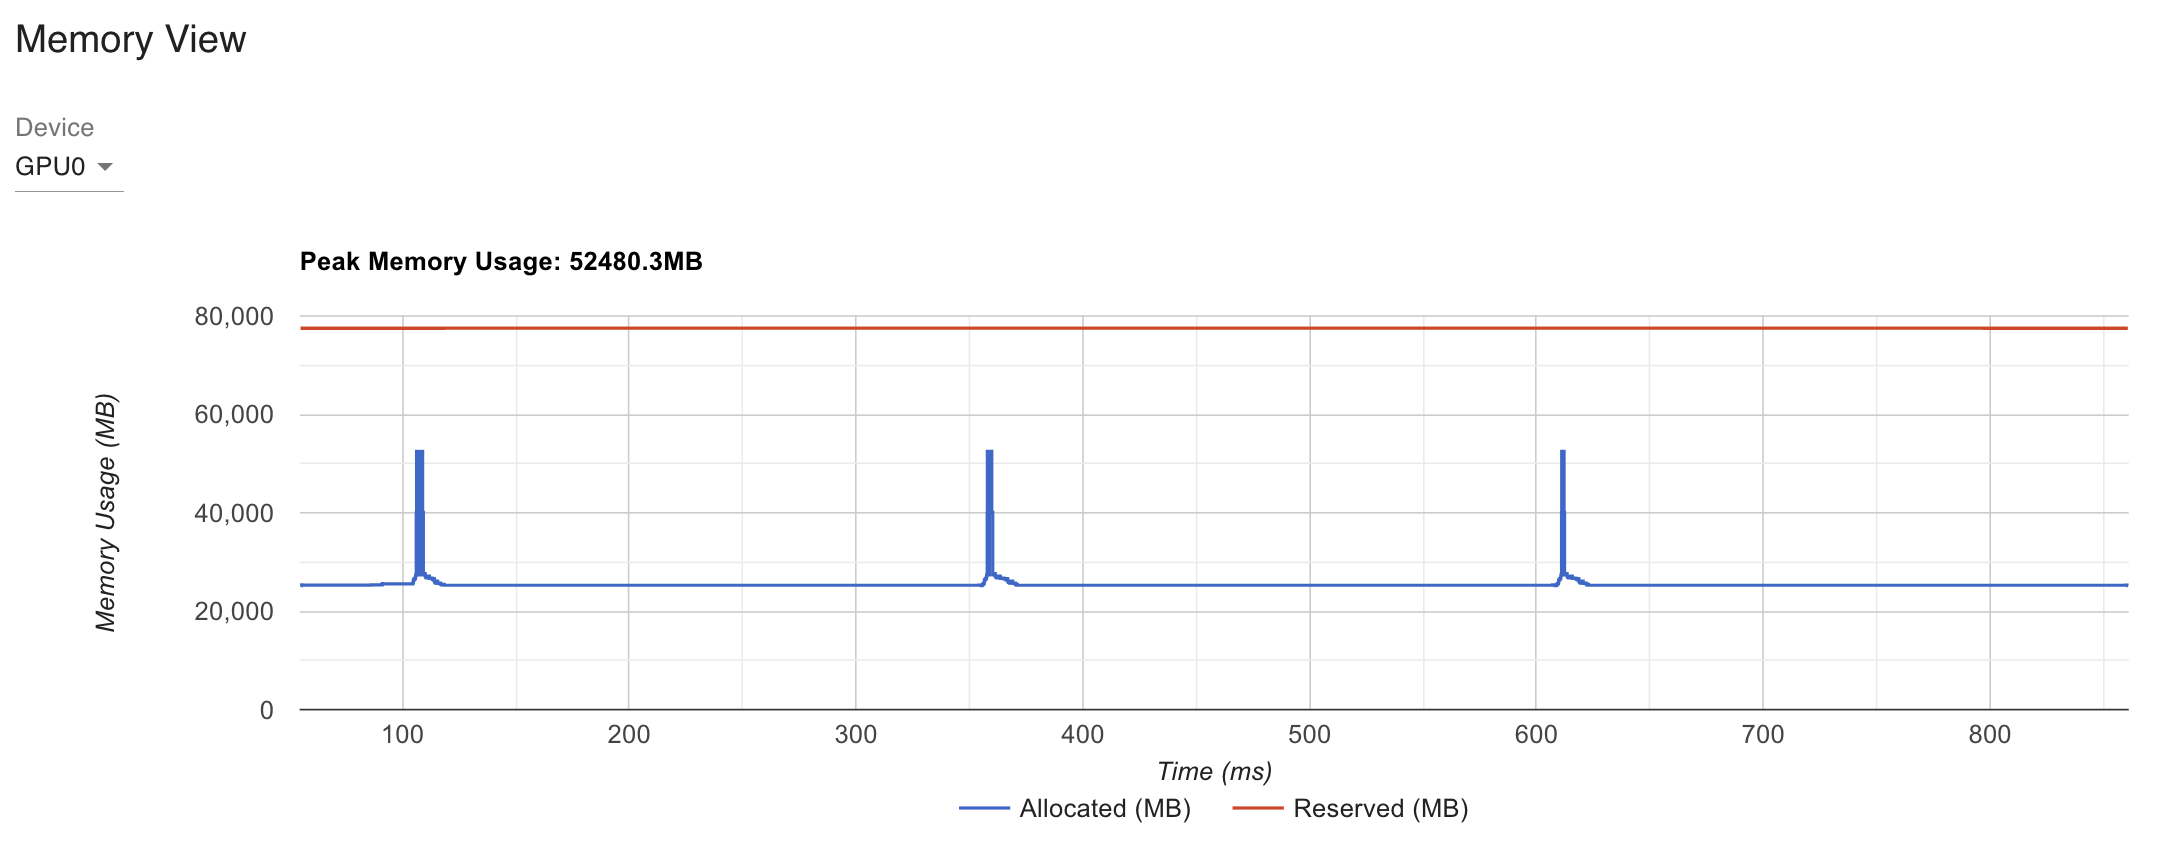
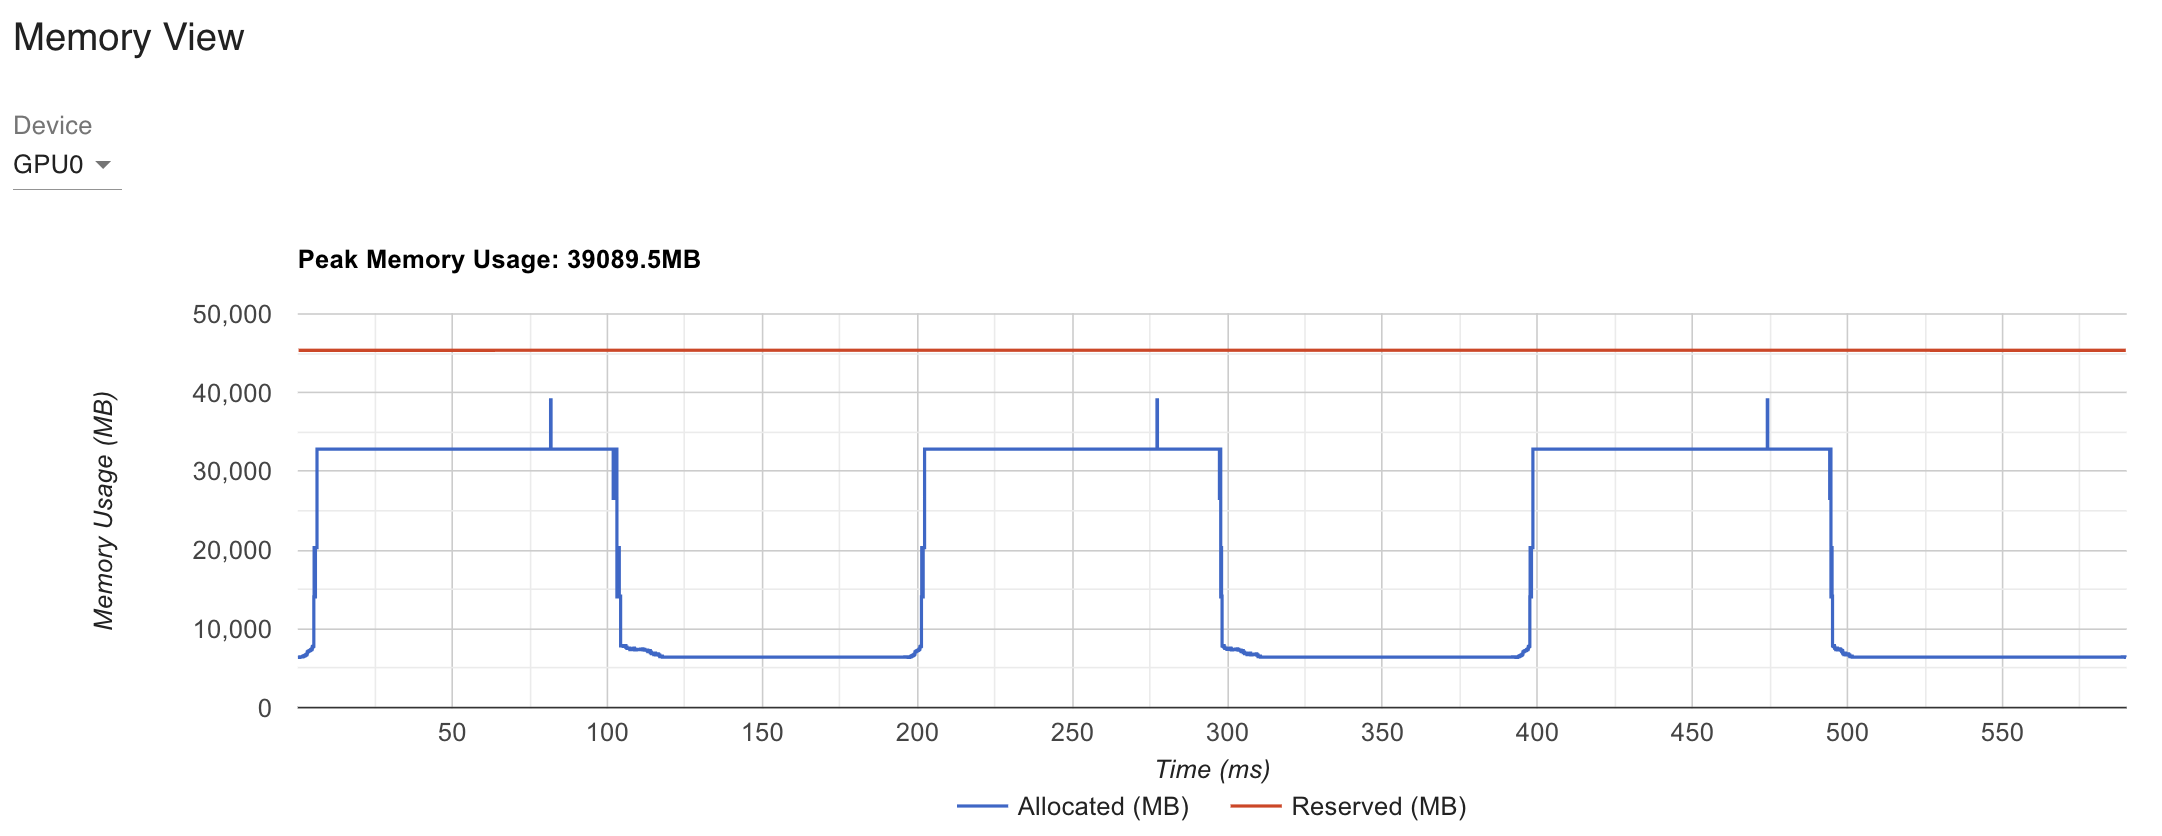
memory가 많이 줄어든 것을 확인할 수 있다.
마지막으로 vocab parallel은 요즘 여기저기에 key feature로 추가되고 있는 fused CE loss kernel과도 관련이 깊으니 한 번 읽어보기를 추천한다.