Tutorial on PyTorch Hook
10 Mar 2023< 목차 >
Motivation
대다수의 Machine Learning (ML) Researcher가 사용하는 Pytorch framwork에는 hook이라는 기능이 있다.
정확히는 hook이라는 것을 nn.module에 등록 (register)할 수 있는 것이다.
Hook은 예를 들어 nn.Linear에 걸 수 있는데,
예를 들어서 forward_hook, backward_hook같은 것이 있고 이를 nn.Linear에 등록하게 되면 linear layer의 forward가 끝나고 내가 의도한 동작을 수행하게 되며 backward는 당연하게도 backward시에 수행하게 된다.
그런데 Hook은 언제? 그리고 왜 필요할까?
Neural Network (NN) training을 적당히 오래 하다보면 model의 layer별 activation의 distribution이나 (l2 norm은 어떤지, max, mean, min 값은 어떤지) gradient 등을 모니터링, 분석하면서 model behavior에 대해 알고싶은 순간들이 있다.
바로 이 때 필요한 것이 Hook이다.
Gradient의 경우 "backward 끝나고 parameter들에서 gradient뽑으면 되는데 왜 hook을 걸어야함?"이라는 생각이 들 수 있지만,
## after backward
grads = []
for n, p in model.parameters():
    if p.requires_grad:
        grads.append(p.grad)
torch의 고급 feature 중 Fully Shared Data Parallel (FSDP)같은걸 구현하려면 hook이 필수적이다. 이는 Microsoft의 Zero Redundancy Optimizer (ZeRO)와 같은 것으로 Data Parallel (DP)시 redundant를 줄여 VRAM memory를 절약하는 기술을 말한다.
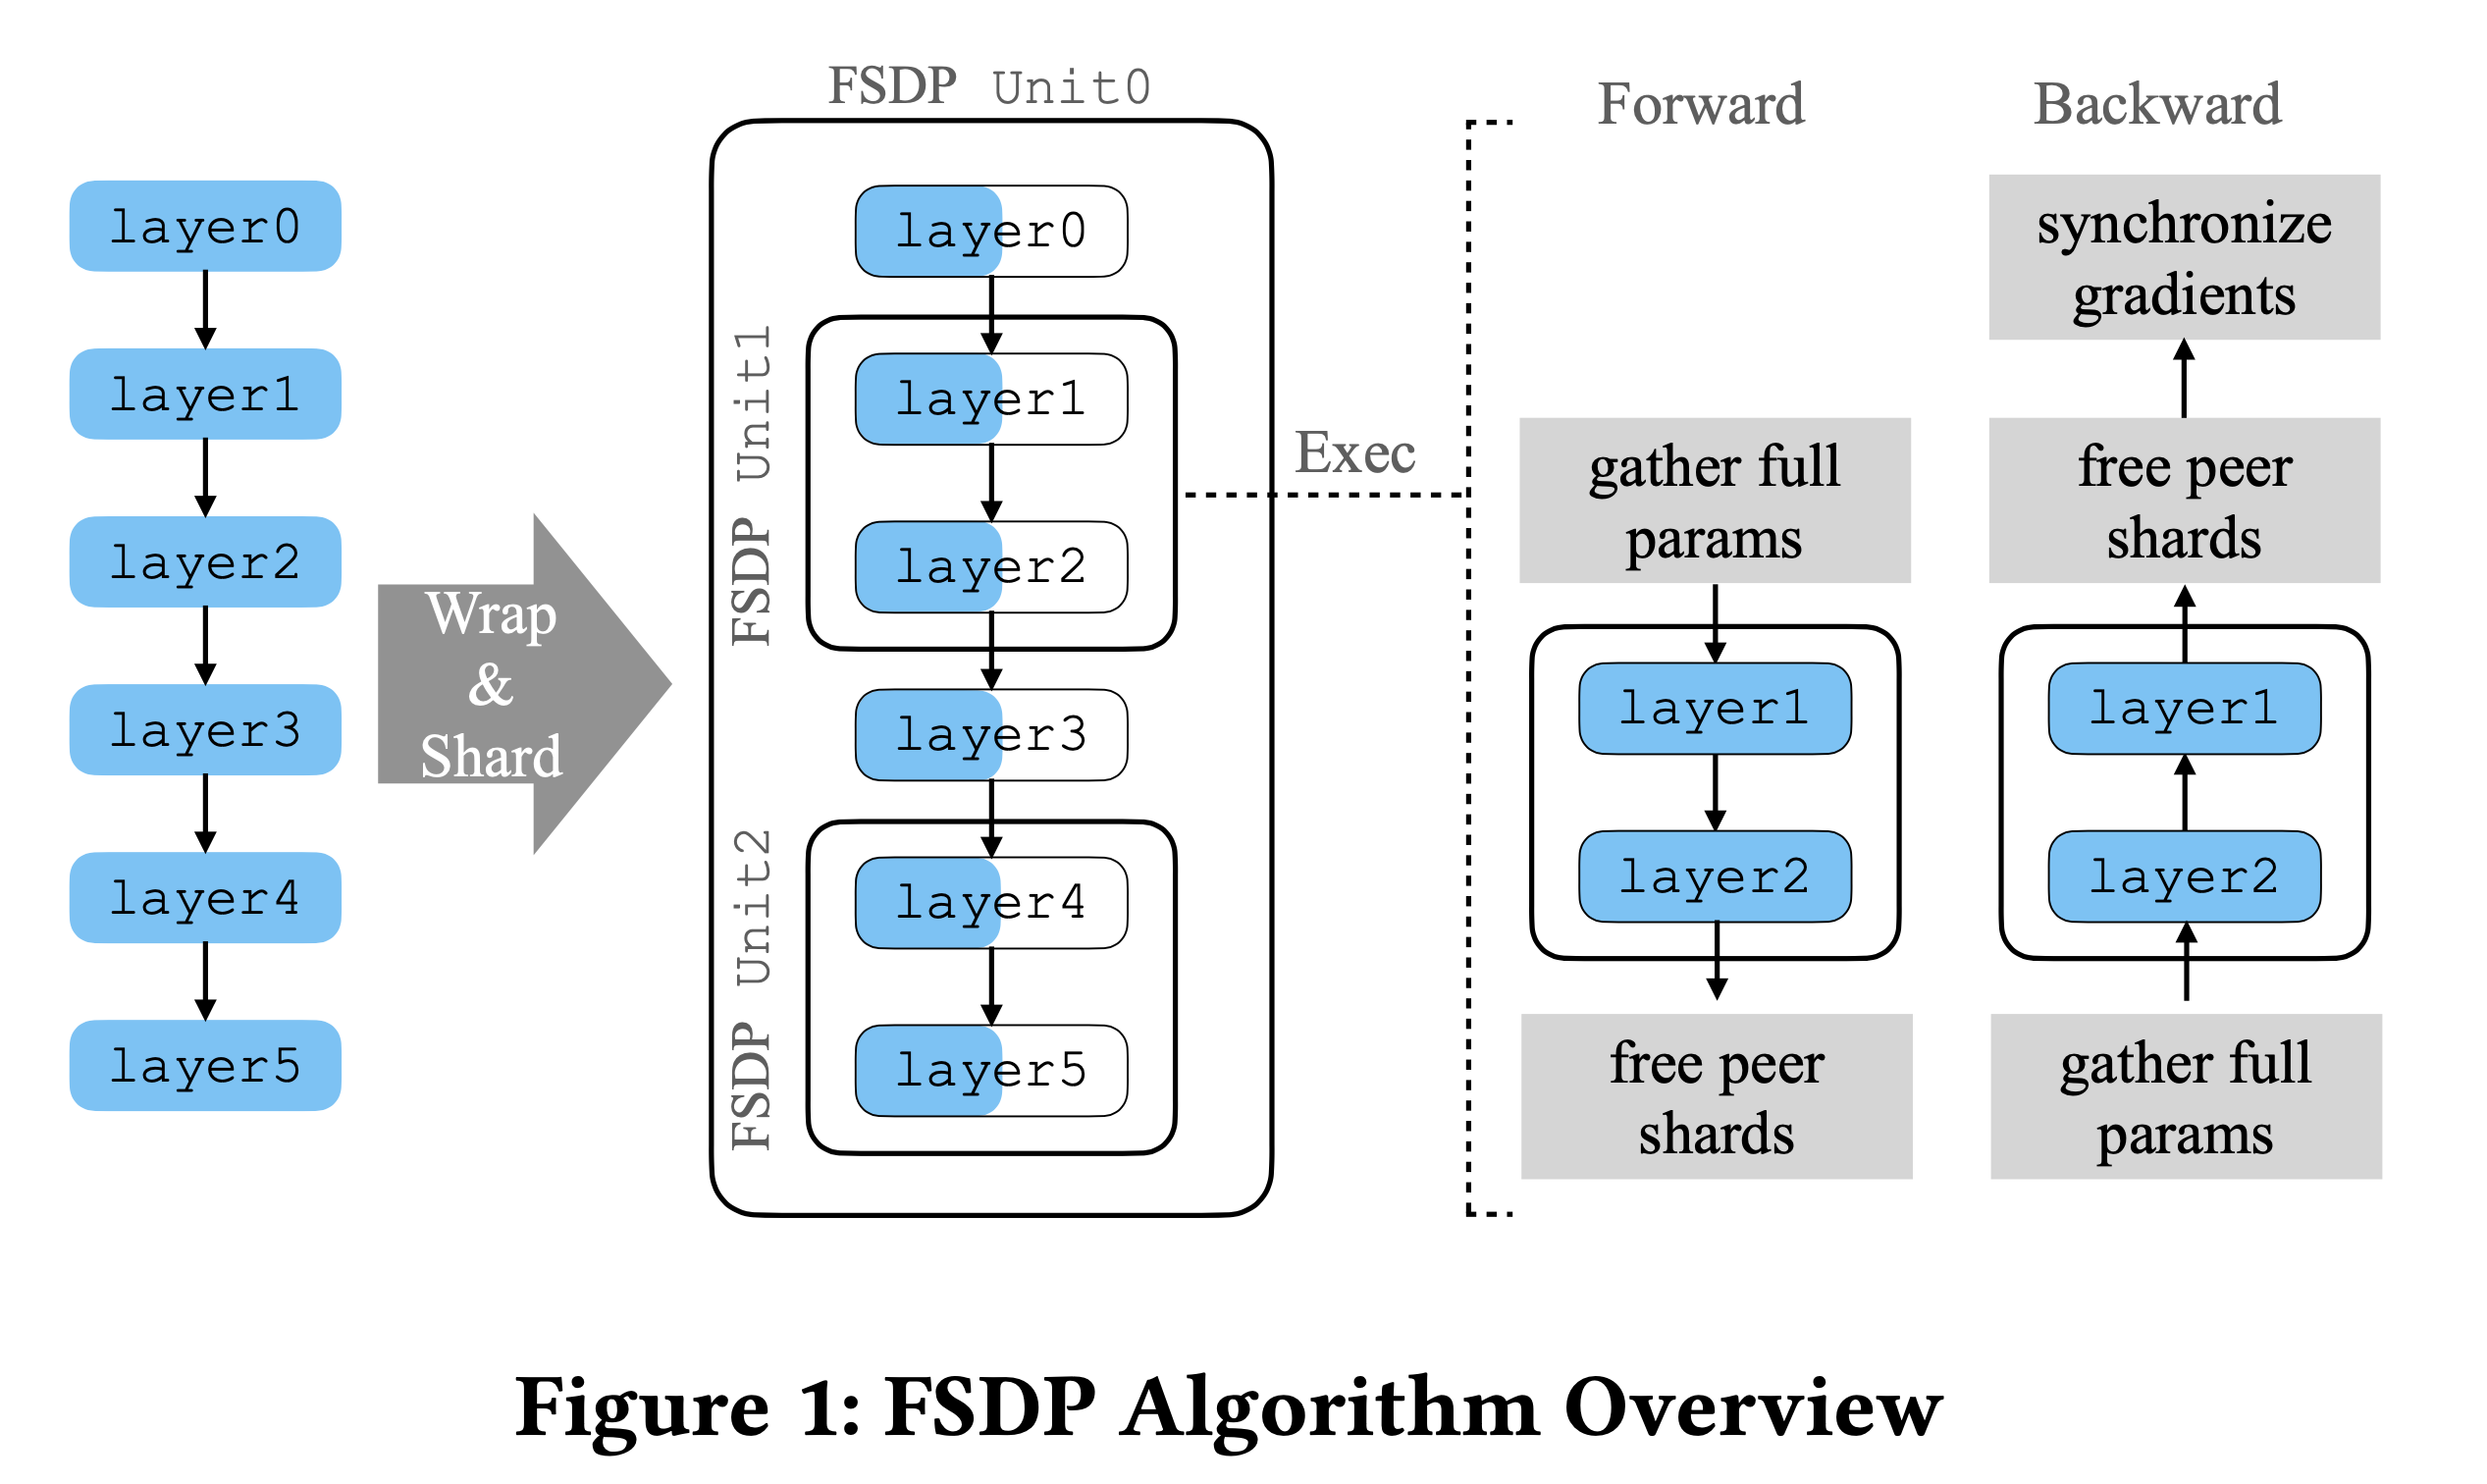 Fig.
Fig.
Blog 내 distributed training에 대한 post가 몇개 있으니 참고하면 좋을 것 같지만, 간단하게만 말하자면 ZeRO, FSDP는 최적화의 정도에 따라 model parameter나 gradient를 병렬처리하려는 GPU device에 쪼개서 들고 있도록 (partition, shard) 해주는 기술이다. 원래 DP만 한다면 Adam optimizer state, gradient, model parameter를 전체를 모든 device가 replicate하고 있어야 했으나, model parameter를 \(\Psi\)라 하고 device 갯수를 \(N_d\)라 할 때 ZeRO를 쓰면 VRAM memory를 다음과 같이 절약할 수 있다.
\[\frac{(2+4+4+4) * \Psi}{N_d} \text { if ZeRO stage is } 3\]그런데 이러면 parameter weight이 device 별로 쪼개져있기 때문에 어떤 device는 layer 1의 parameter가 없어서 forward를 못하게 될 수 있다. 이럴 경우 1st layer의 matrix weight은 device 1만 가지고 있다면 나머지 device에 boradcasting을 해주고 forwarding하여 activation value들을 저장한 뒤 지우는 일을 반복해야한다. 그리고 backward시에도 optimizer state가 device별로 쪼개져있기 때문에 gradient를 계산하고 memory절약을 위해 gradient를 모아줘야 하는데, 이를 backward가 다 끝나고 해주는 것이 아니라 backward가 진행되는 시점에 real-time으로 해줘야 한다. 즉 이렇게 하기 위해서는 forward, backward hook을 등록해줘야 하는 것이다.
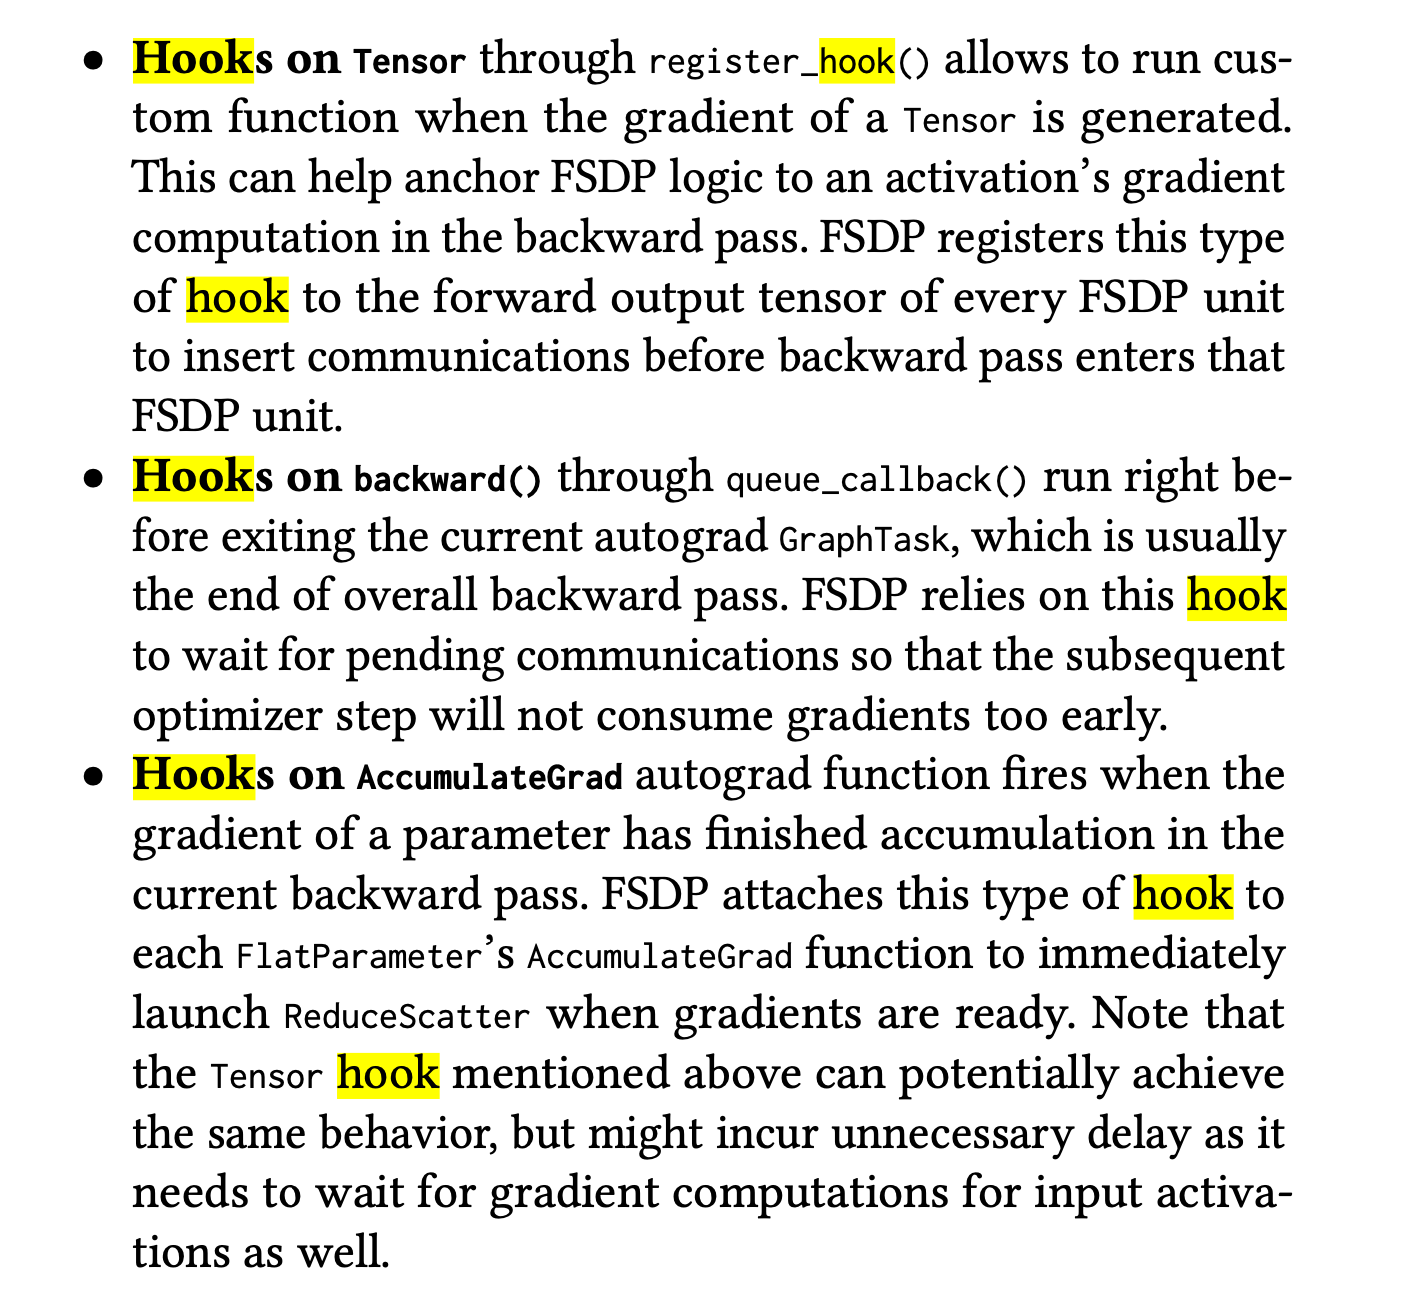 Fig.
Fig.
Layer별로 activation value를 뽑는 경우에 대해서는 예를 들어 training dynamics를 분석하는데 사용 될 수 있다. 아래는 Tensor Program V라는 paper의 한 figure인데, 저자들이 주장하는 바에 따르면, 같은 optimization timestep에서 같은 layer의 activation output의 l2 norm은 hidden size가 늘어남에 따라 변하지 않아야 한다.
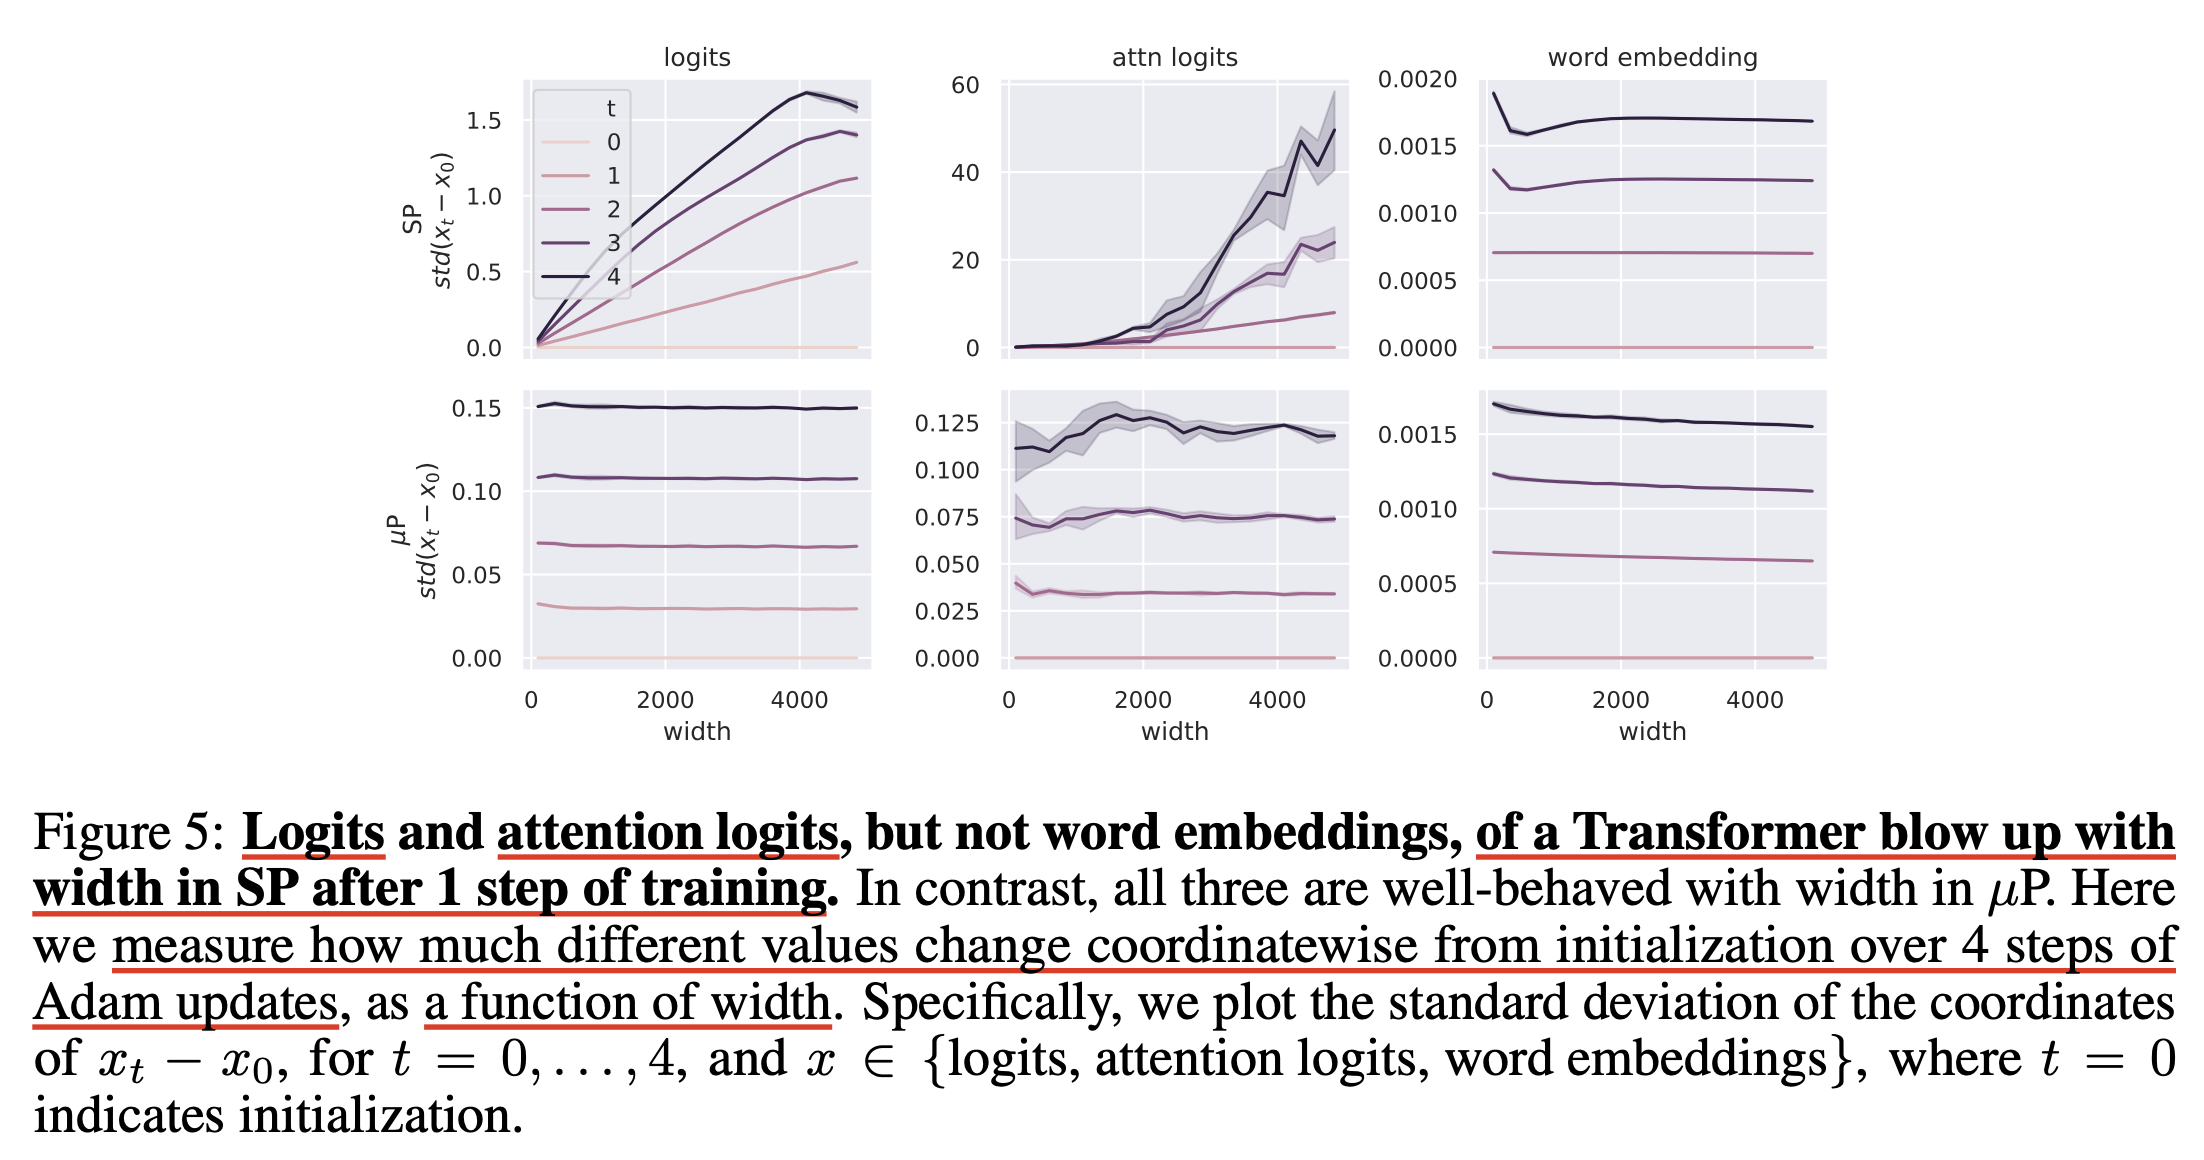 Fig.
Fig.
그리고 이를 잘 구현했는지 확인하기 위해서는 forward hook을 걸어야 하는 것이다.
Use Cases
ResNet Example
먼저 간단하게 random image에 대한 ResNet의 activation을 뽑아보자. 아래처럼 간단하게 model을 선언해준다.
from PIL import Image
import torch
import torch.nn as nn
from torchvision.models import resnet18
from torchvision import transforms as T

device = torch.device('cuda') if torch.cuda.is_available() else torch.device('cpu')

image = Image.open('cat.jpeg')
transform = T.Compose([T.Resize((224, 224)), T.ToTensor()])
X = transform(image).unsqueeze(dim=0).to(device)

model = resnet18(pretrained=True)
model = model.to(device)
print(model)
ResNet(
  (conv1): Conv2d(3, 64, kernel_size=(7, 7), stride=(2, 2), padding=(3, 3), bias=False)
  (bn1): BatchNorm2d(64, eps=1e-05, momentum=0.1, affine=True, track_running_stats=True)
  (relu): ReLU(inplace=True)
  (maxpool): MaxPool2d(kernel_size=3, stride=2, padding=1, dilation=1, ceil_mode=False)
  (layer1): Sequential(
    (0): BasicBlock(
      (conv1): Conv2d(64, 64, kernel_size=(3, 3), stride=(1, 1), padding=(1, 1), bias=False)
      (bn1): BatchNorm2d(64, eps=1e-05, momentum=0.1, affine=True, track_running_stats=True)
      (relu): ReLU(inplace=True)
      (conv2): Conv2d(64, 64, kernel_size=(3, 3), stride=(1, 1), padding=(1, 1), bias=False)
      (bn2): BatchNorm2d(64, eps=1e-05, momentum=0.1, affine=True, track_running_stats=True)
    )
    (1): BasicBlock(
      (conv1): Conv2d(64, 64, kernel_size=(3, 3), stride=(1, 1), padding=(1, 1), bias=False)
      (bn1): BatchNorm2d(64, eps=1e-05, momentum=0.1, affine=True, track_running_stats=True)
      (relu): ReLU(inplace=True)
      (conv2): Conv2d(64, 64, kernel_size=(3, 3), stride=(1, 1), padding=(1, 1), bias=False)
      (bn2): BatchNorm2d(64, eps=1e-05, momentum=0.1, affine=True, track_running_stats=True)
...
그리고 hook을 걸어줄건데, 아래처럼 함수를 만들어주고 register_forward_hook을 사용해서 원하는 nn.Module에 걸어주면 된다.
features = {}
def get_features(name):
    def hook(module, input, output):
        features[name] = output.detach().cpu()
    return hook

h1 = model.avgpool.register_forward_hook(get_features('avgpool'))
h2 = model.maxpool.register_forward_hook(get_features('maxpool'))
h3 = model.layer3[0].downsample[1].register_forward_hook(get_features('comp'))
만약 모든 layer의 activation을 뽑고싶다면 아래처럼 걸 수도 있다.
for name, module in model.named_modules():
    module.register_forward_hook(get_features(name))
이제 model forward를 해보면 features dictionary에 acitvation이 저장되어있는 것을 확인할 수 있다.
out = model(X)
for k,v in features.items():
    print(k)
dict_keys(['maxpool', 'comp', 'avgpool'])
{'maxpool': tensor([[[[0.1353, 0.1667, 0.1667,  ..., 0.1608, 0.1212, 0.1595],
          [0.2054, 0.2170, 0.2137,  ..., 0.2532, 0.2609, 0.2438],
          [0.1948, 0.2130, 0.2137,  ..., 0.2781, 0.2662, 0.2738],
          ...,
          [0.4701, 0.4701, 0.3039,  ..., 0.8598, 0.8067, 0.8267],
          [0.3148, 0.3475, 0.3475,  ..., 0.7769, 0.7109, 0.7109],
          [0.3148, 0.3475, 0.3475,  ..., 0.7769, 0.7109, 0.7109]],

         [[0.6138, 0.4425, 0.4108,  ..., 0.3728, 0.3662, 0.2074],
          [0.6186, 0.4509, 0.4509,  ..., 0.4669, 0.4669, 0.3600],
          [0.6540, 0.4388, 0.4542,  ..., 0.5525, 0.5525, 0.4178],
          ...,
          [1.3034, 1.2000, 0.9978,  ..., 1.0912, 1.0912, 0.5319],
          [1.1350, 0.9732, 0.6896,  ..., 0.5049, 0.5121, 0.5468],
          [1.1350, 0.9732, 0.6051,  ..., 0.5049, 0.3075, 0.1783]],
...
마지막으로 hook을 지우고싶다면 아래처럼 지워주면 되는데, model training과정에서 activation을 뽑아 l2 norm을 측정하는 것 자체가 overhead가 될 수 있으므로 원하는 시점이 아니라면 지우는 것을 추천한다.
h1.remove()
h2.remove()
h3.remove()
Stable Diffusion Example
당연하게도 huggingface transformers나 diffusers등의 model class들 또한 모두 pytorch의 nn.module을 상속받기 때문에 쉽게 hook을 걸어 model behavior를 분석할 수 있다.
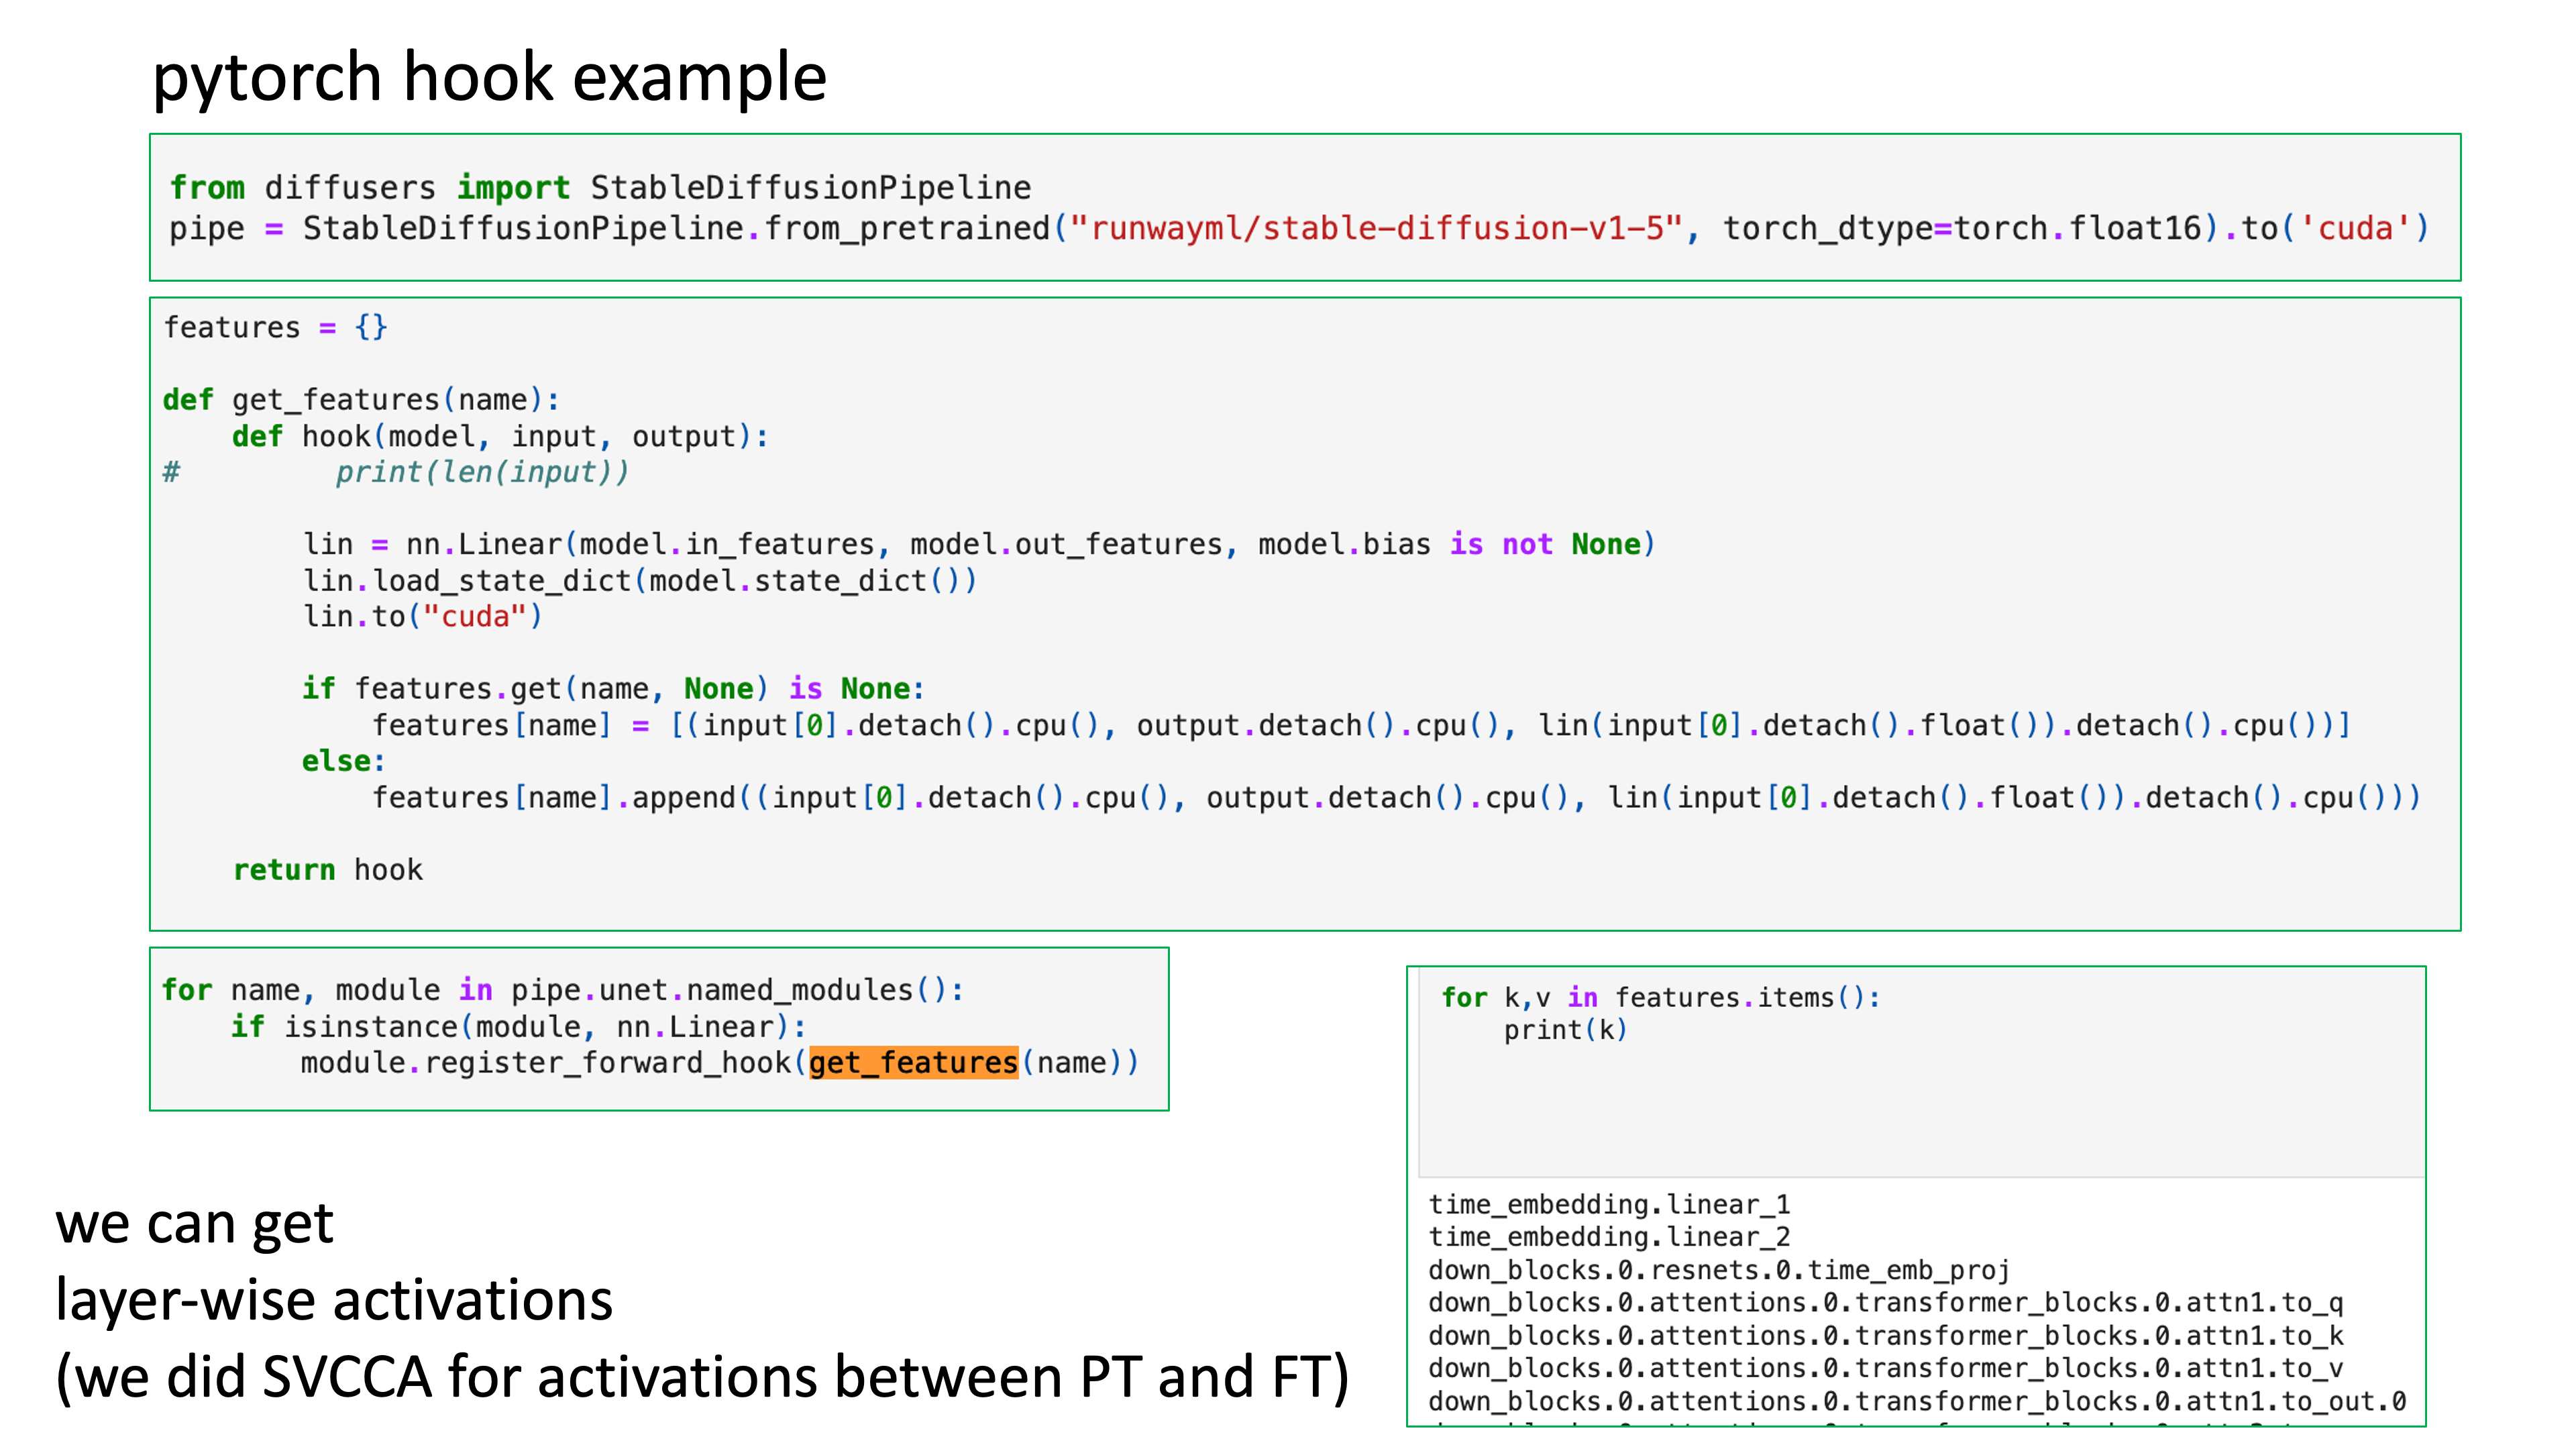 Fig.
Fig.
for name, module in pipe.unet.named_modules():
    if isinstance(module, nn.Linear):
        module.register_forward_hook(get_features(name))

out = pipe(prompt="a cute cat", num_inference_steps = 5)
out.images[0]

for k,v in features.items():
    print(k)
Memory Efficient Fused Optimizer (optimizer.step() In Backward)
이번에는 Pytorch Optimizer가 parameter를 update할 때 memory를 아끼기 위해 hook을 걸어볼 것이다. Memory save를 하는 key idea는 다음과 같다.
- 보통의 pytorch default backward engine이 모든 parameter에 대한 gradient를 다 계산하고 한 번에 update 함
- 하지만 chain rule에 의해 end point에서 부터 backprop을 할 때 weight의 parameter를 즉각적으로 update하고 release 하면 memory를 최대한 아낄 수 있음
이는 register_post_accumulate_grad_hook를 사용해서 구현할 수 있는데, 구현을 위해 Vision Transformer (ViT)를 학습하는 상황을 가정해보자.
import torch
from torchvision import models
from pickle import dump

model = models.vit_l_16(weights='DEFAULT').cuda()
optimizer = torch.optim.Adam(model.parameters())

IMAGE_SIZE = 224
def train(model, optimizer):
    # create our fake image input: tensor shape is batch_size, channels, height, width
    fake_image = torch.rand(1, 3, IMAGE_SIZE, IMAGE_SIZE).cuda()

    # call our forward and backward
    loss = model.forward(fake_image)
    loss.sum().backward()

    # optimizer update
    optimizer.step()
    optimizer.zero_grad()

for _ in range(3):
    train(model, optimizer)
이렇게 model을 학습하는 경우 우리는 VRAM memory 상태를 아래처럼 profiling할 수 있다.
# tell CUDA to start recording memory allocations
torch.cuda.memory._record_memory_history(enabled='all')

# train 3 steps
for _ in range(3):
    train(model, optimizer)

# save a snapshot of the memory allocations
s = torch.cuda.memory._snapshot()
with open(f"snapshot.pickle", "wb") as f:
    dump(s, f)

# tell CUDA to stop recording memory allocations now
torch.cuda.memory._record_memory_history(enabled=None)
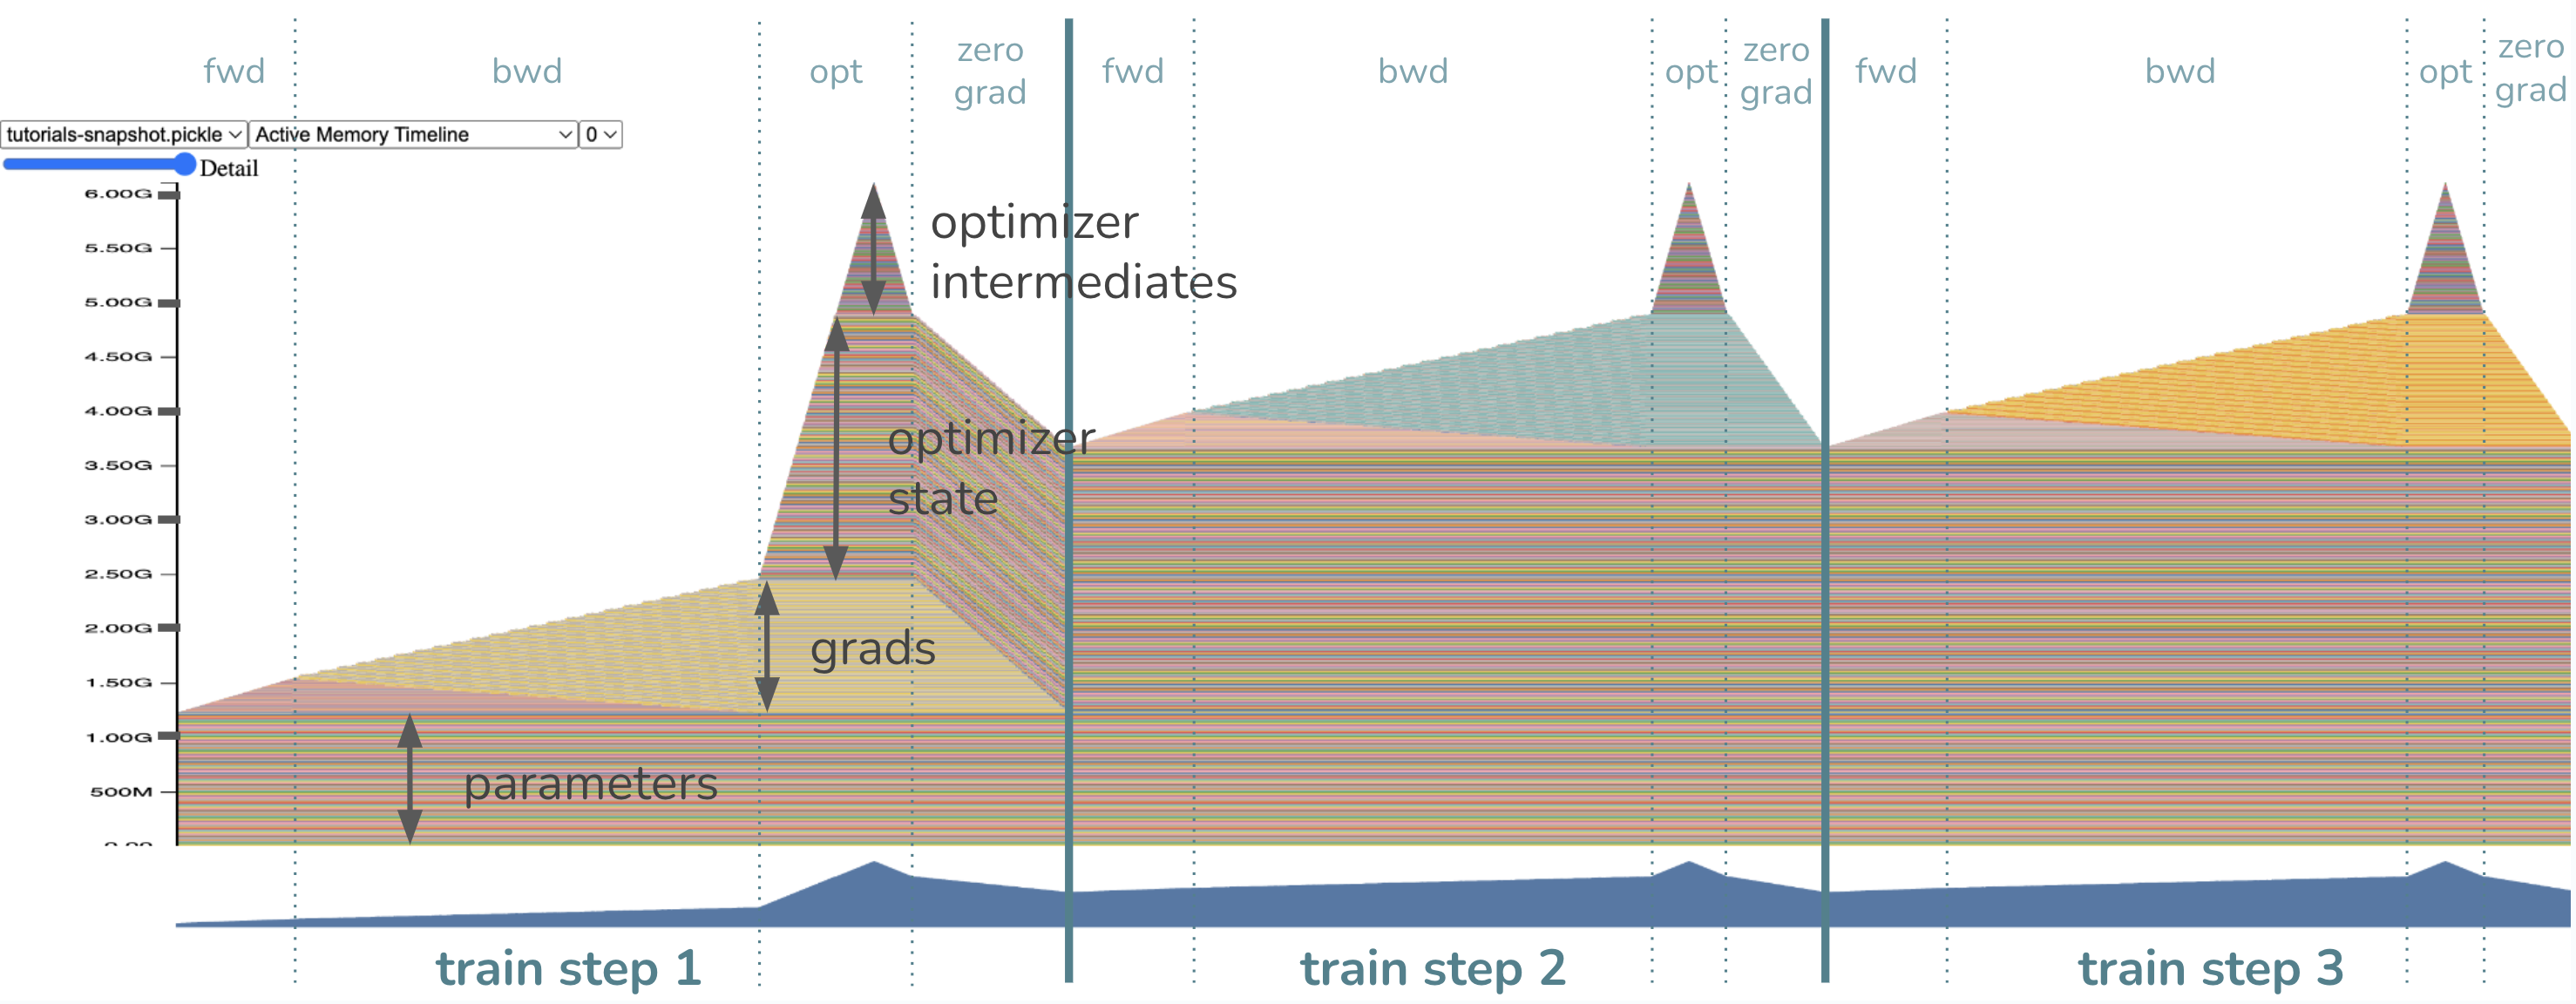 Fig.
Fig.
GPU memory가 누적되는 과정은 아래와 같다고 할 수 있다.
- model parameter가 GPU memory에 올라감 (
1.2GB) - input을
forward함으로써 layer별로 activation이 쌓임 - loss부터
backward하면서 gradient가 생기고 activation은 backprop과정에서 release됨 (여기서는 현재0.4GB정도, input tensor size에 따라 다름)- 이 때 layer별 loss에 대한 weight matrix의 gradient는 반대로 쌓이게됨 (parameter size만큼,
1.2GB)
- 이 때 layer별 loss에 대한 weight matrix의 gradient는 반대로 쌓이게됨 (parameter size만큼,
- Adam optimizer를 위한 1st, 2nd moment 등 optimizer state가 VRAM memory에 올라가기 시작함 (model.forward()하기 전에 선언했으나 늦게 로딩됨, lazy init)
- model parameter의 2배가 올라간다고 할 수 있음 (즉
2.4GB, 지금은 mixed precision은 고려하지 않음) - intermediate tensors 가 추가로 필요함 (
1.2GB)
- model parameter의 2배가 올라간다고 할 수 있음 (즉
- parameter group 별로 (layer 별로, 완전 같은말은 아니지만 편의상) update를 하면서 gradient를 release함
- 다음 training loop…
이제 이를 개선해보자.
핵심은 아래처럼 optimizer dict를 설정하고 hook을 걸어주는 것이다.
# Instead of having just *one* optimizer, we will have a ``dict`` of optimizers
# for every parameter so we could reference them in our hook.
optimizer_dict = {p: torch.optim.Adam([p], foreach=False) for p in model.parameters()}

# Define our hook, which will call the optimizer ``step()`` and ``zero_grad()``
def optimizer_hook(parameter) -> None:
    optimizer_dict[parameter].step()
    optimizer_dict[parameter].zero_grad()

# Register the hook onto every parameter
for p in model.parameters():
    p.register_post_accumulate_grad_hook(optimizer_hook)
그리고 model forward+backward를 3 iteration 돌릴건데, 주의할 점은 더이상 명시적인 optimizer를 갖고있지 않으며, 따라서 step()단계가 없다는 것이다.
# Now remember our previous ``train()`` function? Since the optimizer has been
# fused into the backward, we can remove the optimizer step and zero_grad calls.
def train(model):
    # create our fake image input: tensor shape is batch_size, channels, height, width
    fake_image = torch.rand(1, 3, IMAGE_SIZE, IMAGE_SIZE).cuda()

    # call our forward and backward
    loss = model.forward(fake_image)
    loss.sum().backward()

    # optimizer update --> no longer needed!
    # optimizer.step()
    # optimizer.zero_grad()

for _ in range(3):
    train(model)
여기서 주의할 점은 foreach=False로 되어있다는 점에 대해 살짝 얘기해보자. Pytorch optimizer는 여러 구현 방식이 있는데, 그 중에는 for-loop, foreach (multi-tensor) 그리고 Fused Adam가 있다고 한다 (Source). 가장 naive한 optimization step 방식은 For-loop인데, 이를 single-tensor 방식이라고 부른다. 그리고 foreach, Fused adam로 갈수록 빨라지는데, fused adam의 경우 예를 들어 adam의 1st, 2nd moment를 elementwise로 계산하는 것을 하나의 kernel로 fusion하여 memory access를 줄임으로써 훨씬 빠르게 parameter update를 하는 걸 의미한다. foreach에 대해서는 자료를 많이 못찾겠어서 이는 multi-tensor방식이며 for-loop보다는 훨씬 빠른 방법이라고 하지만 foreach=True로 setting이 되게 되면 intermediate tensors를 저장할 만큼의 VRAM memory를 먹게 된다고 한다. 그 이유는 예를 들어 ViT model의 parameter를 update할 때 for-loop은 parameter (group?)를 순회하면서 연산하기 때문에 느린데 반해 foreach는 각 parameter들을 하나의 multi-tensor로 만들어 한 번에 처리하기 때문이라고 한다. 이 때 당연히 for-loop이 loop을 돌면서 CUDA kernel을 여러번 launch하는 것을 피할 수 있기 때문에 속도가 빠른것이라고 한다.
We have 3 major categories of implementations: for-loop, foreach (multi-tensor), and fused.
The most straightforward implementations are for-loops over the parameters with big chunks of computation.
For-looping is usually slower than our foreach implementations, which combine parameters into a multi-tensor
and run the big chunks of computation all at once, thereby saving many sequential kernel calls.
A few of our optimizers have even faster fused implementations, which fuse the big chunks of computation into one kernel.
We can think of foreach implementations as fusing horizontally and fused implementations as fusing vertically on top of that.

In general, the performance ordering of the 3 implementations is fused > foreach > for-loop.
So when applicable, we default to foreach over for-loop.
Applicable means the foreach implementation is available,
the user has not specified any implementation-specific kwargs (e.g., fused, foreach, differentiable),
and all tensors are native and on CUDA.
Note that while fused should be even faster than foreach,
the implementations are newer and we would like to give them more bake-in time before flipping the switch everywhere.
이제 hook을 추가한 case에 대해 memory profiling을 해보도록 하자.
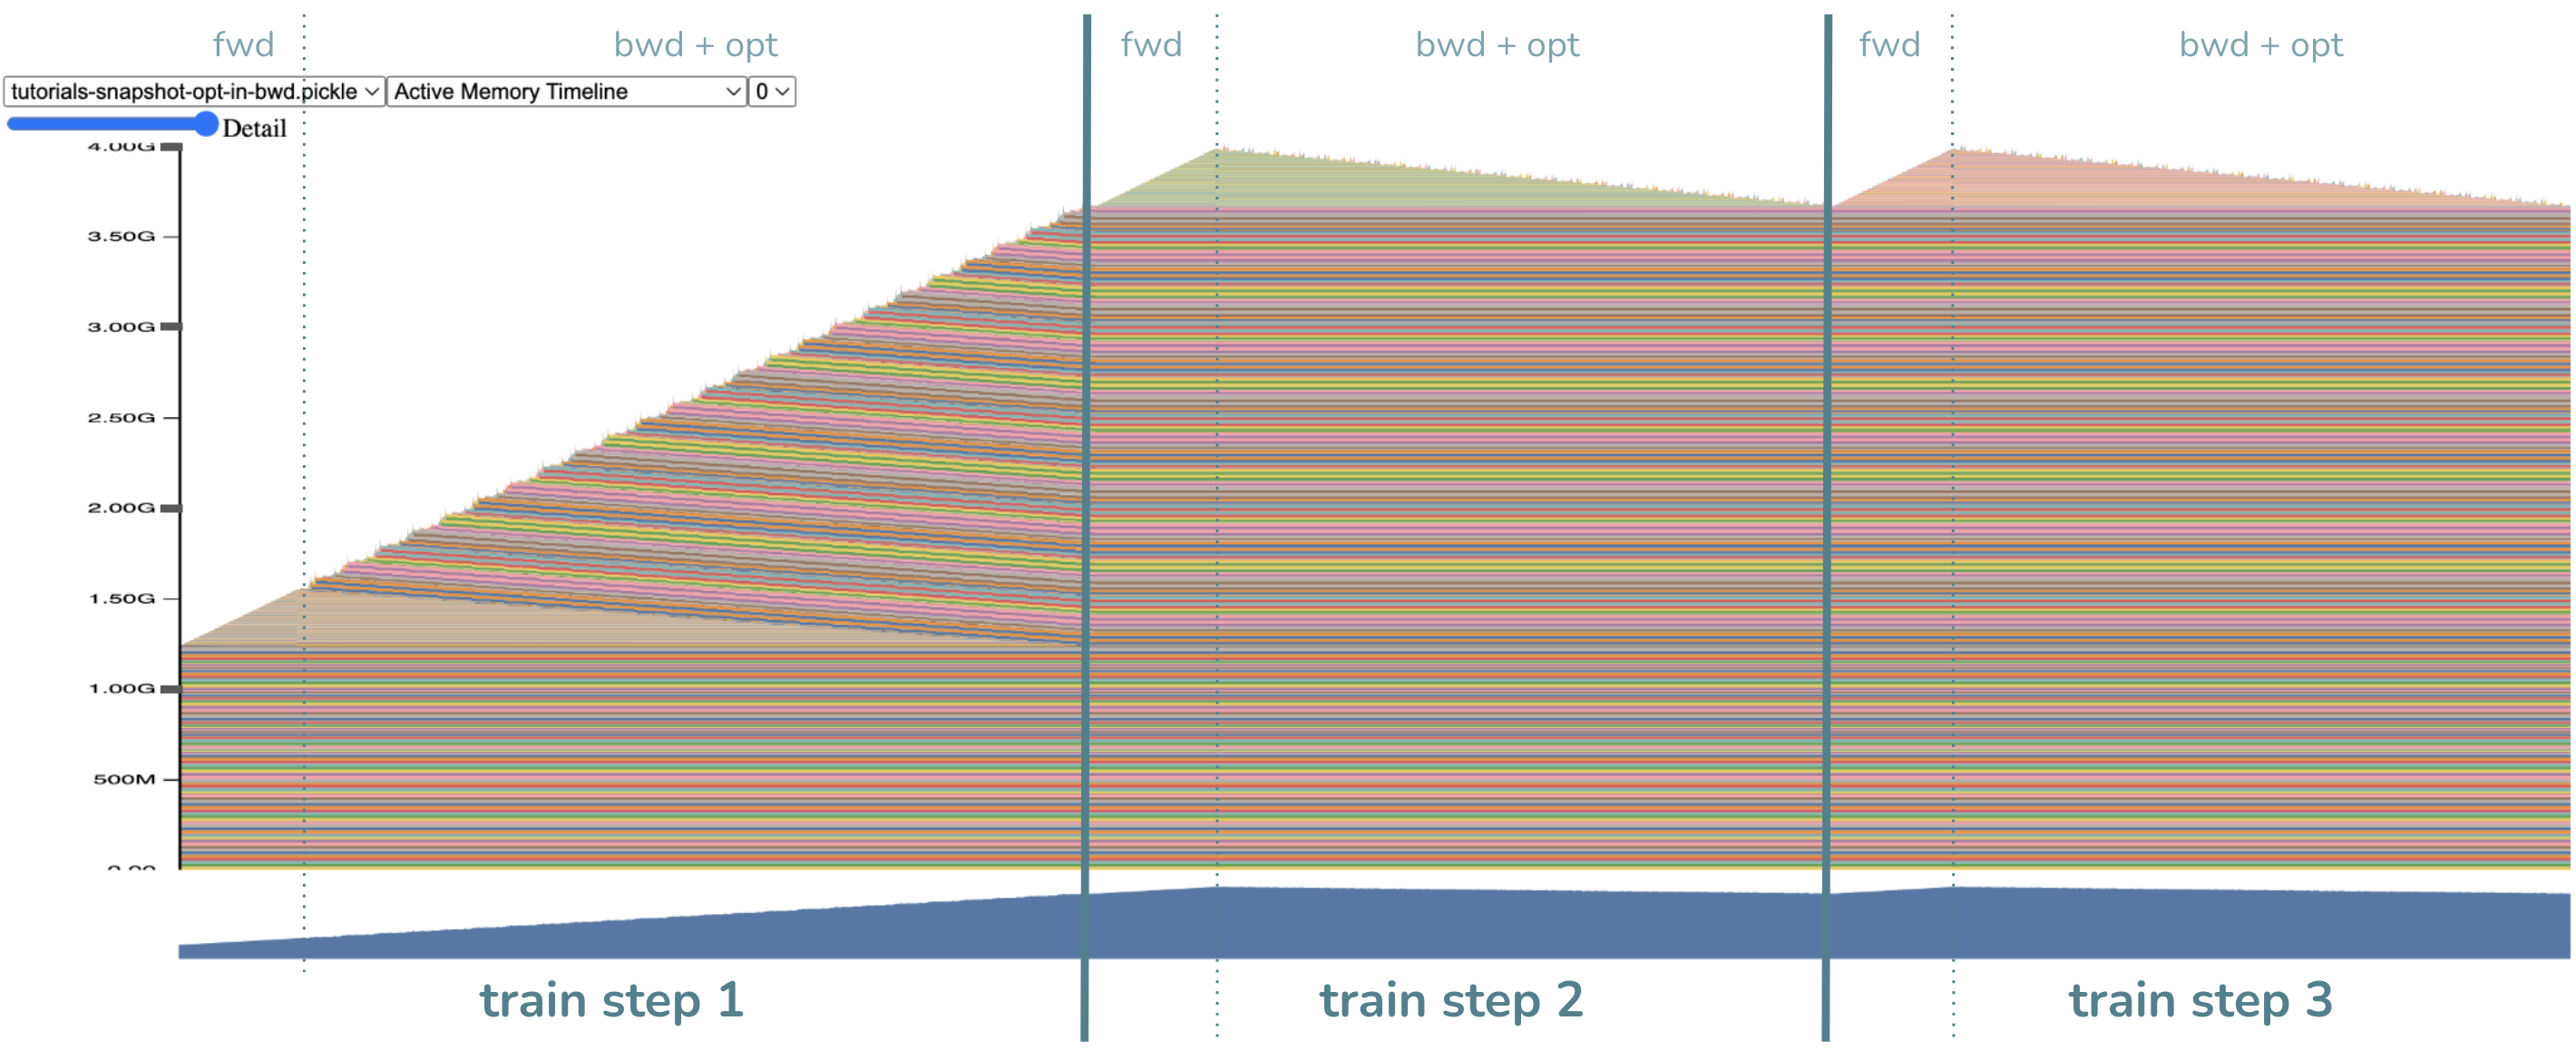 Fig.
Fig.
우리는 peak VRAM memory가 6GB에서 4GB로 확 줄어들었고,
backward에 step을 fusion했기 때문에 더이상 step()은 없어졌음을 확인할 수 있다.
이는 gradient가 원래 parameter size인 1.2GB만큼 다 만들어졌어야 했으나,
gradient가 만들어지는 족족 step()에 반영하고 지워지기 때문에 1.2GB가 줄어들었으나 figure에서 보면 최대 3.6GB까지 줄어든 것이고,
1.2GB정도가 추가로 없어진 것은 step을 위한 intermediate tensor도 gradient의 일부에만 반영되기 때문에 없어진 것으로 보이는데,
이는 fused optimizer가 없이도 foreach=False를 하는 것 만으로도 달성할 수 있는 memory saving이라 별로 중요하지 않다고 한다.
그런데 두 번째 training loop을 보면 peak memory가 3.6이 아니라 4.0GB쯤 되는 것을 볼 수 있는데, 이는 이제 peak memory를 찍는 부분이 forward가 끝난 지점으로 옮겨가서 그렇다. activaiton이 앞서 0.4GB정도 먹는다 했으니 3.6+0.4=4.0GB가 이제 peak memory가 되는 것이다.
Appetizer for ZeRO-2
마지막으로 DeepSpeed ZeRO stage-2에 대해서 간단하게만 얘기하자. ZeRO-2는 backward를 해서 gradient를 구하고 parameter update를 하기위한 Adam optimizer의 1st, 2nd moment, 즉 opitmizer state와 gradient가 각 device별로 쪼개져 있다. 다시 말해 해당 paramter의 정보를 담당하는 device가 아니라면 바로바로 지워줘야 하는 것이고 parameter별로 backar hook이 register되어 있다.
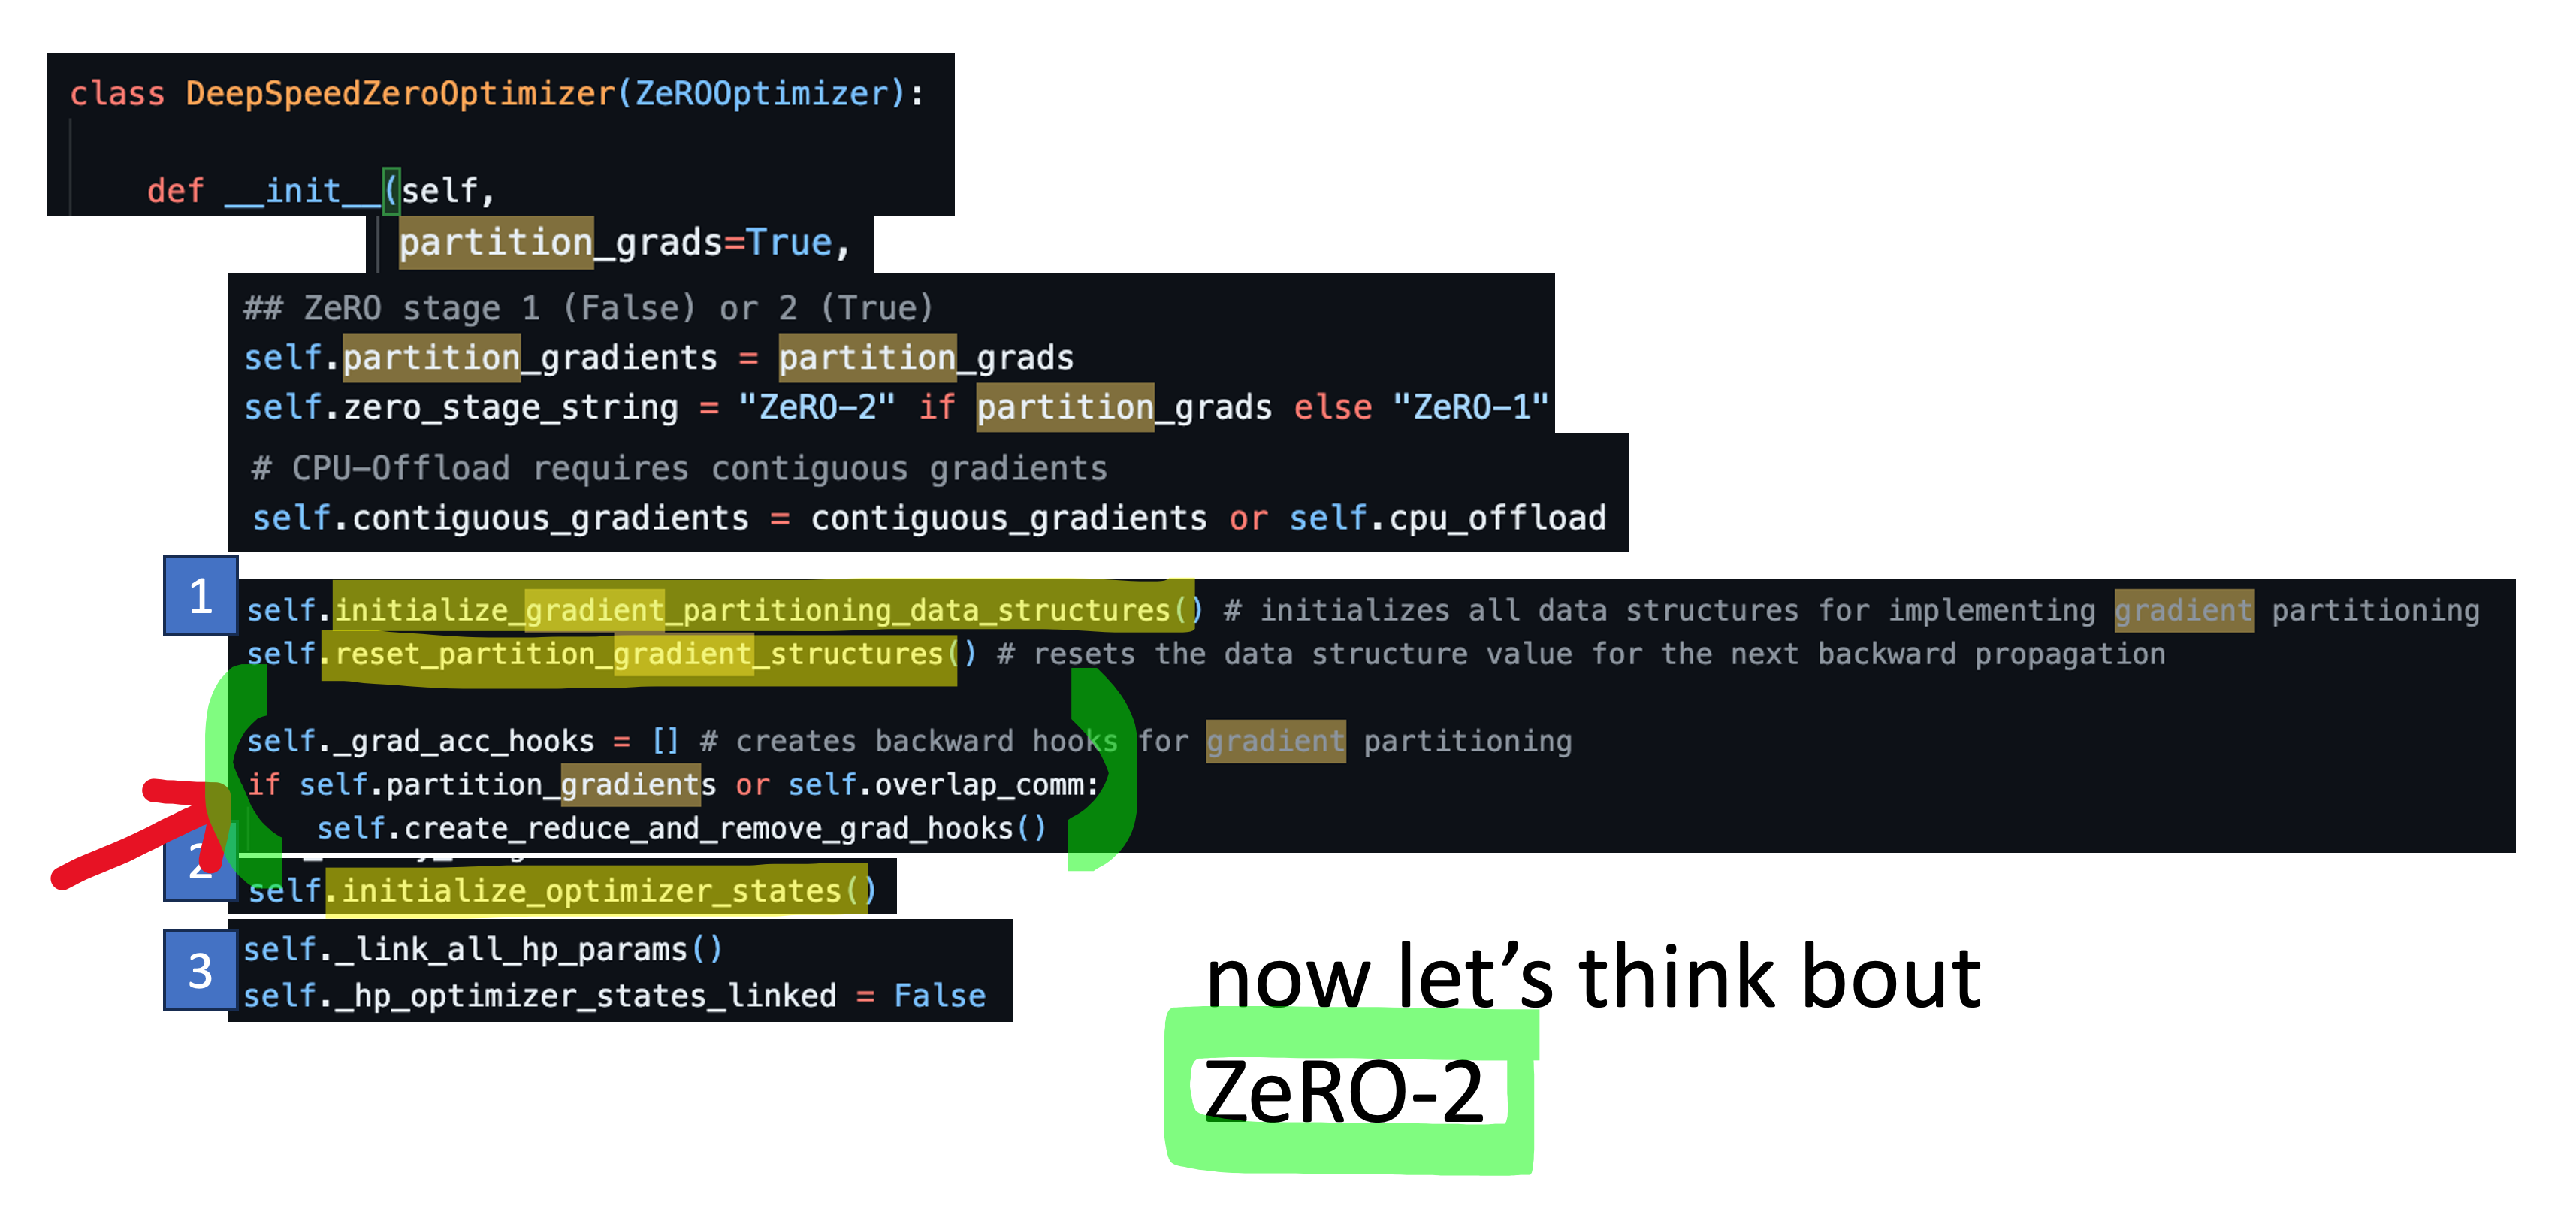 Fig.
Fig.
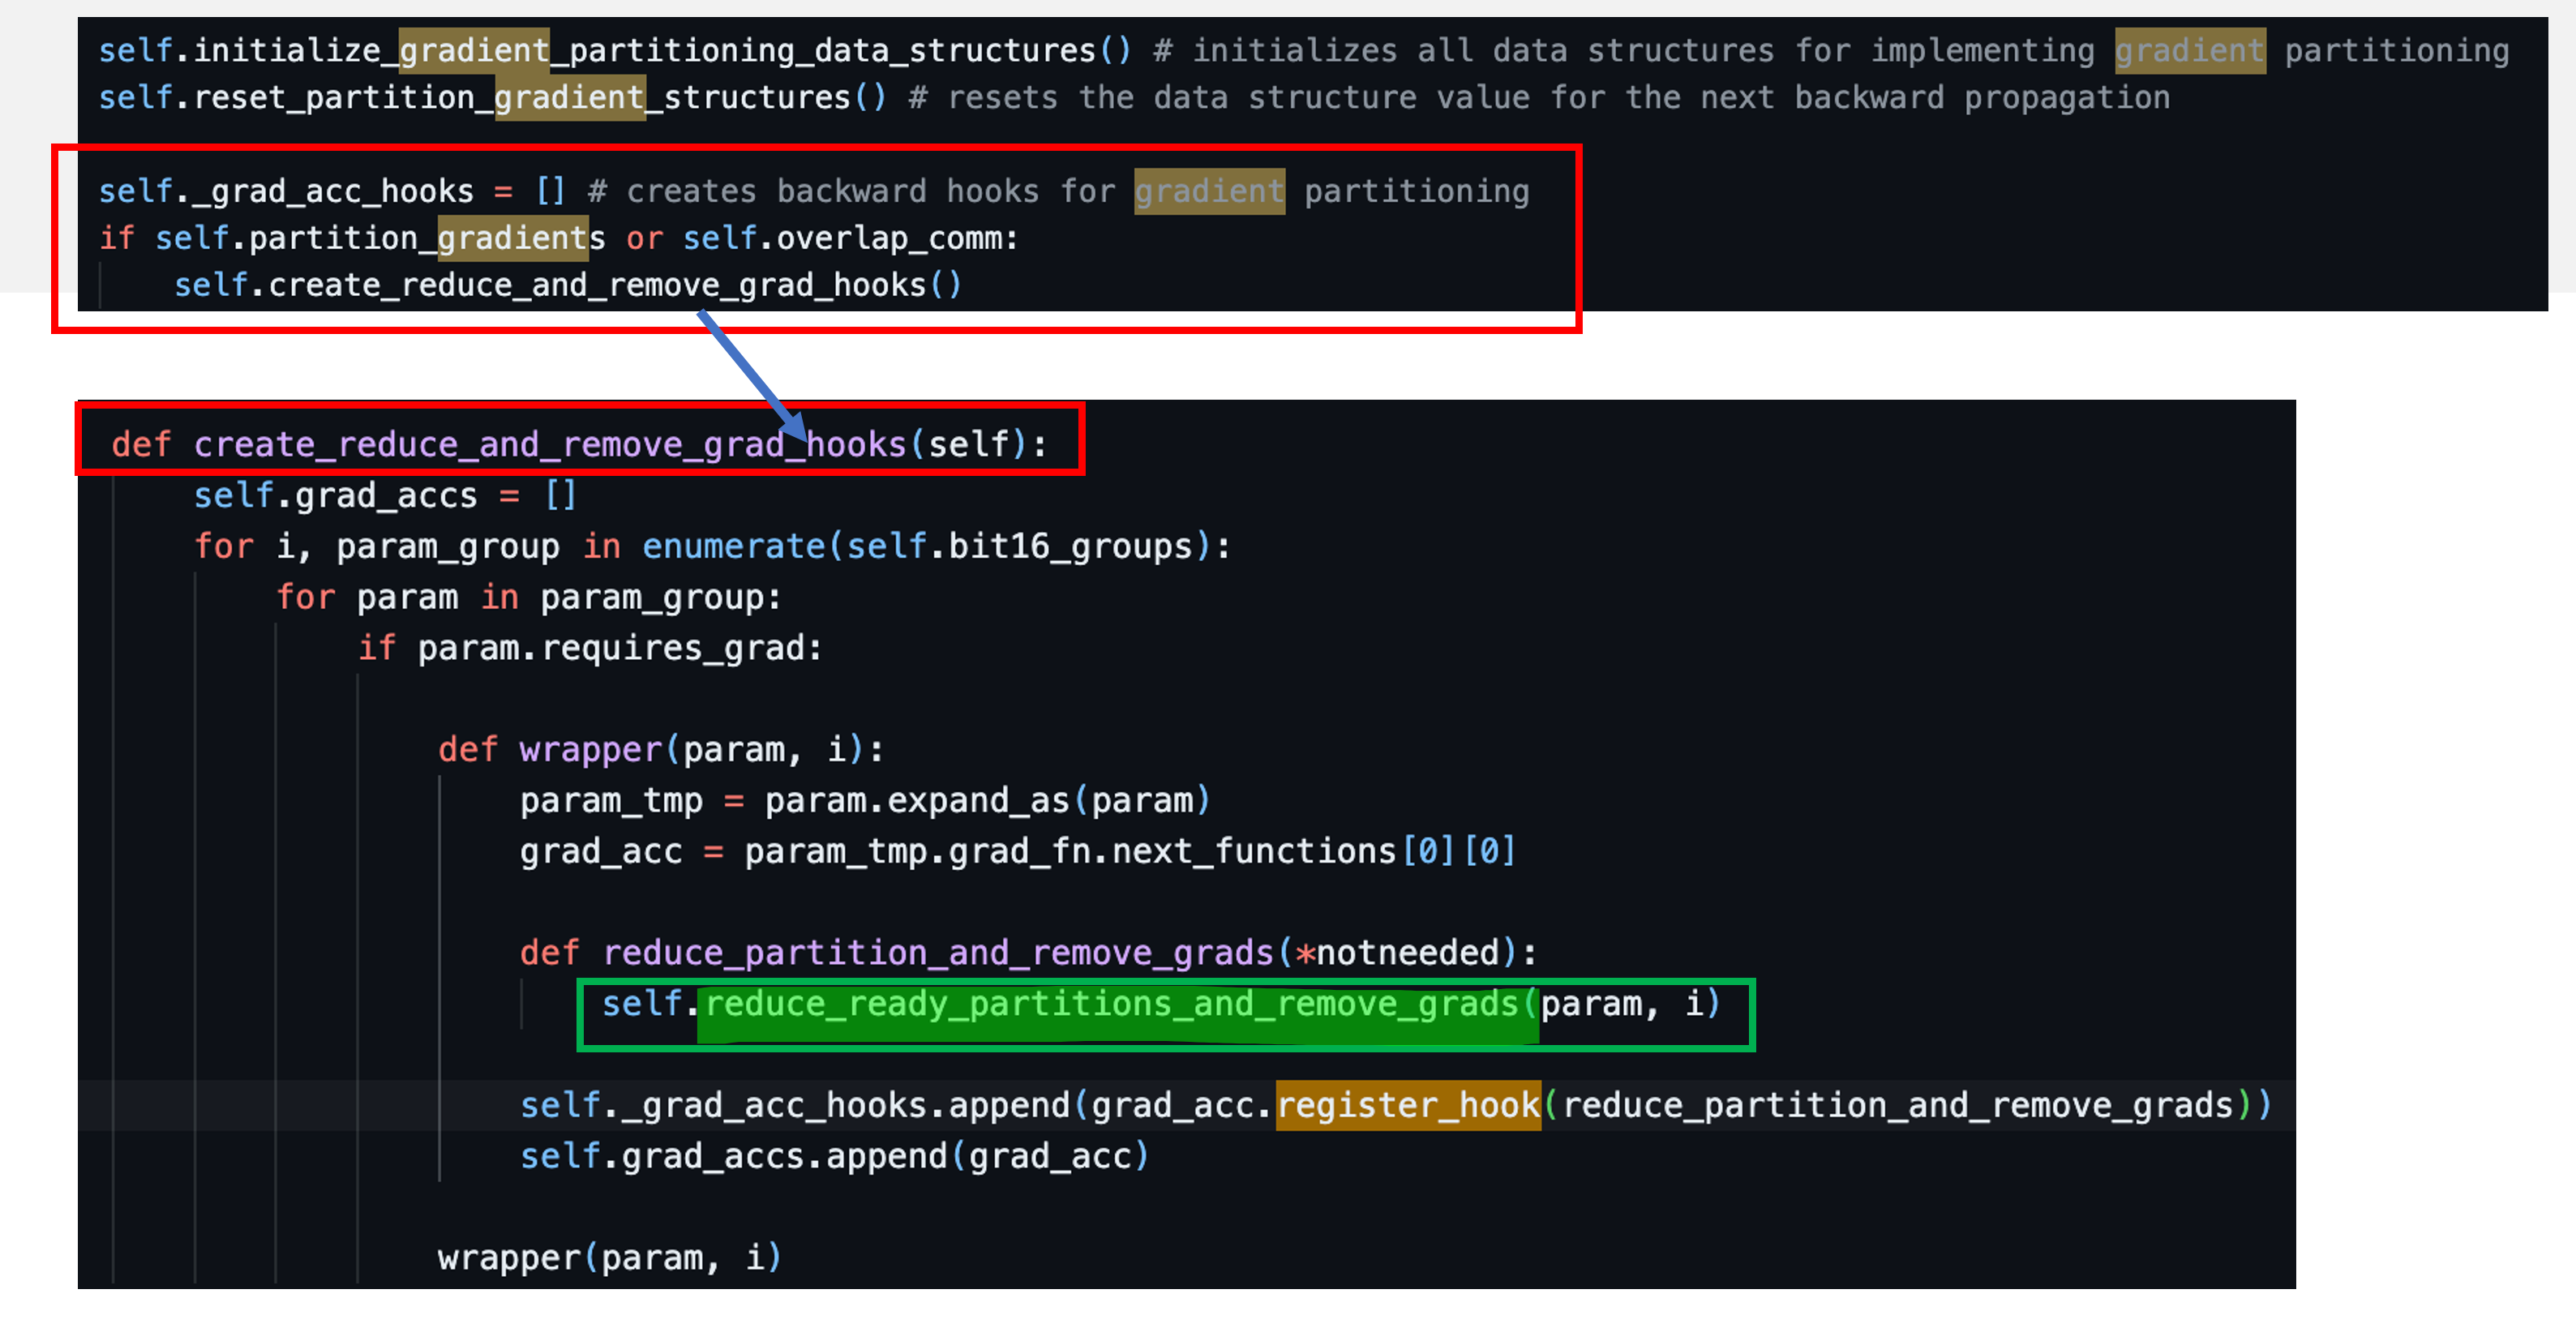 Fig.
Fig.
구현이 더 궁금한 사람은 DeepSpeed/deepspeed/runtime/zero/stage_1_and_2.py를 읽어보길 바란다. 기회가 되면 따로 post를 작성하도록 하겠다.
References
- Pytorch Docs
- DeepSpeed ZeRO
- Others