Pytorch Implementation of Variational AutoEncoders (VAEs)
22 May 2022< 목차 >
- AutoEncoder (AE)
- Variational AutoEncoder (VAE)
- Vector Quantized Variational AutoEncoder (VQ-VAE)
- References
이번 post 에서는 Variational AutoEncoder (VAE) model들을 직접 학습해보려고 한다.
Alexander Van de Kleut의 post를 base로 삼았다.
VAE 에 관한 이론적인 내용은 저의 블로그 내 다른 post 를 참고하시면 좋을 것 같다.
AutoEncoder (AE)
VAE를 구현하기 전에 유사한 구조체인 Auto Encoder (AE)를 먼저 학습해보려고 한다.
AE 는 다음과 같이 생겼는데,
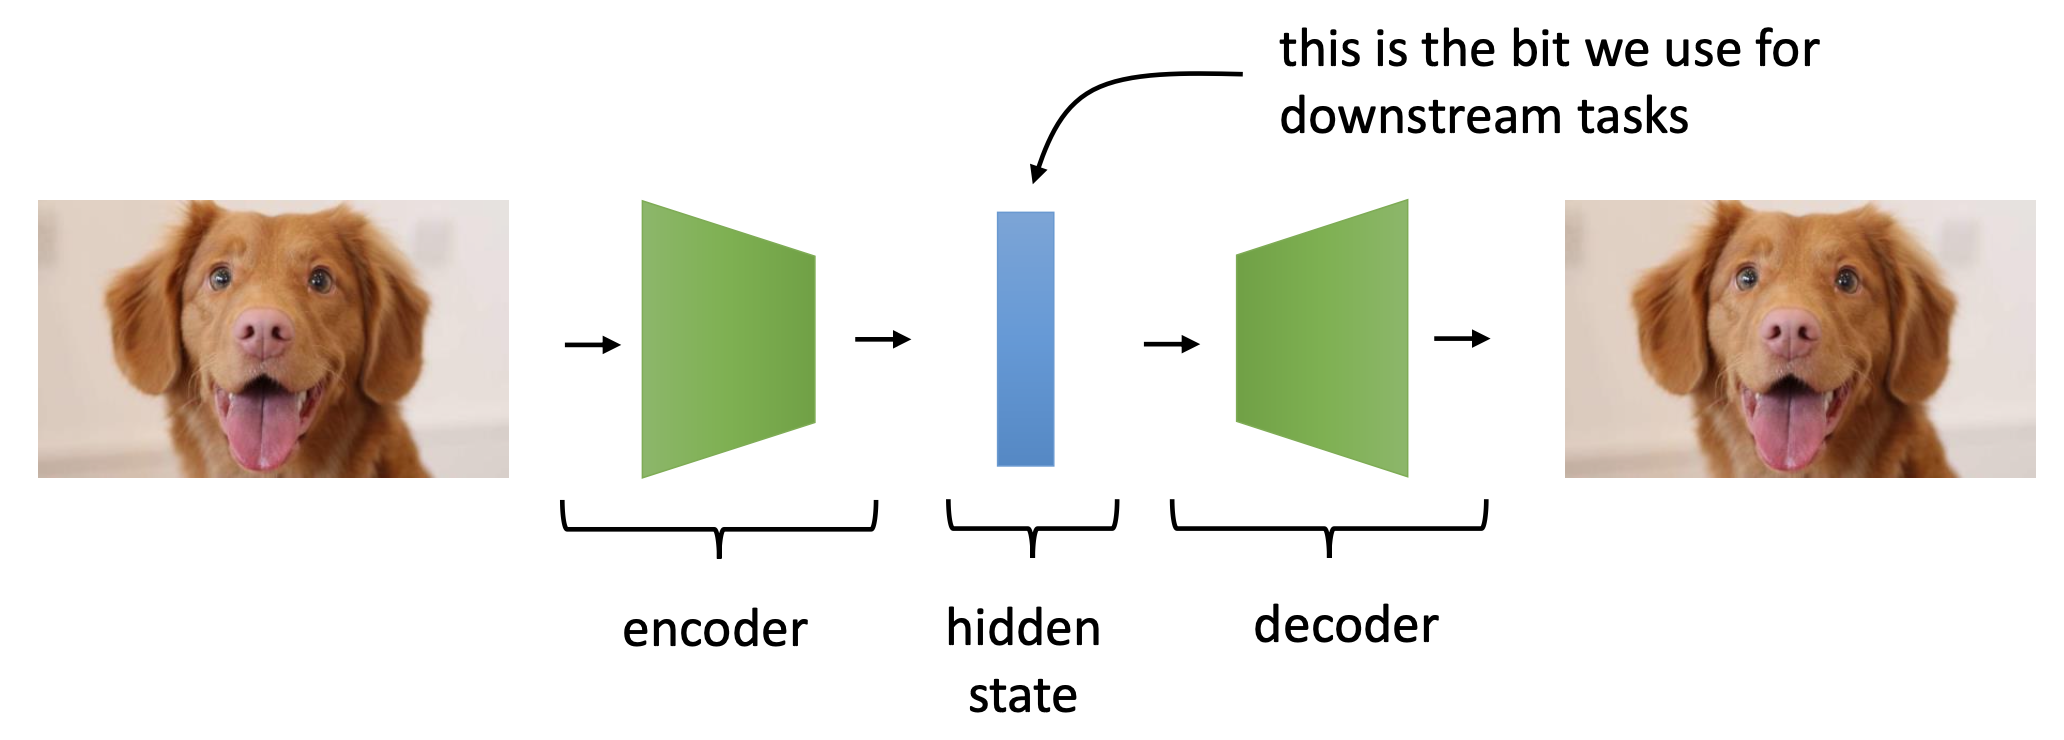 Fig. Encoder 와 Decoder 로 이루어진 아주 간단한 AutoEncoder 모델
다들 아시다시피 input 정보를 압축하는 Encoder와 이를 복원하는 Decoder가 있으며, 목적은 input 을 잘 나타내는 feature (representation) 을 encoder가 학습하는 것이다.
Encoder와 Decoder를 아래처럼 간단하게 구성해준다.
class Encoder(nn.Module):
    def __init__(self, image_size, num_channel, latent_dims):
        super(Encoder, self).__init__()
        self.linear1 = nn.Linear(image_size**2 * num_channel, 512)
        self.linear2 = nn.Linear(512, latent_dims)

    def forward(self, x):
        x = torch.flatten(x, start_dim=1)
        x = F.relu(self.linear1(x))
        return self.linear2(x)
class Decoder(nn.Module):
    def __init__(self, image_size, num_channel, latent_dims):
        super(Decoder, self).__init__()
        self.linear1 = nn.Linear(latent_dims, 512)
        self.linear2 = nn.Linear(512, image_size**2 * num_channel)
        self.image_size = image_size
        self.num_channel = num_channel

    def forward(self, z):
        z = F.relu(self.linear1(z))
        z = torch.sigmoid(self.linear2(z))
        return z.reshape((-1, self.num_channel, self.image_size, self.image_size))
왜 Decoder의 최종 출력값이 0~1로 mapping되느냐? (sigmoid를 왜 쓰느냐?), 그 이유는 우리가 사용할 데이터셋이 MNIST 인데 이 데이터는 흑백 이미지 데이터로 각 픽셀값이 0~1 로 이루어져 있기 때문이다. 이제 이 인코더가 뱉은걸 디코더가 받도록 구성해주면 끝이다.
class Autoencoder(nn.Module):
    def __init__(self, image_size, num_channel, latent_dims):
        super(Autoencoder, self).__init__()
        self.encoder = Encoder(image_size, num_channel, latent_dims)
        self.decoder = Decoder(image_size, num_channel, latent_dims)

    def forward(self, x):
        z = self.encoder(x)
        return self.decoder(z)
간단하게 argparser로 몇 가지 인자를 정의해주고
parser = argparse.ArgumentParser()
parser.add_argument('--dataset_dir_path', type=str, default='./data')
parser.add_argument('--batch_size', type=int, default=256)
parser.add_argument('--num_epoch', type=int, default=25)

parser.add_argument('--lr', type=float, default=0.001)
parser.add_argument('--lr_step', type=float, default=1.0)
parser.add_argument('--latent_dims', type=int, default=2)

parser.add_argument('--log_interval', type=int, default=50)
parser.add_argument('--plot', action='store_true')

args = parser.parse_args()
아래처럼 torchvision library의 데이터셋을 사용해서 data loader를 만든다.
dataset = torchvision.datasets.MNIST(args.dataset_dir_path,
            train=True,
            transform=torchvision.transforms.ToTensor(),
            download=True)
dataset_test = torchvision.datasets.MNIST(args.dataset_dir_path,
            train=False,
            transform=torchvision.transforms.ToTensor(),
            download=True)
image_size = 28
num_channel = 1

data_loader = torch.utils.data.DataLoader(dataset, batch_size=args.batch_size, shuffle=True,num_workers=4)
data_loader_test = torch.utils.data.DataLoader(dataset_test, batch_size=args.batch_size, shuffle=False,num_workers=4)
학습을 하려면 당연히 아까 만든 Autoencoder class를 model로 선언해주고 optimizer 등을 정의해줘야 한다.
model = Autoencoder(image_size, num_channel, args.latent_dims).to(device)
optimizer = torch.optim.AdamW(model.parameters(), lr=args.lr)
lr_scheduler = torch.optim.lr_scheduler.StepLR(optimizer, step_size=int(args.num_epoch*args.lr_step), gamma=0.333)
이제 data loader, model 그리고 optimizer 를 사용해서 training loop 를 돌리면 된다.
    for epoch in range(args.num_epoch):
        train_num_batches = len(data_loader)
        test_num_batches = len(data_loader_test)

        model.train()
        lr = lr_scheduler.get_last_lr()[0]
        for i, (x,y) in enumerate(data_loader):

            x = x.to(device)
            pred = model(x)
            loss = F.mse_loss(pred, x, reduction='sum')
            optimizer.zero_grad()
            loss.backward()
            optimizer.step()

            if i % args.log_interval == 0 and i > 0:
                print(f'| epoch {epoch:3d} | '
                    f'{i:5d}/{train_num_batches:5d} batches | '
                    f'lr {lr:02.4f} | '
                    f'loss {loss:5.3f}')

        model.eval()
        val_loss = 0.0
        for i, (x,y) in enumerate(data_loader_test):
            x = x.to(device)
            with torch.no_grad():
                pred = model(x)
                loss = F.mse_loss(pred, x, reduction='sum')
                val_loss += loss.item()

        print(f'| epoch {epoch:3d} | lr {lr:02.4f} | total validation loss {val_loss/test_num_batches:5.3f}')

        lr_scheduler.step()
아주 간단하죠.
    pred = model(x)
    loss = F.mse_loss(pred, x, reduction='sum')
특히 단순하게 이미지 픽셀을 원본과 비교하면서 복원하는게 전부이기 때문에 loss는 mse loss를 쓴 걸 알 수 있다. (하지만 이 post에서도 설명했듯 흑백 이미지는 픽셀이 0이냐 1이냐로 나눌 수도 있기 때문에 Binary Cross Entropy (BCE)를 사용해서 학습해도 된다)
마지막으로 학습 결과로 Encoder가 어떻게 mnist 이미지를 학습했는지 보도록 하겠다.
    if args.plot:
        save_dir_path = os.path.join(os.getcwd(),'assets')
        if not os.path.isdir(save_dir_path) : os.mkdir(save_dir_path)
        plot_latent(model, data_loader_test, save_dir_path)
        plot_reconstructed(model, image_size, num_channel, save_dir_path, r0=(-10, 10), r1=(-10, 10), n=15)
위에서 사용한 plot 함수는 아래처럼 정의된다.
def plot_latent(model, data_loader, save_dir_path):
    plt.clf()
    for i, (x, y) in enumerate(data_loader):
        z = model.encoder(x.to(device))
        z = z.to('cpu').detach().numpy()
        plt.scatter(z[:, 0], z[:, 1], c=y, cmap='tab10')
    plt.colorbar()
    file_path = os.path.join(save_dir_path,'latent_space.png')
    if os.path.exists(file_path) : os.remove(file_path)
    plt.savefig(file_path)
def plot_reconstructed(model, image_size, num_channel, save_dir_path, r0=(-3, 3), r1=(-3, 3), n=15):
    plt.clf()
    w = image_size
    img = np.zeros((n*w, n*w, num_channel))
    for i, y in enumerate(np.linspace(*r1, n)):
        for j, x in enumerate(np.linspace(*r0, n)):
            z = torch.Tensor([[x, y]]).to(device)
            x_hat = model.decoder(z)
            x_hat = x_hat.reshape(num_channel, image_size, image_size)
            recon_img = x_hat.permute(1, 2, 0).to('cpu').detach().numpy()
            img[(n-1-i)*w:(n-1-i+1)*w, j*w:(j+1)*w, :] = recon_img
    plt.imshow(img, extent=[*r0, *r1])
    file_path = os.path.join(save_dir_path,'reconstruct_images.png')
    if os.path.exists(file_path) : os.remove(file_path)
    plt.savefig(file_path)
저장된 plot 이미지를 보면 아래와 같은데,
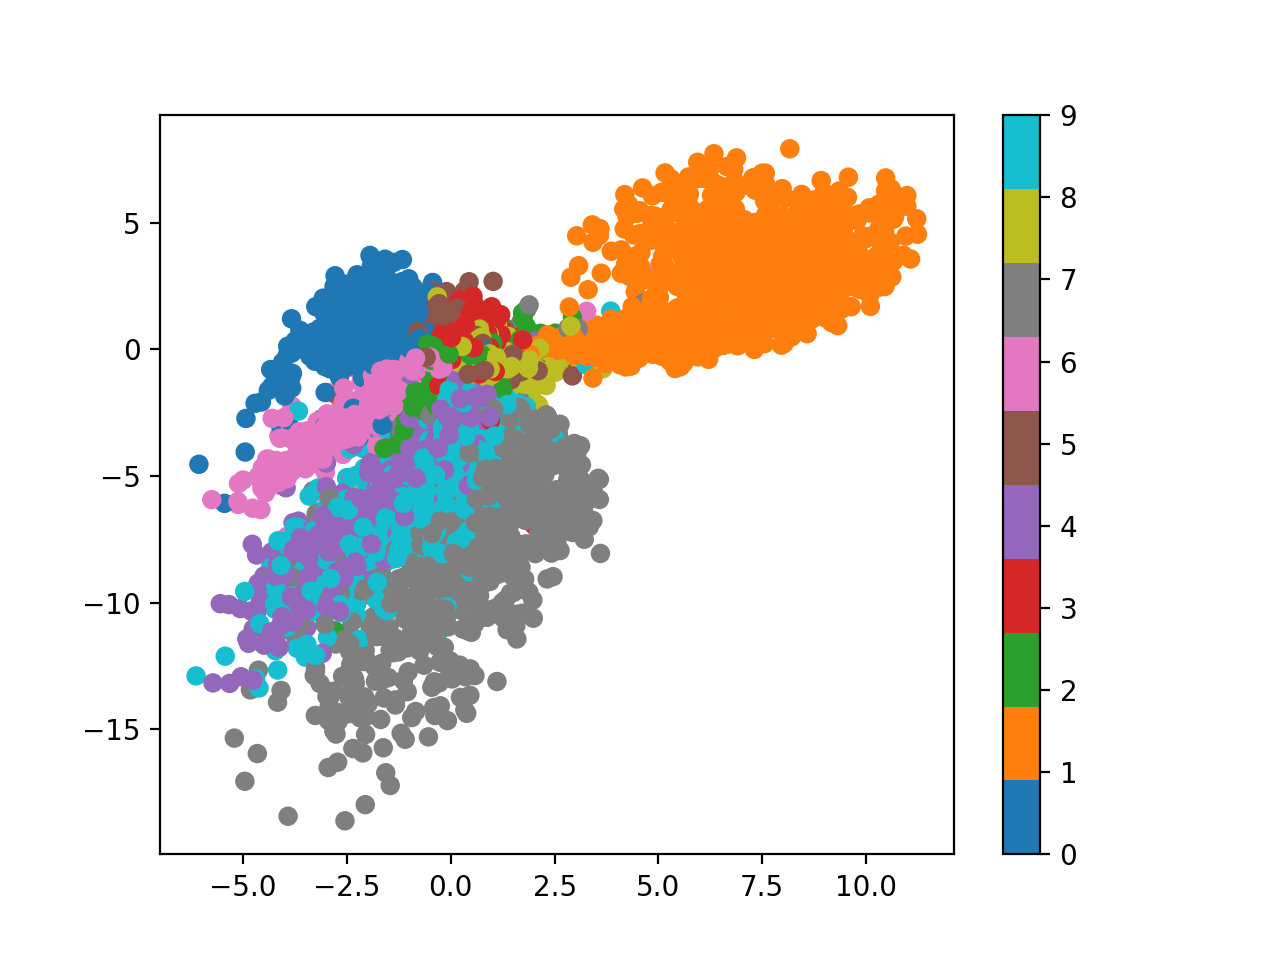 Fig. 2-dim Latent Space from AutoEncoder
첫 번째 이미지는 우리가 AutoEncoder의 hidden dimension, 즉 latent dimension 을 2로 정했기 때문에 이를 2차원 좌표상에 나타낸 것이다.
잘 보시면 어느정도 같은 숫자를 나타내는 데이터들이 뭉치는걸 볼 수 있지만 딱히 맘에 들지는 않는다.
여러 이유가 있을 수 있다.
- model 이 너무 간단하다.
- lr, num_epoch 등 하이퍼 파라메터가 적절하지 못했다.
그 다음으로는 우리가 2차원 좌표상에 Latent Vector들이 어떻게 mapping됐는지 이해했으니 거기서부터 이미지를 복원해보고 이를 plot해본 것인데,
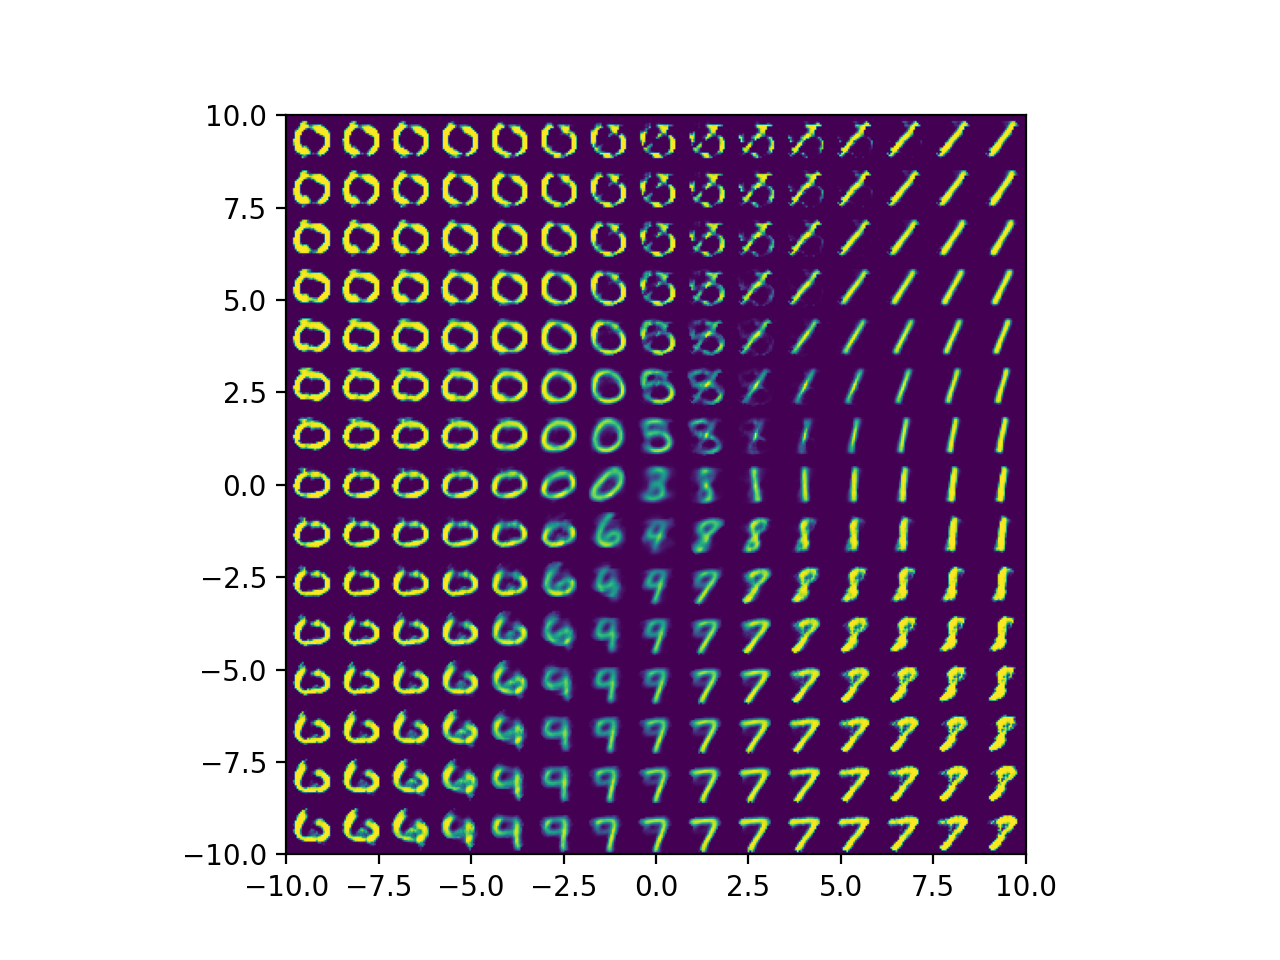 Fig. Decoded Images from 2-dim Latent Space Points
1사분면쪽에서 복원한 이미지들은 대부분 1인걸로 봐서 디코더도 적당히 학습된걸 알 수 있다.
Variational AutoEncoder (VAE)
이제 VAE를 구현해보자. AE와 유사한 구조를 가지고 있지만 몇 가지 다른점이 있다.
- Encoder는 Latent Dim 차원의 Vector를 뱉는게 아니라, Latent Dim 차원의
가우시안 분포(다른거여도 되긴 하지만 보통 normal dist) 를 예측한다. 즉 가우시안 분포의 mean 값을 예측함. ELBO Objective를 썼다. (MSE Loss +KL Divergence Loss)- 미분 불가능한 샘플링 연산을 처리하기 위해
Reparameterization Trick을 썼다.
 Fig. VAE의 Encoder는 Fixed Vector가 아닌 어떠한 분포를 예측한다.
VAE는 AE랑 구조 자체는 다른게 크게 없으니 구현체도 비슷하다.
class VariationalAutoencoder(nn.Module):
    def __init__(self, image_size, num_channel, latent_dims):
        super(VariationalAutoencoder, self).__init__()
        self.encoder = Encoder(image_size, num_channel, latent_dims)
        self.decoder = Decoder(image_size, num_channel, latent_dims)

    def forward(self, x):
        z = self.encoder(x)
        return self.decoder(z)
Decoder도 뭐 latent vector z를 받아서 원래 이미지사이즈의 Tensor를 뱉는거니 크게 다른건 없는데,
class Decoder(nn.Module):
    def __init__(self, image_size, num_channel, latent_dims):
        super(Decoder, self).__init__()
        self.linear1 = nn.Linear(latent_dims, 512)
        self.linear2 = nn.Linear(512, image_size**2 * num_channel)
        self.image_size = image_size
        self.num_channel = num_channel

    def forward(self, z):
        z = F.relu(self.linear1(z))
        z = torch.sigmoid(self.linear2(z))
        return z.reshape((-1, self.num_channel, self.image_size, self.image_size))
문제는 Encoder이다.
class Encoder(nn.Module):
    def __init__(self, image_size, num_channel, latent_dims):
        super(Encoder, self).__init__()
        self.linear1 = nn.Linear(image_size**2 * num_channel, 512)
        self.linear_mean = nn.Linear(512, latent_dims) # for mean
        self.linear_variance = nn.Linear(512, latent_dims) # for variance

        self.N = torch.distributions.Normal(0, 1) # zero mean, unit variance gaussian dist
        if device == 'cuda':
            self.N.loc = self.N.loc.cuda() # hack to get sampling on the GPU
            self.N.scale = self.N.scale.cuda()

        self.kld = 0

    def forward(self, x):
        x = torch.flatten(x, start_dim=1)
        x = F.relu(self.linear1(x))

        mu = self.linear_mean(x) # mean
        sigma = torch.exp(self.linear_variance(x)) # variance
        z = mu + sigma * self.N.sample(mu.shape) # sampled with reparm trick

        self.kld = (sigma**2 + mu**2 - torch.log(sigma) - 1/2).sum() # closed-form kl divergence solution

        return z
이전 AE Encoder와 다른게 좀 있는데요, 바로 input을 hidden vector로 mapping하는 linear1 layer 뒤에 mean 과 variance 를 예측하는 linear layer가 각각 2개나 있다는 것이다. 즉 아래의 그림처럼 하기 위해서 각각을 예측하는 레이어가 두 개 있는 것이다.

여기에서 아래 부분이 중요한데,
        mu = self.linear_mean(x) # mean
        sigma = torch.exp(self.linear_variance(x)) # variance
        z = mu + sigma * self.N.sample(mu.shape) # sampled with reparm trick
VAE에 대해서 다시 생각해보자.
- VAE
- What we want : \(p(x) = \int p(y \vert z) p(z) dz\)
- Encoder : \(q_{\phi}(z \vert x_i)\)
- Decoder : \(p_{\theta}(x_i \vert z)\)
ELBO: \(L(p_{\theta}(x_i \vert z), q_{\phi}(z \vert x_i)) = \mathbb{E}_{z \sim q_{\phi}(z \vert x_i)} [log p(x_i \vert z) + log p(z)] + H(q_{\phi}(z \vert x_i))\)
VAE는 ELBO 수식에 보면 이미지를 encoder에 태우면 어떤 분포 (보통 가우시안 분포)가 나오는데 여기에 기대값이 취해져 있다.
즉 원래같았으면 그 분포에서 뽑을 수 있는 z vector 는 다 뽑아서 계산을 해야 하는데 이건 불가능하므로 Sampling을 몇 번 하는걸로 대체하는 것이다.
즉 위의 코드에서 보면 가우시안 분포의 mean, variance값을 출력하는 각각의 레이어를 통과한건 알겠는데 여기에서 sigma에 어떤 self.N이라는 zero-mean unit variance 의 가우시안분포에서 뽑은 어떤 값을 곱해주는걸 알 수 있는데,
이게 바로 sampling효과를 내지만 미분을 가능하게 해주는 Reparameterization Trick이다.
- VAE
- ELBO : \(L(p_{\theta}(x_i \vert z), q_{\phi}(z \vert x_i)) = \mathbb{E}_{z \sim q_{\phi}(z \vert x_i)} [log p(x_i \vert z) + log p(z)] + H(q_{\phi}(z \vert x_i))\)
- Final Objective : \(\hat{\theta},\hat{\phi} = arg max_{\theta,\phi} ( \sum_{i=1}^{N} [ log p_{\theta} (x_i \vert \mu_{\phi} (x_i) + \epsilon \sigma_{\phi} (x_i) ) - D_{KL} ( q_{\phi} (z \vert x_i ) \parallel p(z) ) ] )\)
위의 수식에서 \(\epsilon\) 이 variance \(\sigma\)와 곱해져서 더해지는 부분이 바로 이 부분이다.
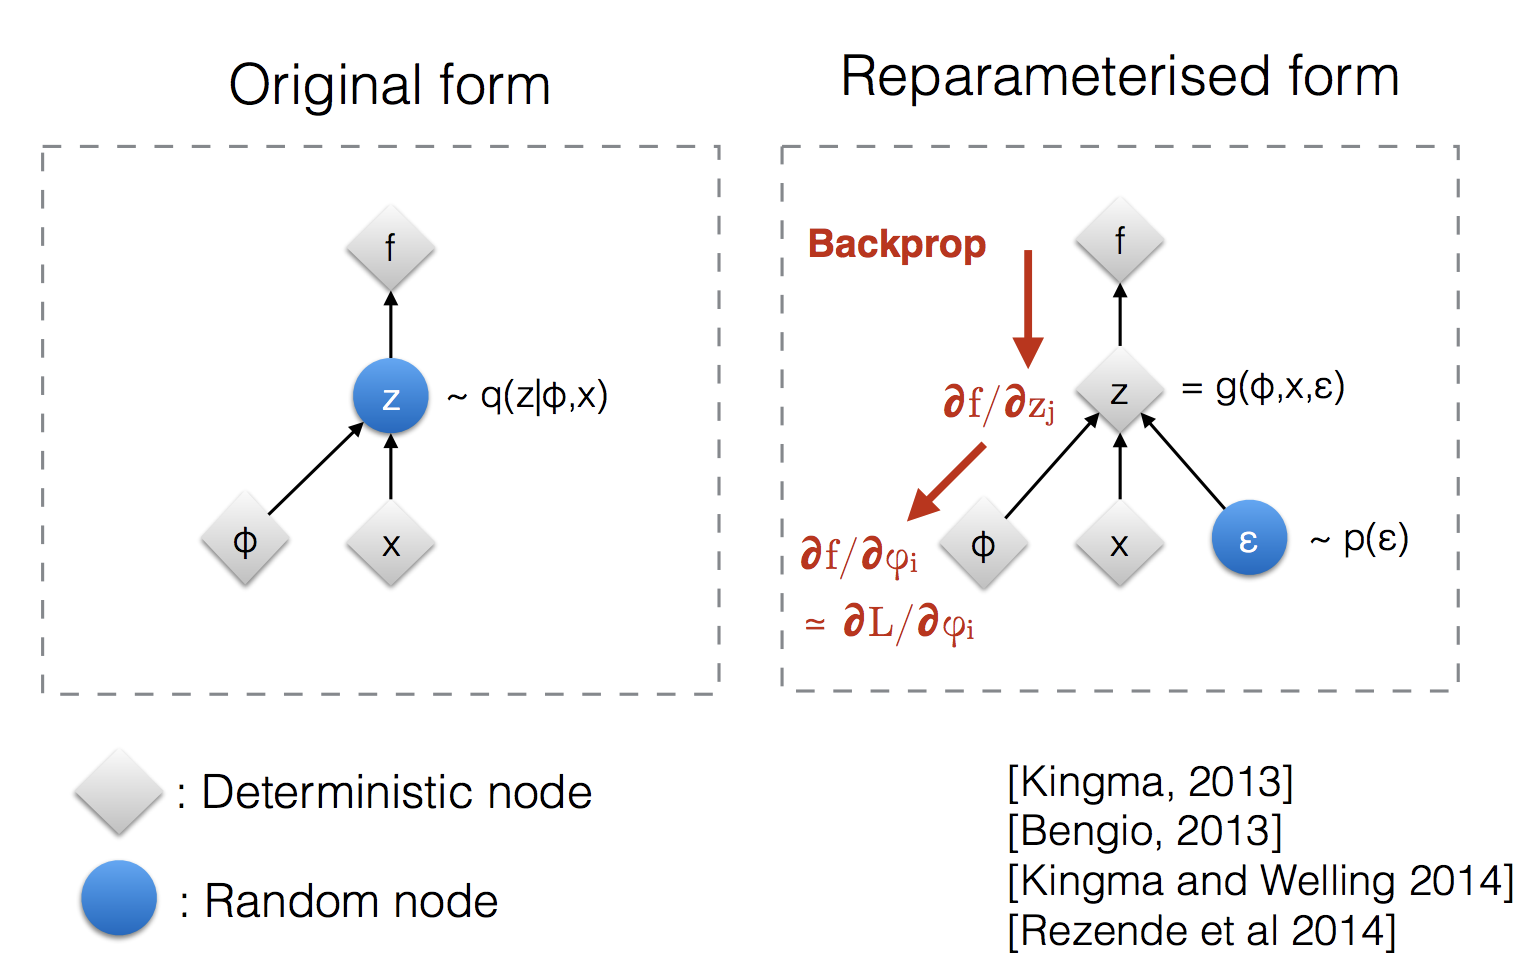 Reparameterization Trick은 Sampling 효과를 내도록 해주지만 미분불가능한 Sampling 연산이 아니므로 end-to-end로 VAE를 학습할 수 있게 해준다.
그리고 코드에서 눈에 띄는 점이 하나 더 있는데요, 바로 뉴럴넷을 forwarding 하면서 self.kld 라는 값을 계산해 낸다는 점이다.
    def forward(self, x):
        x = torch.flatten(x, start_dim=1)
        x = F.relu(self.linear1(x))

        mu = self.linear_mean(x) # mean
        sigma = torch.exp(self.linear_variance(x)) # variance
        z = mu + sigma * self.N.sample(mu.shape) # sampled with reparm trick

        self.kld = (sigma**2 + mu**2 - torch.log(sigma) - 1/2).sum() # closed-form kl divergence solution

        return z
이 부분은 원래 Objective Function 에 있는 두 항 중 우항에 해당하는 것인데,
\[\hat{\theta},\hat{\phi} = arg max_{\theta,\phi} ( \sum_{i=1}^{N} [ log p_{\theta} (x_i \vert \mu_{\phi} (x_i) + \epsilon \sigma_{\phi} (x_i) ) - D_{KL} ( q_{\phi} (z \vert x_i ) \parallel p(z) ) ] )\]이건 \(p(z)\) 라는 매우 간단한 가우시안 분포와 Encoder가 뱉은 가우시안 분포 \(q_{\phi}(z \vert x)\) 사이의 KL Divergence (KLD) 이므로,
두 가우시안 분포의 KLD 이기 때문에 closed-form solution이 이미 알려져 있어서 이를 사용한 것이다.
마지막으로 VAE 학습시에는 아까 봤던 디코더가 z를 받아서 원본을 복원하는 reconstruction loss (AE에서도 봤던 mse loss와 아예 같음) 에 kld loss를 더해주면 끝이다.
    x = x.to(device)
    pred = model(x)
    recon_loss = loss = F.mse_loss(pred, x, reduction='sum')
    kld_loss = model.encoder.kld
    loss = recon_loss + args.kld_weight * kld_loss
마찬가지로 plot을 해보자면 아래와 같은 이미지를 얻을 수 있는데, (마찬가지로 latent vector의 차원은 2차원이고, 같은 encoder, decoder 구조로 25에폭 돌림)
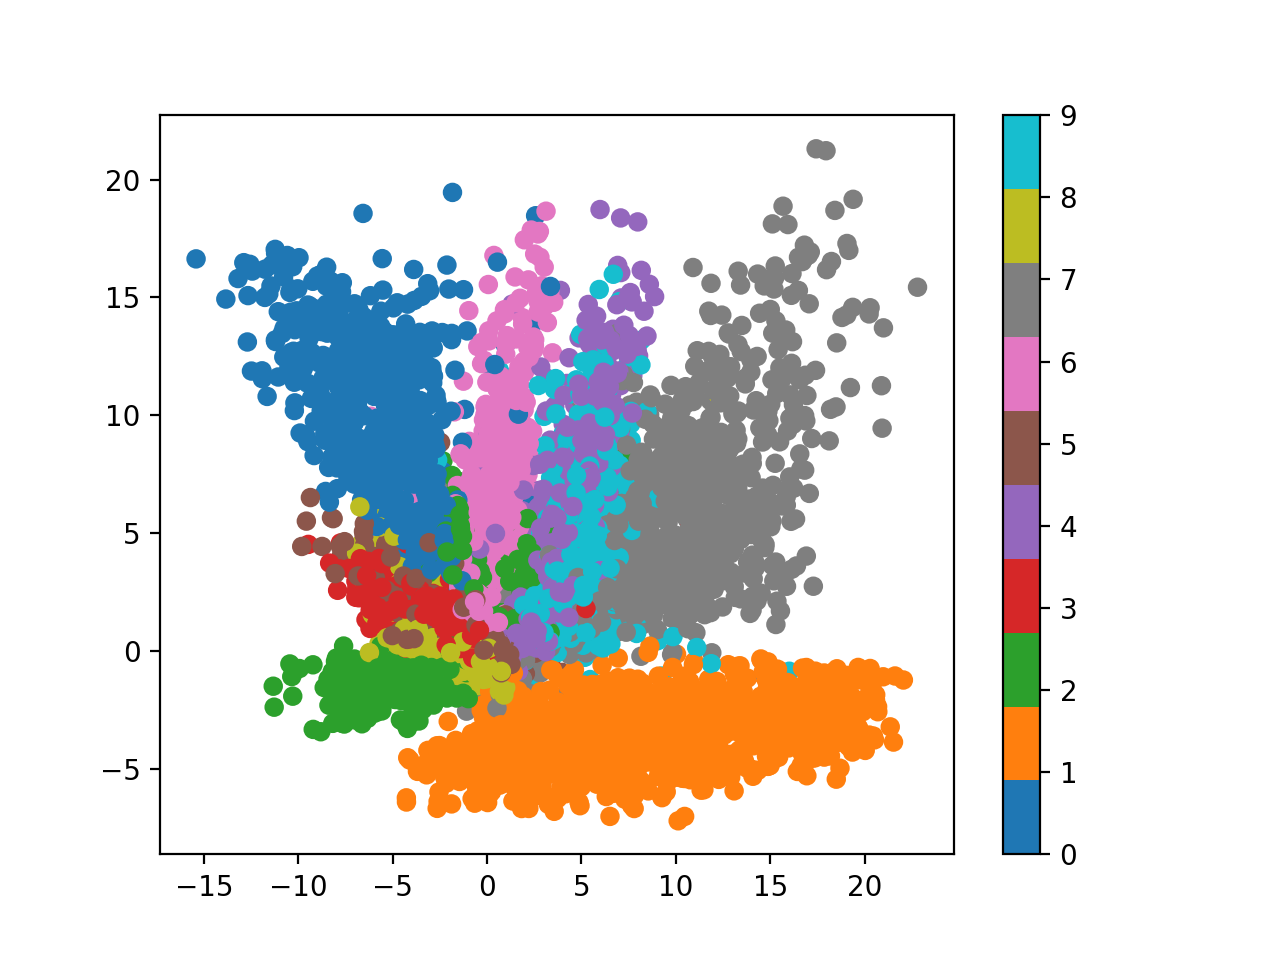 Fig. 2-dim Latent Space from AutoEncoder (VAE)
2차원 분포 상에 좀 더 둥글게, 즉 가우시안 분포 내에 같은 숫자들은 같이 뭉친걸 (semantic clustering) 볼 수 있다. 마찬가지로 디코더로 latent vector 들을 디코딩해보면
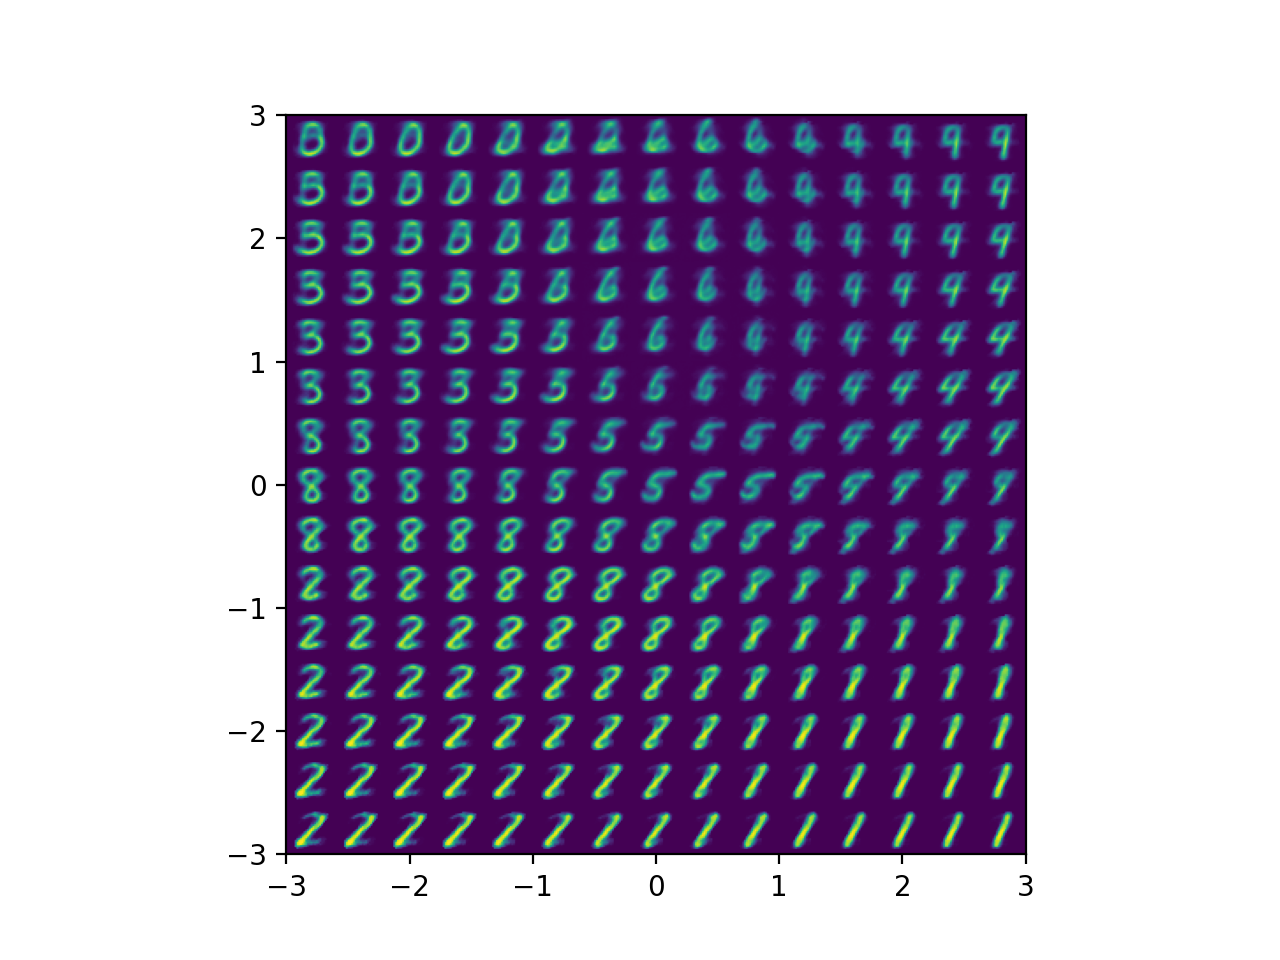 Fig. Decoded Images from 2-dim Latent Space Points (VAE)
위와 같은 사진을 얻을 수 있다.
사실 아직 좀 만족스럽지 않을 수 있다. 왜냐면 저는 VAE 정도면 이정도는 해줘야 되는거 아니야? 라고 생각했기 때문인데,
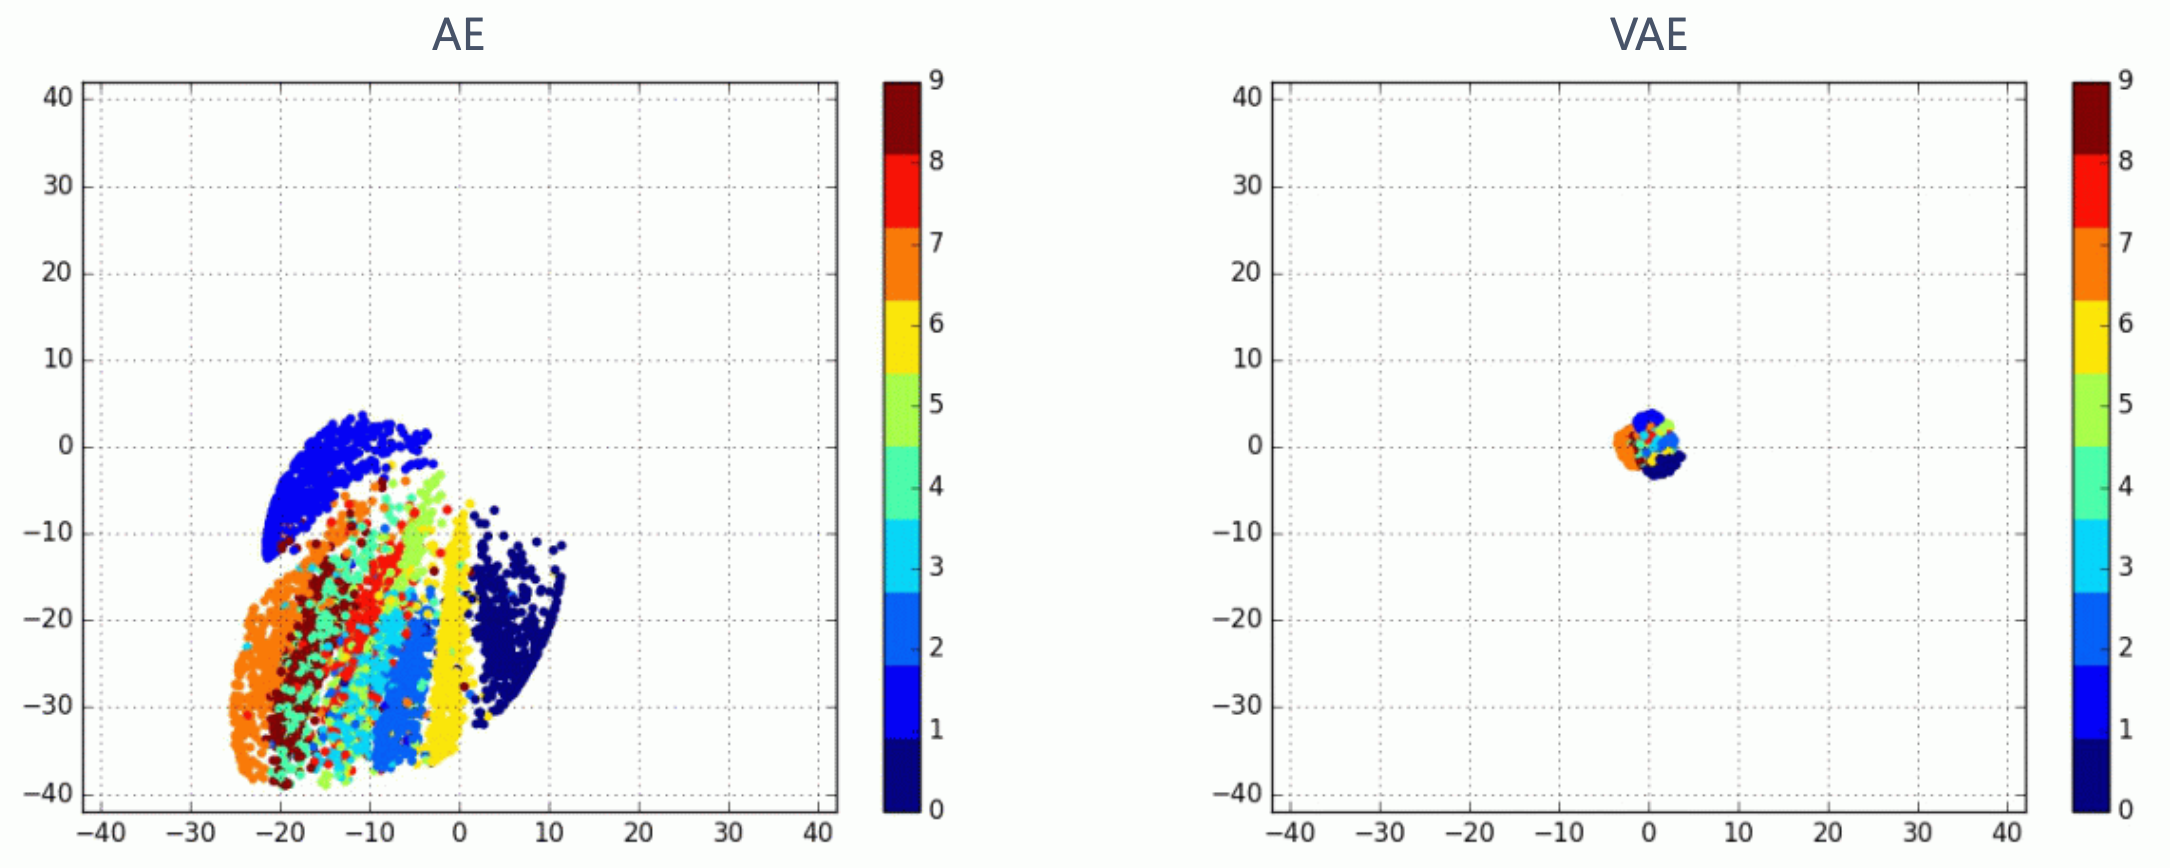 Fig. AE vs VAE Latent Space. Soruce from 오토인코더의 모든 것 (이활석님)
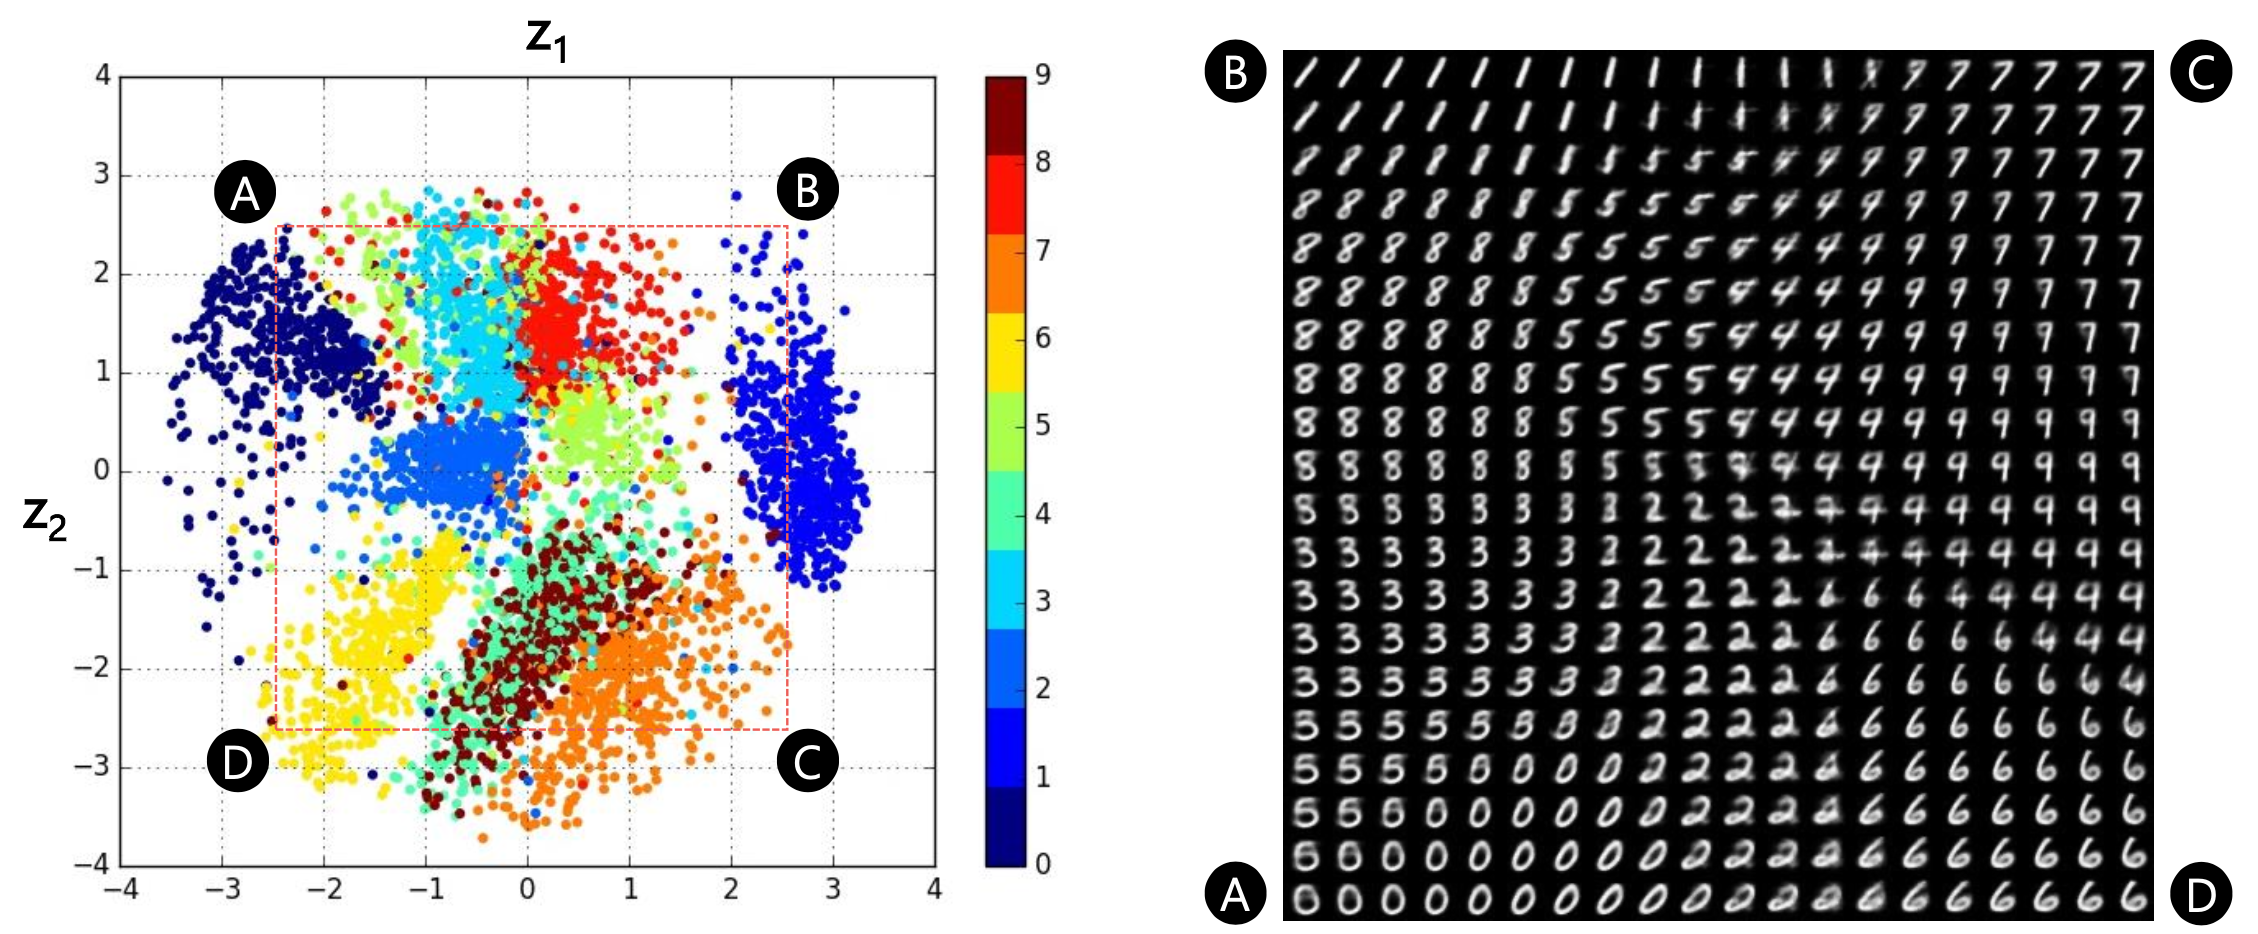 Fig. VAE Latent Space and Reconstructed Images from Latent Vectors. Soruce from 오토인코더의 모든 것 (이활석님)
이 경우 Convolutional Neural Network (CNN)을 섞어주면 좋다. 알다시피 CNN은 image domain input에 대해 spatial information을 보존하면서 feature learning을 하고, 필요한 model parameter수도 확 줄여준다.
Encoder에 2D CNN layer를 4~5층 정도 쌓고,
class DeepEncoder(nn.Module):
    def __init__(self, image_size, num_channel, latent_dims):
        super(DeepEncoder, self).__init__()

        modules = []
        hidden_dims = [32, 64, 128, 256, 512] if image_size == 64 else [64, 128, 256, 512]

        in_channel = num_channel
        for h_dim in hidden_dims:
            modules.append(
                nn.Sequential(
                    nn.Conv2d(in_channel, out_channels=h_dim,
                              kernel_size= 3, stride= 2, padding  = 1),
                    nn.BatchNorm2d(h_dim),
                    nn.LeakyReLU())
            )
            in_channel = h_dim

        self.encoder = nn.Sequential(*modules)
        self.linear_mean = nn.Linear(hidden_dims[-1]*4, latent_dims)
        self.linear_variance = nn.Linear(hidden_dims[-1]*4, latent_dims)

        self.N = torch.distributions.Normal(0, 1) # zero mean, unit variance gaussian dist

        if device == 'cuda':
            self.N.loc = self.N.loc.cuda() # hack to get sampling on the GPU
            self.N.scale = self.N.scale.cuda()

        self.kld = 0

    def forward(self, x):
        x = self.encoder(x)
        x = torch.flatten(x, start_dim=1)

        mu = self.linear_mean(x) # mean
        sigma = torch.exp(self.linear_variance(x)) # variance
        z = mu + sigma * self.N.sample(mu.shape) # sampled with reparm trick

        self.kld = (sigma**2 + mu**2 - torch.log(sigma) - 1/2).sum() # closed-form kl divergence solution

        return z
Decoder도 유사하게 쌓아주면 된다.
class DeepDecoder(nn.Module):
    def __init__(self, image_size, num_channel, latent_dims):
        super(DeepDecoder, self).__init__()

        self.image_size = image_size
        self.num_channel = num_channel

        modules = []
        hidden_dims = [512, 256, 128, 64, 32] if image_size == 64 else [512, 256, 128, 64]

        self.decoder_input = nn.Linear(latent_dims, hidden_dims[0] * 4)

        for i in range(len(hidden_dims) - 1):
            modules.append(
                nn.Sequential(
                    nn.ConvTranspose2d(hidden_dims[i],
                                       hidden_dims[i + 1],
                                       kernel_size=3,
                                       stride = 2,
                                       padding=1,
                                       output_padding=1),
                    nn.BatchNorm2d(hidden_dims[i + 1]),
                    nn.LeakyReLU())
            )
        self.decoder = nn.Sequential(*modules)

        # 28, 32 image size
        final_conv_layer =  nn.Conv2d(
            hidden_dims[-1],
            out_channels=num_channel,
            kernel_size=5 if image_size == 28 else 3 ,
            padding=0 if image_size == 28 else 1
            )
        self.final_layer = nn.Sequential(
                            nn.ConvTranspose2d(hidden_dims[-1],
                                               hidden_dims[-1],
                                               kernel_size=3,
                                               stride=2,
                                               padding=1,
                                               output_padding=1),
                            nn.BatchNorm2d(hidden_dims[-1]),
                            nn.LeakyReLU(),
                            final_conv_layer
                            )

    def forward(self, z):
        out = self.decoder_input(z)
        out = out.view(-1, 512, 2, 2)
        out = self.decoder(out)
        out = self.final_layer(out)
        out = torch.sigmoid(out)
        return out
그리고 use_deep_layers 라는 argument 로 이를 선택할 수 있게 한다.
class VariationalAutoencoder(nn.Module):
    def __init__(self, image_size, num_channel, latent_dims, use_deep_layers):
        super(VariationalAutoencoder, self).__init__()
        if not use_deep_layers :
            self.encoder = Encoder(image_size, num_channel, latent_dims)
            self.decoder = Decoder(image_size, num_channel, latent_dims)
        else:
            self.encoder = DeepEncoder(image_size, num_channel, latent_dims)
            self.decoder = DeepDecoder(image_size, num_channel, latent_dims)

    def forward(self, x):
        z = self.encoder(x)
        return self.decoder(z)
그 결과 아래처럼 좀 더 오밀조밀한 공간, 즉 -3~3 정도로 더 좁은 공간에 embedding vector들이 mapping되는걸 볼 수 있고,
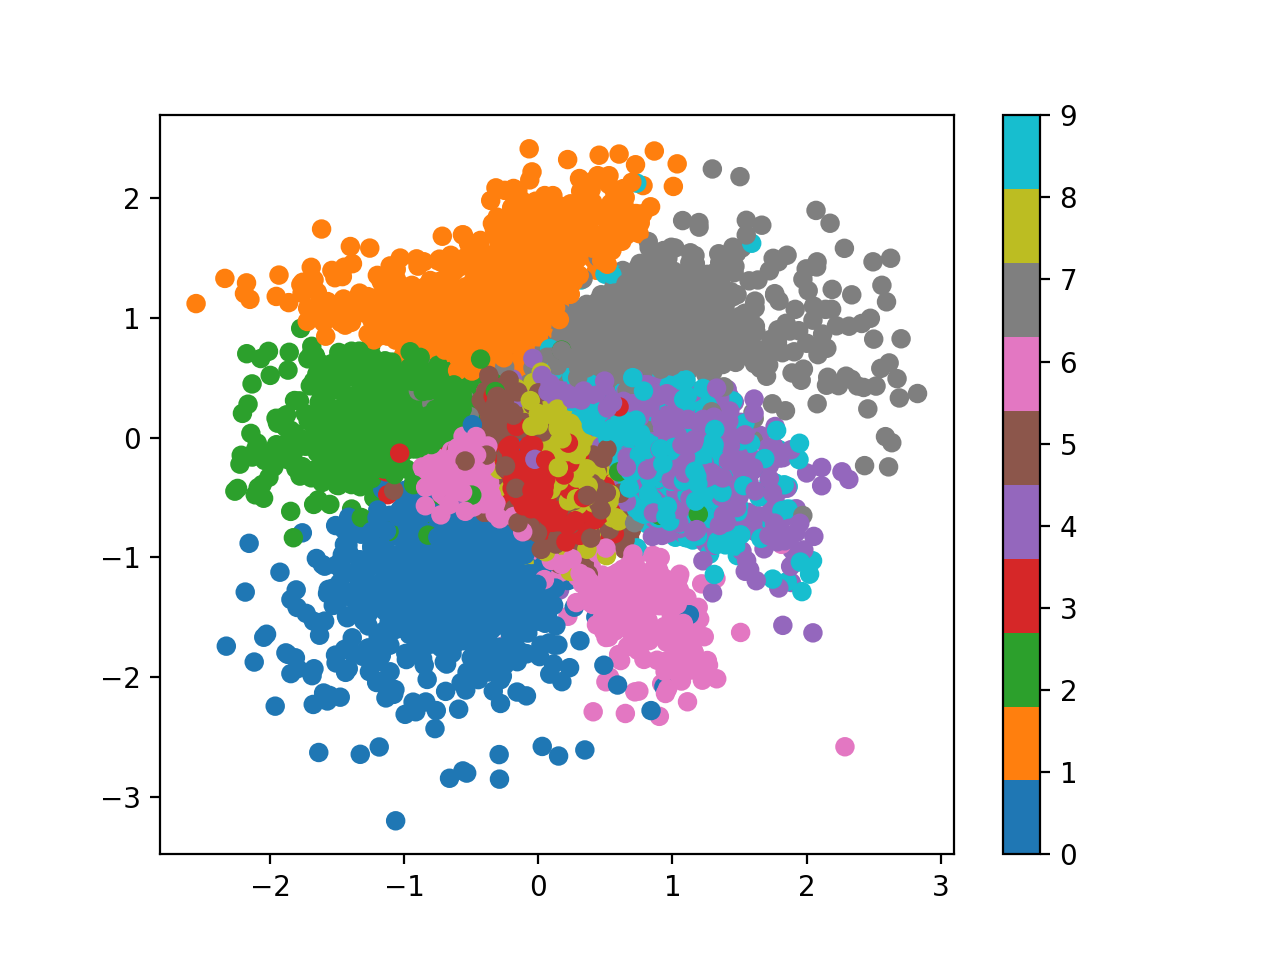 Fig.
Fig.
이 latent vector들로부터 복원한 결과도 더 깔끔한 걸 볼 수 있다.
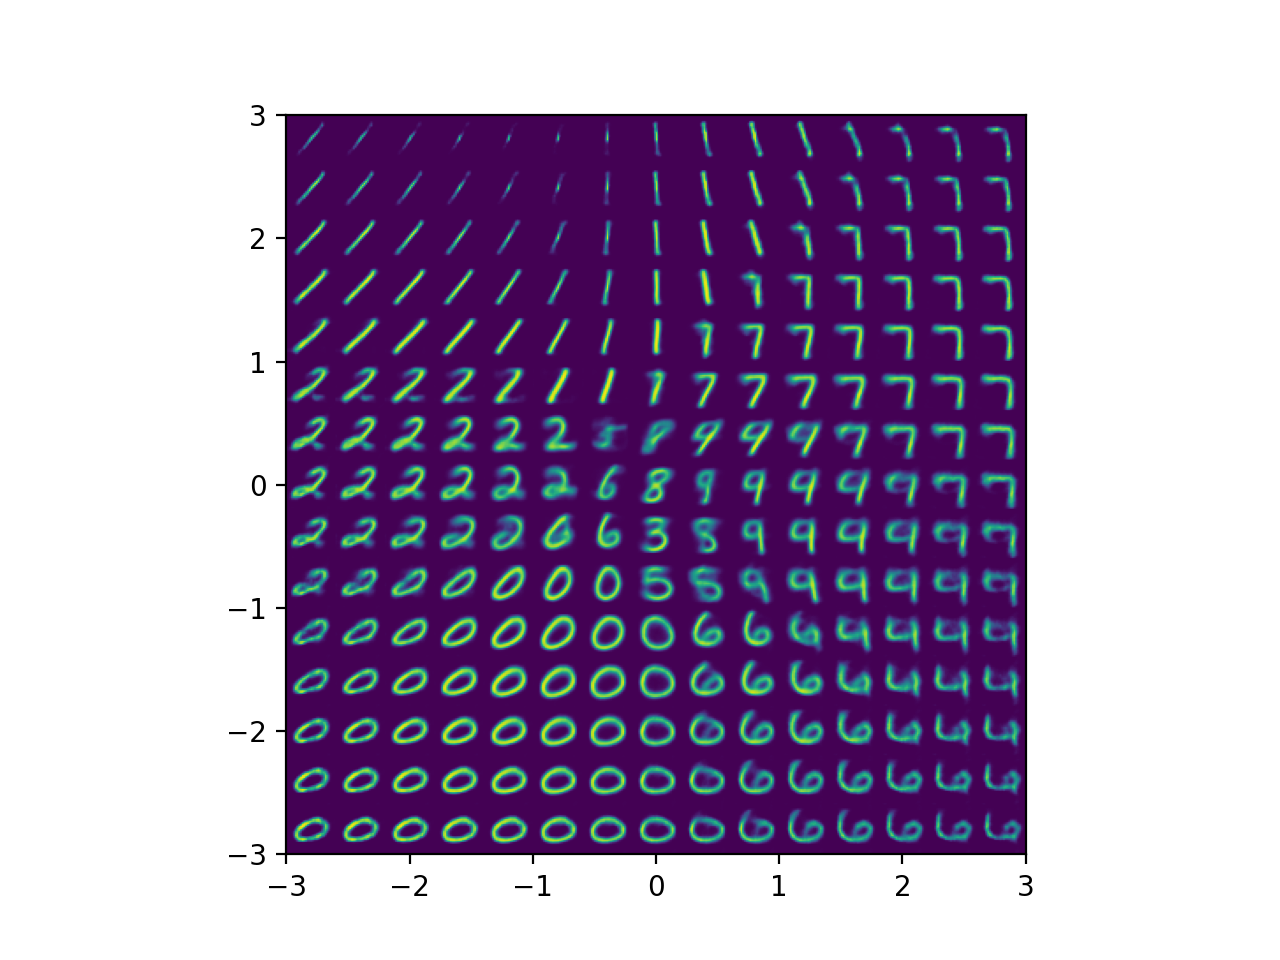 Fig.
Fig.
그리고 여기서 좀 더 나아가 원본 이미지를 Encoder -> Decoder 에 순차적으로 태워 얼마나 잘 복원하는지 확인해보면,
def plot_reconstruct_from_images(model, data_loader, save_dir_path):
    og_images = None
    recon_images = None
    for i, (x,y) in enumerate(data_loader):
        og_images = x[:10]
        recon_images = model(x.to(device))[:10]
        break;

    plt.clf()
    fig, axs = plt.subplots(2, 10, figsize=(16, 6))
    for j, (og, recon) in enumerate(zip(og_images, recon_images)):
        axs[0, j].imshow(og.permute(1, 2, 0).to('cpu').detach().numpy())
        axs[1, j].imshow(recon.permute(1, 2, 0).to('cpu').detach().numpy())
        axs[0, j].axis('off')
        axs[1, j].axis('off')
    plt.tight_layout()
    plt.show()

    file_path = os.path.join(save_dir_path,'reconstruct_from_images.png')
    if os.path.exists(file_path) : os.remove(file_path)
    plt.savefig(file_path)
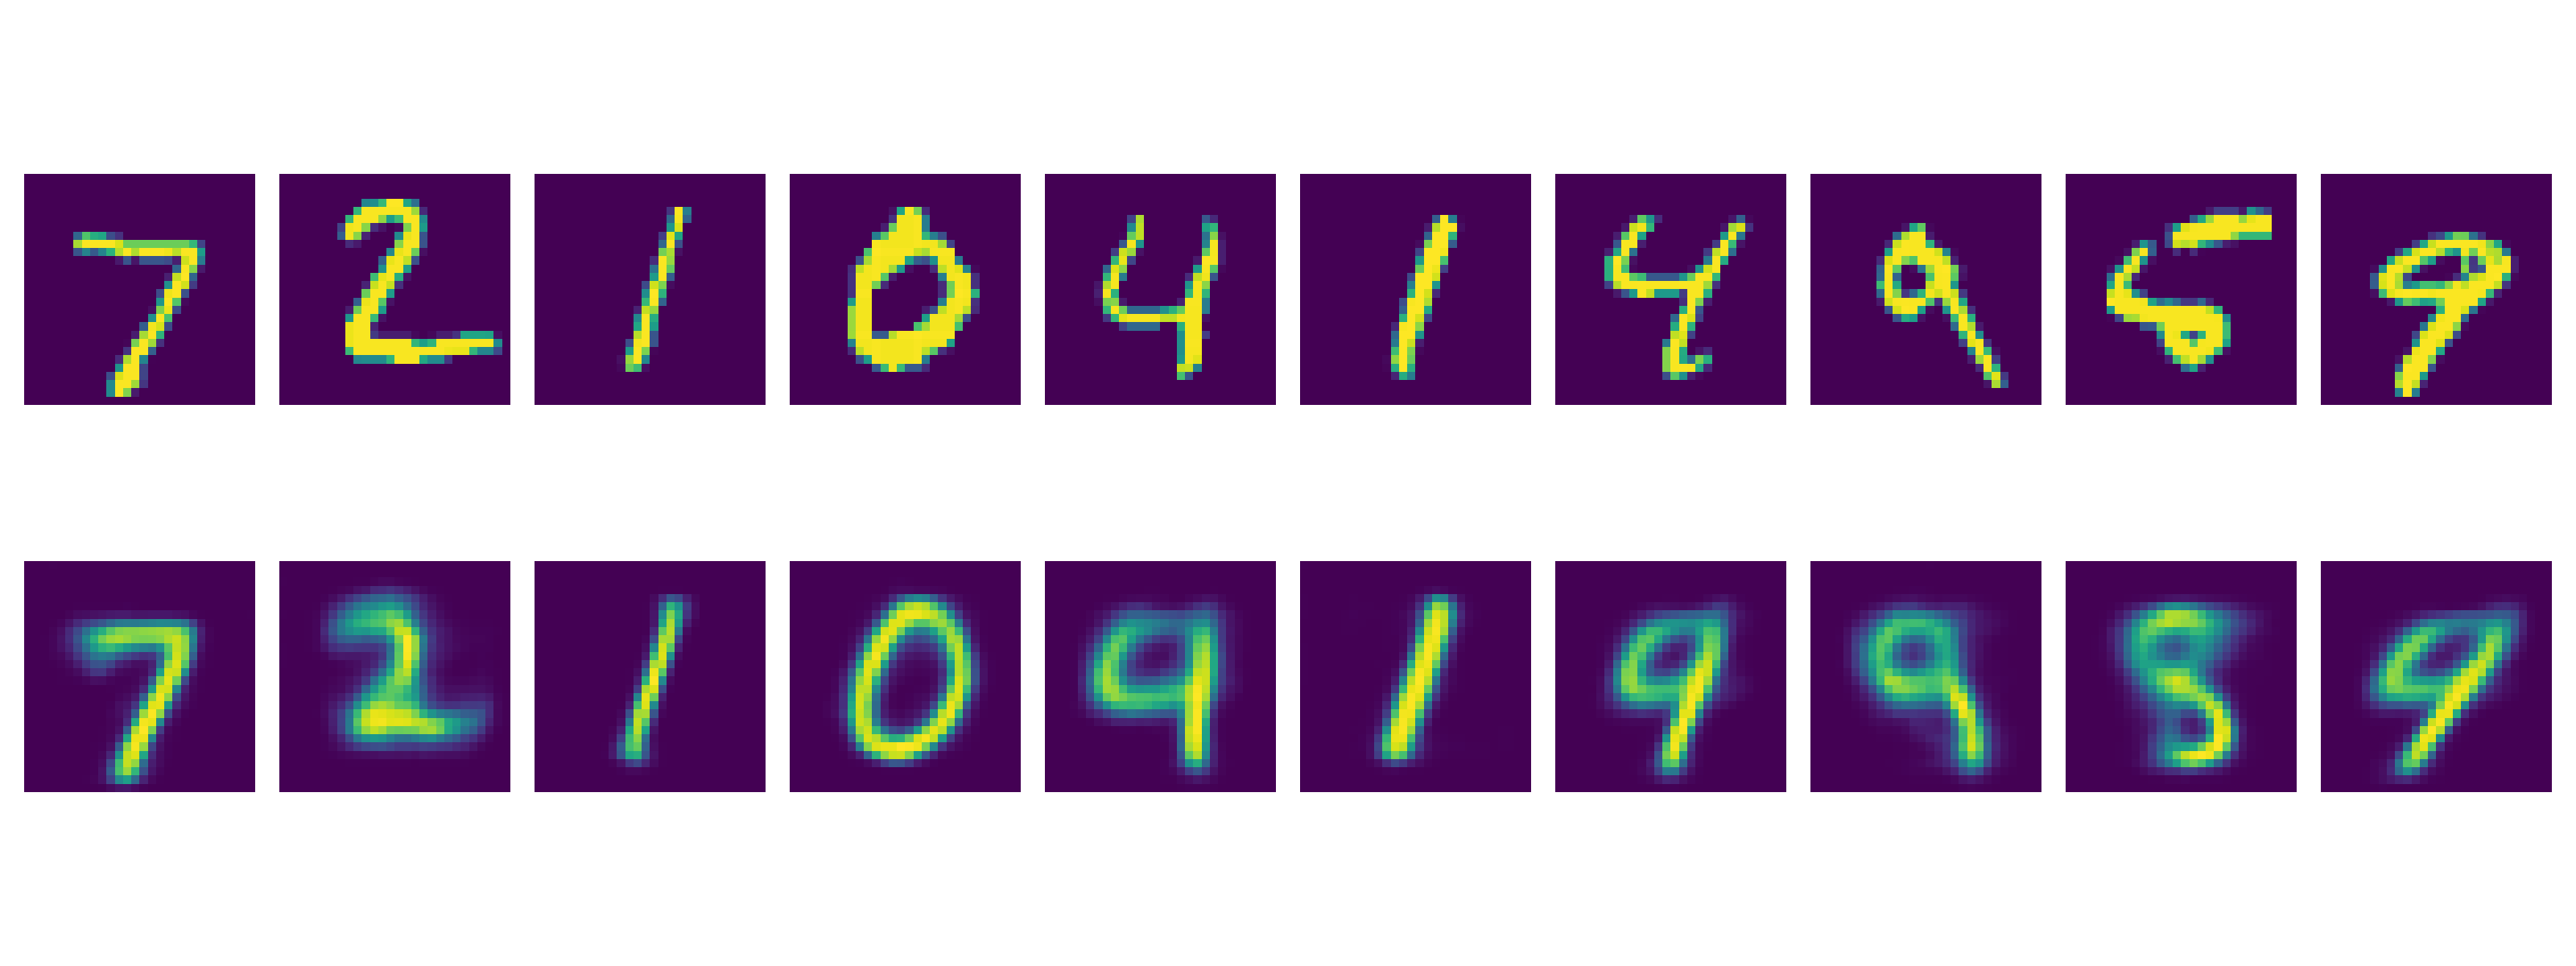 Fig.
Fig.
당연히 잘 되는걸 볼 수 있다. 다음으로 2차원의 random vector를 생성해서 Decoder에게 이미지를 복원하라고 시켜보면 이것도 잘 하는걸 볼 수 있다.
def plot_random_sample_from_prior(model, latent_dims, save_dir_path):
    z = torch.randn(10, latent_dims)
    samples = model.decoder(z.to(device))

    plt.clf()
    fig, axs = plt.subplots(1, 10, figsize=(16, 3))
    for j, sample in enumerate(samples):
        axs[j].imshow(sample.permute(1, 2, 0).to('cpu').detach().numpy())
        axs[j].axis('off')
    plt.tight_layout()
    plt.show()

    file_path = os.path.join(save_dir_path,'sample_from_prior.png')
    if os.path.exists(file_path) : os.remove(file_path)
    plt.savefig(file_path)

    return samples
 Fig.
Fig.
마지막으로 Alexander Van de Kleut가 한 것처럼 두 개의 서로다른 class로 부터 latent vector를 뽑은 뒤 이 두개의 벡터를 서로 interpolation 하는 실험을 해봤다.
def interpolate(model, image_size, num_channel, save_dir_path, x1, x2, n=20):
    z1 = model.encoder(x1)[0]
    z2 = model.encoder(x2)[0]

    z = torch.stack([z1 + (z2 - z1)*t for t in np.linspace(0, 1, n)])
    interpolate_list = model.decoder(z.to(device)).to('cpu').detach()

    plt.clf()
    w = image_size
    img = np.zeros((w, n*w, num_channel))
    for i, x_hat in enumerate(interpolate_list):
        x_hat = x_hat.reshape(num_channel, image_size, image_size)
        recon_img = x_hat.permute(1, 2, 0).numpy()
        img[:, i*w:(i+1)*w, :] = recon_img
    plt.imshow(img)
    plt.xticks([])
    plt.yticks([])

    file_path = os.path.join(save_dir_path,'interpolated_images.png')
    if os.path.exists(file_path) : os.remove(file_path)
    plt.savefig(file_path)
아래처럼 1과 0의 latent vector를 interpolate 하면 이상한 숫자가 decoding 되는게 아니라 embedding space상에 이 둘 사이에 mapping된 숫자들이 튀어나오는 것을 볼 수 있다.
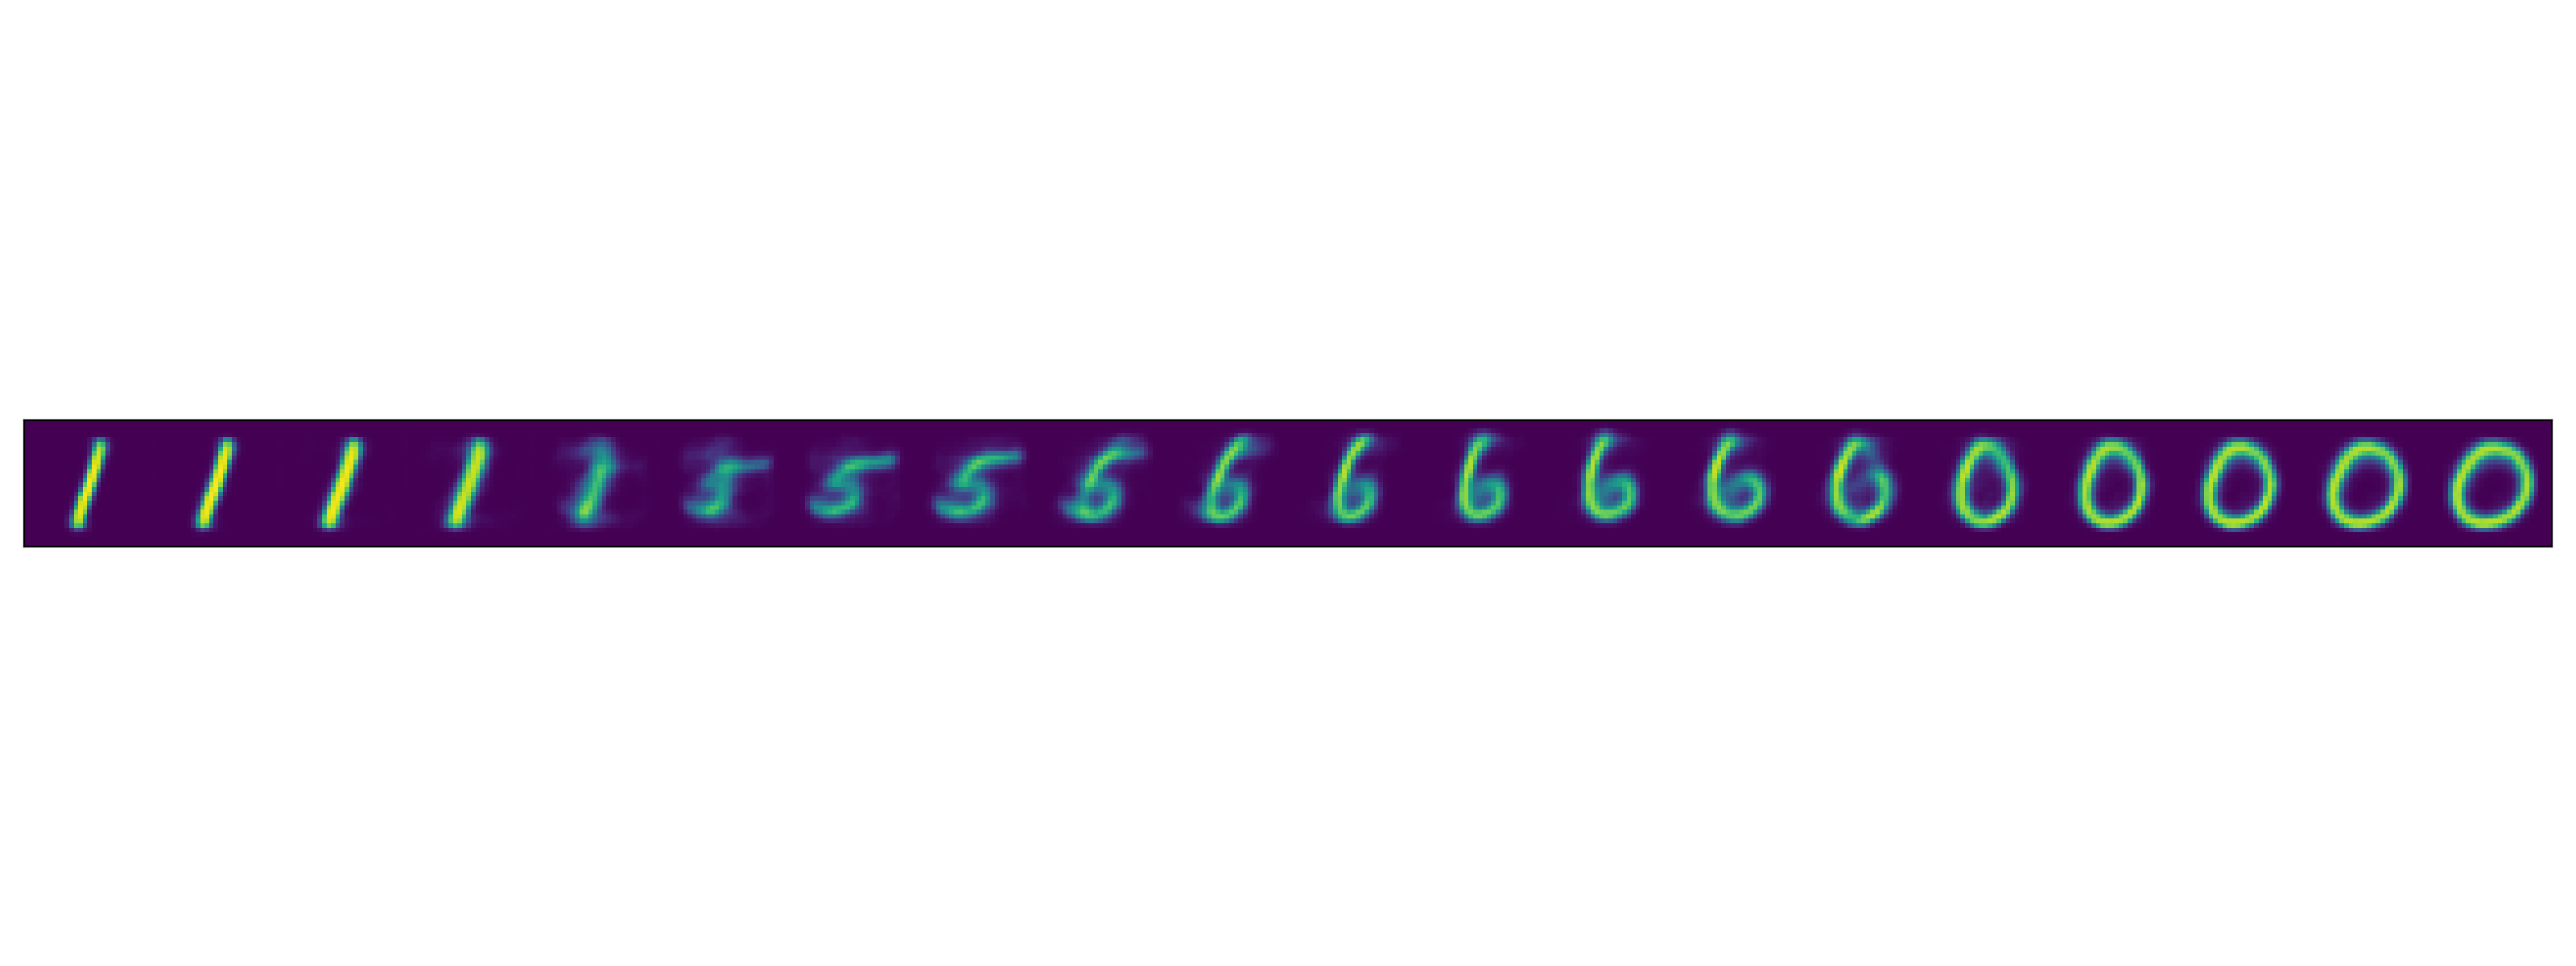 Fig.
Fig.
AE나 VAE로 학습한 인코더의 manifold가 가지는 장점은 이처럼 우리가 생각하지 못하는 데이터의 특성을 저차원에 잘 mapping시켜준다는 데 있는데,
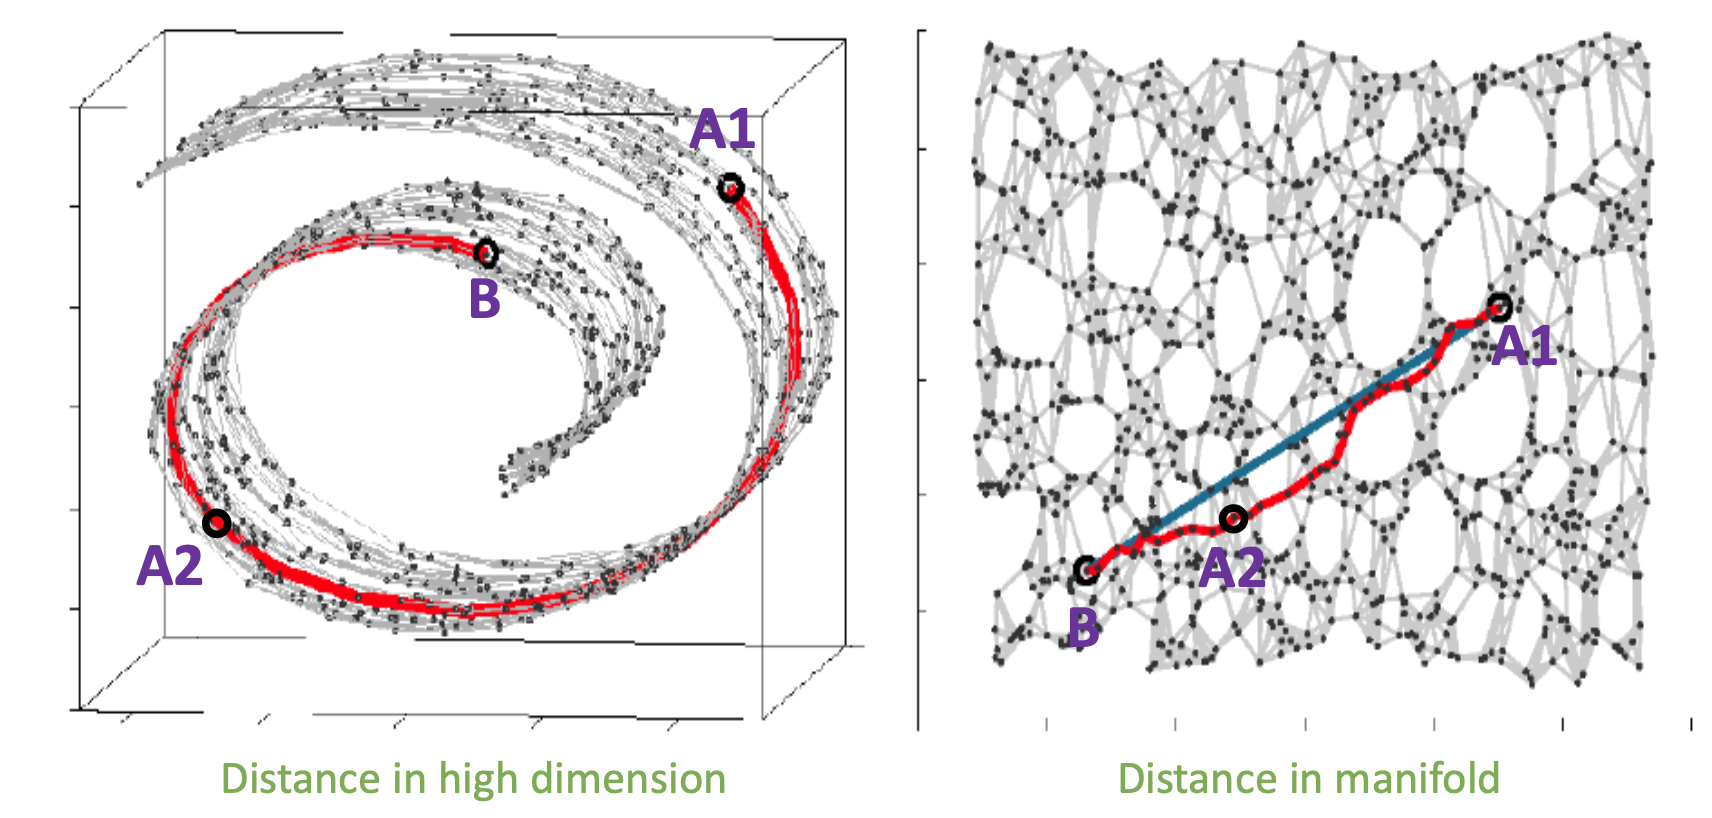 Fig.
Fig.
실제 MNIST의 원래 차원인 28*28, 즉 784차원의 고차원 공간에서는 1 과 0 (그림에서 A1과 B) 사이에 딱히 상관관계 등의 정보가 없었으나, (왼쪽 사진) VAE나 AE로 학습한 인코더는 이 관계를 잘 해석했기 때문에 그 사이에 A2 같은게 있다는걸 보여준 셈이 된다고 할 수 있겠다 (오른쪽 사진).
마지막으로 이 interpolation 하는 process를 animation으로 표현해보자.
def interpolate_gif(model, image_size, num_channel, save_dir_path, x1, x2, n=100):
    z1 = model.encoder(x1)[0]
    z2 = model.encoder(x2)[0]

    z = torch.stack([z1 + (z2 - z1)*t for t in np.linspace(0, 1, n)])
    interpolate_list = model.decoder(z.to(device)).to('cpu').detach() * 255

    mode = 'F' if num_channel == 1 else 'RGB'
    trans = transforms.ToPILImage(mode)
    images_list = []
    for x_hat in interpolate_list:
        recon_img = x_hat.reshape(num_channel, image_size, image_size)
        img = (trans(recon_img)).resize((256, 256))
        # recon_img = x_hat.reshape(num_channel, image_size, image_size)[0]
        # img2 = Image.fromarray(recon_img.numpy()).resize((256, 256))
        images_list.append(img)
    images_list = images_list + images_list[::-1] # loop back beginning

    plt.clf()
    file_path = os.path.join(save_dir_path,'interpolated_images.gif')
    if os.path.exists(file_path) : os.remove(file_path)

    images_list[0].save(
        file_path,
        save_all=True,
        append_images=images_list[1:],
        loop=1)
아래처럼 좀 있어보이는 gif를 얻을 수 있습니다.
 Fig.
Fig.
추가적으로 Deep CNN VAE 에 latent dimension을 128로도 키워봤는데요, 이 때는 2차원일때와 다르게 시각화 하기 힘들기 때문에 t-SNE 를 사용해서 시각화를 할 수 있는데,
def plot_latent_with_tsne(model, data_loader, save_dir_path, dim=2):
    plt.clf()

    latents = torch.Tensor()
    labels = torch.Tensor()
    for i, (x, y) in enumerate(data_loader):
        # z = model.encoder(x.to(device)).to('cpu').detach().numpy()
        z = model.encoder(x.to(device))
        latents = torch.cat((latents,z.to('cpu')),0)
        labels = torch.cat((labels,y),0)

    z = latents.to('cpu').detach().numpy()
    y = labels.to('cpu').detach().numpy()

    tsne_vector = manifold.TSNE(
        n_components=dim, learning_rate="auto", perplexity=40, init="pca", random_state=0
    ).fit_transform(z)

    if dim == 2:
        plt.scatter(tsne_vector[:, 0], tsne_vector[:, 1], c=y, cmap='tab10')
    elif dim == 3:
        fig = plt.figure()
        ax = fig.add_subplot(projection='3d')
        ax.scatter(tsne_vector[:, 0], tsne_vector[:, 1], tsne_vector[:, 2], c=y, cmap='tab10')

    file_path = os.path.join(save_dir_path,'latent_space_with_tsne_{}d.png'.format(dim))
    if os.path.exists(file_path) : os.remove(file_path)
    plt.savefig(file_path)
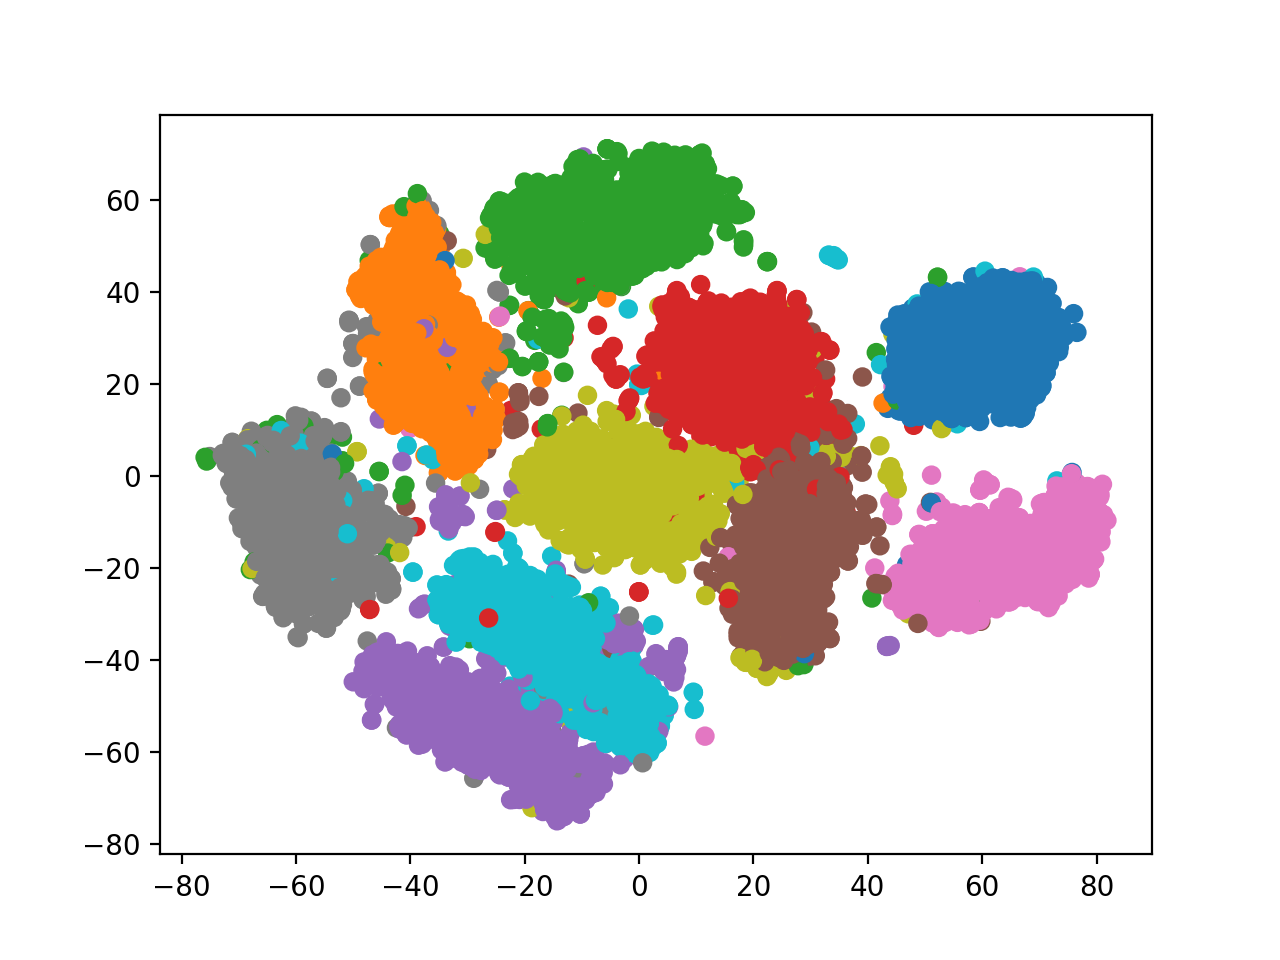 Fig. 128차원 -> 2차원 latent space 시각화
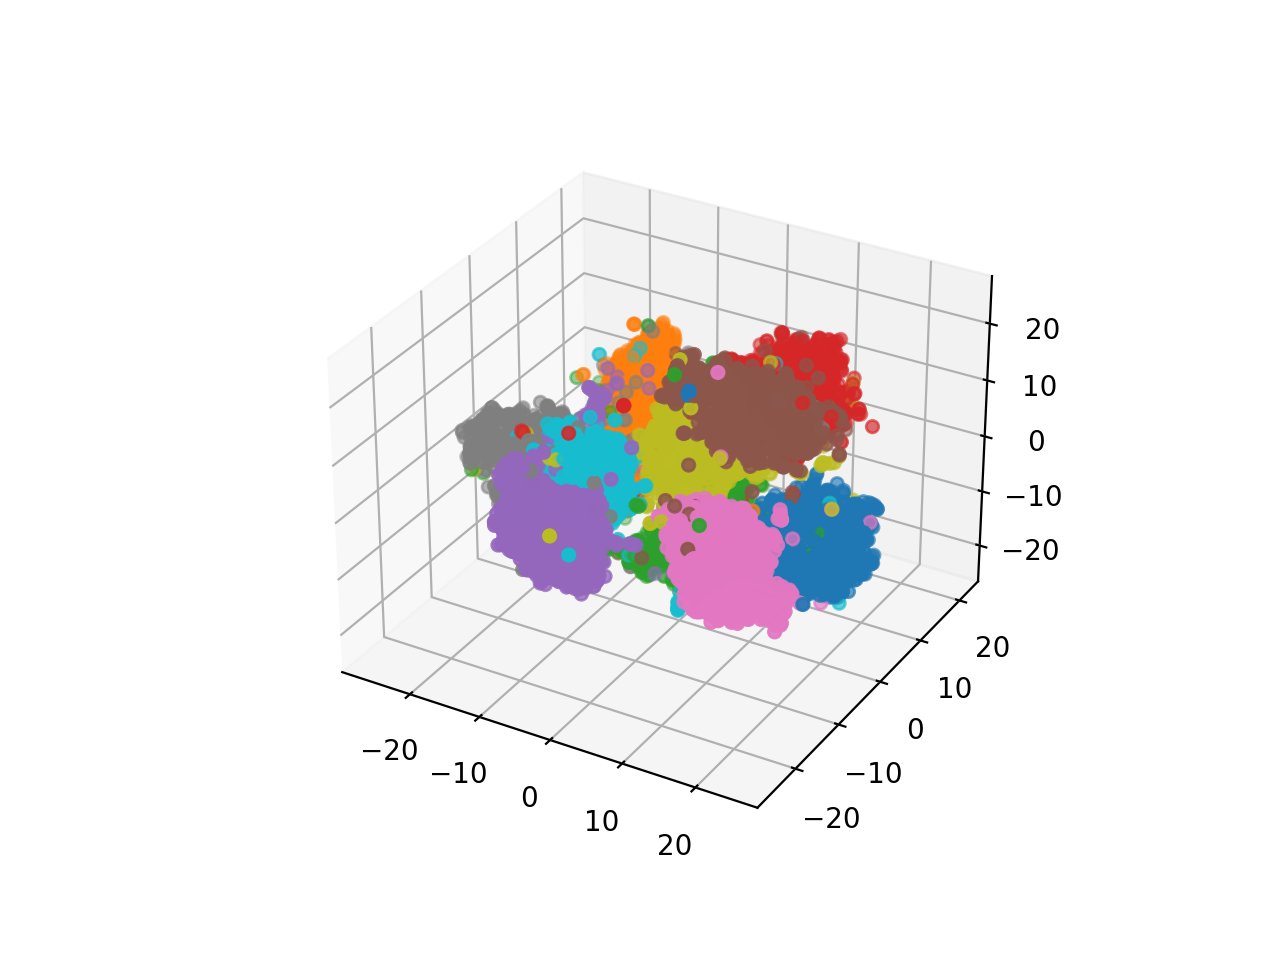 Fig. 128차원 -> 3차원 latent space 시각화
2차원일때보다 더 잘 클러스터링 된 걸 알 수 있었으나 랜덤으로 샘플링한 128차원 벡터를 디코딩 했을 때는 너무 고차원 상에 sparse하게 데이터가 mapping돼서 그런지 썩 좋지 못한 모습을 보였다.
 Fig. decoding random sampled 128 dim latent vector
Vector Quantized Variational AutoEncoder (VQ-VAE)
- TBC (let’s check this)