(WIP) Iterative Optimization Algorithms for ML (2/4) - Deep Dive Into Adaptive Optimizers (AdaGrad, RMSProp Adam). (Why It Works? / Importance of Beta 1,2 and epsilon / Adam Variants)
06 Aug 2024< 목차 >
- Overview Of Following Adam Variants
- Adam Optimizer
- Revisit AdaGrad: Why Adaptive Optimizer Really Works?
- Revisit AdaGrad: Why Adaptive Optimizer Really Works?
- (2018) Adafactor: Adaptive Learning Rates with Sublinear Memory Cost
- (2017) Decoupled Weight Decay Regularization
- (2019) On the Variance of the Adaptive Learning Rate and Beyond (RAdam)
- Dive Into Pytorch Adam, AdamW and Adafactor Implementation
- References
Overview Of Following Adam Variants
2010년대 중후반까지만 해도 어떤 model을 학습하던 무지성으로 Adam optimizer를 사용하라는 말이 있었다. 하지만 10년대 후반부터 20년대에는 AdamW를 쓰는 것이 baseline이 되었고, memory나 성능면에서 Adam optimizer가 갖는 문제점을 지적하고 이를 개선한 optimizer들이 계속 제안이 되고 있다.
AdamW가 제안된 paper title은 Decoupled Weight Decay Regularization으로 ICLR 2019 (preprint는 2017)에 발표되었는데,
이 algorithm의 key idea는 이름에서도 알 수 있듯 Adam은 우리가 생각하는 Weight decay regularization이 제대로 안되고 있다는 점을 꼬집어 Adam을 변형한 것이라고 요약할 수 있다.
Adafactor는 AdamW가 제안된 년도 (2017)의 이듬해 (2018)에 제안되었는데, Adam, AdamW는 momentum을 EMA tracking 하기 위해 model parameter의 4배에 달하는 memory가 필요하다는 문제를 가지고 있고 Adafactor는 이를 tackle 한다. 2018년 즈음이라면 V100-32GB GPU가 최신일 시절인데 Google에서 한참 transformer model size를 키우면 성능이 좋다는 것이 입증되고 있던 시기라 scale up하던 시절이라 memory reduction의 필요성이 절실했을 것이다. (Adafactor의 1저자 Noam Shazeer는 Transformer의 저자이며 Google에서 엄청난 족적을 남겼다)
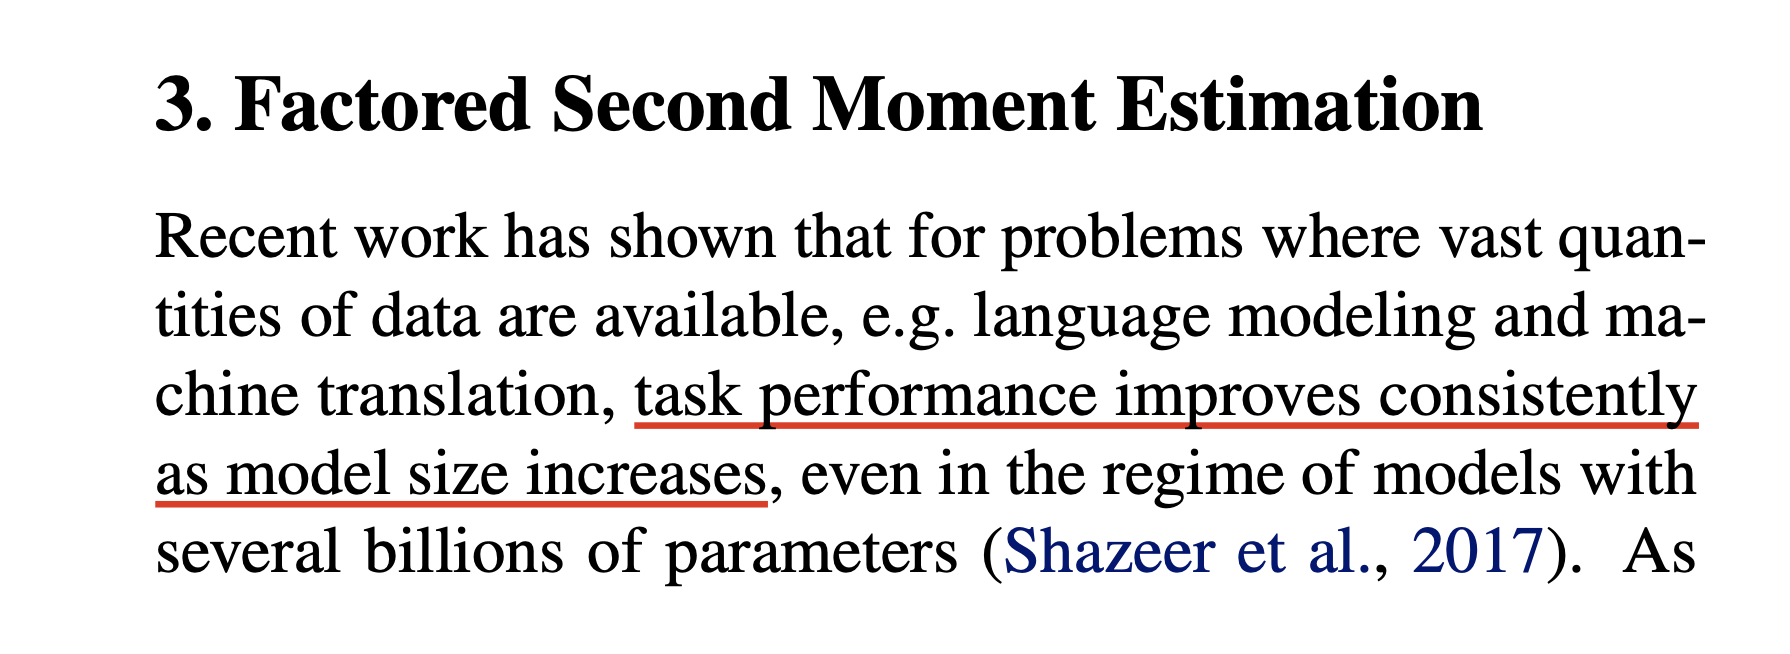 Fig.
Fig.
Adafactor가 제안된 paper title이 Adaptive Learning Rates with Sublinear Memory Cost인 점에서 알 수 있듯 이는 sublinear cost를 갖는 Adam variant라고 생각하면 된다.
Key contribution은 Adam의 second moment를 row rank approximation하여 저장하는 것과 parameter size별로 lr scaling을 하는 것 등이 있다.
Adam Optimizer
A Brief Review of Adam
본격적으로 Adafactor등에 대해 알아보기 전에 Adam optimizer에 대한 recapitulate을 하도록 하자.
Adam은 간단히 말해서 gradient scale이 parameter별로 달라 학습이 불안정 한 것을 막기 위해 normalize해주는 adaptive learning rate technique과 이전 optimization step 에서의 gradient를 tracking하여 loss surface 내의 plateau나 saddle point같이 gradient가 사라지는 지점을 빠져나오기 위한 momentum technique이 결합된 것이라고 할 수 있다.
Adam algorithm은 다음과 같이 parameter update를 하는데,
여기서 \(x_t\)가 optimization timestep, \(t\)에서의 Neural Network (NN)의 parameter 이다.
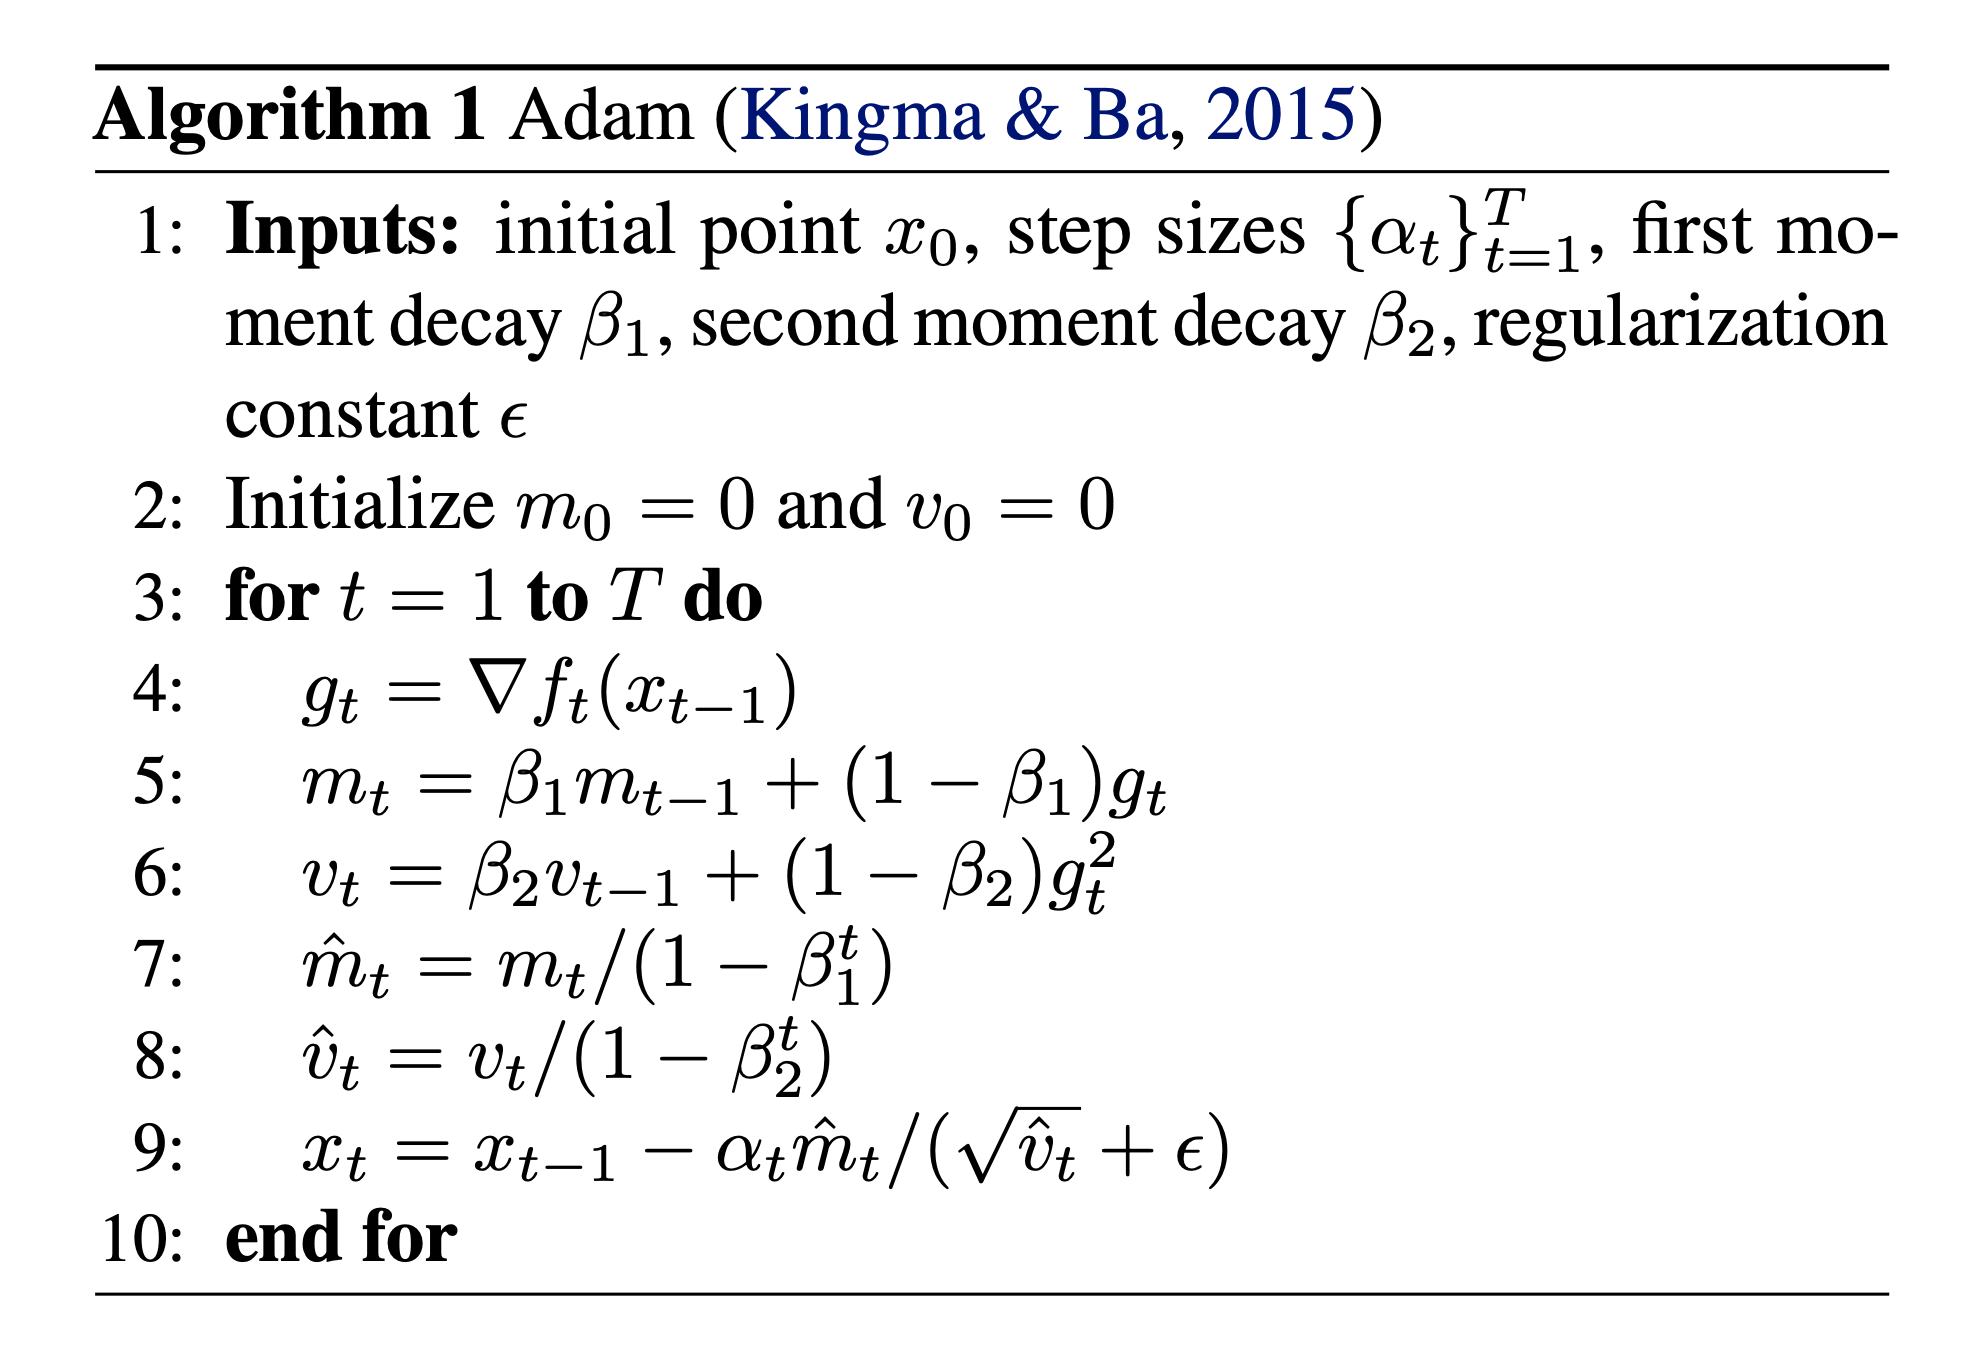 Fig.
Fig.
Adam이 param update를 하기 위한 quantity를 계산하는 부분은 아래 5개의 step으로 요약할 수 있다.
- 1.Loss를 parameter에 대해 미분하여 gradient를 구한다. (Line 4)
- 2.Moment estimation을 한다. (Line 5, 6)
- 1st moment, \(m_t\)를 \(\beta_1\) factor로 Exponential Moving Average (EMA) 한다.
- 2nd moment, \(v_t\)를 \(\beta_2\) factor로 EMA 한다.
- 3.Timestep이 작을 경우 gradient가 너무 작게 update되는 문제를 방지하기 위해 각 moment에 대해 Bias Correction을 해준다. (Line 7, 8)
- 4.1st moment를 2nd moment의 square root로 나눠주면 gradient scale이 각 차원별로 normalize되고, 이 때 0으로 나눠지는 것을 막기 위해 \(\epsilon\)을 추가한다. (Line 9)
- 5.4번에서 term과 learning rate를 곱한 quantity로 parameter를 update한다. (Line 9)
여기서 \(m_t, v_t\)는 momentum이 아니라 moment라는 점에 주의해야 한다. Momentum은 기존의 gradinet의 direction을 유지해주는 현상(?) 자체를 의미하며, Momnet는 mathematics에서 쓰는 term으로, 1st moment, \(m_t\)는 sample의 평균을 말하, 2nd moment, \(v_t\)는 uncentered variance를 말한다. 그래서 1st moment는 현재 optimization step의 batch를 가지고 추정한 average gradient, \(g_t\)가 되는데, 이것이 Momentum trick에 의해서 앞선 gradient들과 합쳐지는 것이고, 2nd moment는 uncentered 이므로 \(\mathbb{E}[(g_t - \mu)^2]\)가 아니라 \(\mathbb{E}[g_t^2]\)가 되는 것이다.
Adam에서 1st moment가 gradient의 direction을 정하는 momentum을 의미하고, 2nd moment가 adaptive Learning Rate (LR)를 의미한다. 보통 각 moment를 EMA하는 factor로 \(\beta_1=0.9\), \(\beta_2=0.999\)를 쓰는데 (두 값은 모두 \(0~1\) 사이의 값이여야 함), 이는 gradient direction을 결정하는 데에는 과거의 값의 90%를 유지하고 현재의 값은 10%만 반영한다는 의미가 담겨있고, gradient의 각 dimension 별로의 scale (step size)는 과거의 값을 99.9% 유지하고, 현재의 값은 0.1%만 반영한다는 의미가 담겨있다. 다시 말해서 gradient scale은 좀 더 보수적으로 현재의 값을 반영해서 LR를 조절하겠다는 것을 말한다.
학습 후반부로 갈 수록 bias correction은 더 이상 의미가 없어지고 EMA만 계속 하게 될틴데, 이 때 \(\beta\)을 0에 가깝게 scheduling한다면 pure SGD에 가깝게 되면서 convergence에 도움이 될 수도 있다. 하지만 Adam을 LR을 점차 줄이는 (decay) scheduler와 함게 쓴다면 의미가 없을 수도 있다. 이렇듯 beta 1, 2는 user의 training setting에 따라서 중요한 HyperParameter (HPs)이며 세심하게 tuning 하는 것이 성능에 지대한 영향을 미칠 수도 있다. (사실 beta2가 beta1보다 훨씬 큰 이유에 대해서 아마 training stability를 위한 것 같은데 reference를 찾지 못하겠다. 분명 어디서 봤던 것 같은데… 찾으면 다시 수정하도록 하겠다.)
Revisit AdaGrad: Why Adaptive Optimizer Really Works?
앞선 post에서는 AdaGrad나 RMSProp같은 adaptive optimizer에 대해서 대충 직관적으로만 설명하고 Adam으로 넘어갔지만, 사실 이둘을 자세히 이해하는것이 굉장히 중요하다. 왜냐하면 Adam optimizer의 paper를 잘 읽어보면 Adam은 optimizer hyperparameter, \(\beta_1, \beta_2\)를 어떻게 설정하느냐에 따라서 AdaGrad와 동치인 optimizer가 될 정도로 관련이 깊기 때문이다 (bias correction을 제외하면 말이다).
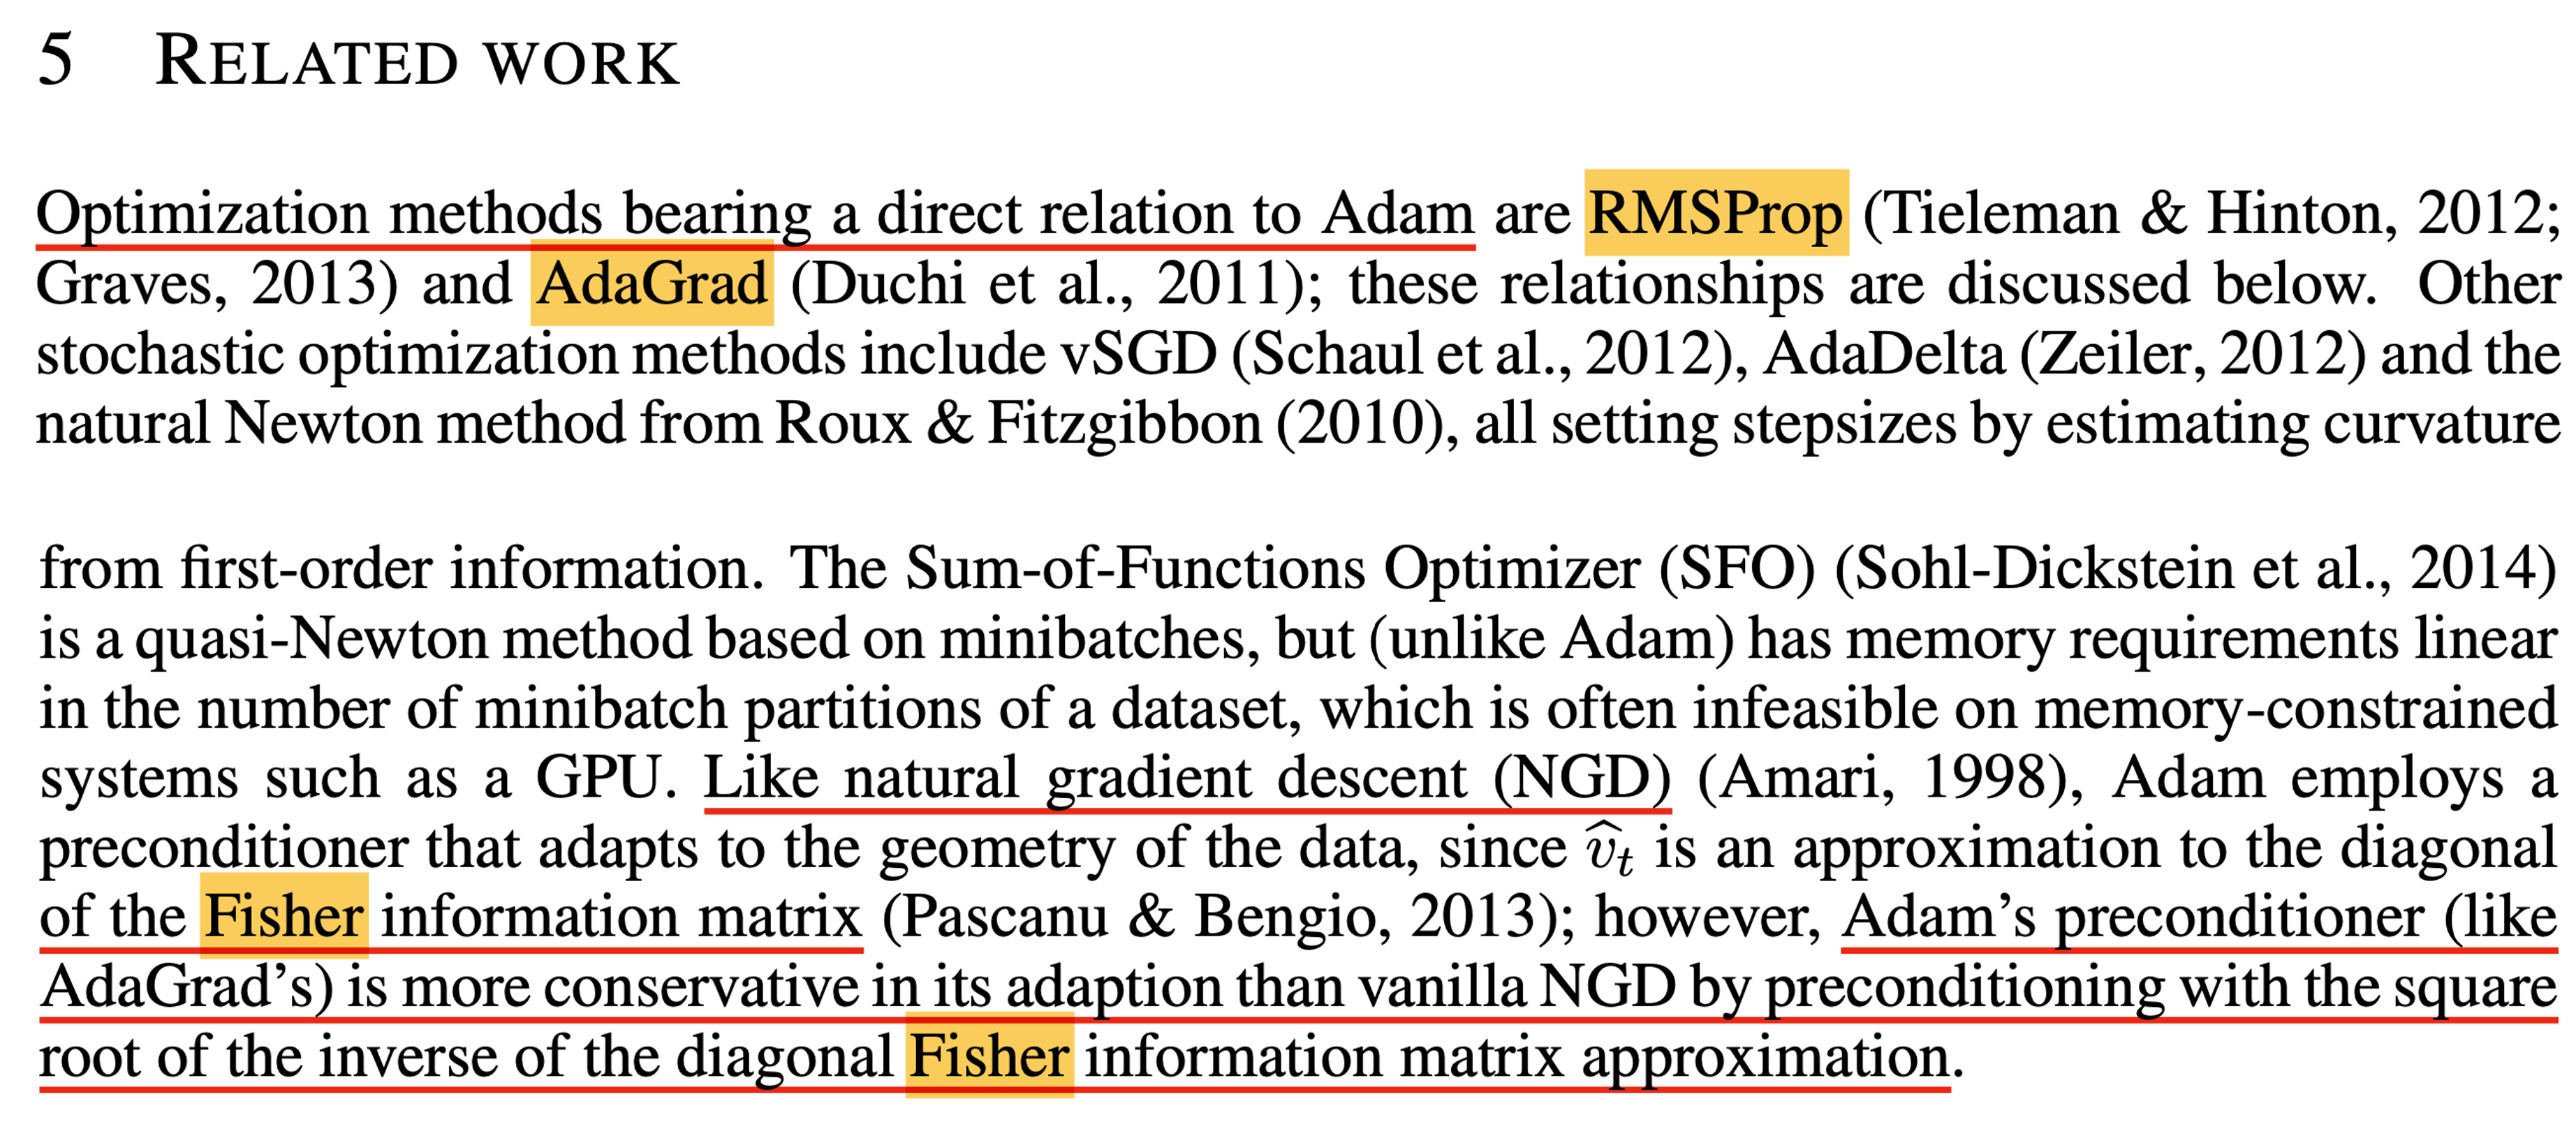 Fig.
Fig.
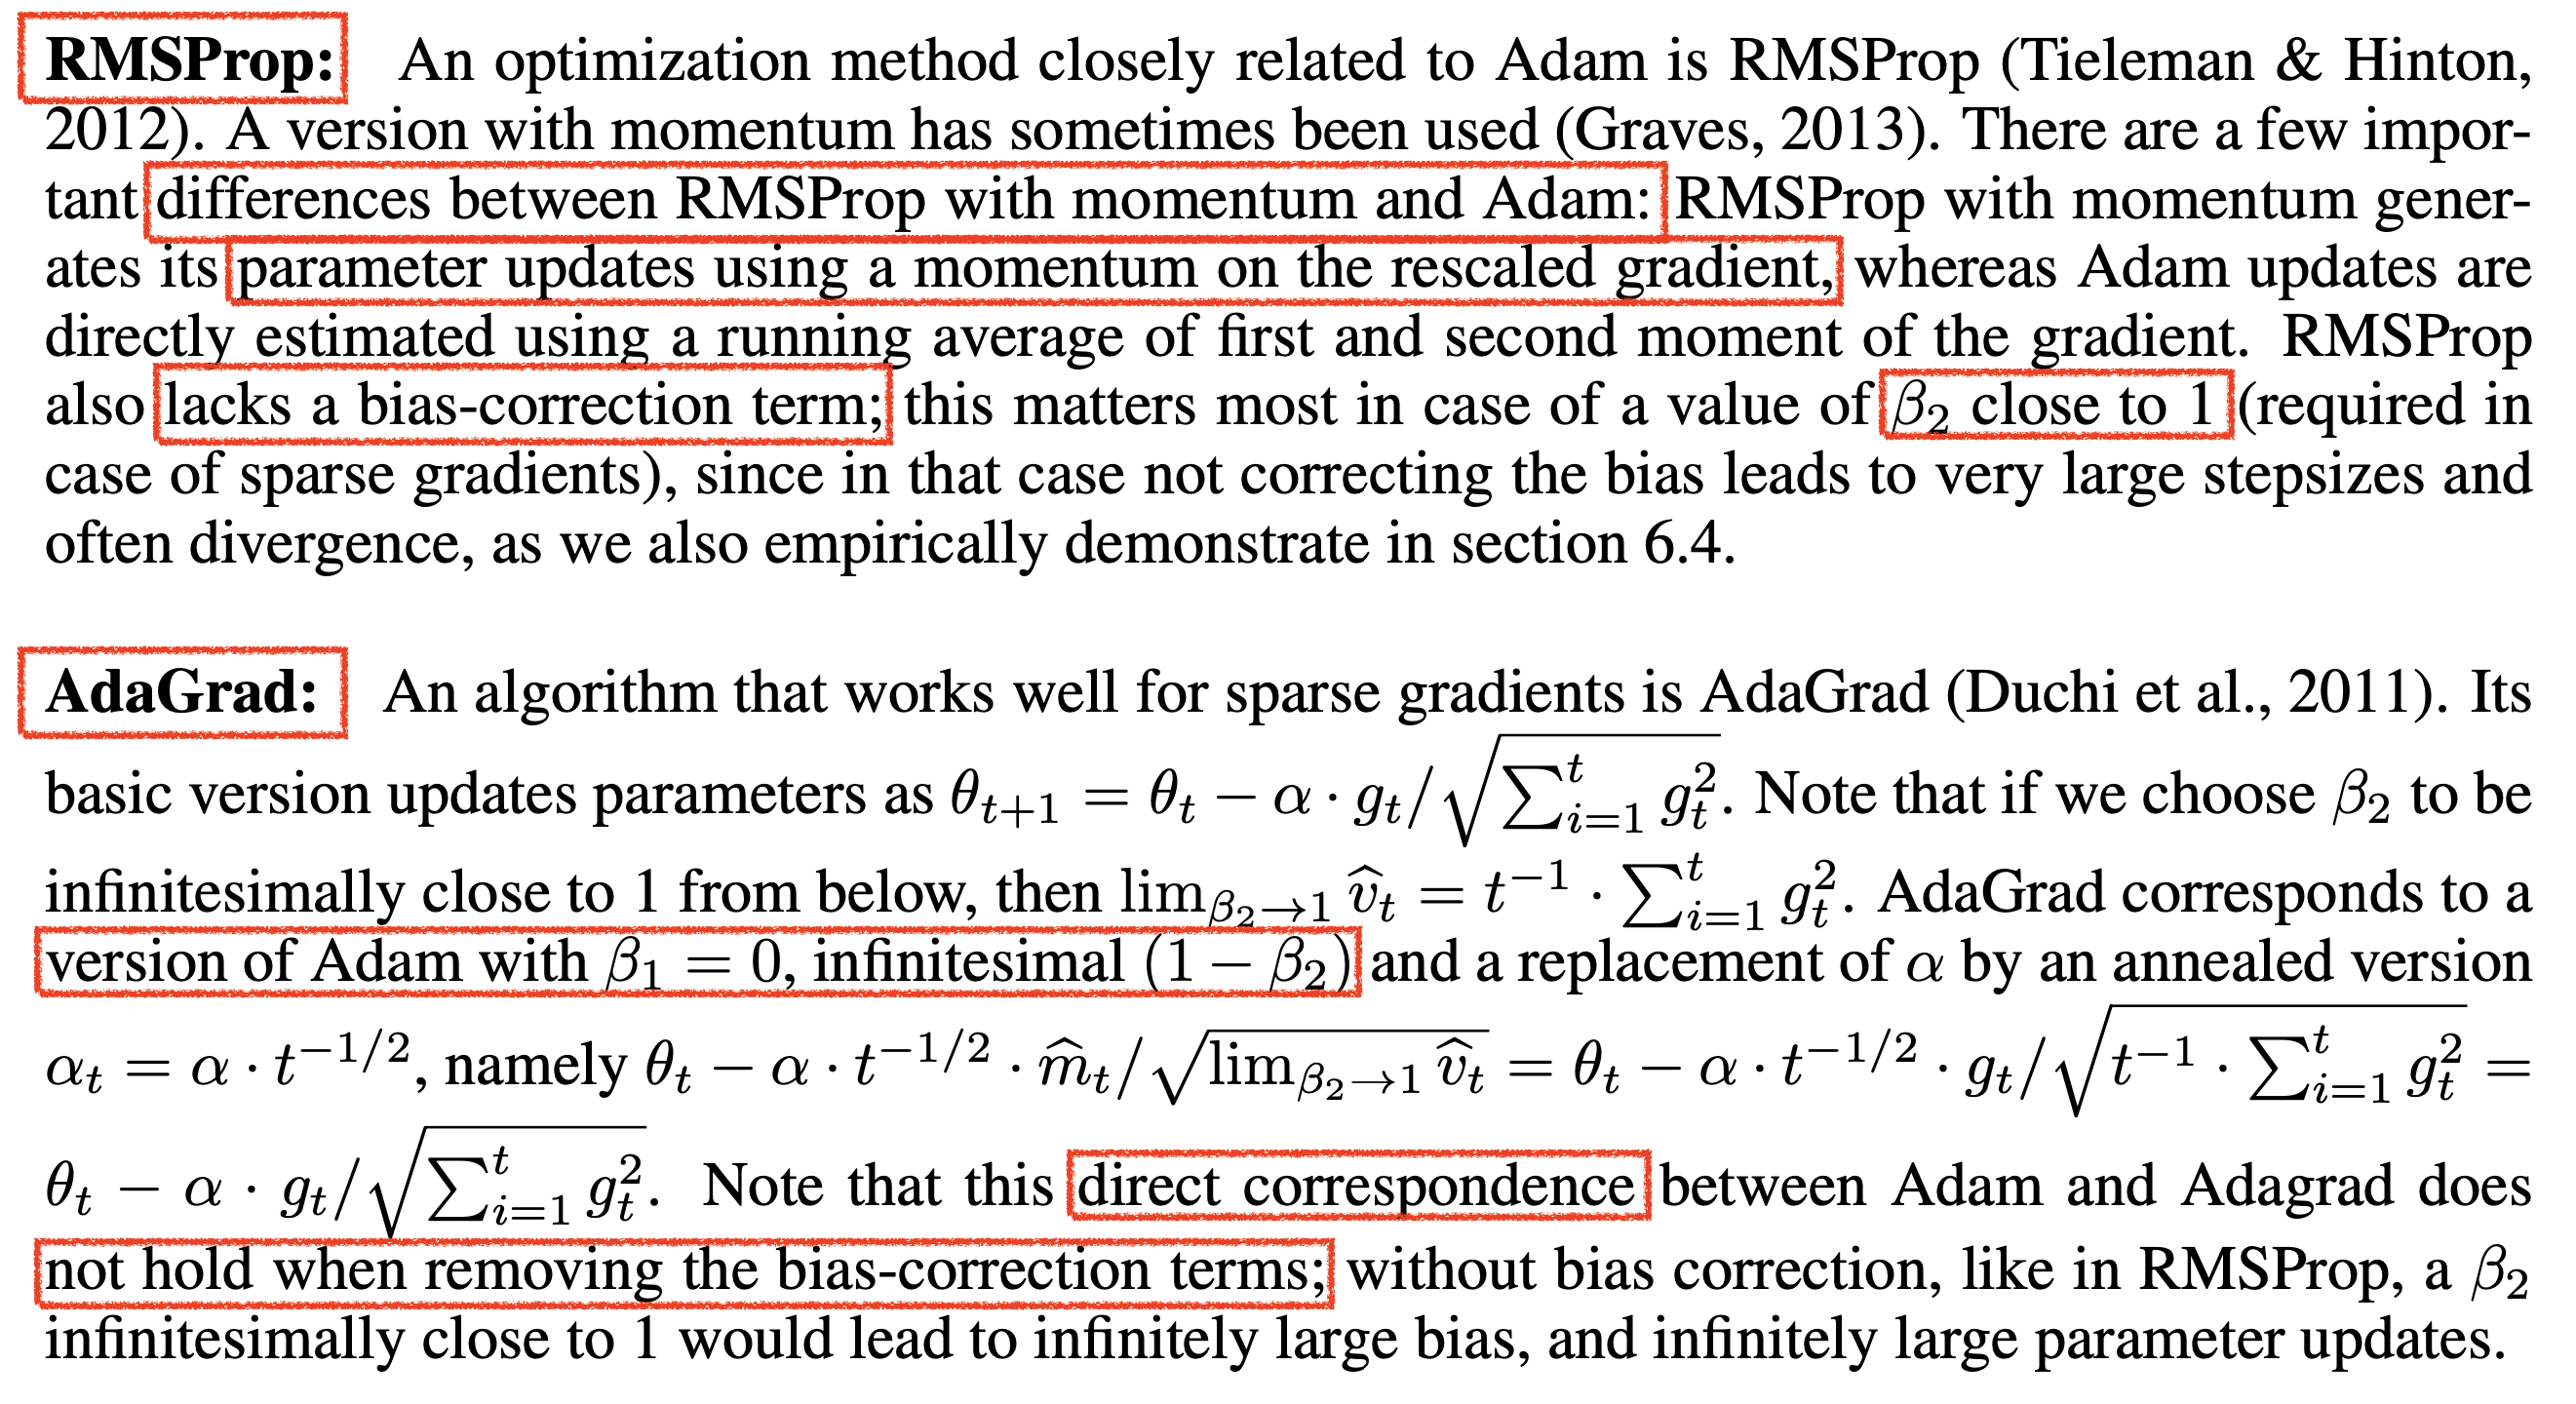 Fig.
Fig.
AdaGrad나 RMSProp은 모두 LR을 weight parameter dimension별로 다르게 적용하여 parameter들이 공평하게 수렴하도록 하는 역할을 했는데, 앞선 post에서 또 “왜 momentum이나 adaptive LR method가 왜 Newton’s method 와 비슷한 역할을 하는지?”에 대한 얘기는 하지 않았다. 하지만 Large Scale NN을 학습하는데 modern optimizer들의 behavior나 hyperparameter를 이해하는 것은 매우 중요하기 때문에 이에 대한 깊은 이해를 해두면 앞으로 다른 optimizer들을 볼 때 큰 도움이 될 것이다.
Adam paper에는 “Adam의 Preconditioner는 Fisher Information Matrix의 diagonal의 approximation이지만 AdaGrad처럼 Natural Gradient Descent (NGD)의 preconditioner보다 더 보수적이다”라고 적혀있는데 과연 이게 무슨말일까?
 Fig.
Fig.
Revisit AdaGrad: Why Adaptive Optimizer Really Works?
Hyperparameters of Adam
(2018) Adafactor: Adaptive Learning Rates with Sublinear Memory Cost
이제 Adafactor Optimizer에 대해 알아보도록 하자.
Adafactor의 주된 motivation은 앞서 말했다시피 Adam Optimizer를 위한 state가 너무 크다는 것이다.
1st and 2nd moment를 위해서 기존 optimizer에 비해 3배의 VRAM memory가 필요하다.
TL;DR하자면 이 optimizer에서의 주된 내용은 2nd moment estimation을 low rank factorization 하거나 1st moment를 쓰지 않아도 그렇게 큰 문제가 없다는 것과 parameter별로 서로 다른 relative step size를 해주는 등의 실험을 했다는 것이다 (마치 Maximal Update Parameterization (muP) 처럼). 주된 experimental arguments들은 다음과 같다.
- Factored Second Moment Estimation
- No Momentum
- Update Clipping
- Increasing Decay Parameter
- Relative Step Size
이제 이들에 대해서 차례대로 알아보자.
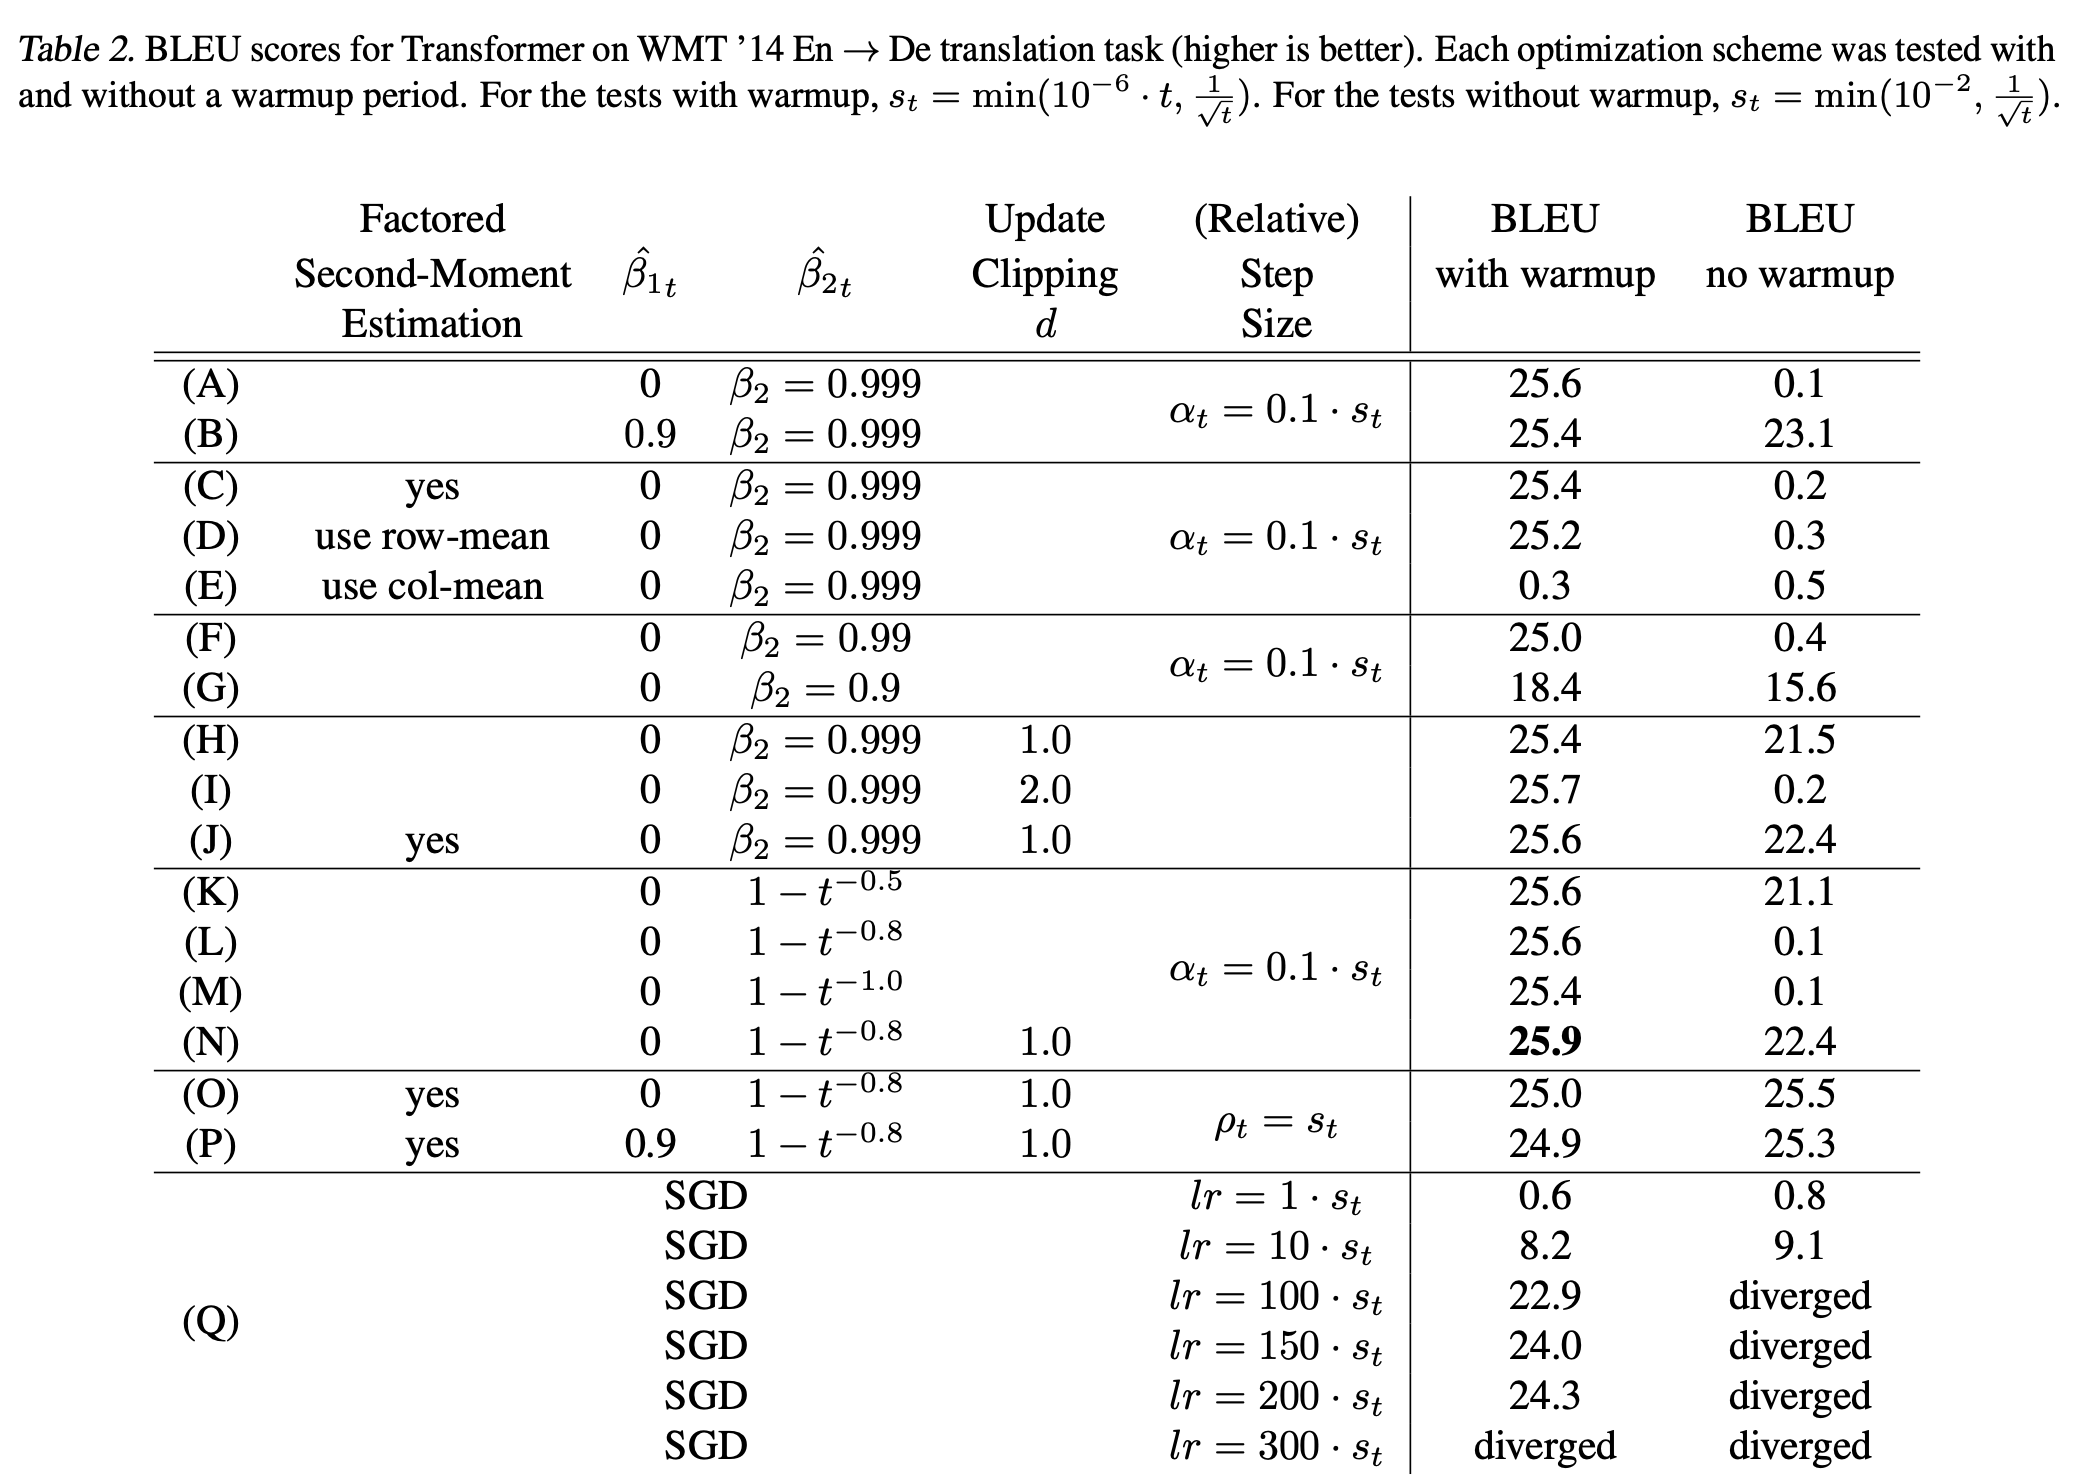 Fig. Extensive Exp Results for Adam Varaiants
Factored Second Moment Estimation
먼저 Adafactor라는 이름에서도 알 수 있고, 방금 설명한 것 처럼 저자들은 1st moment는 일단 제껴두고 (후에 1st moment없이도 학습할 수 있음을 보이기 때문에), 2nd moment는 필요하긴 한데 이것이 weight matrix크기만큼의 VRAM memory를 요구하기 때문에 이를 factorization 한다. 아래 algorithm을 보면 optimization step, \(t\)에서의 2nd moment, \(V_t\)를 계속 EMA tracking하는데, 1st moment는 없다는 걸 알 수 있고, 2nd moment 통계량을 구하는 수식이 좀 신기하다는 걸 알 수 있다. 마지막에 square root를 취하고 gradient, LR과 곱해서 parameter를 update하는 것은 같다.
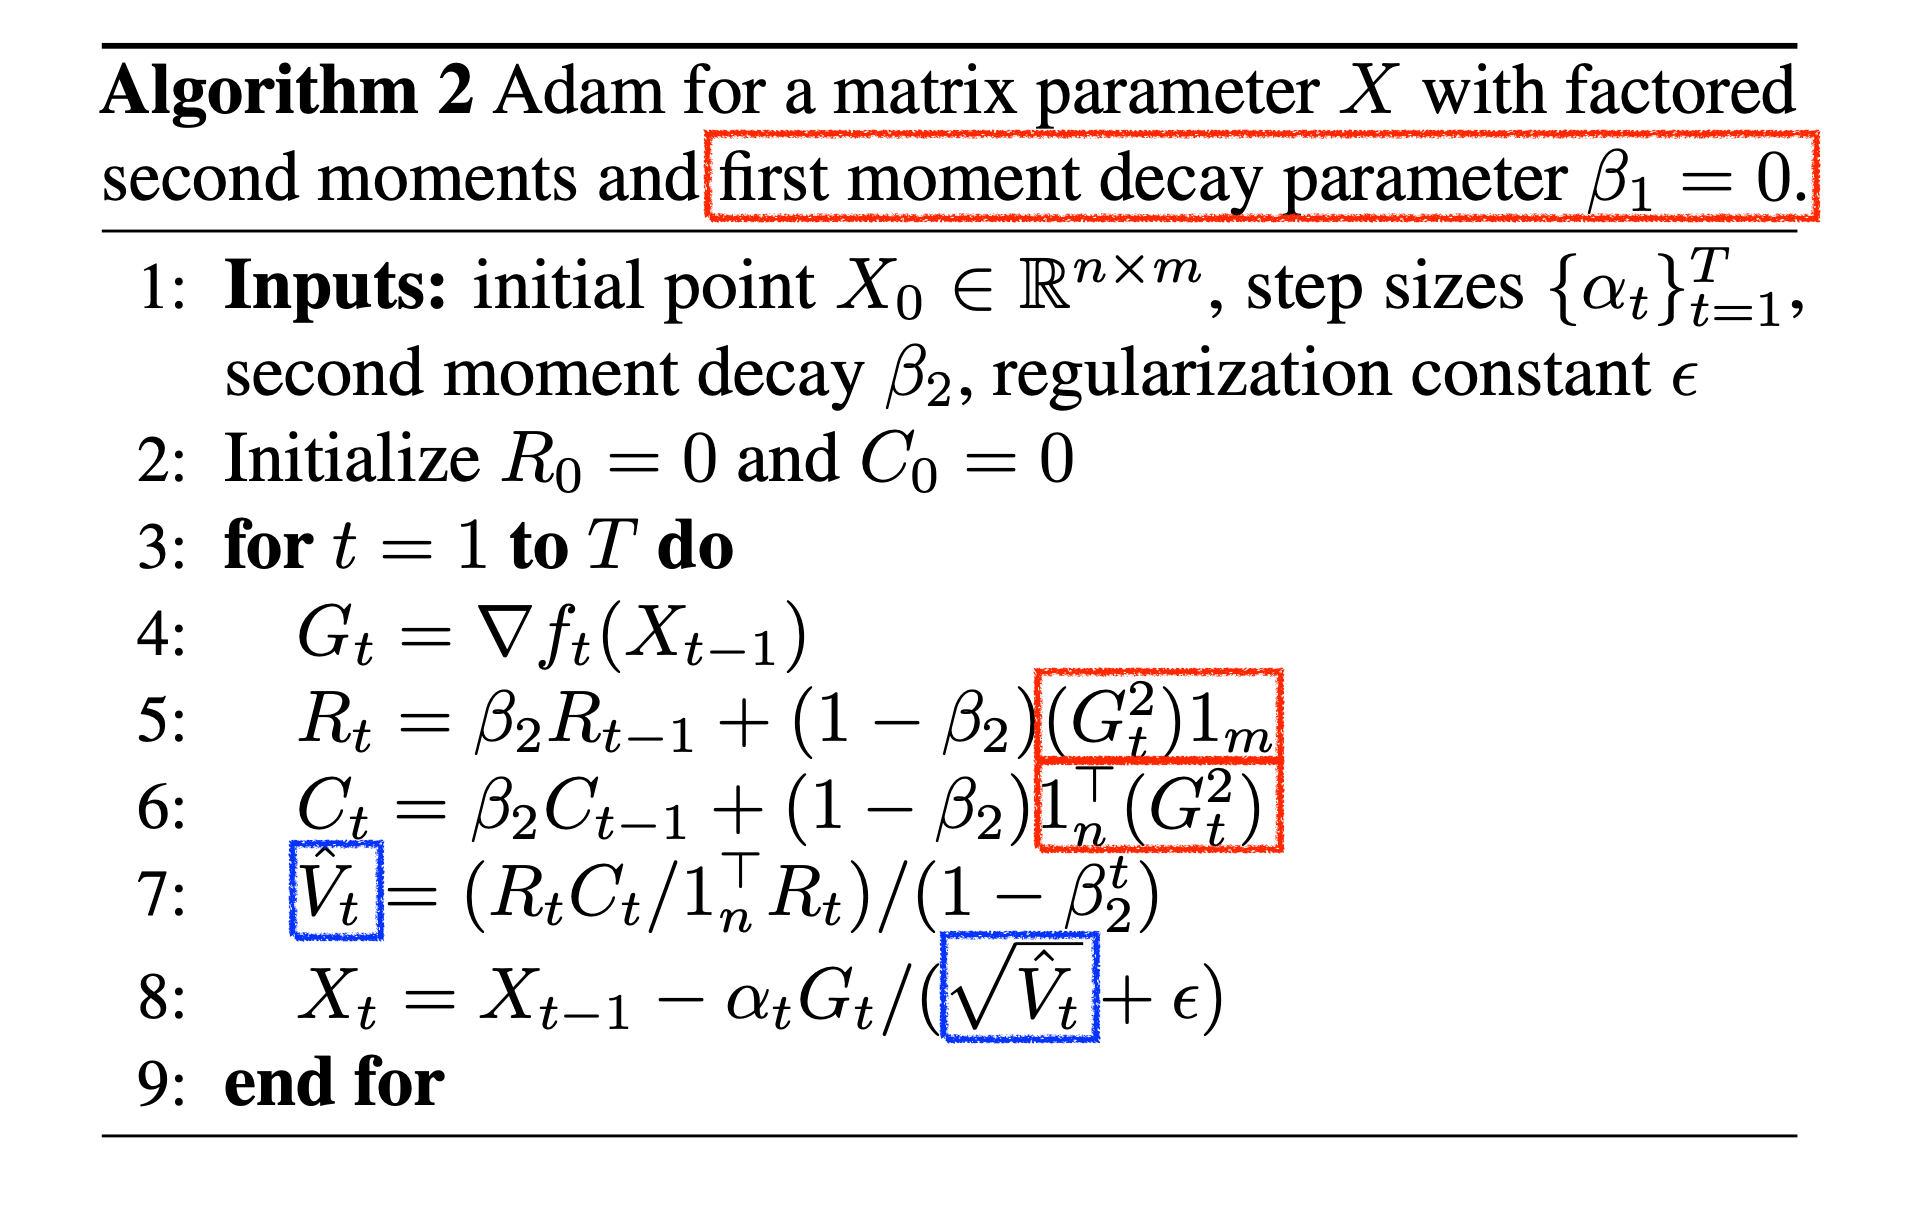 Fig. Factored Second Moment Estimation
비교를 위해 원래 Adam에 대한 algorithm을 아래에 첨부한다.
 Fig. Original Adam (Recap)
 Fig. Source from tweet
No Momentum
A Problem with Adam: Out-of-Date Second Moment Estimator
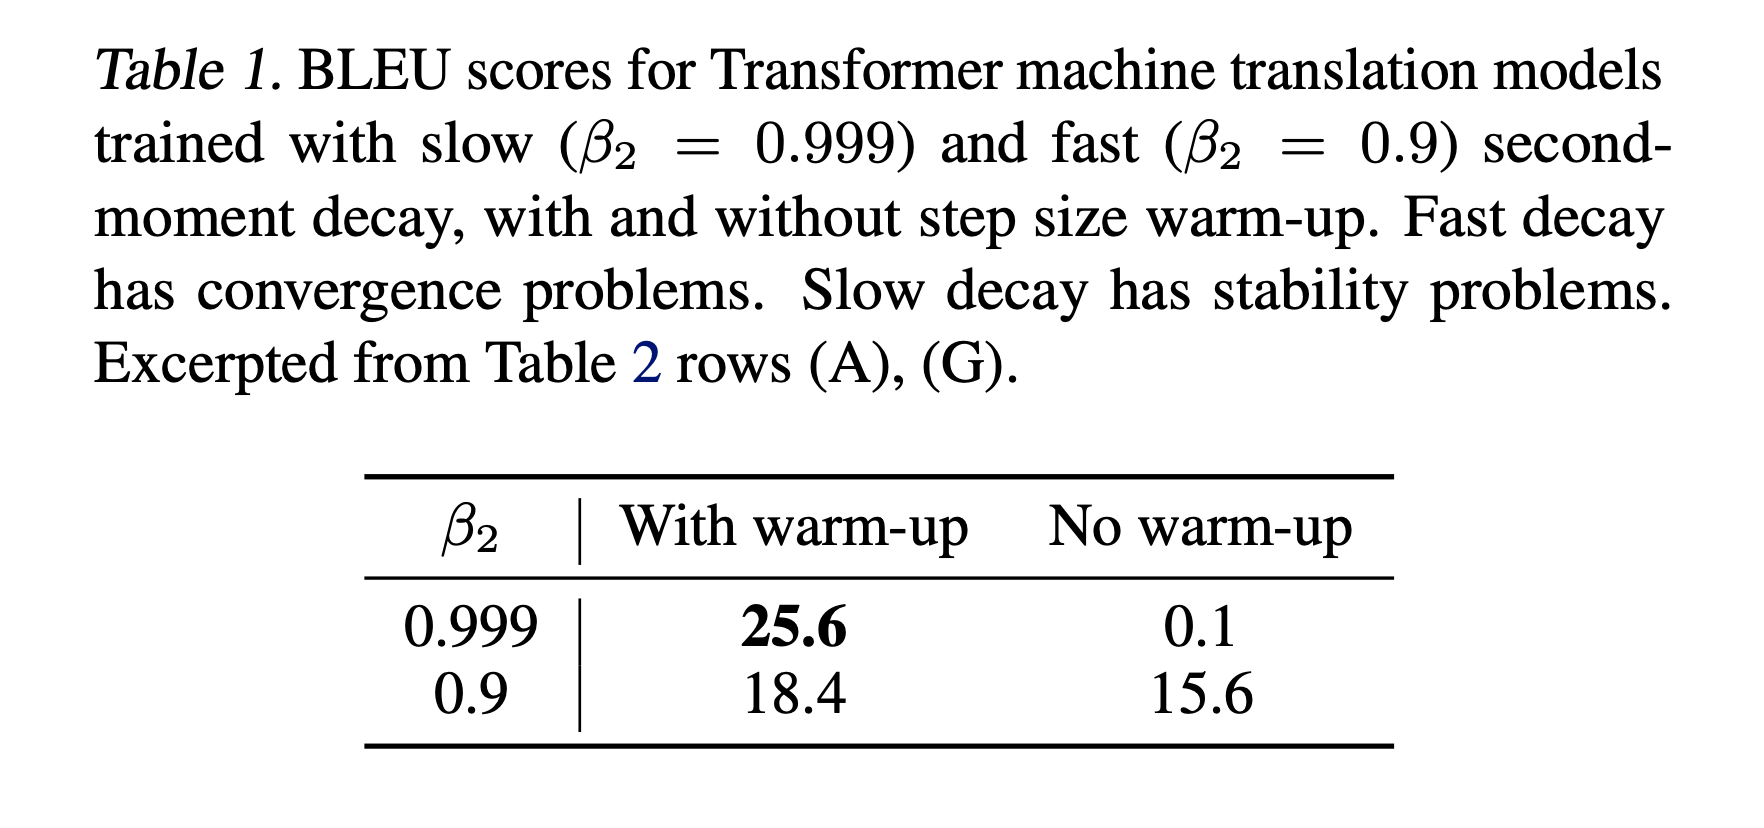 Fig.
Fig.
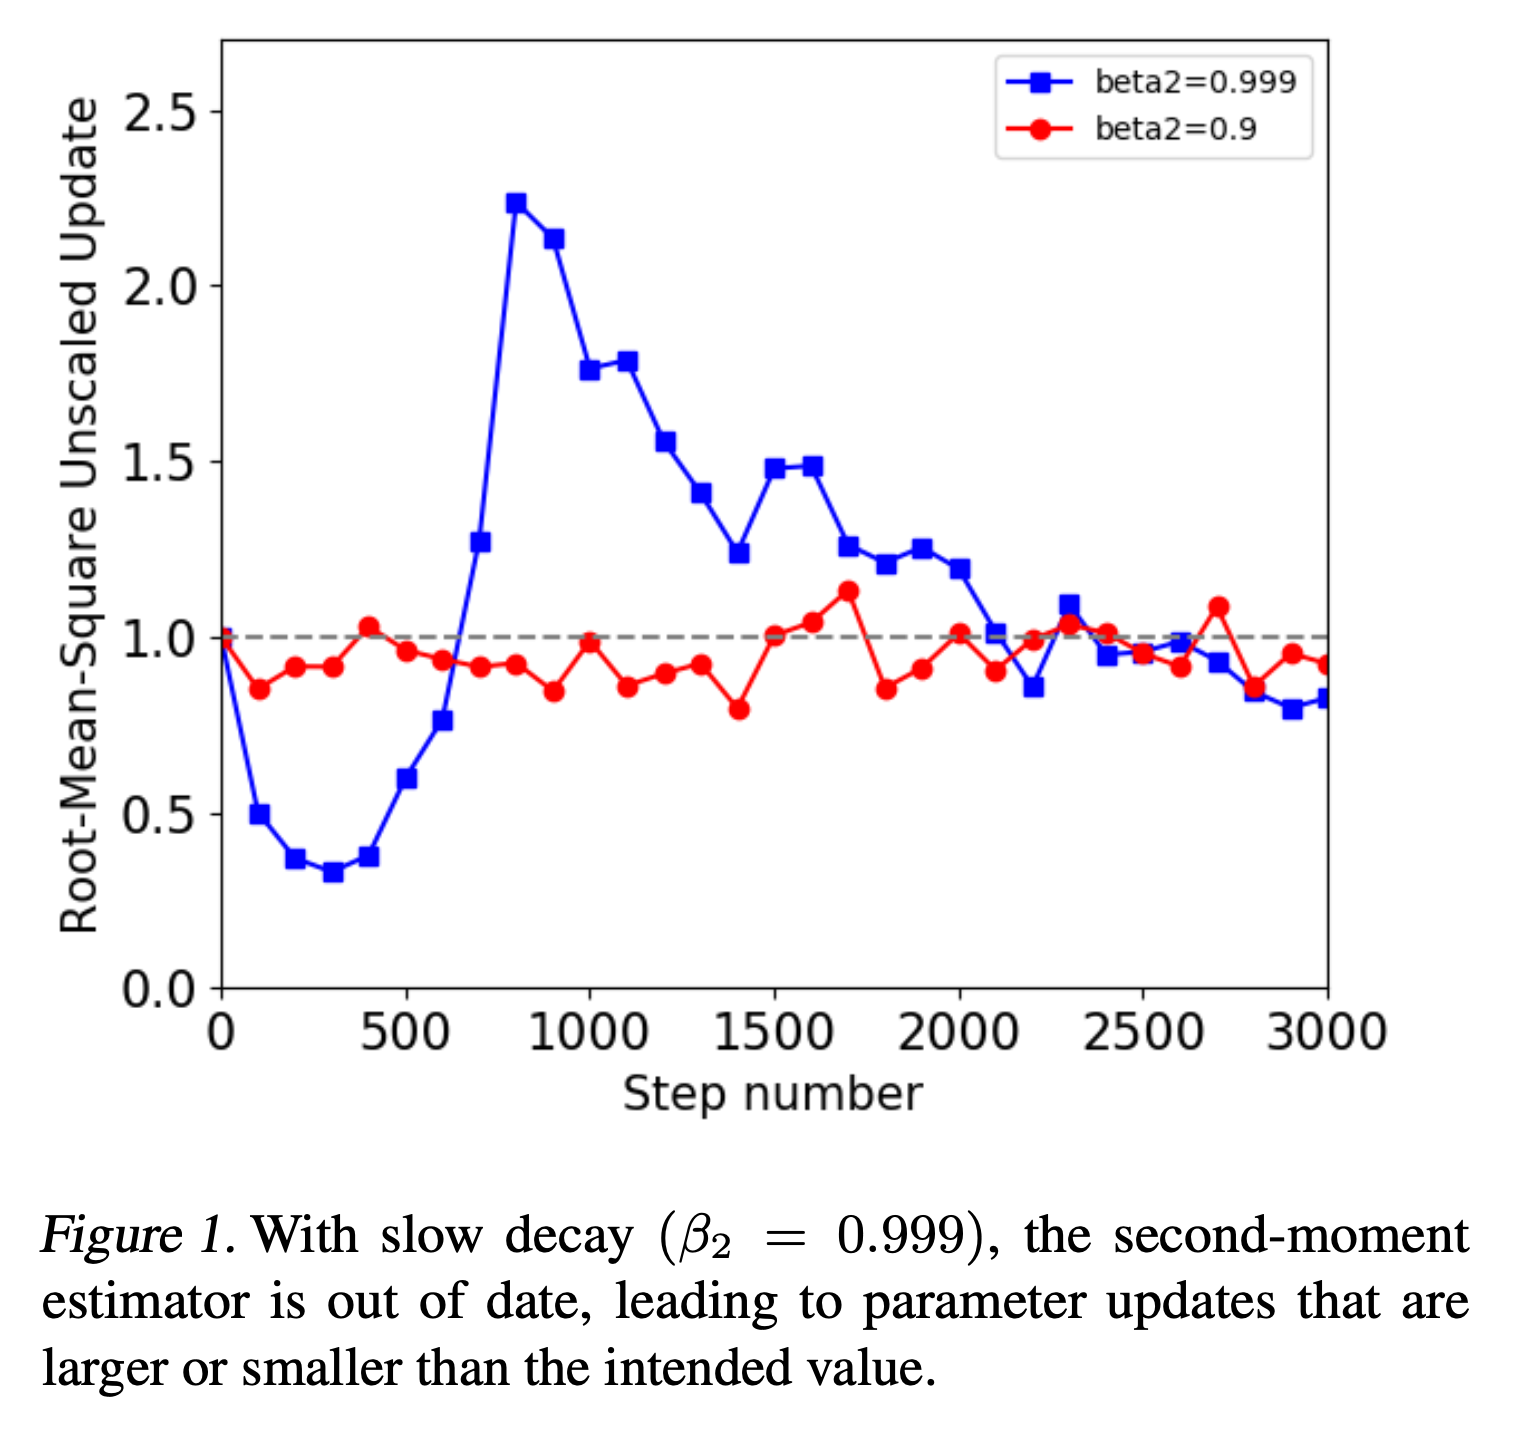 Fig.
Fig.
Update Clipping
Increasing Decay Parameter
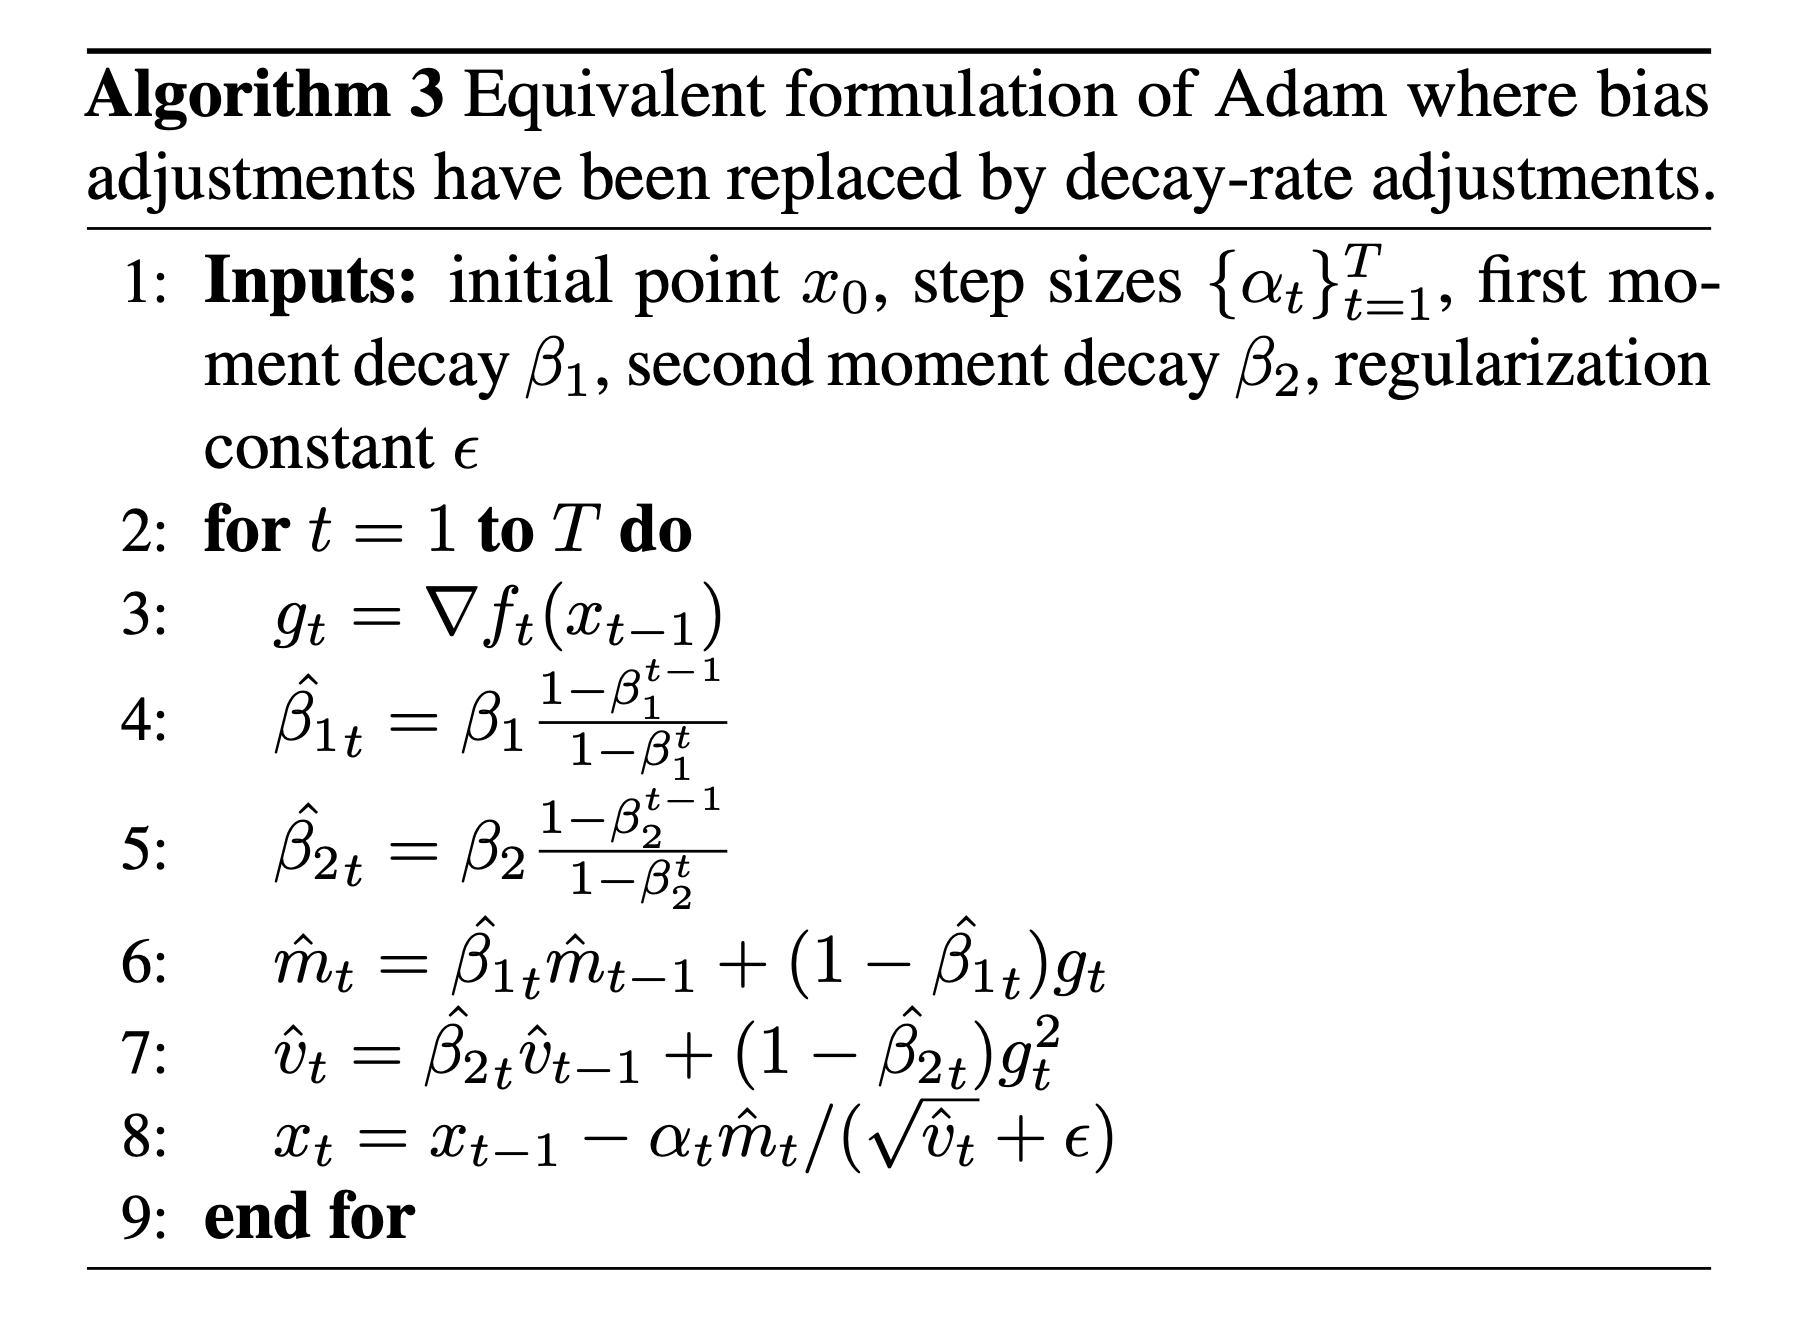 Fig.
Fig.
Relative Step Size
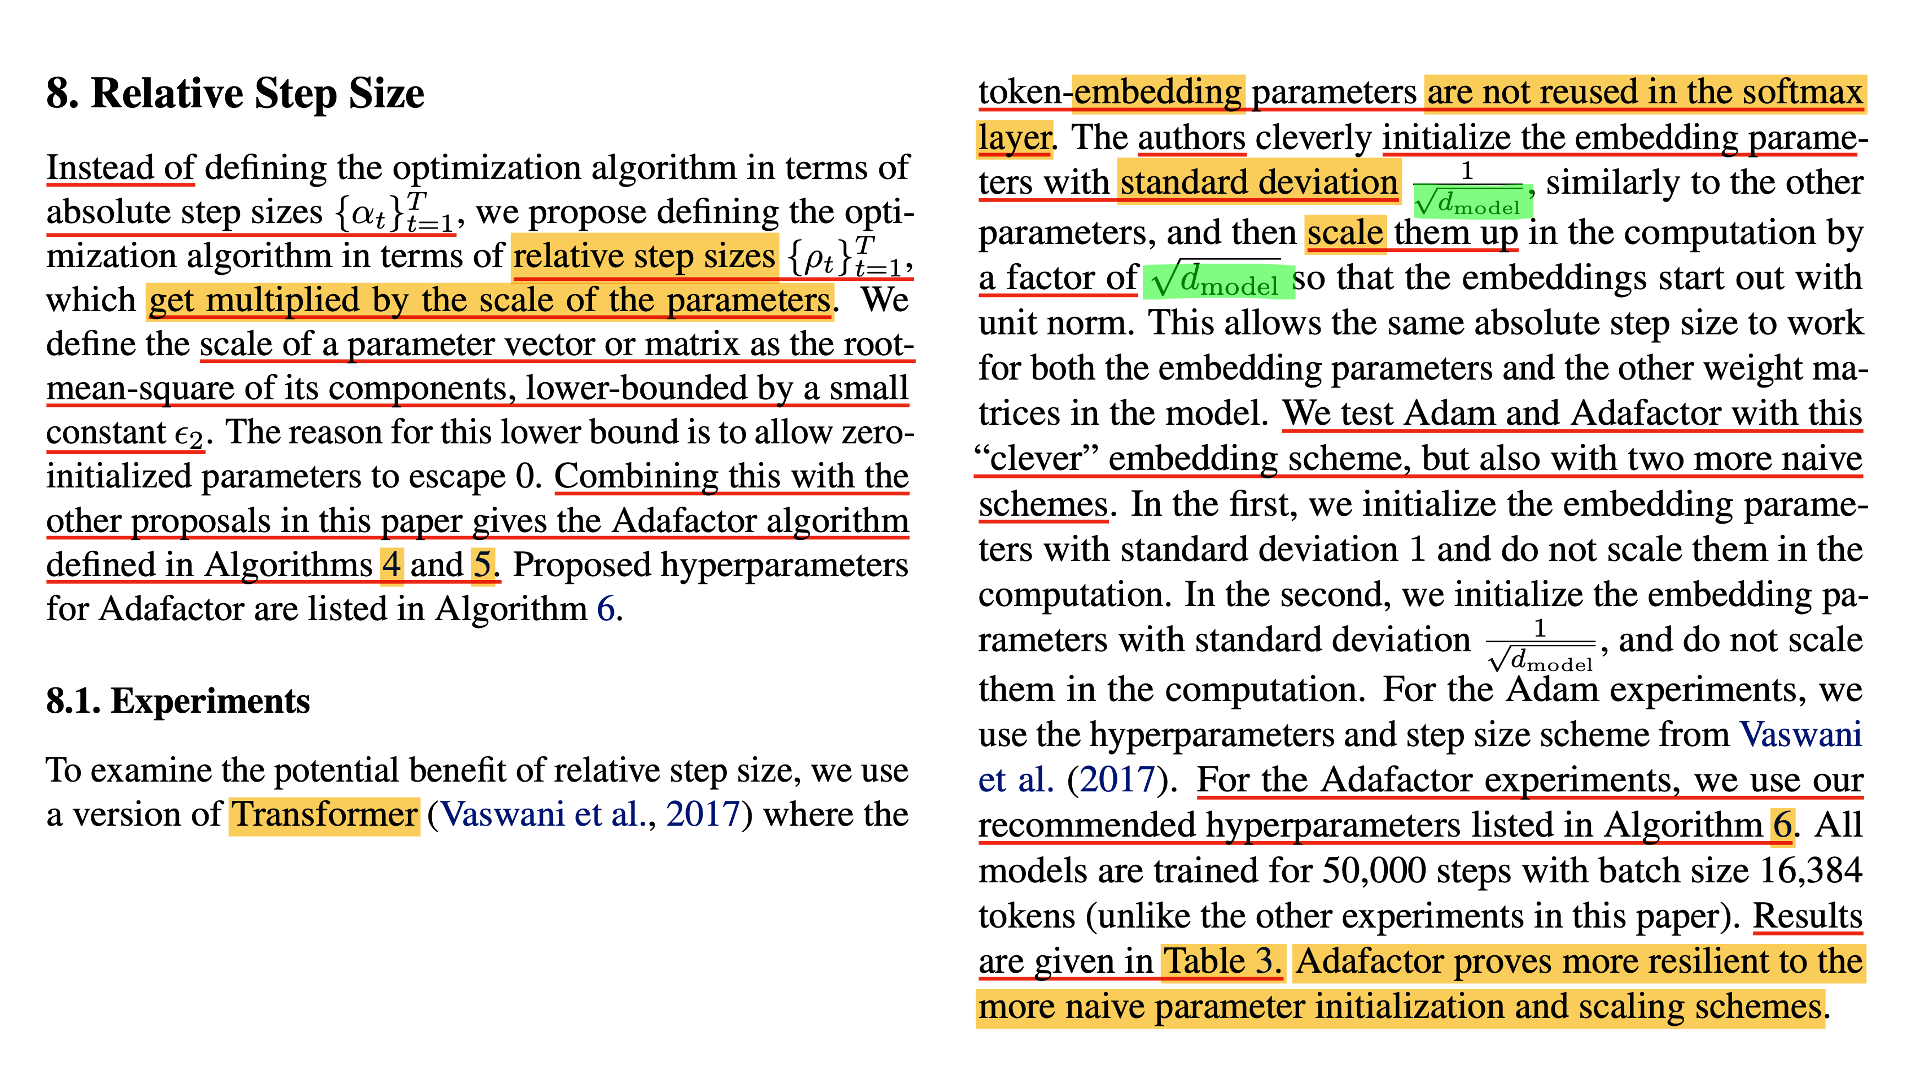 Fig.
Fig.
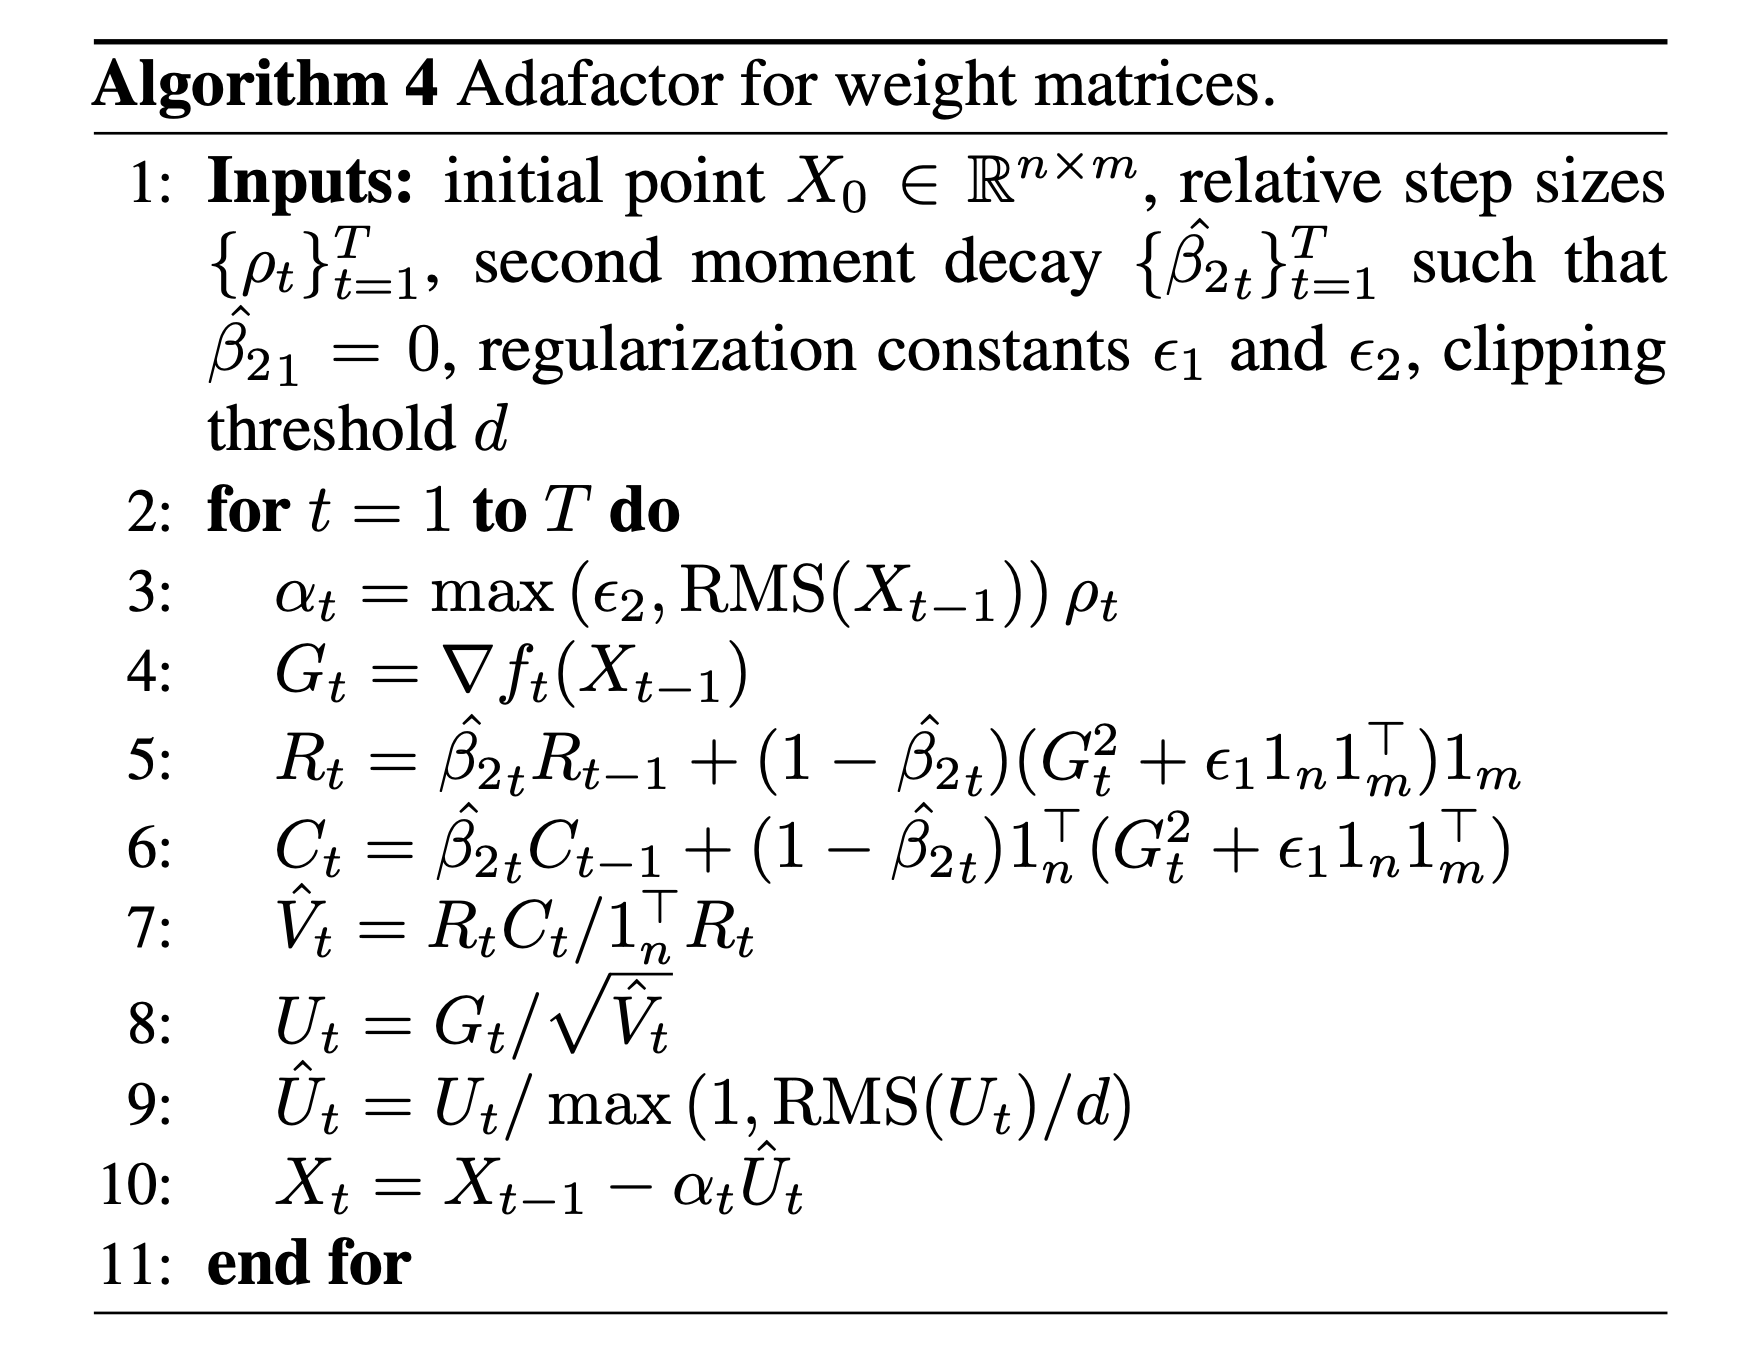 Fig.
Fig.
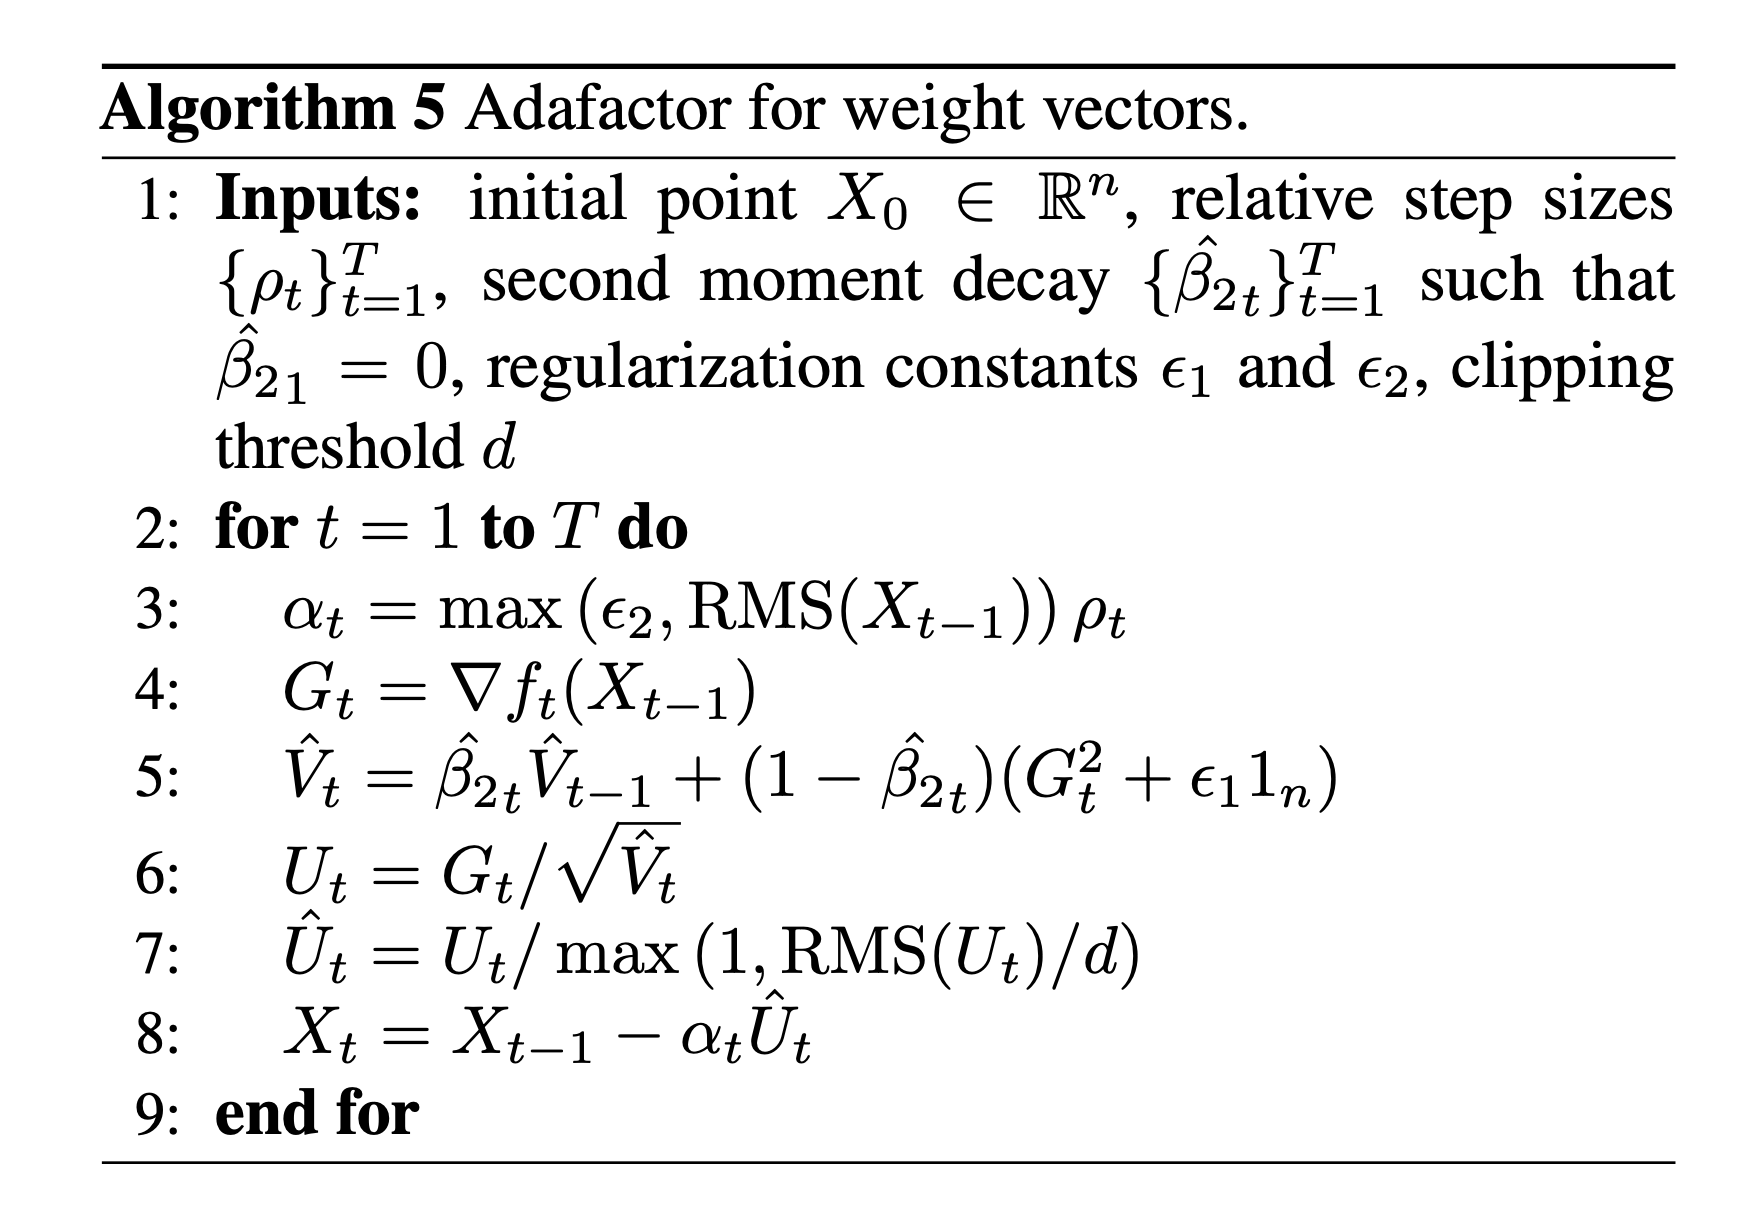 Fig.
Fig.
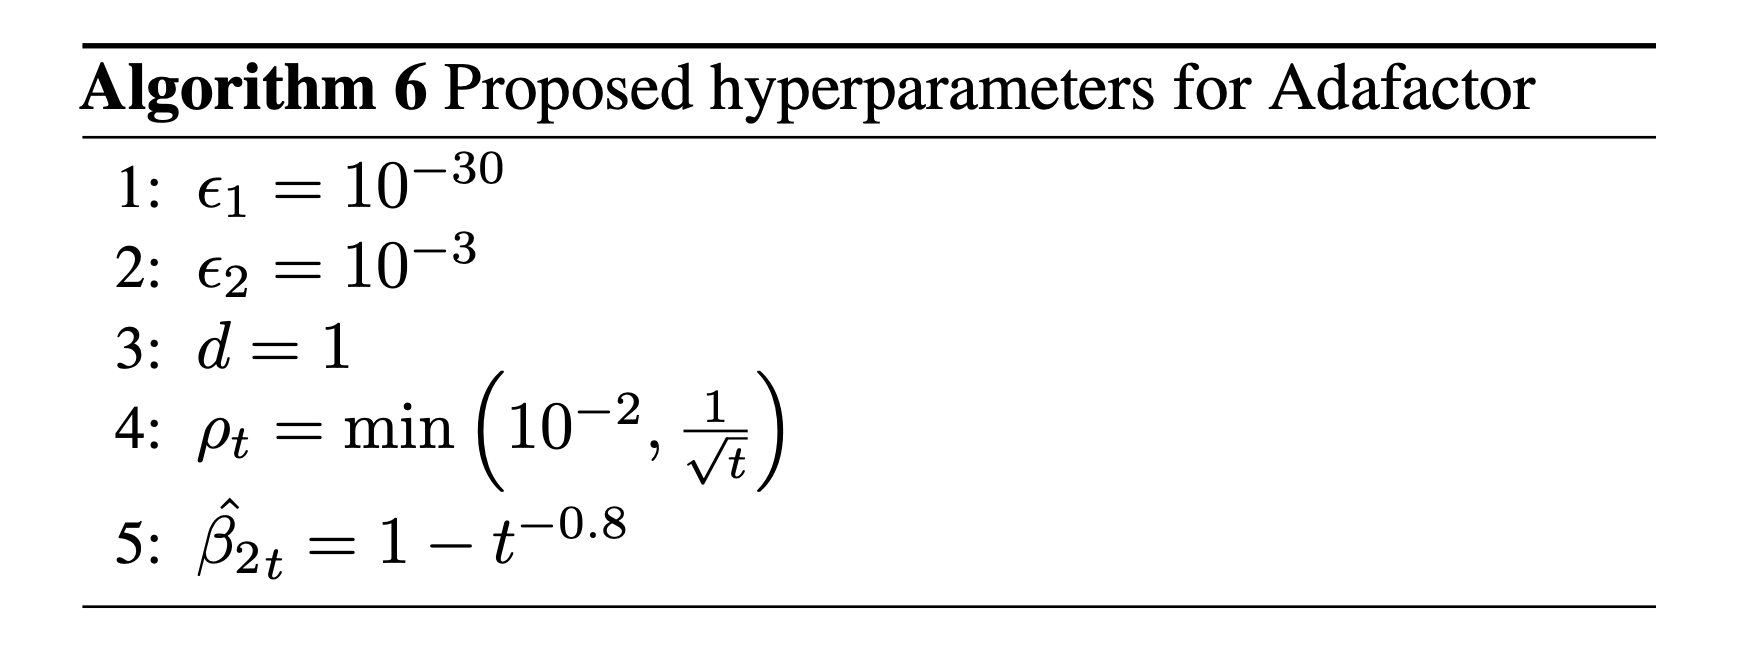 Fig.
Fig.
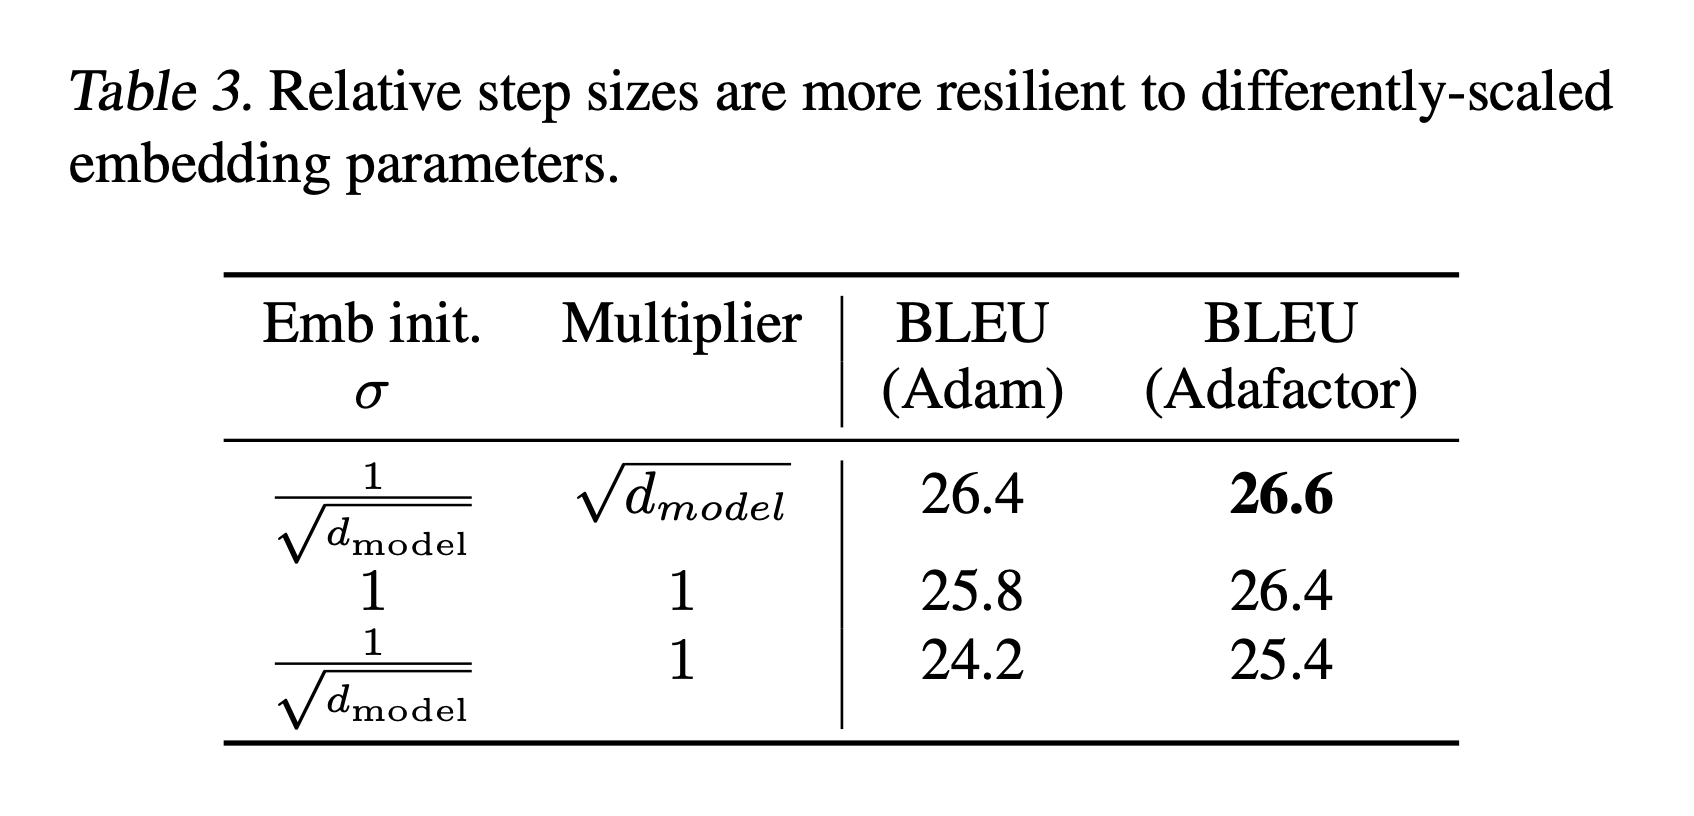 Fig.
Fig.
Unit Scaling Intuition from Noam Shazeer
(2017) Decoupled Weight Decay Regularization
이제 AdamW에 대해서 한 번 알아보도록 하자. AdamW의 저자들이 Adam같은 adaptive gradient algorithm을 가지고 놀면서 얻은 key observation은 다음과 같다.
- L2 regularization and weight decay are not identical.
- L2 regularization is not effective in Adam.
- Weight decay is equally effective in both SGD and Adam.
- Optimal weight decay depends on the total number of batch passes/weight updates.
- Adam can substantially benefit from a scheduled learning rate multiplier.
이제 위 5가지 observation에 대해 자세히 알아보도록 하자.
Decoupling The Weight Decay From The Gradient-based Update
Paper에서 이야기하길 Pytorch를 포함한 많은 Deep Learning Libraries에서 L2 regularization을 weight decay와 동의어 처럼 (equivalent) 쓰인다고 얘기한다. L2 regularization과 weight decay 모두 NN model이 training data의 noise까지 학습해서 정답을 도출한다거나 하는 overfitting 현상을 방지하는 것으로 알려져 있다. 다르게 말하면 generalization performance를 올리는 도움이 된다 technique들인 것이다.
하지만 저자들은 이 두 technique이 같은 것은 SGD에 대해서만 성립한다고 주장한다. 이를 분석하기 위해 원래 Machine Learning (ML)의 weight decay가 (아마도) 처음 제안된 Hanson et al. (1988)의 수식을 짚어보자.
\[\begin{aligned} & \underbrace{\theta_{t+1} = \theta_t - \alpha \nabla f_t(\theta_t)}_{\text{original SGD update rule}} & \\ & \underbrace{\theta_{t+1} = (1 \color{red}{-\lambda}) \theta_t - \alpha \nabla f_t(\theta_t)}_{\text{w/ weight decay}} & \\ \end{aligned}\]말 그대로 gradient를 기반으로 param update를 하면서 current param에 \(\lambda\)만큼 decay를 하는 것이다. 여기서 \(f_t(\theta_t)\)는 objective function인데, 만약 \(\lambda=0.01\)이라면 \(\theta_{t+1} = 0.99 \theta_t - \alpha \nabla f_t(\theta_t)\)가 되는 것이다.
이번에는 L2 regularization을 적용해서 SGD update를 하는 경우에 대해 생각해보자. Regularization이 적용된 objective function은 다음과 같다.
\[f_{t}^{reg} (\theta) f_t(\theta) + \frac{\lambda'}{2} \parallel \theta \parallel^2_2\]Paper의 pooposition 1은 아래와 같은데, 말 그대로 SGD를 하는 경우에는 weight decay = L2 regularization이 성립한다는 것이며, 이는 실제로 미분을 해봄으로써 쉽게 증명할 수 있다.
 Fig.
Fig.
아래 proof (appendix에 있음)가 미분체를 비교하는 것인데, 당연하게도 L2 reg = weight decay임이 성립하는 것을 알 수 있으나, 그냥 성립하는 것은 아니고 \(\lambda' = \frac{\lambda}{\alpha}\)일 경우에 성립한다는 걸 알 수 있다.
 Fig.
Fig.
당연하게도 objective를 미분하면 \(\lambda' \theta\) term만 나오는 것이 맞지만, gradient 전체에 Learning Rate (LR), \(\alpha\)가 곱해지기 때문에 weight decay와 완전히 같기 위해서는 \(\alpha\)로 나눠야만 이 둘이 동치가 되는 것이다.
이것이 의미하는 바가 무엇일까?
바로 L2 regularization factor, \(\lambda'\)가 \(\lambda, \alpha\)의 term이기 때문에,
즉 LR과 강력하게 묶여있기 때문에 (tightly coupled), Hyperparameters (HPs) search를 하기가 어려워질 수 있다는 것이다.
그래서 저자들은 이에 대한 해법으로 Decoupled SGD (SGDW)라는 것을 제안하는데,
이는 아래 Algorithm 1에서 확인할 수 있다.
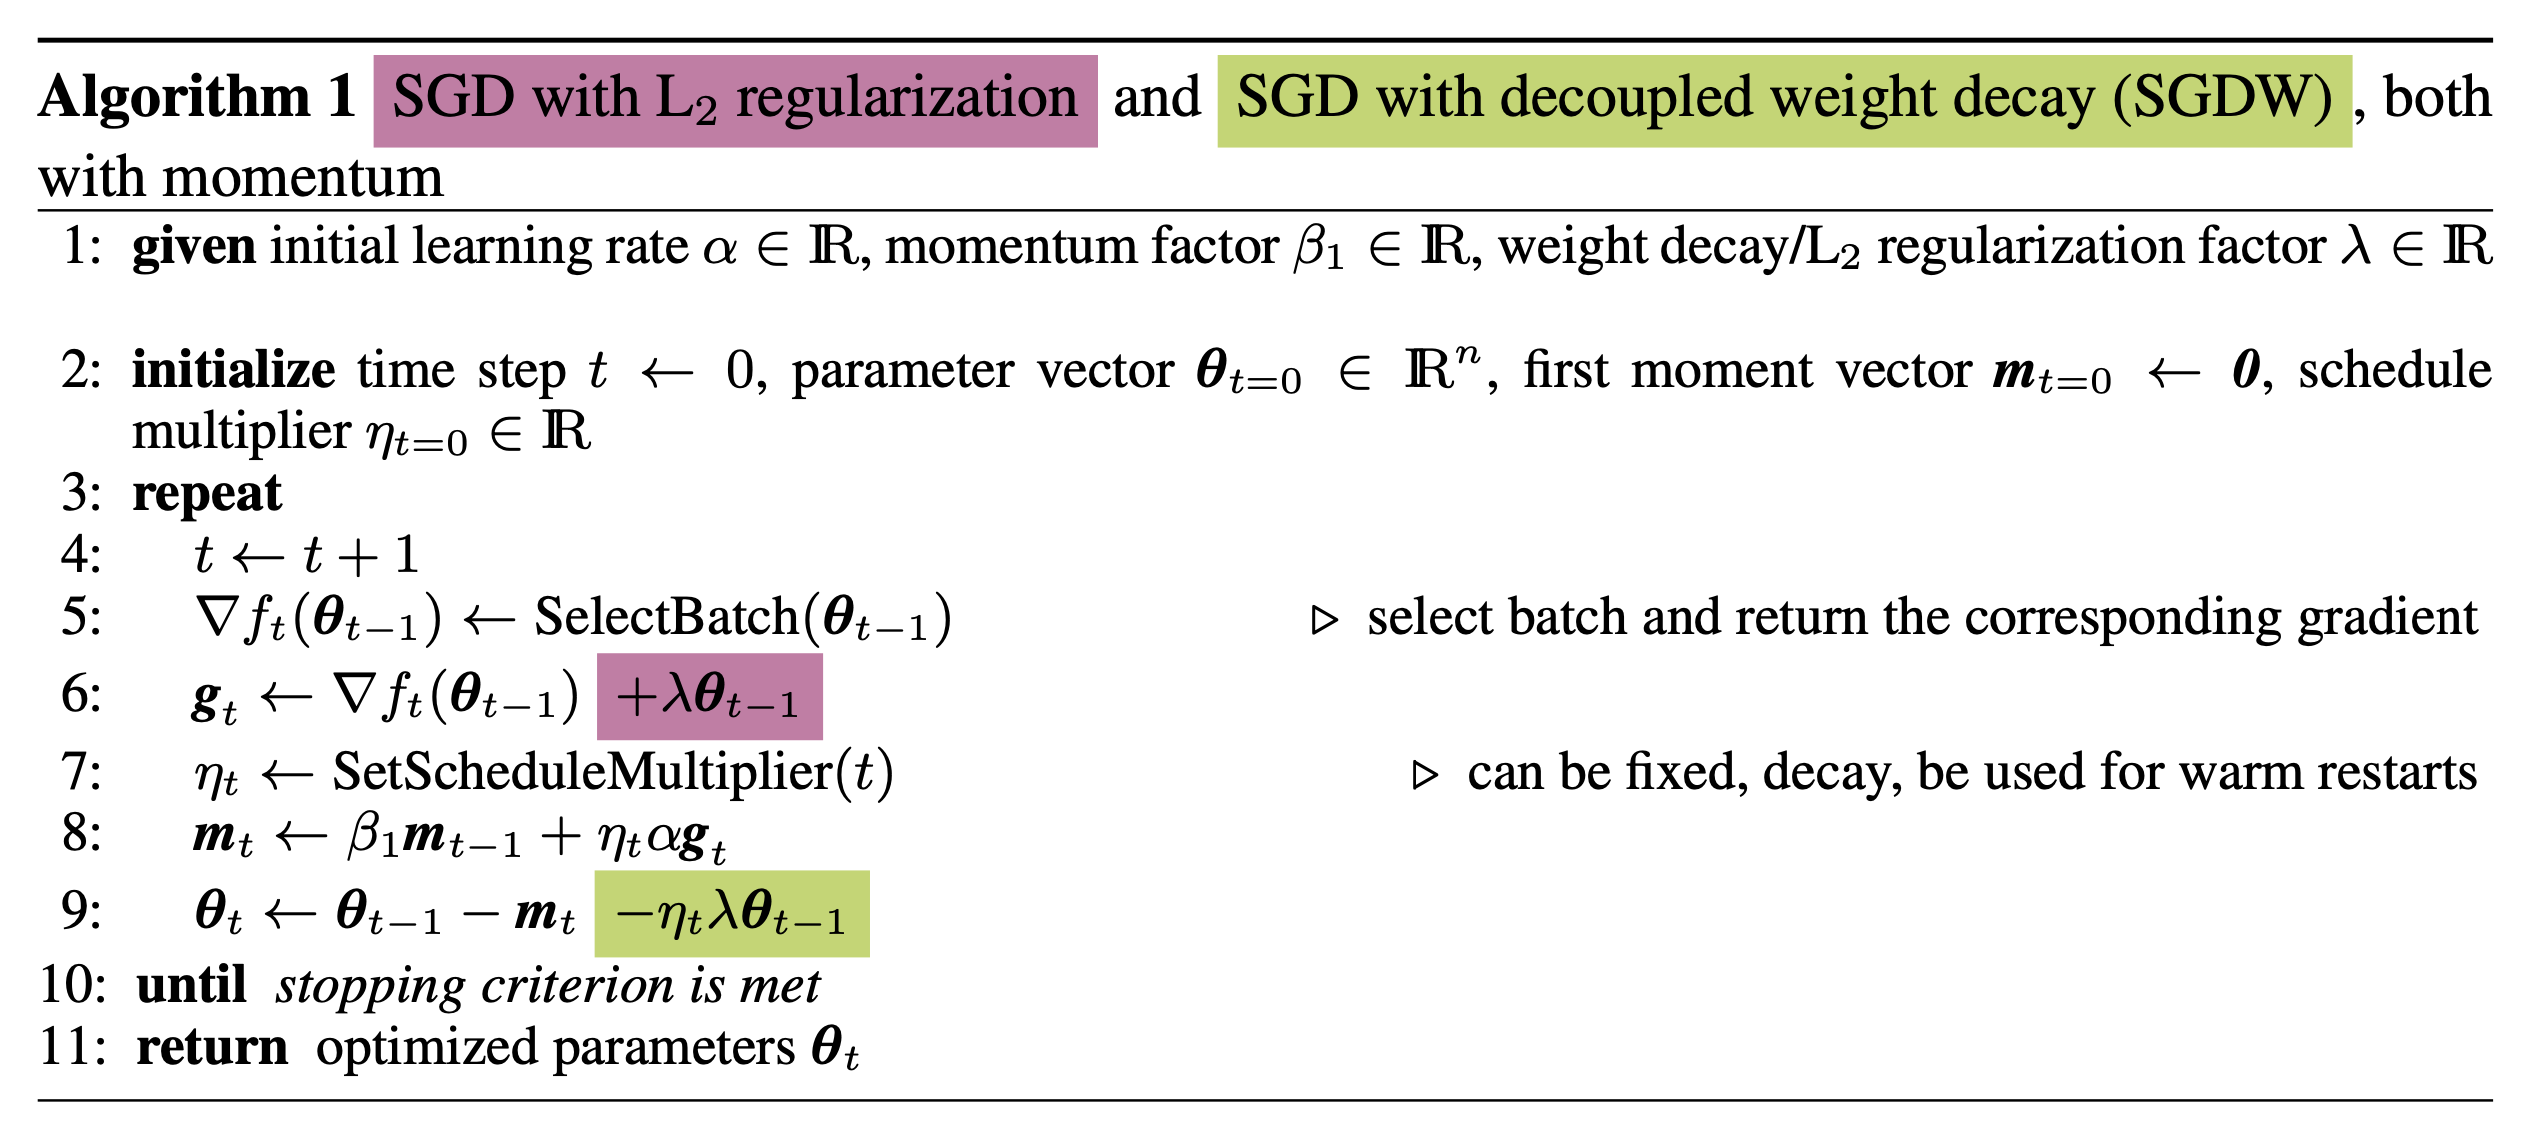 Fig.
Fig.
여기서 9번째 line이 decoupled weight decay가 적용된 line인데, 이는 Pure SGD에 decoupling을 적용한 것은 아니다. 보면 8번 line에서 momentum을 계산하는 것을 볼 수 있다. 즉 이는 SDG with momentum이다.
여기서 6번 line이 pytorch같은 opensource ML framework의 weight decay가 이뤄지는 부분 (라고 쓰고 실제로는 L2 regularization 이었던 것)인데, 조금 헷갈리는 것이 L2 regularization과 decoupled weight decay를 같이 써도 되는건지 모르겠다. pytorch 구현을 봐도 그런 term은 없고, 따로 algorithm caption이 없어서 자색 음영처리가 된 부분은 SGDW에서는 실제로는 쓰지 않는다고 봐야할 것 같다.
여기서 weight decay에 여전히 \(\eta_t\)가 곱해지는 것을 알 수 있는데, 이는 LR scheduling (decaying)을 할 때 쓰이는 값이다. 즉 실제로 training을 할 때 매 timestep, \(t\)에서의 LR은 initial LR이 \(\alpha\)일 때 \(\alpha \cdot \eta_t\)이 되는데, 이
이번에는 Adam같은 adaptive optimizer에서 weight decay와 L2 regularization를 비교해보자. 조금 복잡하게 쓰여있는 것 같지만, 요약하자면 SGD때보다 Adam에서 weight decay와 L2 regularization이 차이가 난다는 것이다.
 Fig.
Fig.
얼만큼 차이가 나는지는 아래 proof를 보면 알 수 있는데, Adam에서 하는 것 처럼 1st, 2nd moment estimation을 하고 bias correction을 한 값이 각각 \(\hat{m_t}, \hat{v_t}\)라고 할 때, 우리가 기대하는 weight decay와 실제 L2 regularization을 objective에 추가해 Adam update수식을 유도한 것은 아래와 같은 차이가 있다.
\[\begin{aligned} & \theta_{t+1} \leftarrow \theta_t - \alpha \lambda' \color{red}{M_t} \theta_t - \alpha \color{red}{M_t} \nabla f_t(\theta_t) & \\ & \theta_{t+1} \leftarrow (1- \lambda) \theta_t - \alpha \color{red}{M_t} \nabla f_t(\theta_t) & \\ & \text{where } \color{red}{M_t} = \frac{\hat{m_t}}{\sqrt{\hat{v_t}}+\epsilon} & \\ \end{aligned}\] Fig.
Fig.
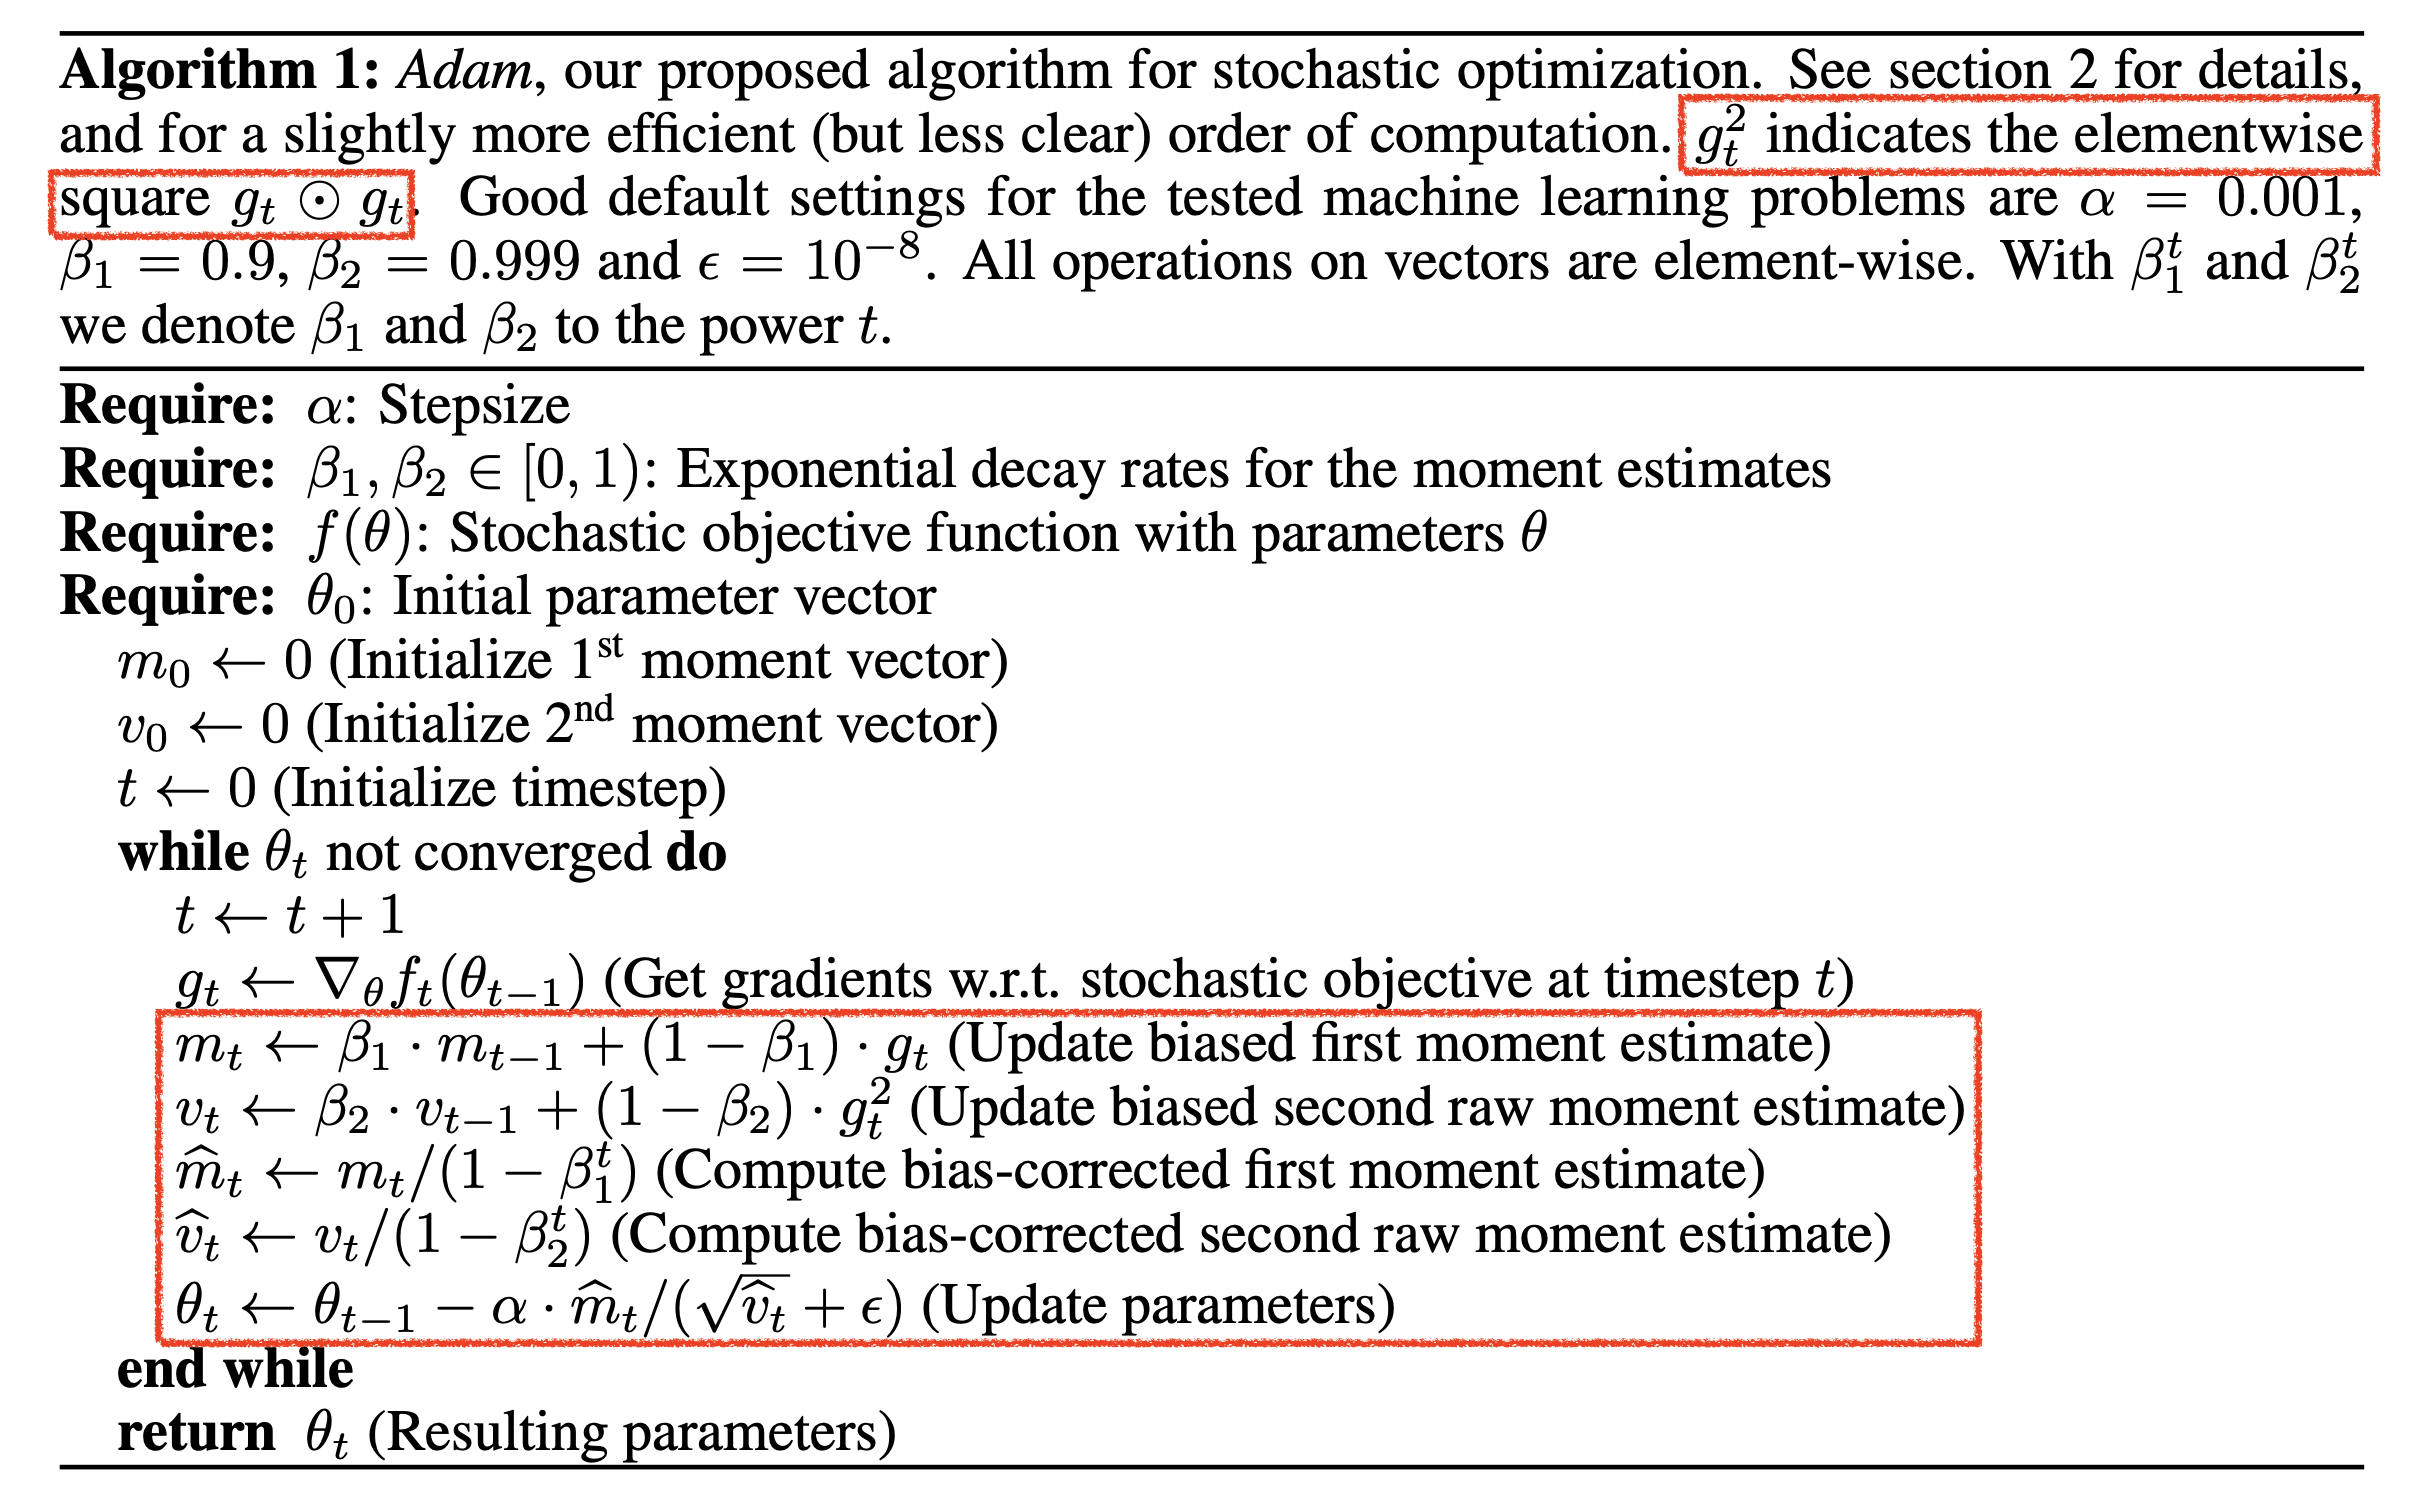 Fig.
Fig.
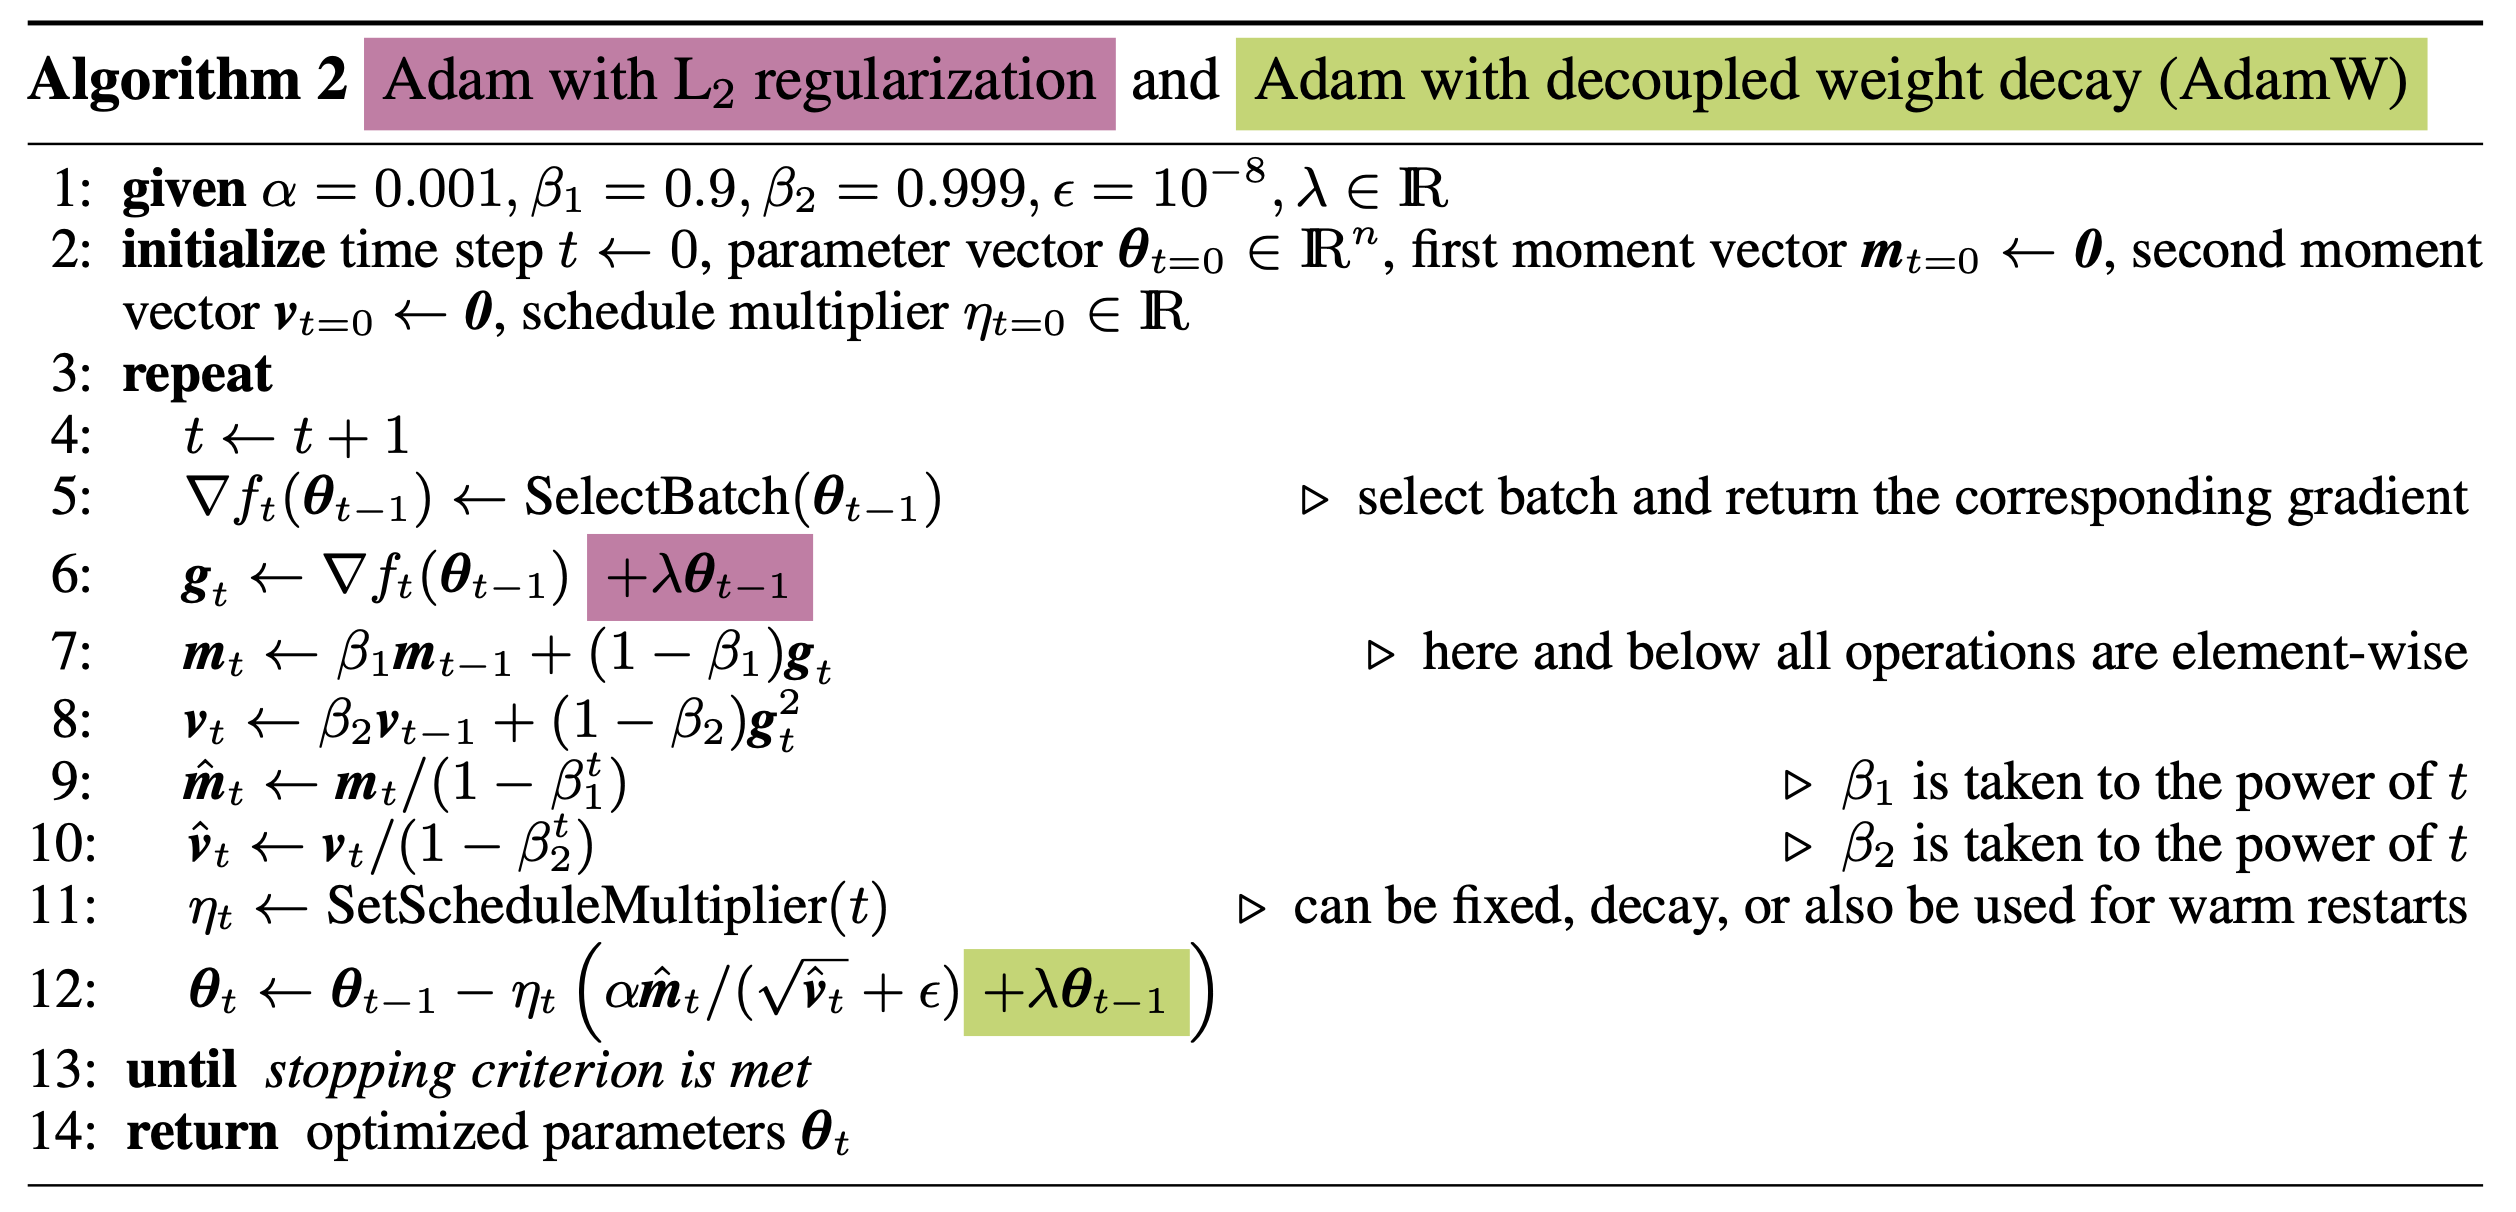 Fig.
Fig.
Adam에 적용된 decoupled weight decay는 아래 Algorithm 2의 12번째 line이다.
 Fig.
Fig.
마찬가지로 scheuler multiplier가 \(\lambda\)에 곱해지는 것을 확인할 수 있다.
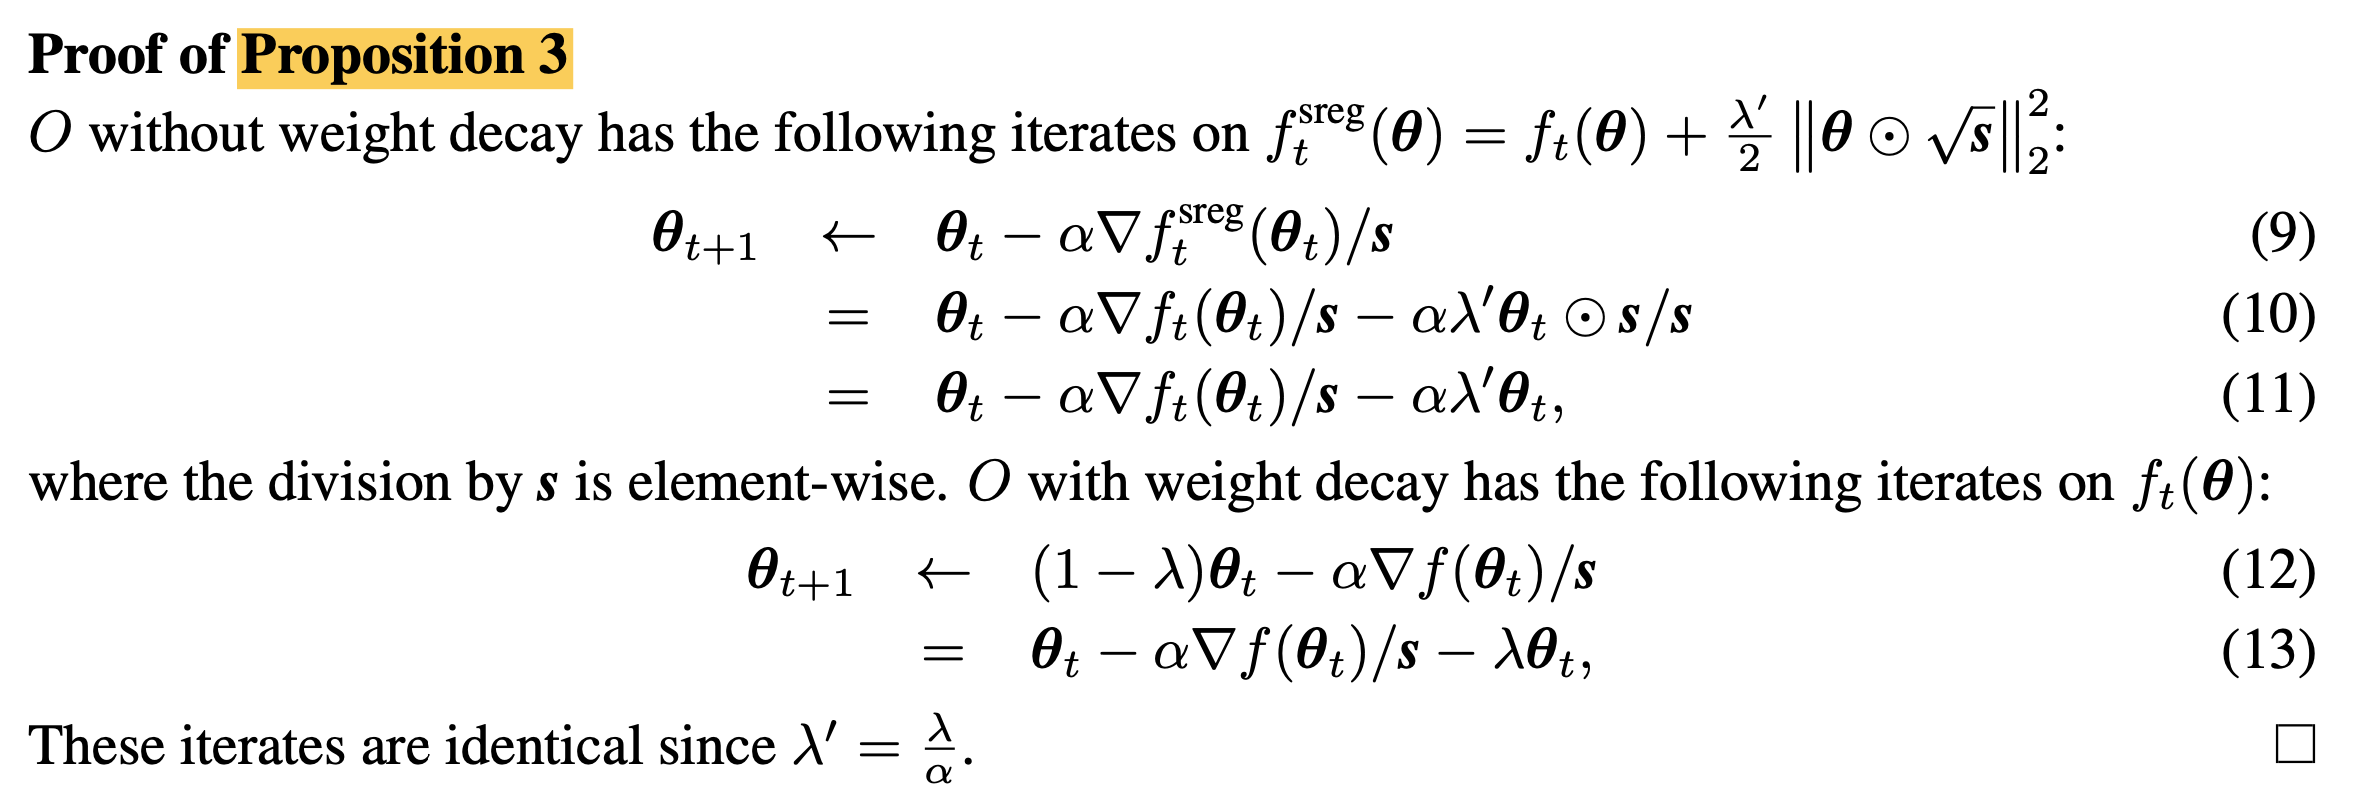 Fig.
Fig.
Justification of Decoupled Weight Decay Via A View Of Adaptive Gradient Methods As Bayesian Filtering
Experimental Results
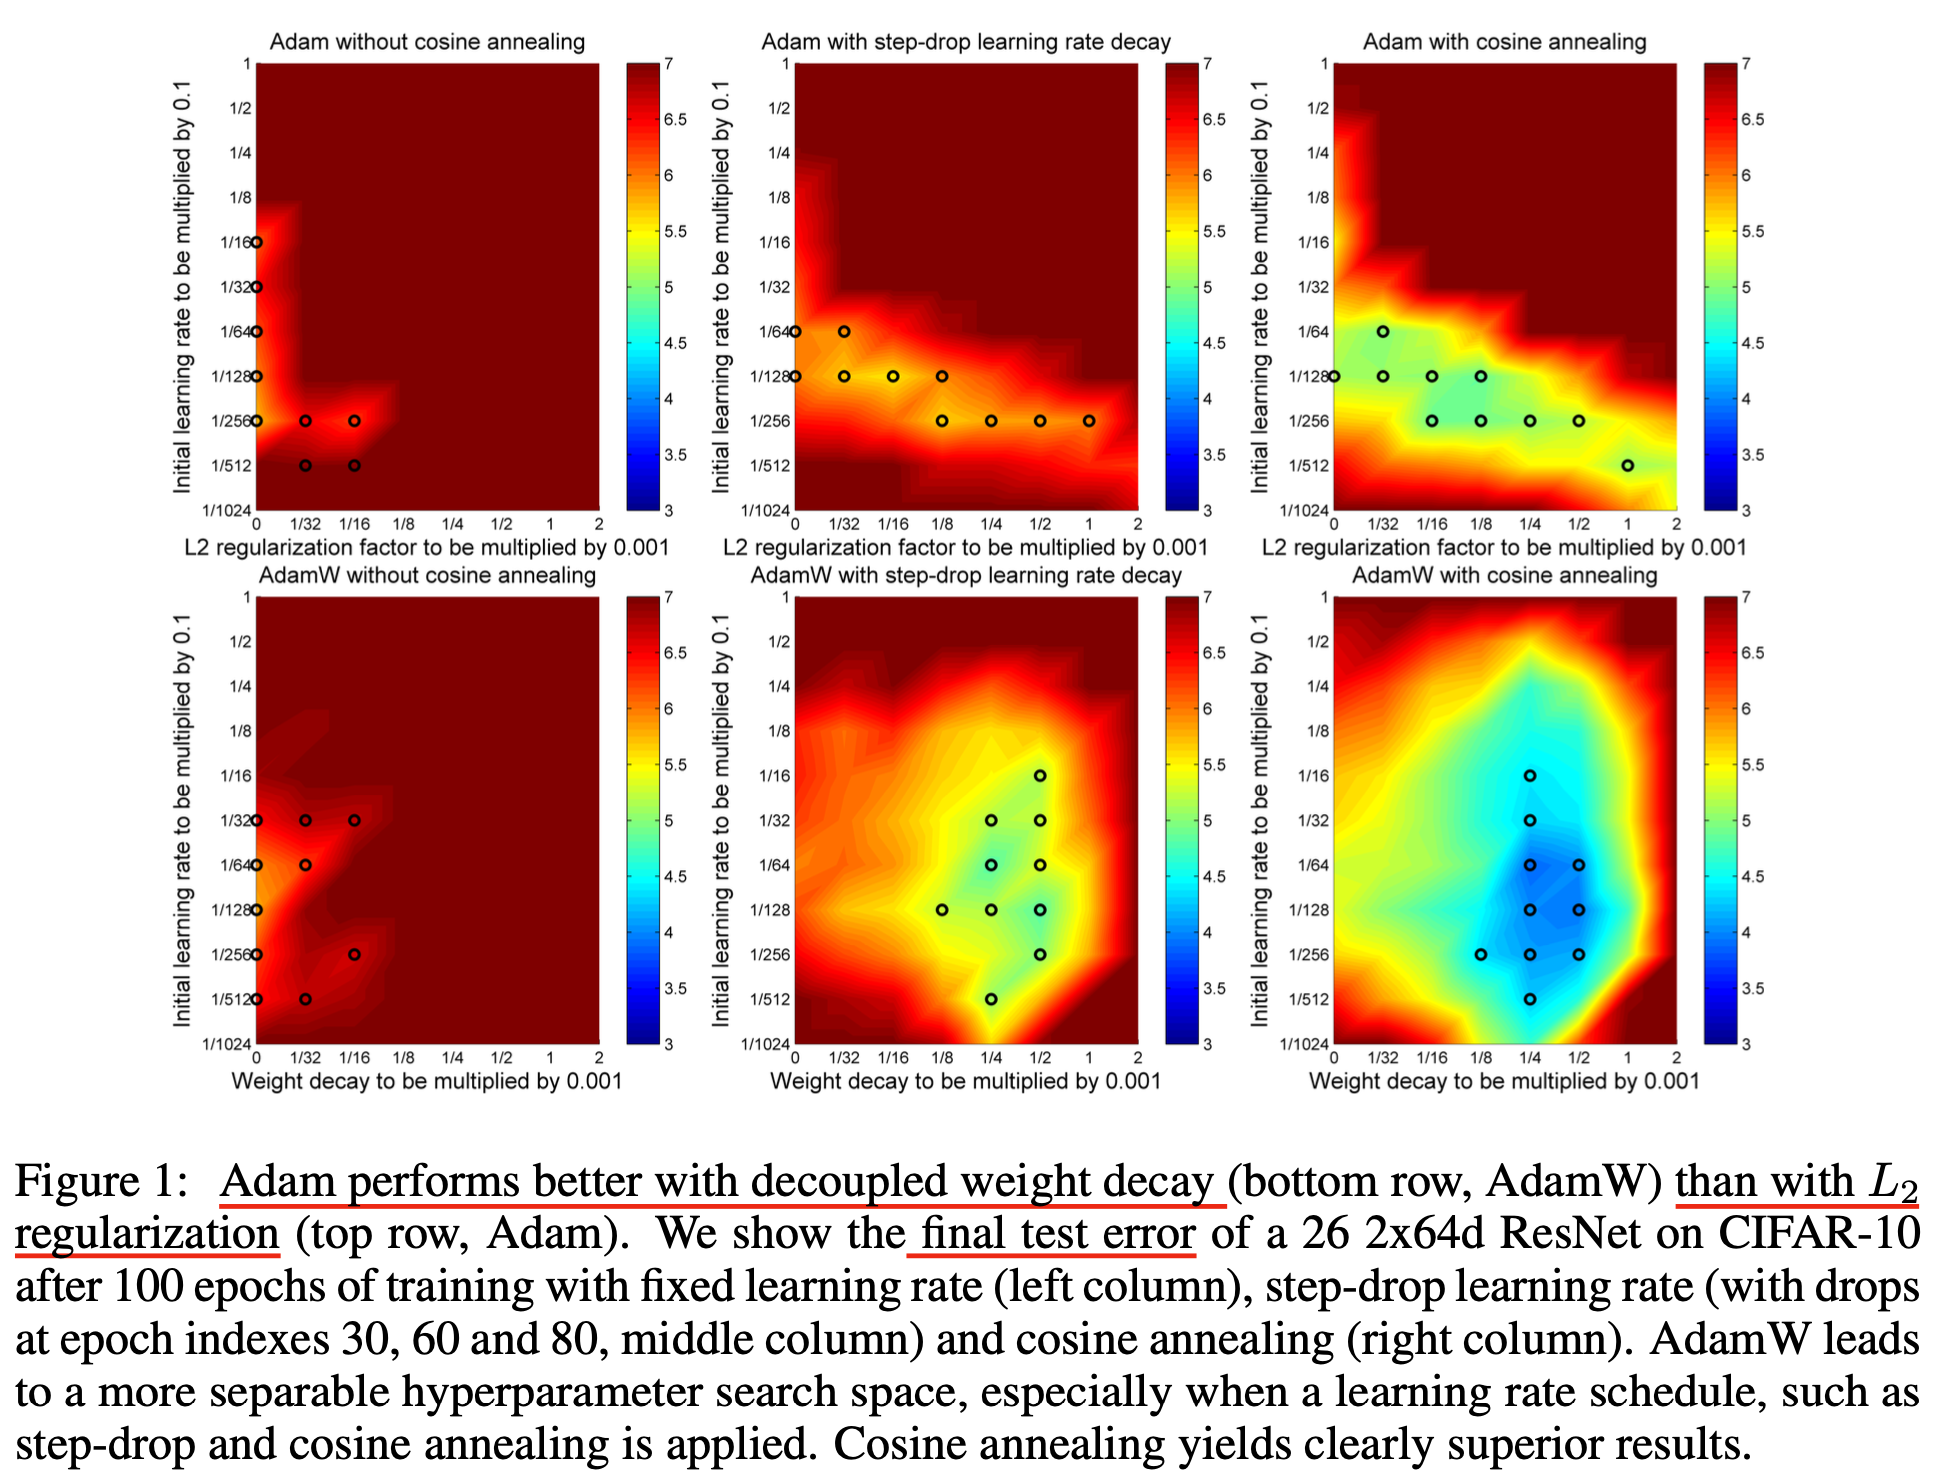 Fig.
Fig.
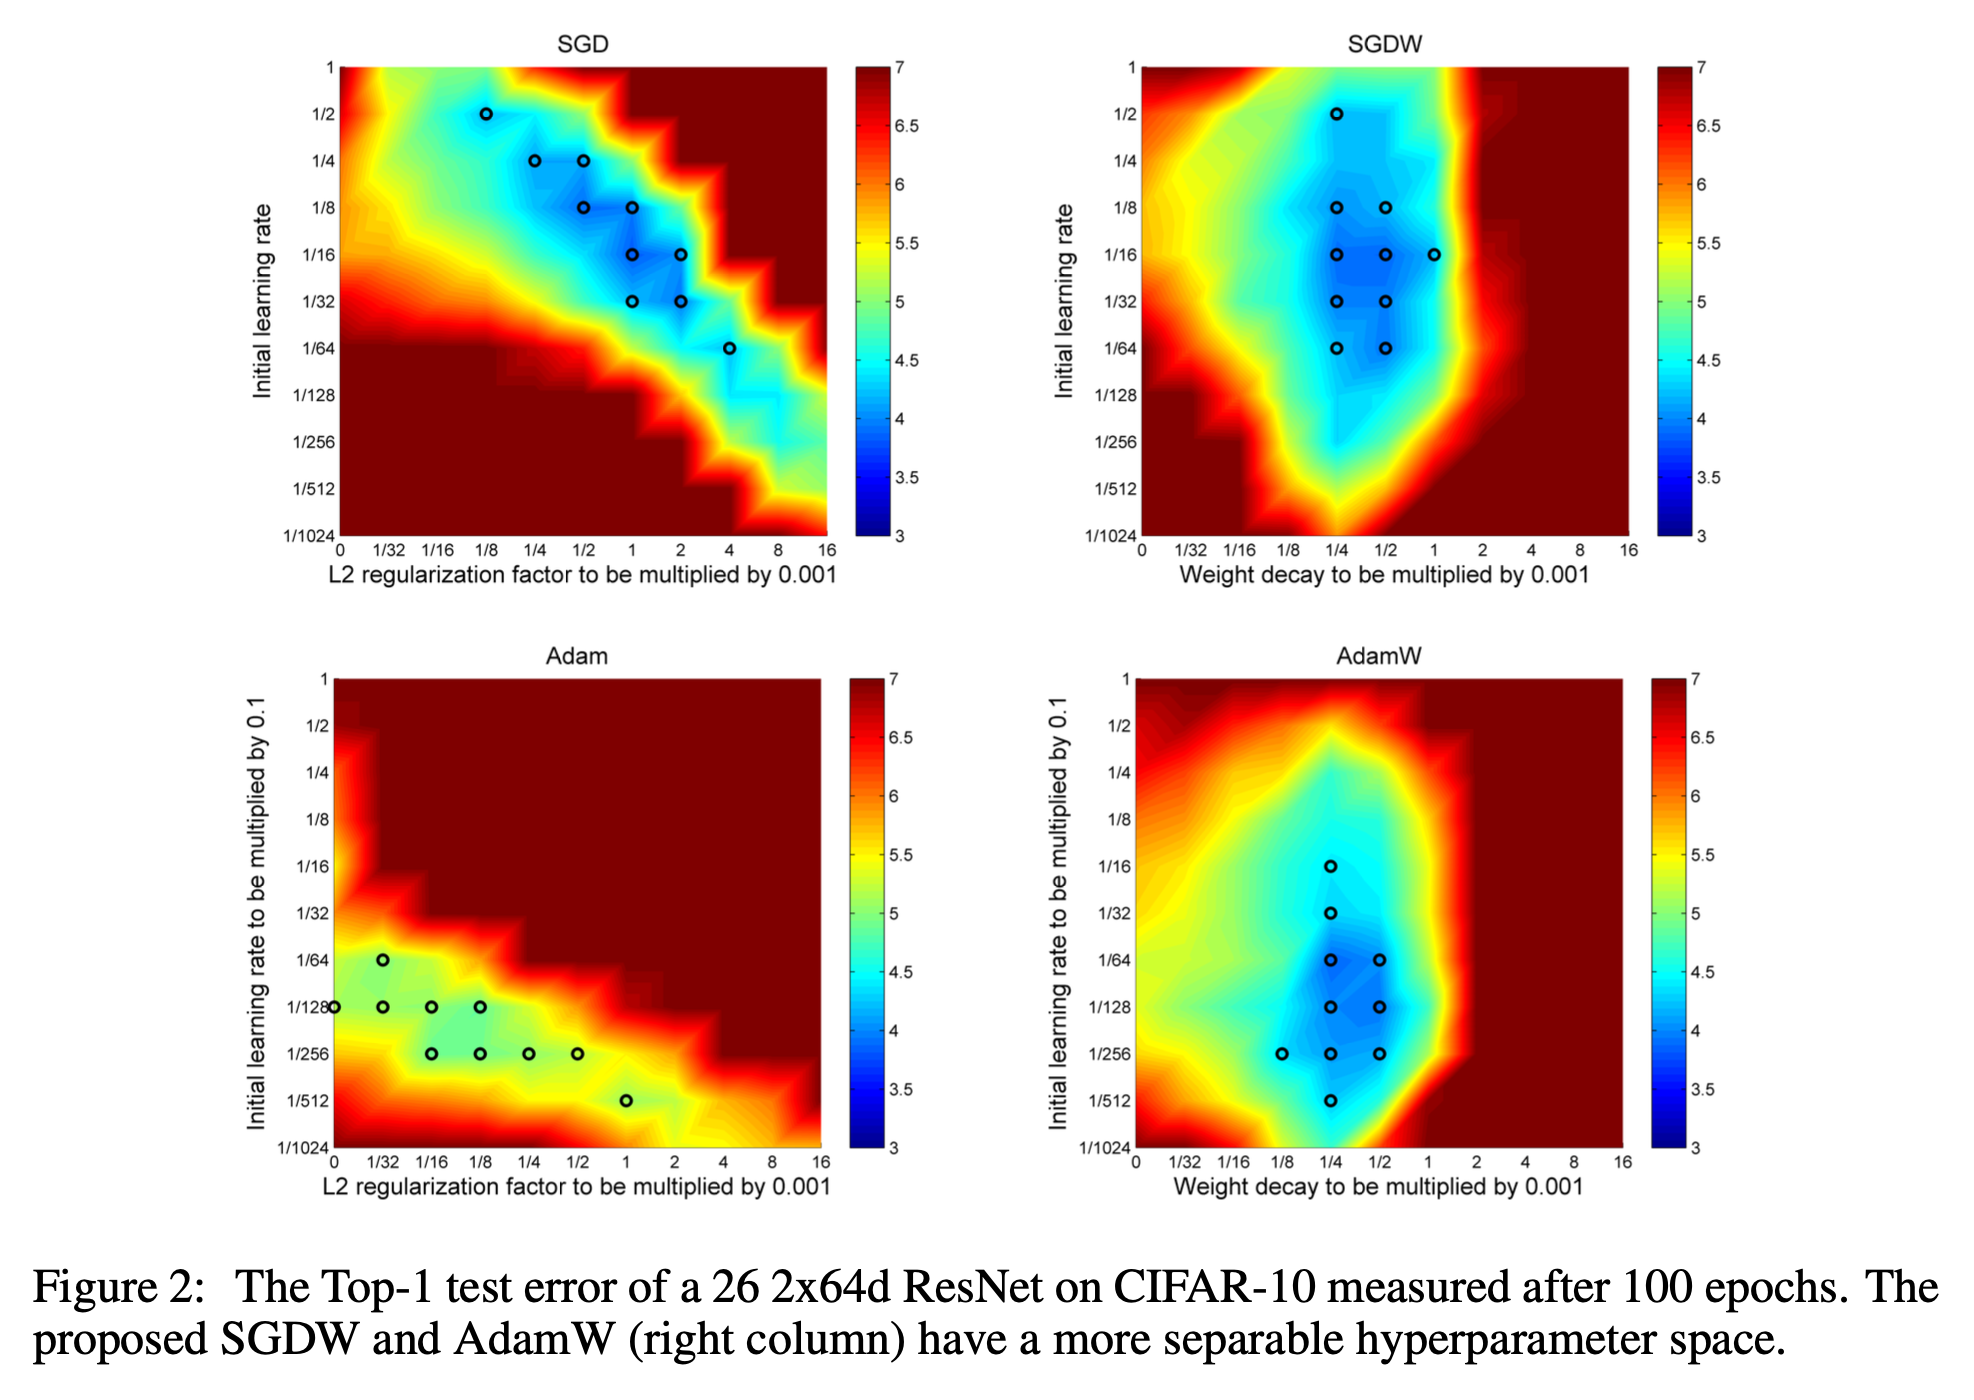 Fig.
Fig.
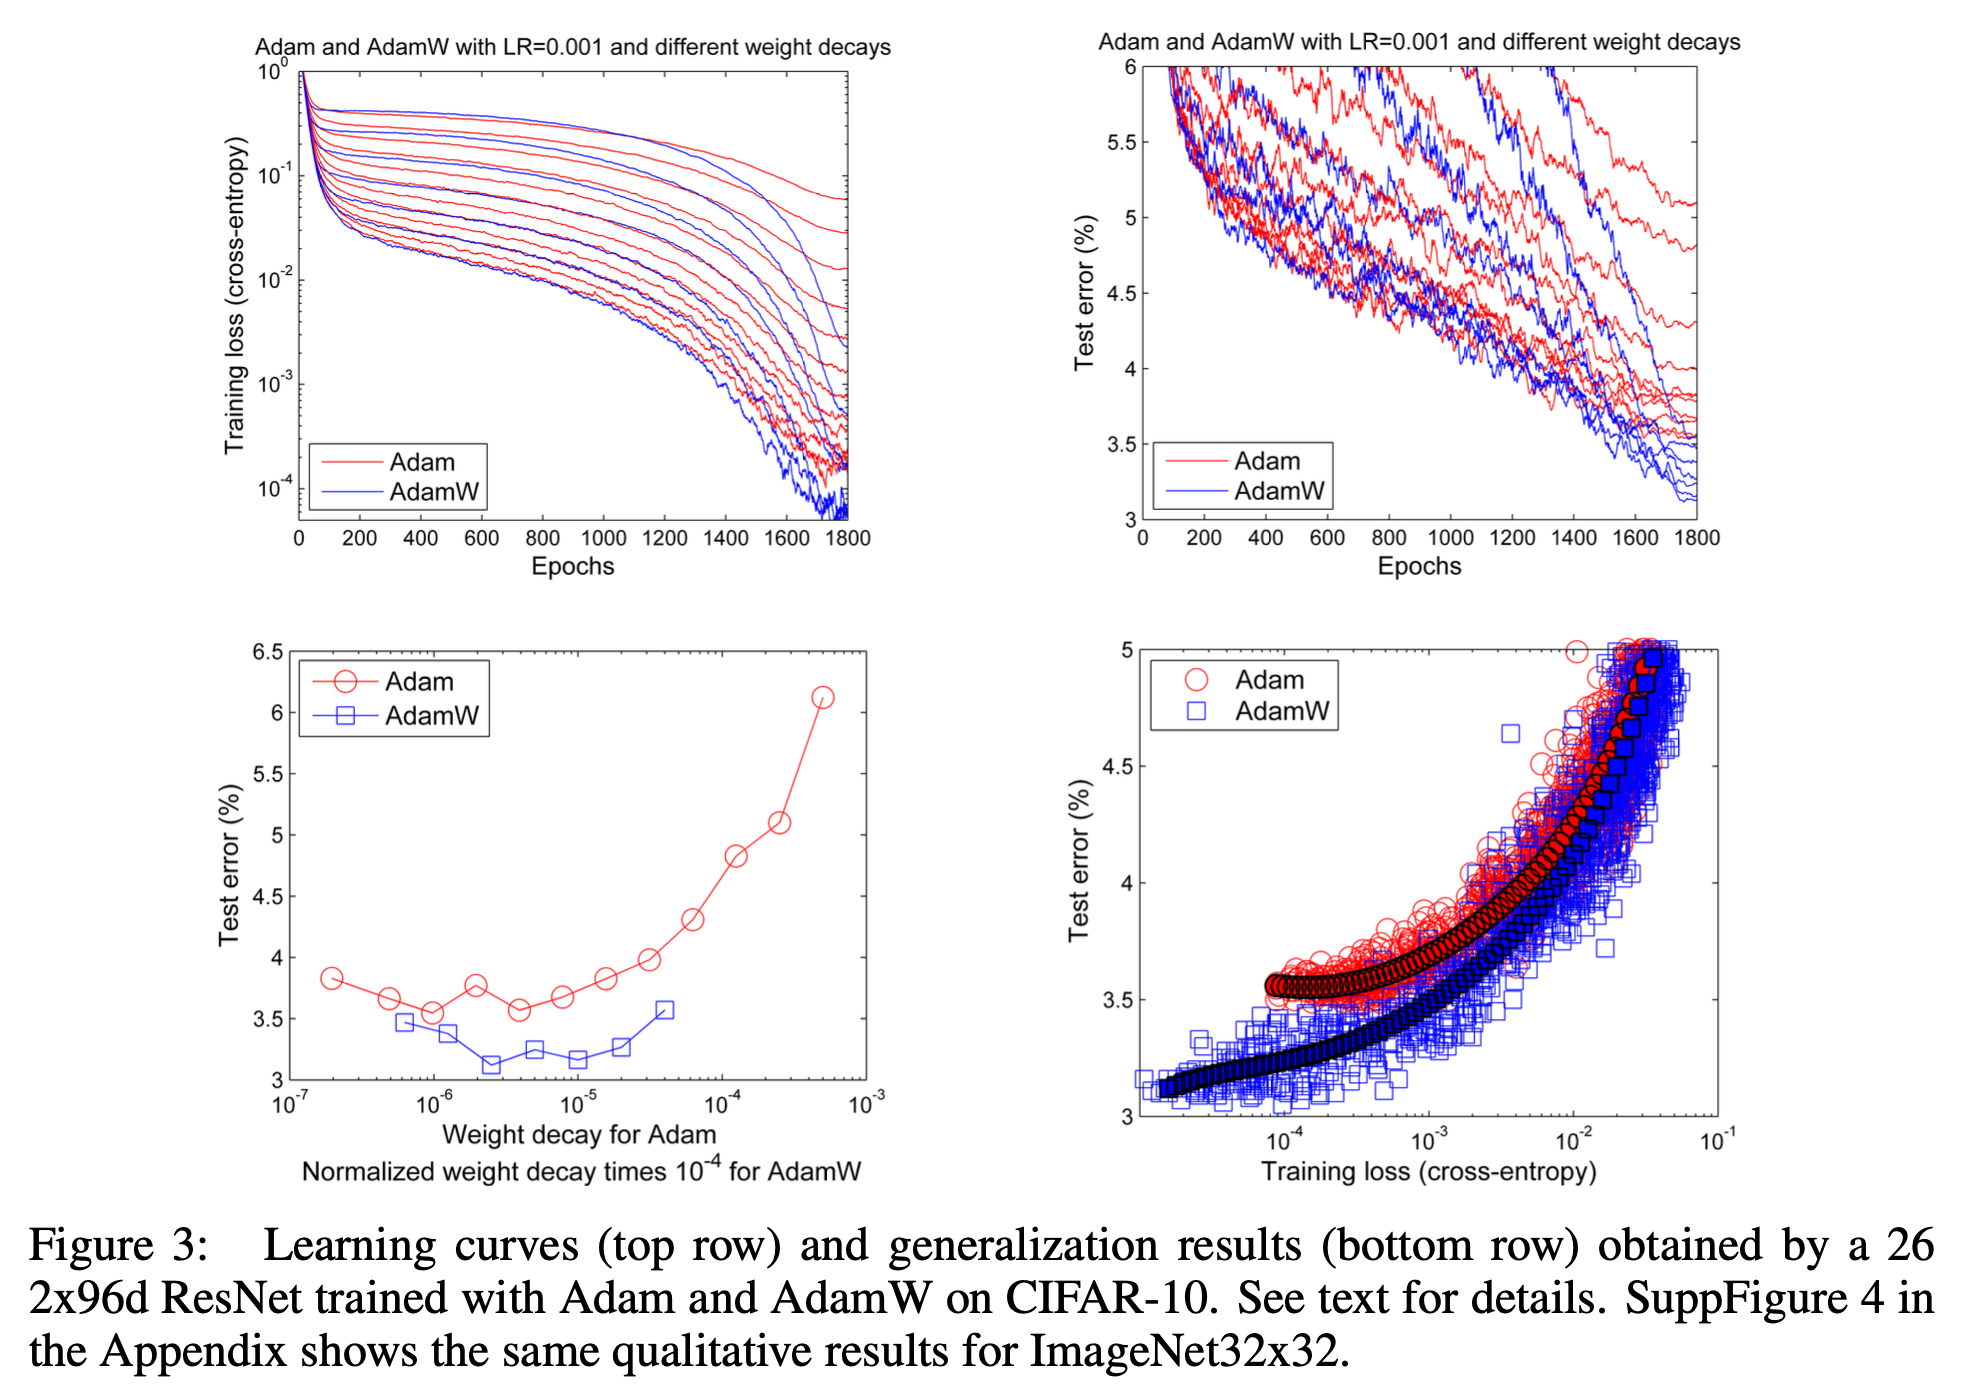 Fig.
Fig.
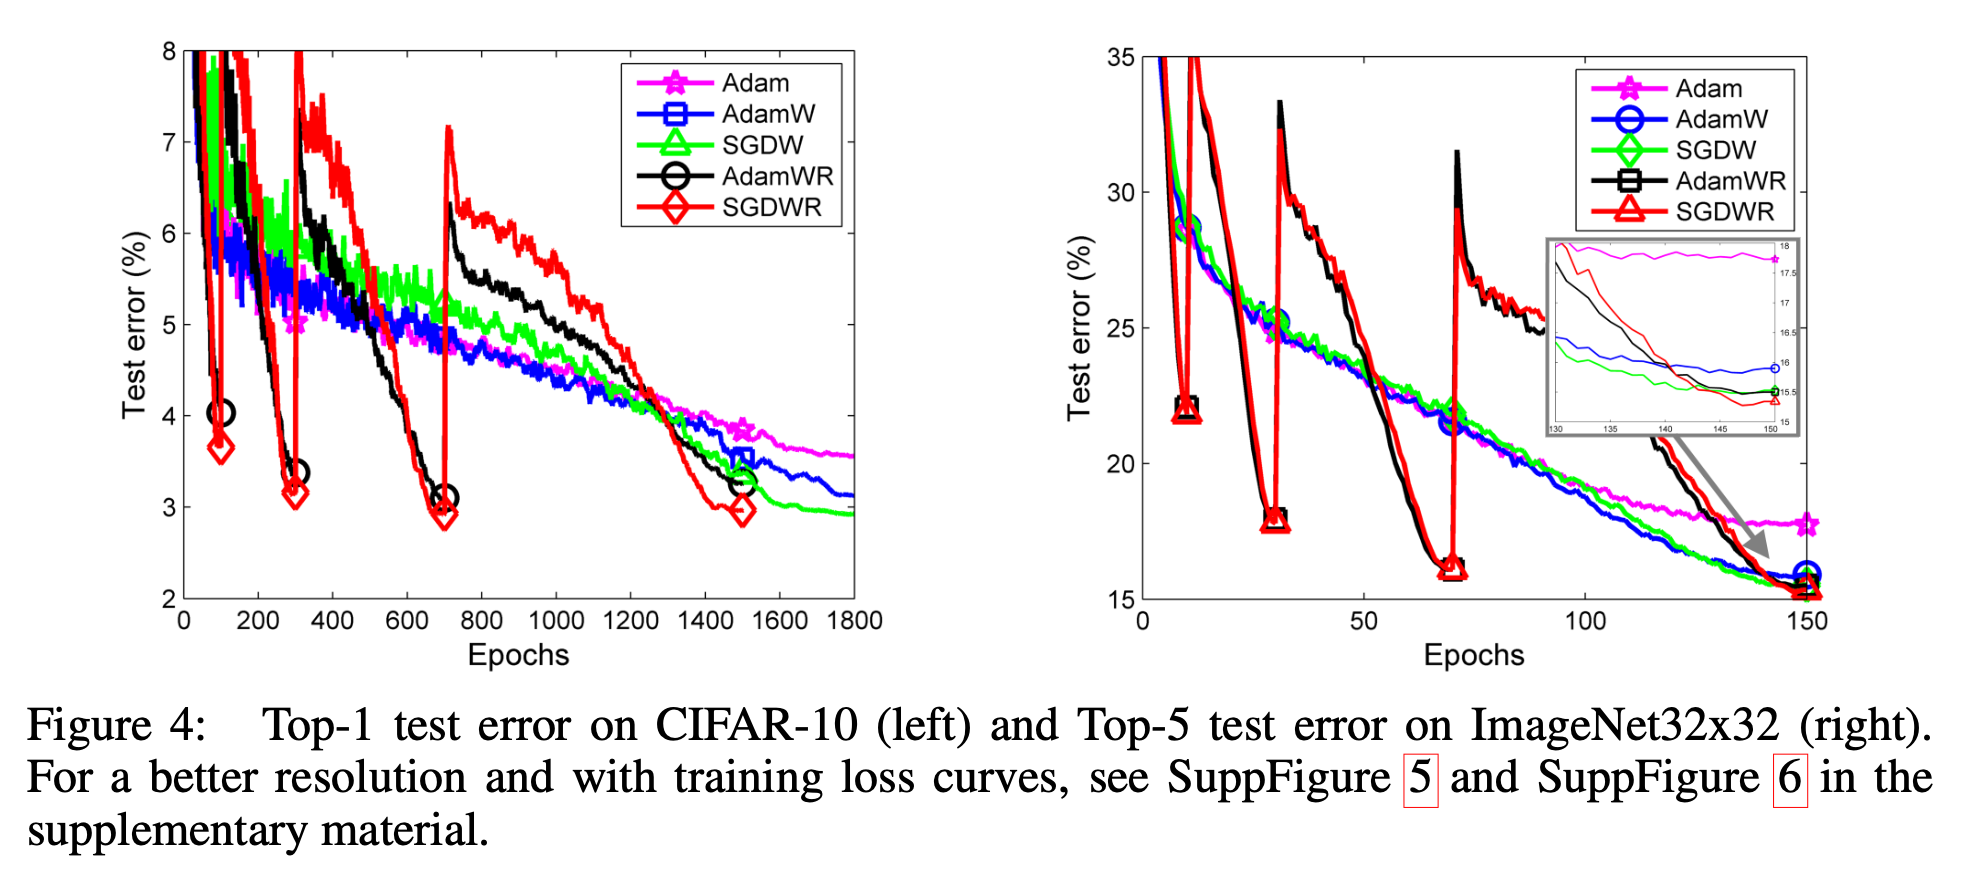 Fig.
Fig.
(2019) On the Variance of the Adaptive Learning Rate and Beyond (RAdam)
tmp
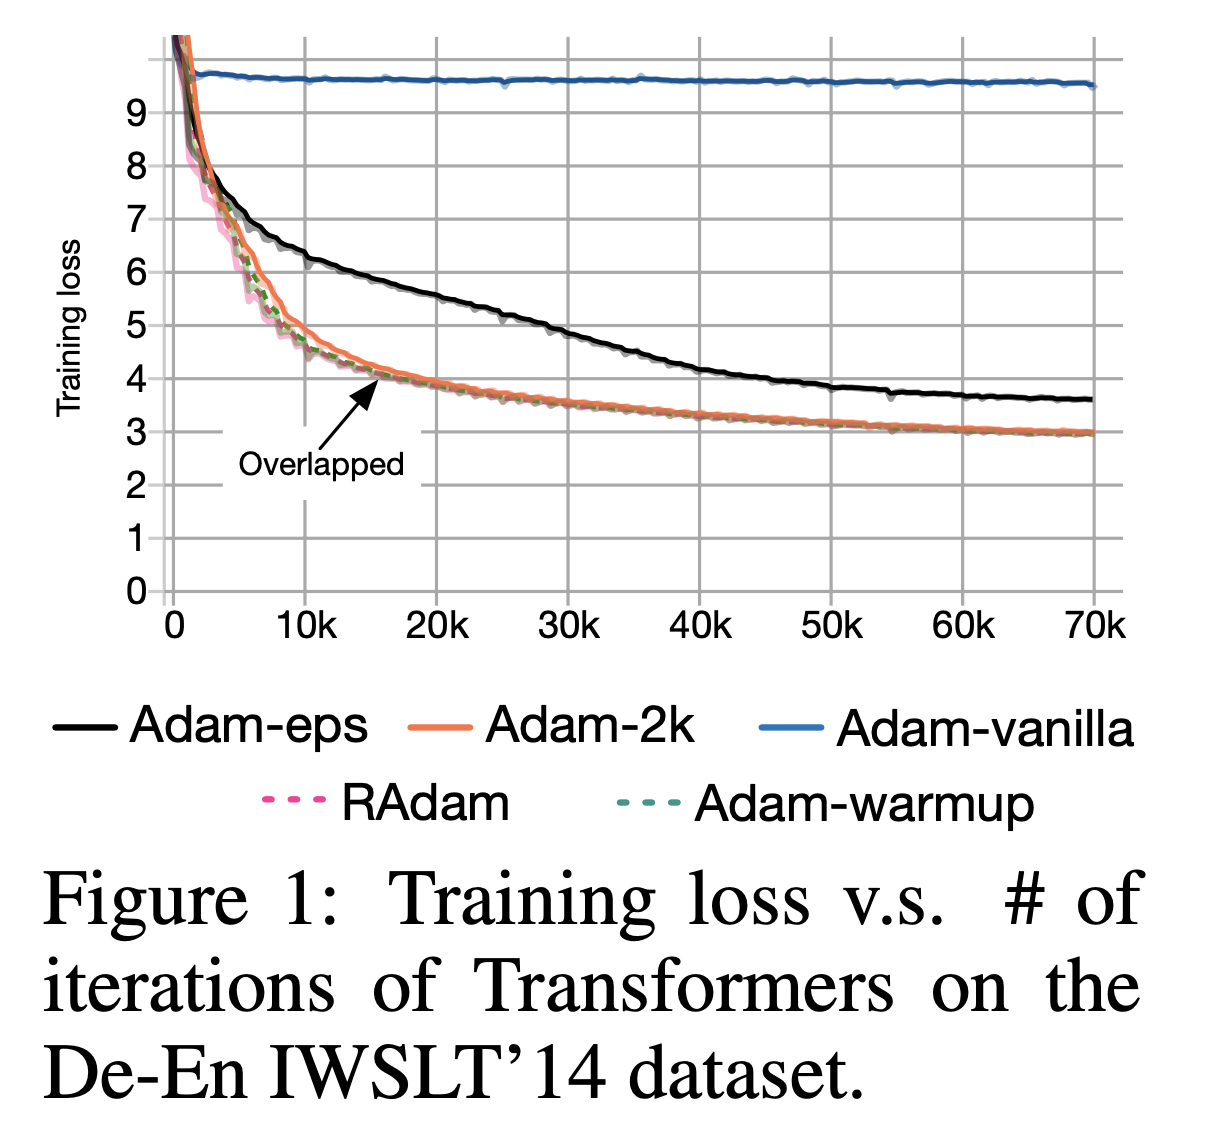 Fig.
Fig.
 Fig.
Fig.
Warmup As Variance Reduction (and intuition for epsilion of Adam)
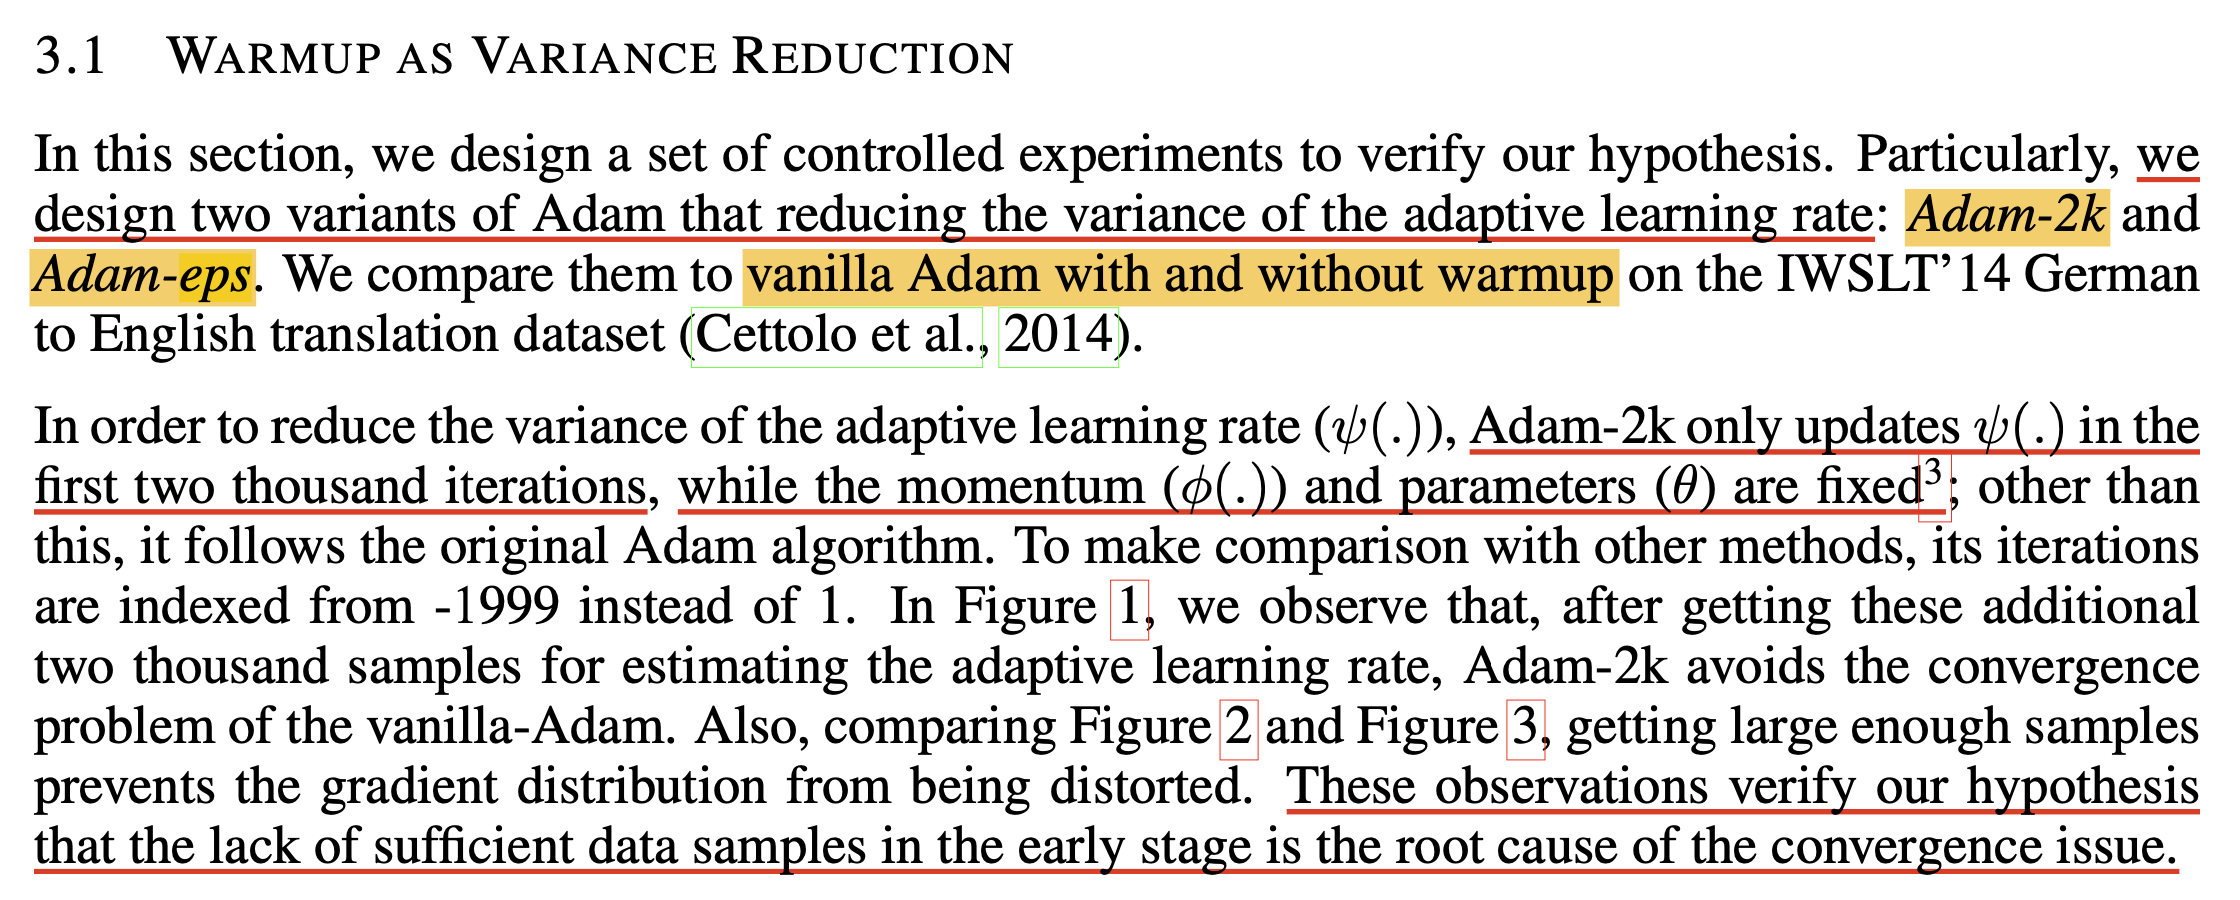 Fig.
Fig.
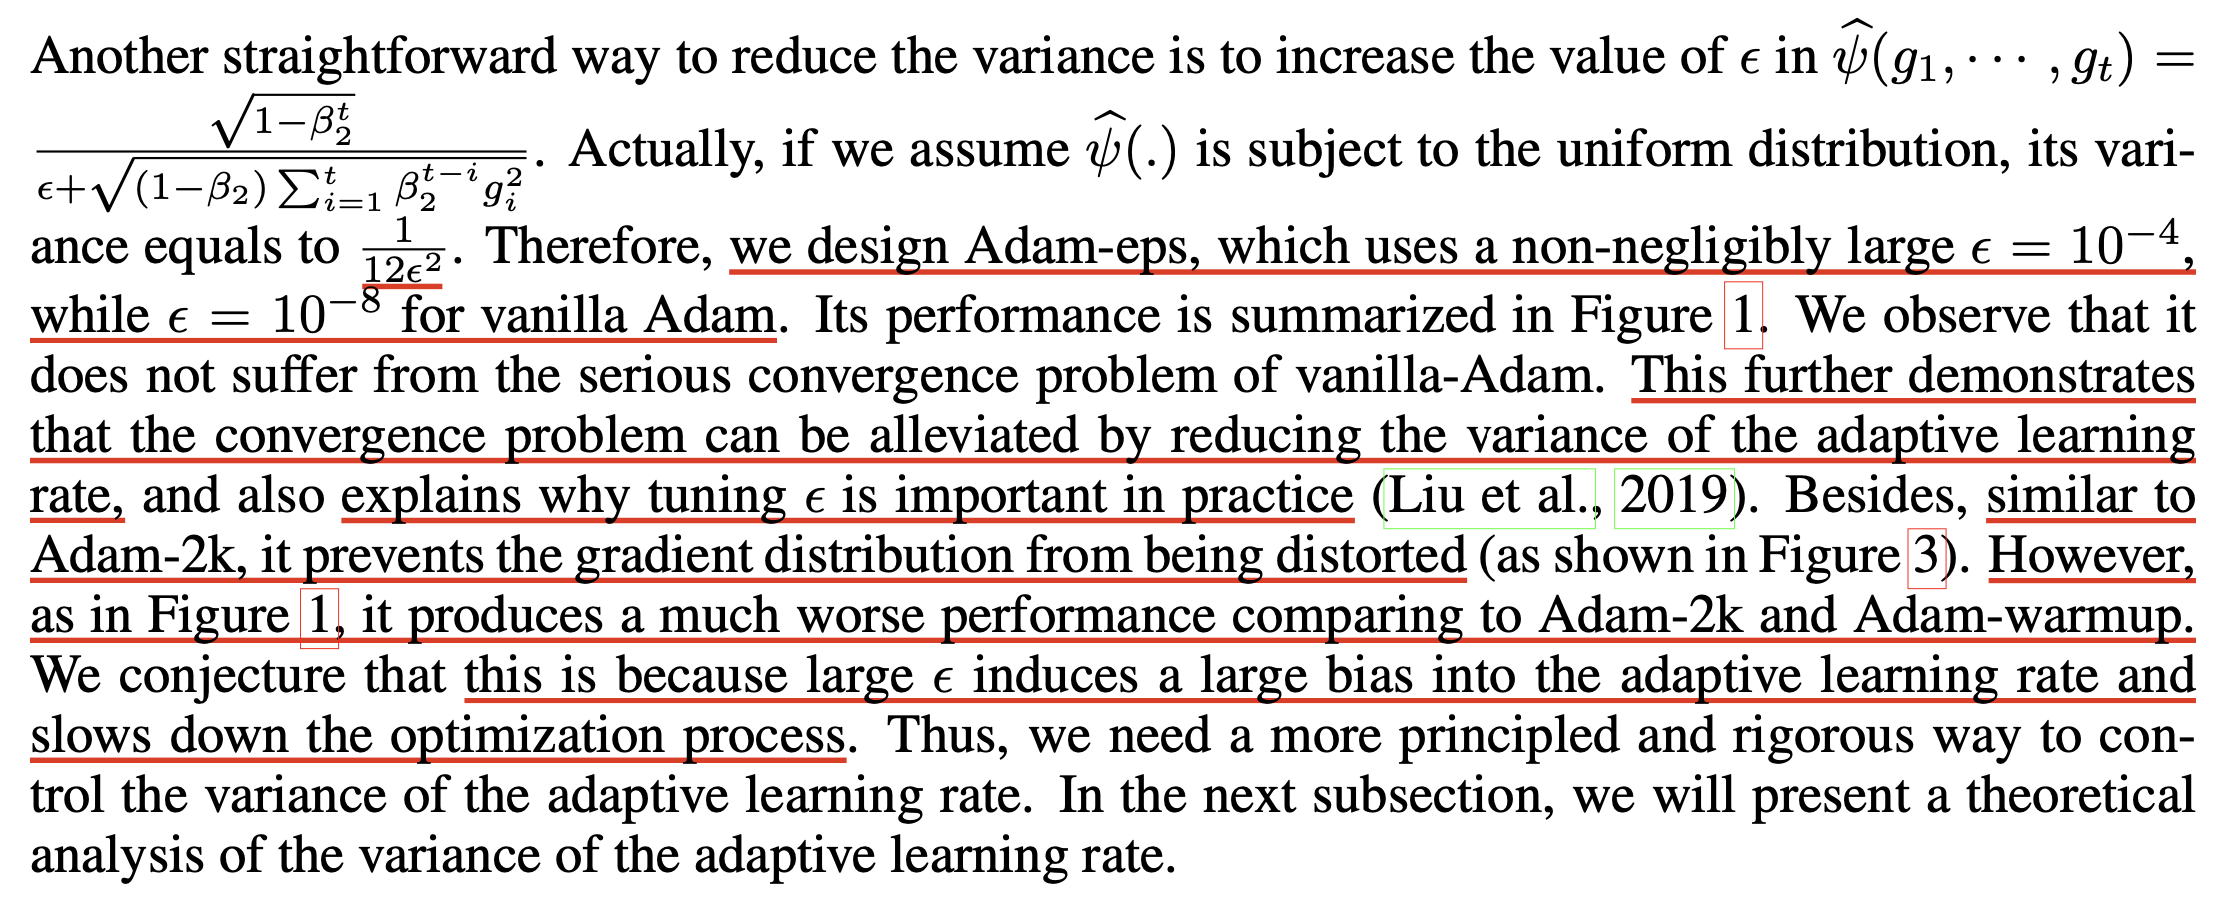 Fig.
Fig.
 Fig.
Fig.
tmp
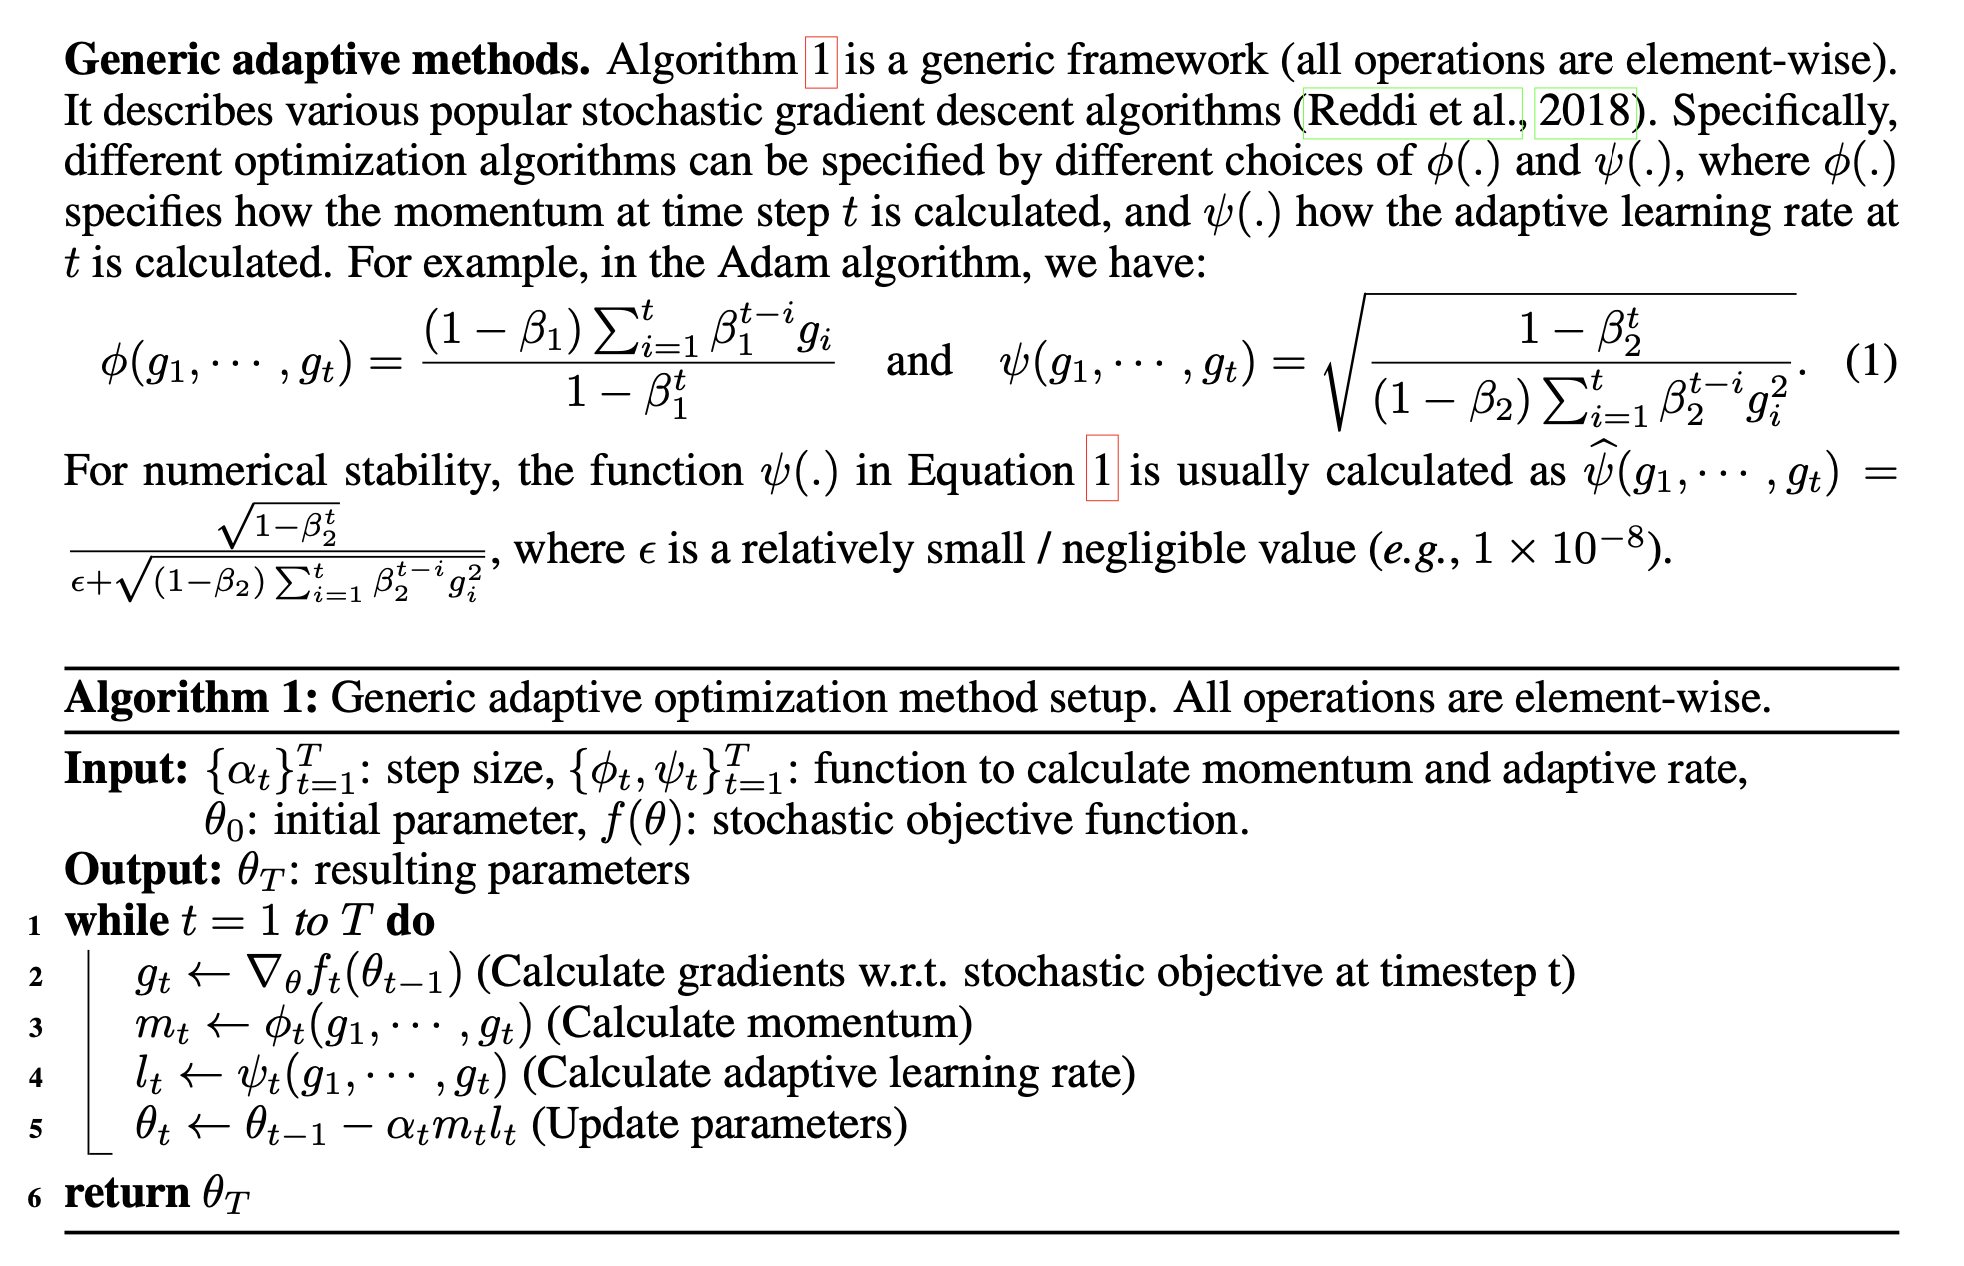 Fig.
Fig.
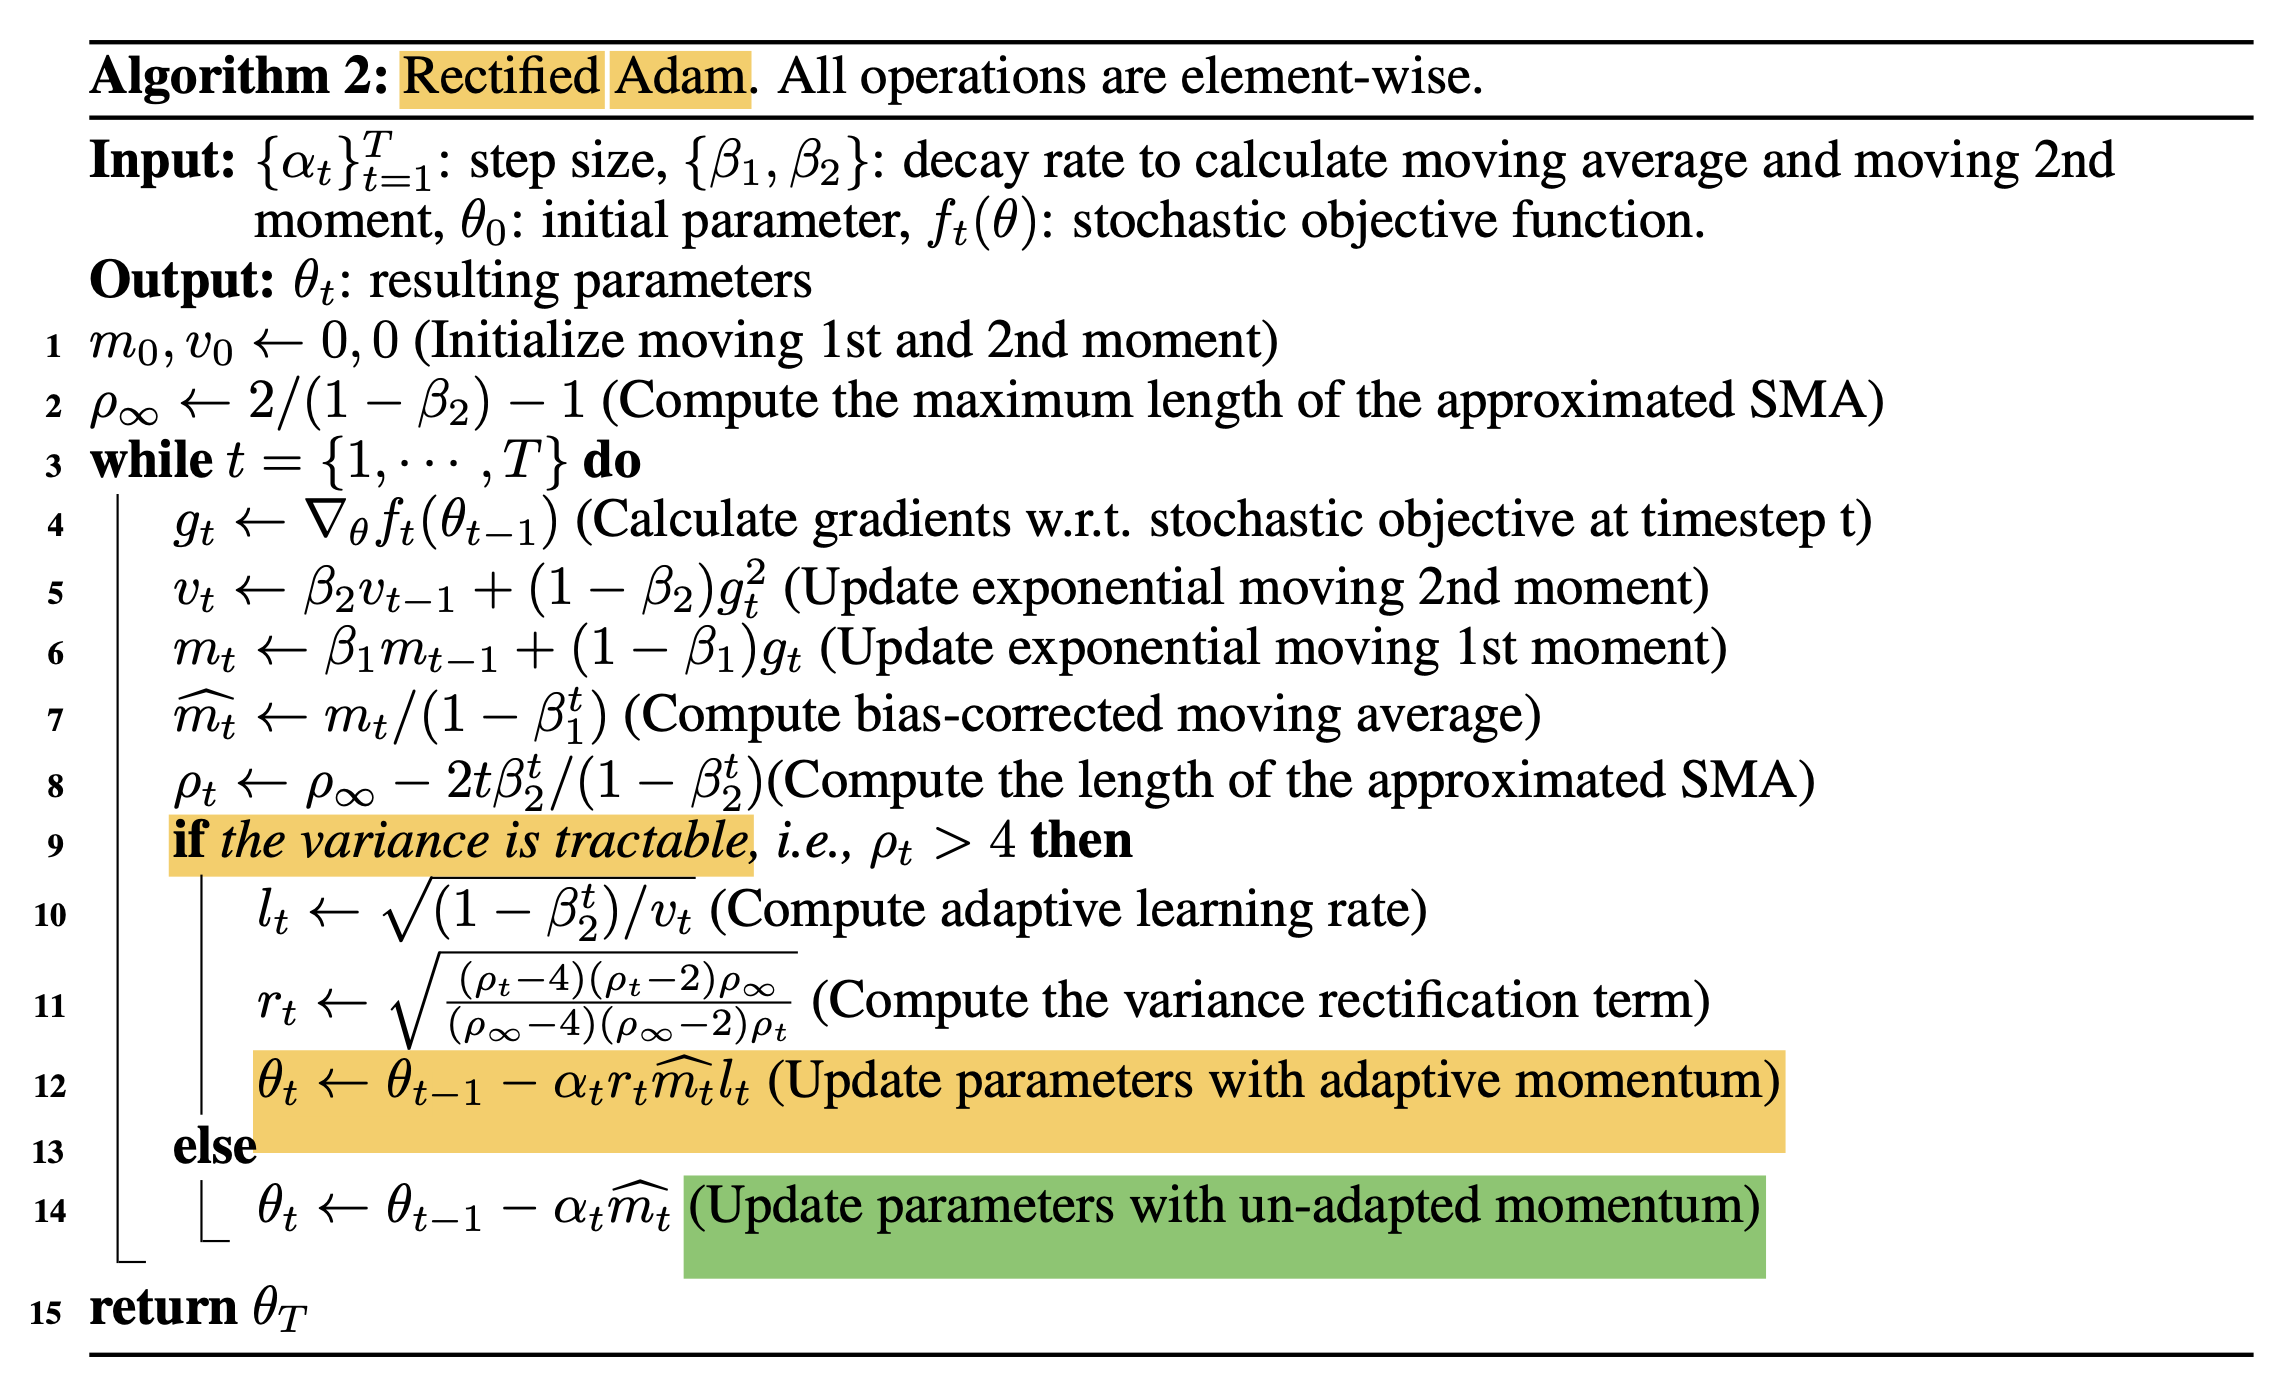 Fig.
Fig.
Dive Into Pytorch Adam, AdamW and Adafactor Implementation
Optmizer는 NN을 학습하는데 매우 중요하다. 사실 NN을 학습시킨다 (training)고 의인화 해서 표현하는데, 이것은 loss surface를 정의하고 (model arch, loss function, dataset이 정해지면 정해짐) 그 안에서 optimization을 하는 것 뿐이기 때문이다. 따라서 Pytorch같은 opensource framework의 optimizer module이 실제로 의도하는대로 작동하는지에 대해 생각해 볼 가치가 있다. 왜냐하면 AdamW같은 경우도 이를 검증하는 과정에서 탄생했다고 생각해볼 수 있기 때문이다.
PyTorch Adam
먼저 Pytorch Adam 구현이 어떻게 되어있는지 살펴보자. 실제로는 아래 algorithm을 따라서 구현되어있는데, gradient asecent를 고려해서 maximize argument가 있는 것 같고 이 외에는 AMSGrad를 제외하면 paper와 다를 바 없다.
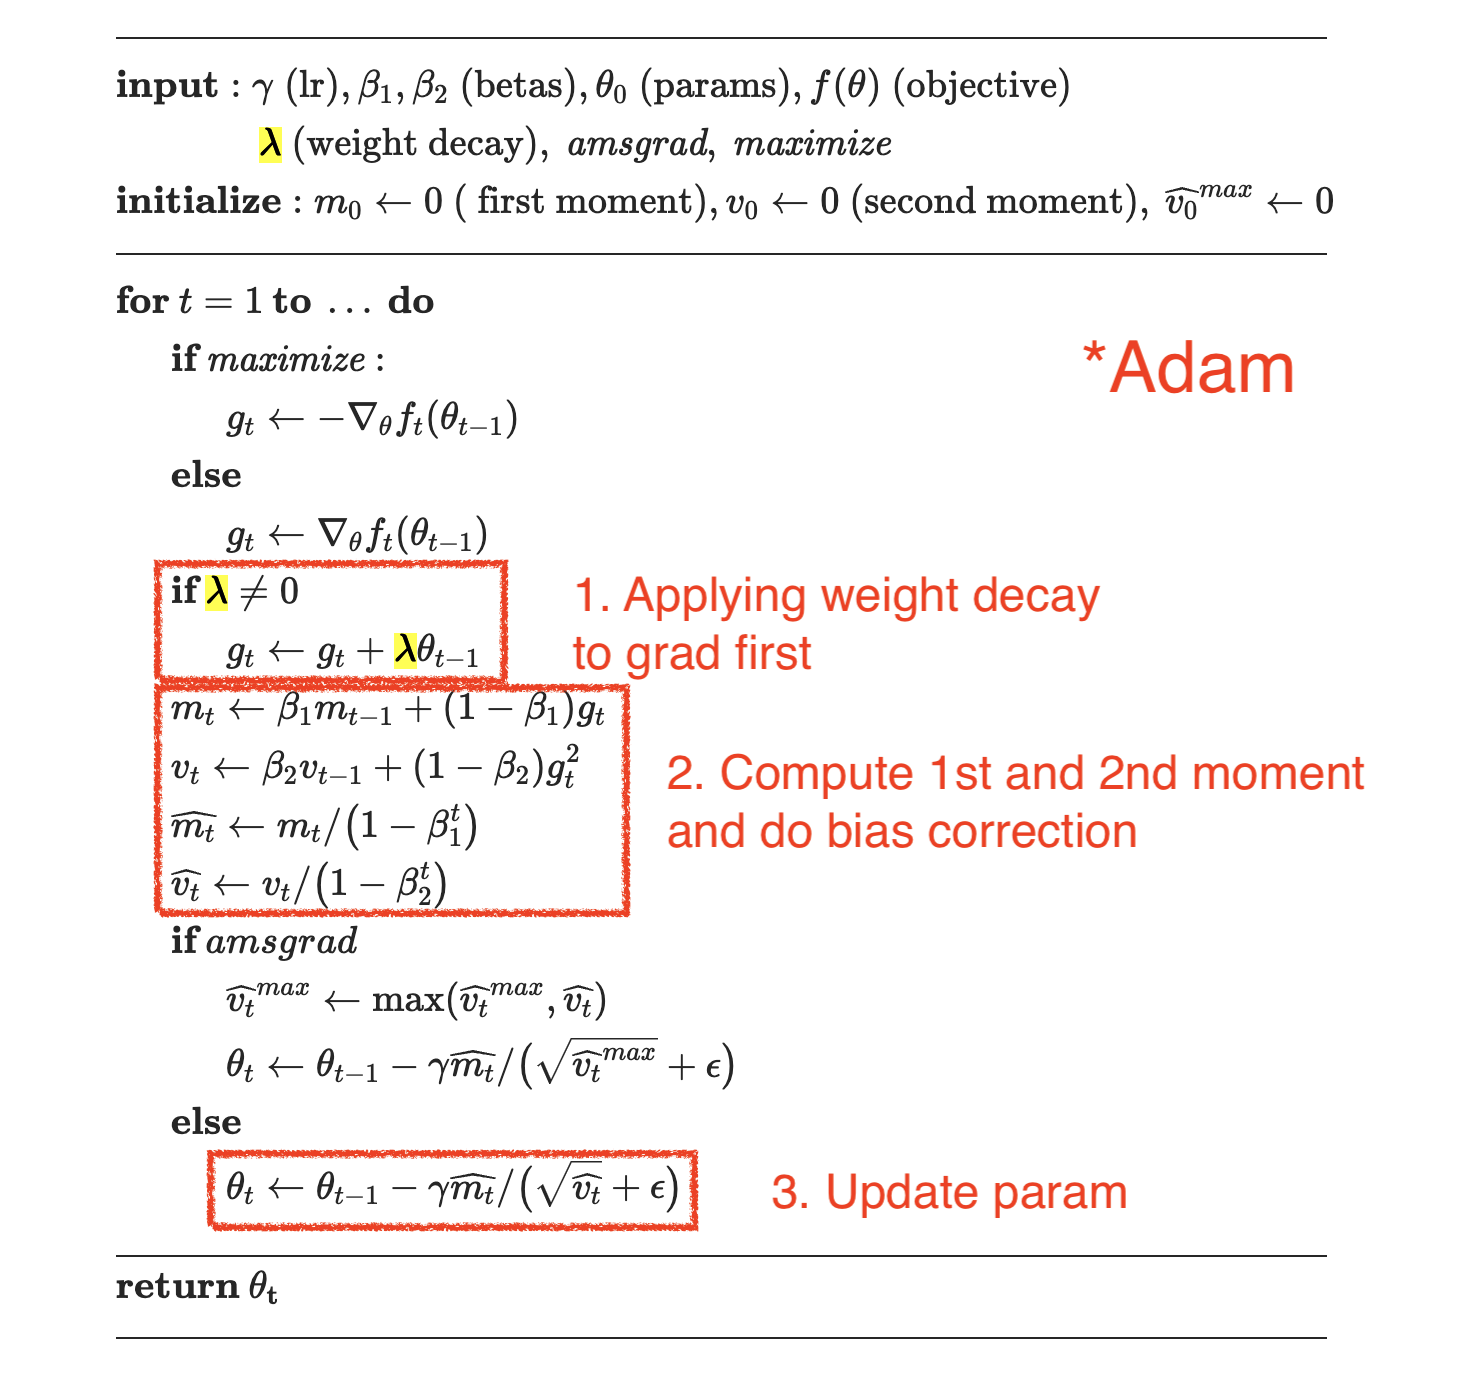 Fig.
Fig.
Document에 가면 torch.nn.optim의 class에서 호출할 수 있는 method들과 input keyword arguments들이 쓰여있는 걸 확인할 수 있다.
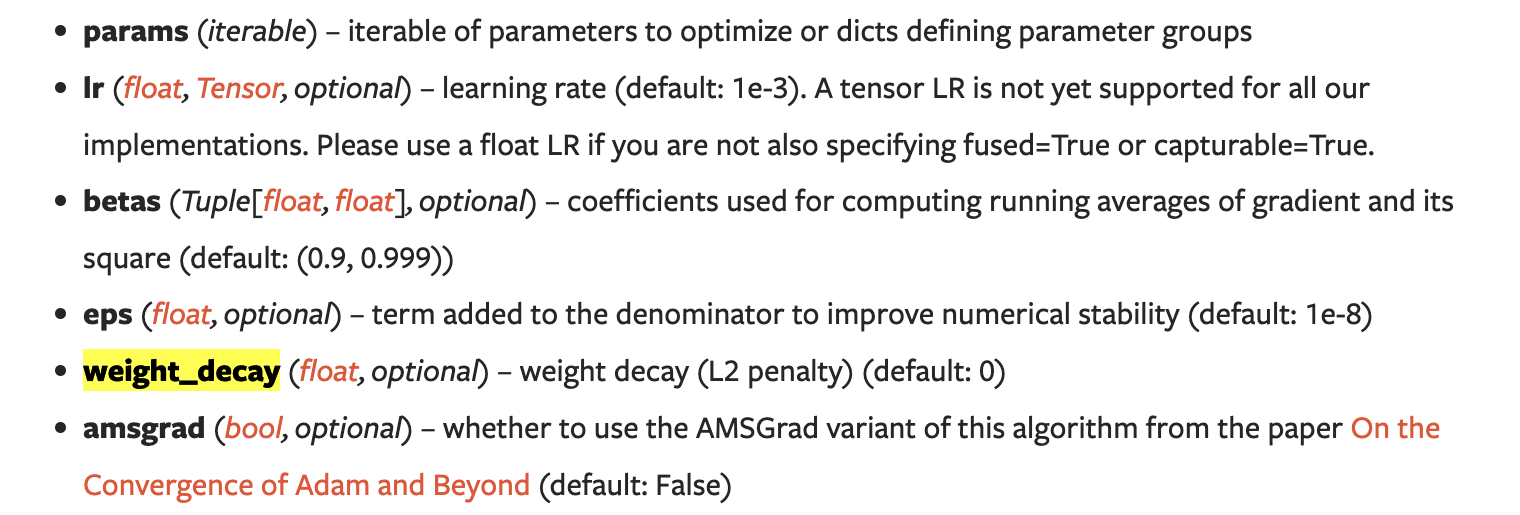 Fig.
Fig.
실제 code가 구현된 pytorch/torch/optim/adam.py 부분을 보면 어떻게 moment 계산, bias correction 등을 하는지, 그리고 weight decay를 하는지를 확인할 수 있다.
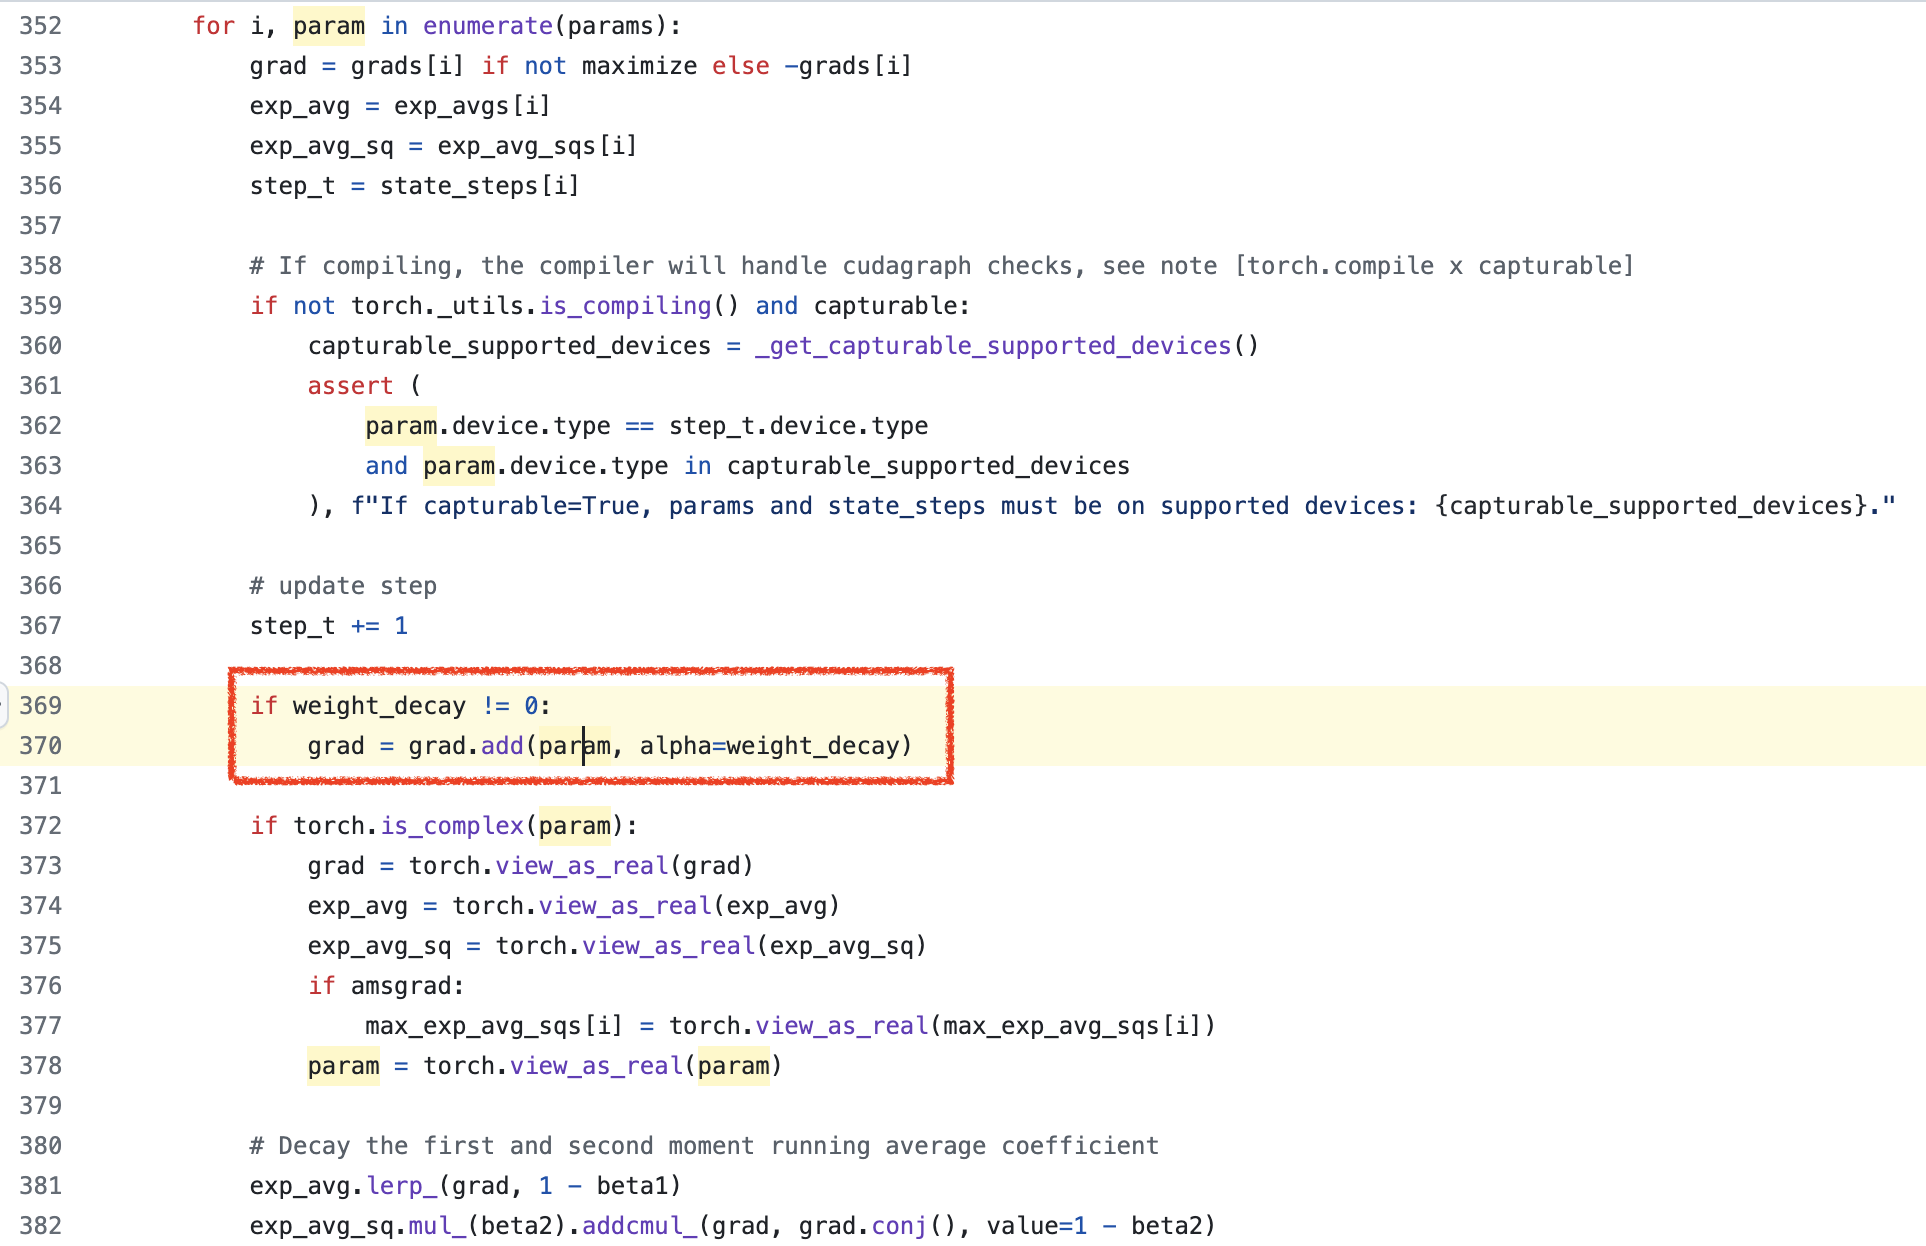 Fig.
Fig.
앞서 살펴본 것 처럼 weight decay가 gradient에 대해서 먼저 적용되고, 이 gradient를 가지고 moments estimation을 하는 것을 확인할 수 있다.
PyTorch AdamW and Potential Issue of Setting Weight Decay
이제 Pytorch AdamW를 보자.
AdamW는 Adam과 다르게 grad가 아니라 param, theta에 대해서 weight decay를 적용하는 것을 확인할 수 있다.
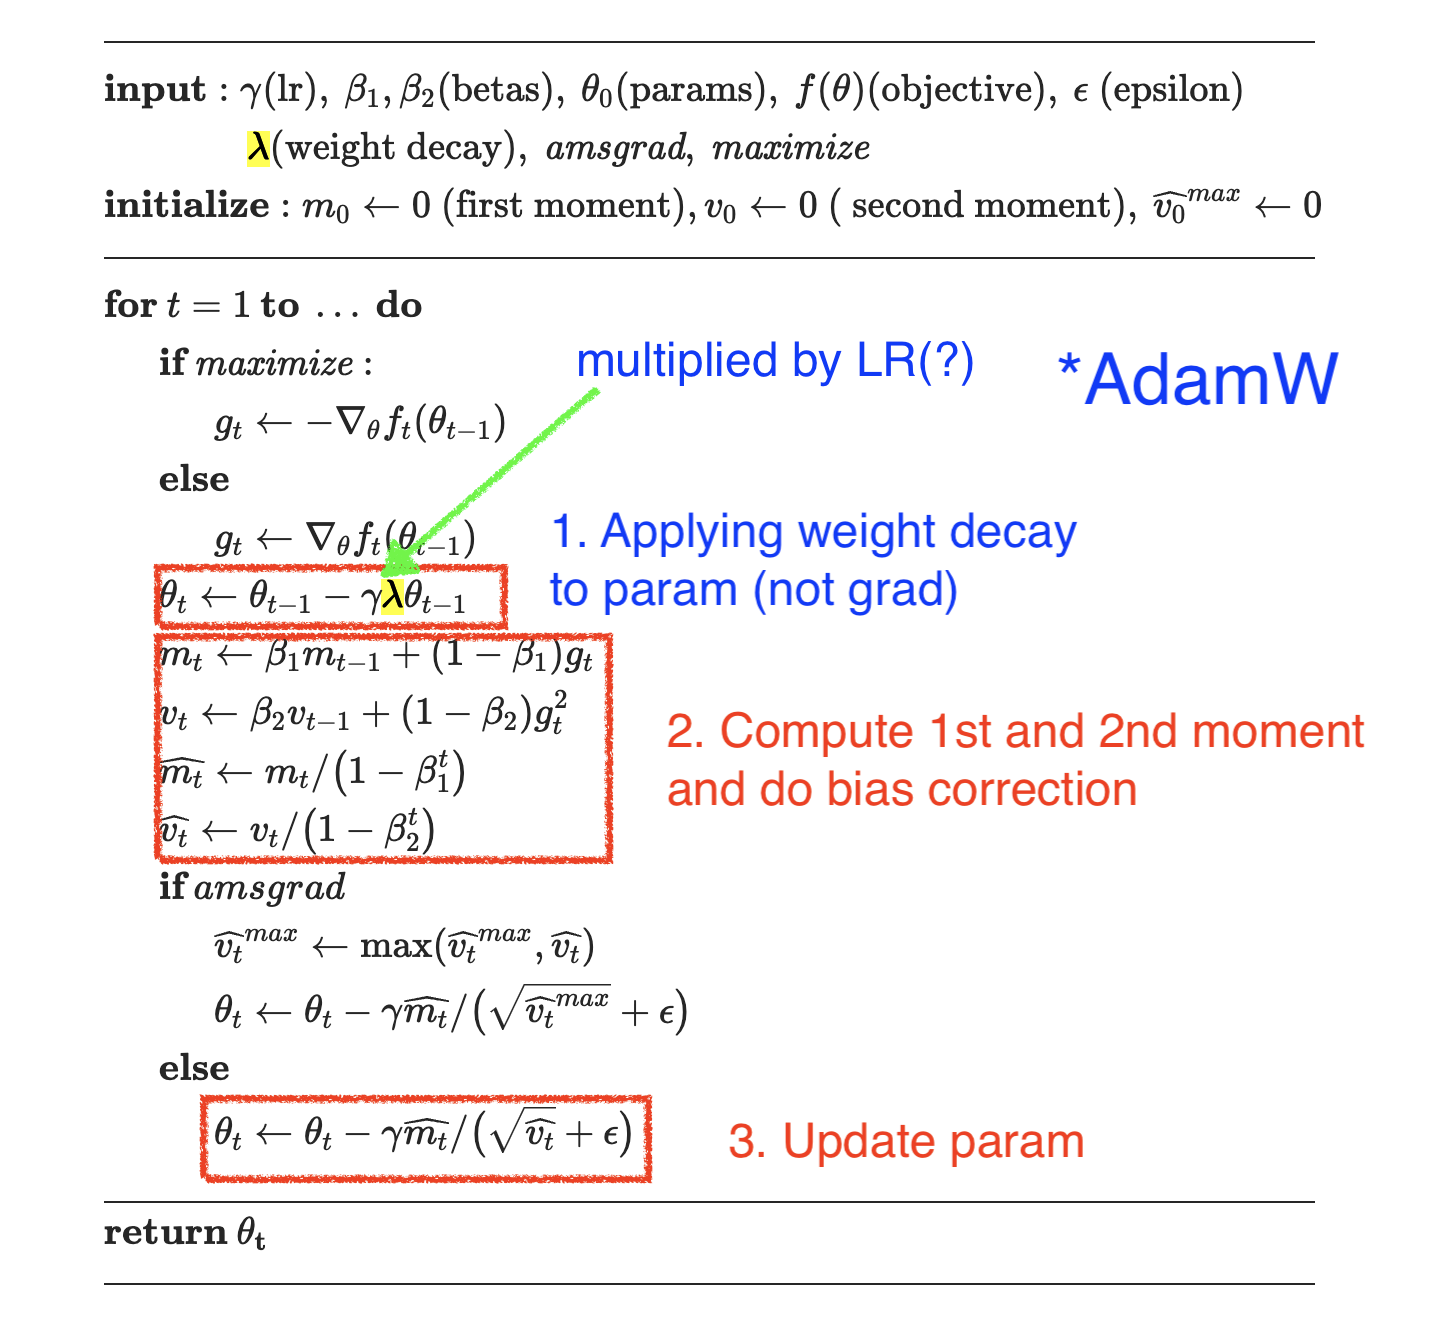 Fig.
Fig.
그런데 Pytorch의 AdamW 구현을 보면 이상한 구석을 발견할 수 있는데, 바로 learning rate (위 algorithm에서는 \(\gamma\))가 곱해지는 것이다. 당연히 paper에는 이런 부분이 없기 때문에 이 부분에 문제를 제기한 사람들도 있다. 아래 issue page를 보자.
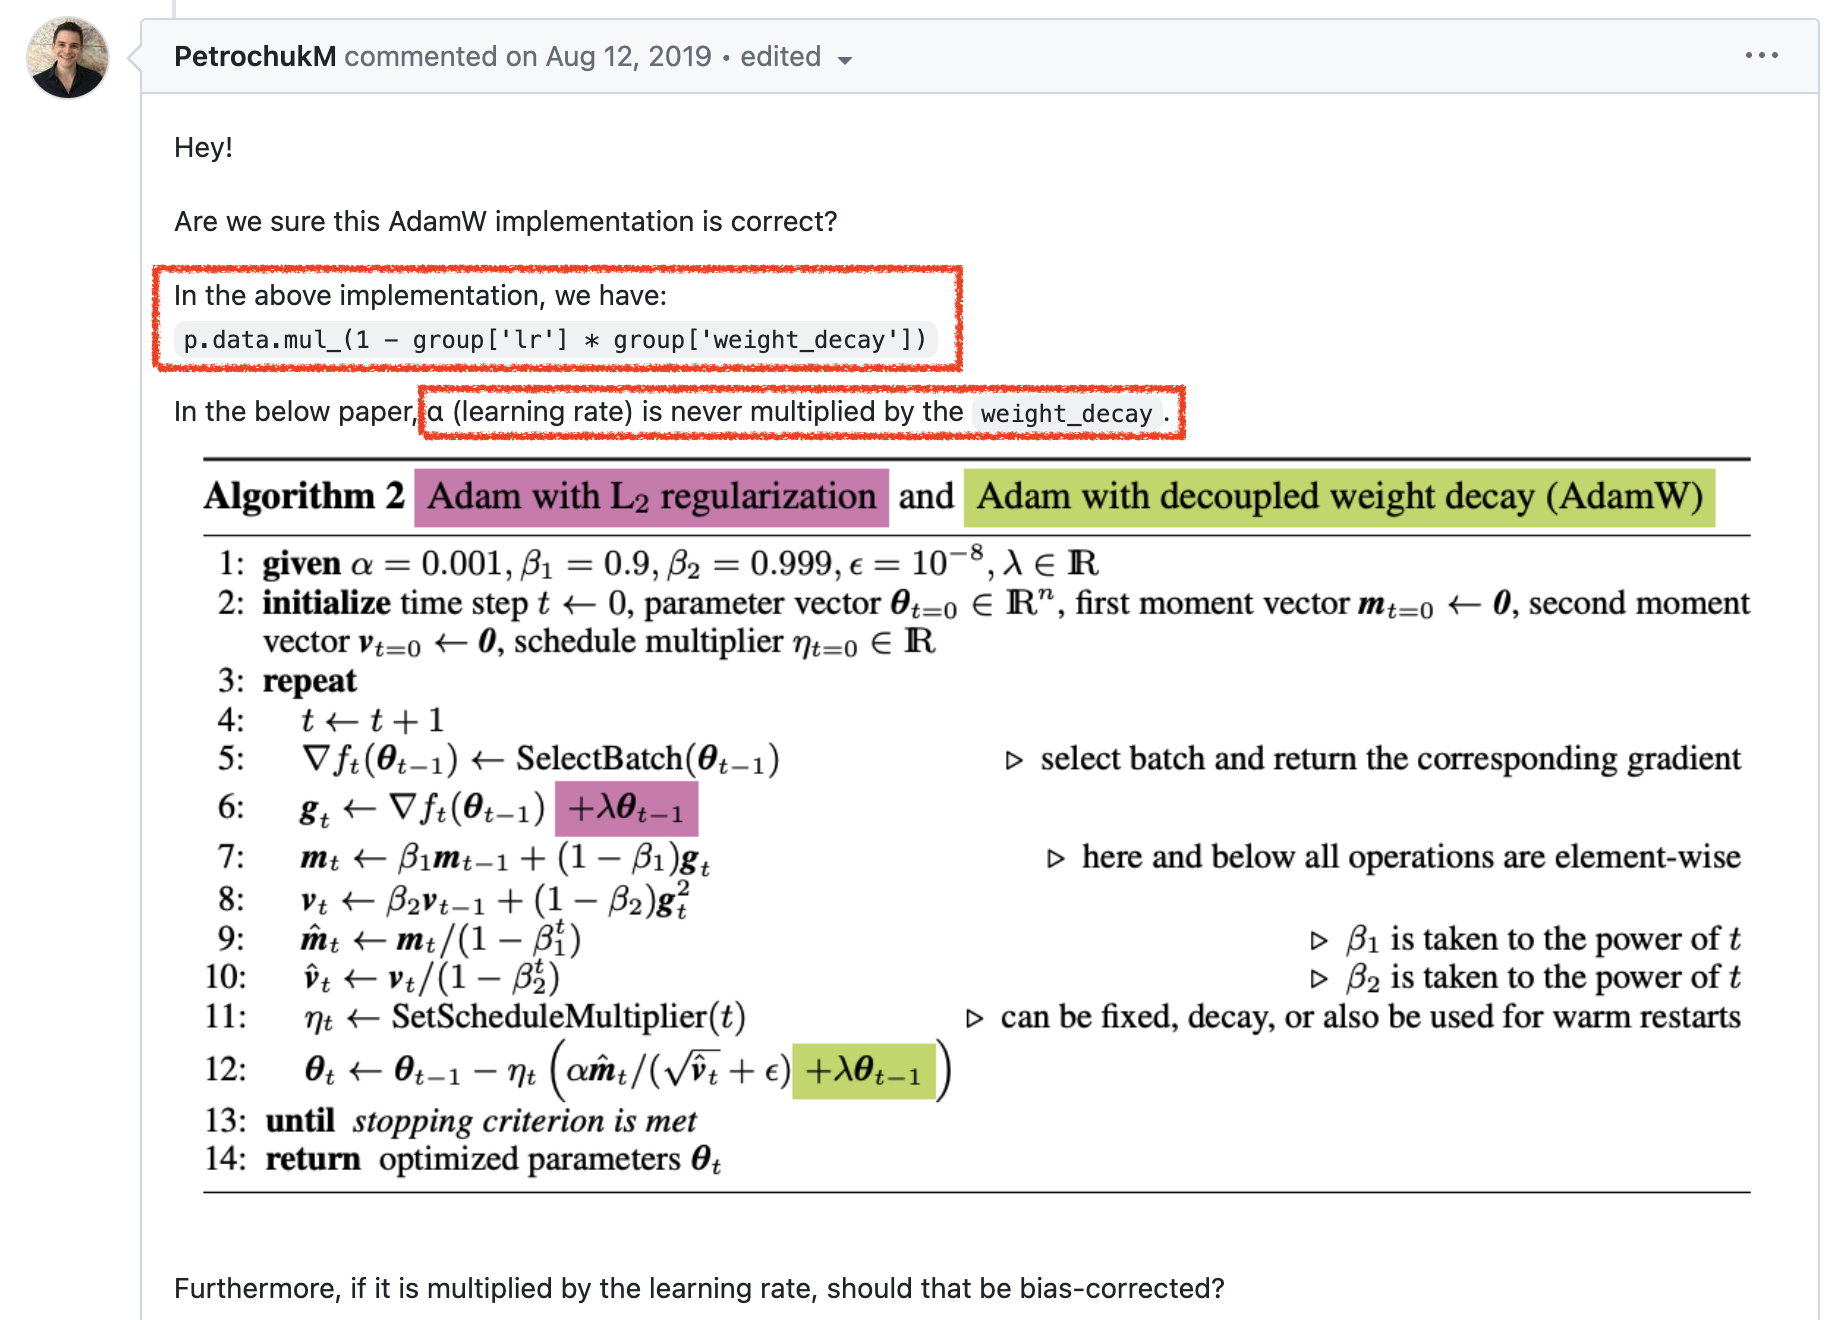 Fig.
Fig.
그런데 이렇게 code를 구현한 데는 사실 그만한 이유가 있었다. 아래 pytorch author의 답변을 보도록 하자.
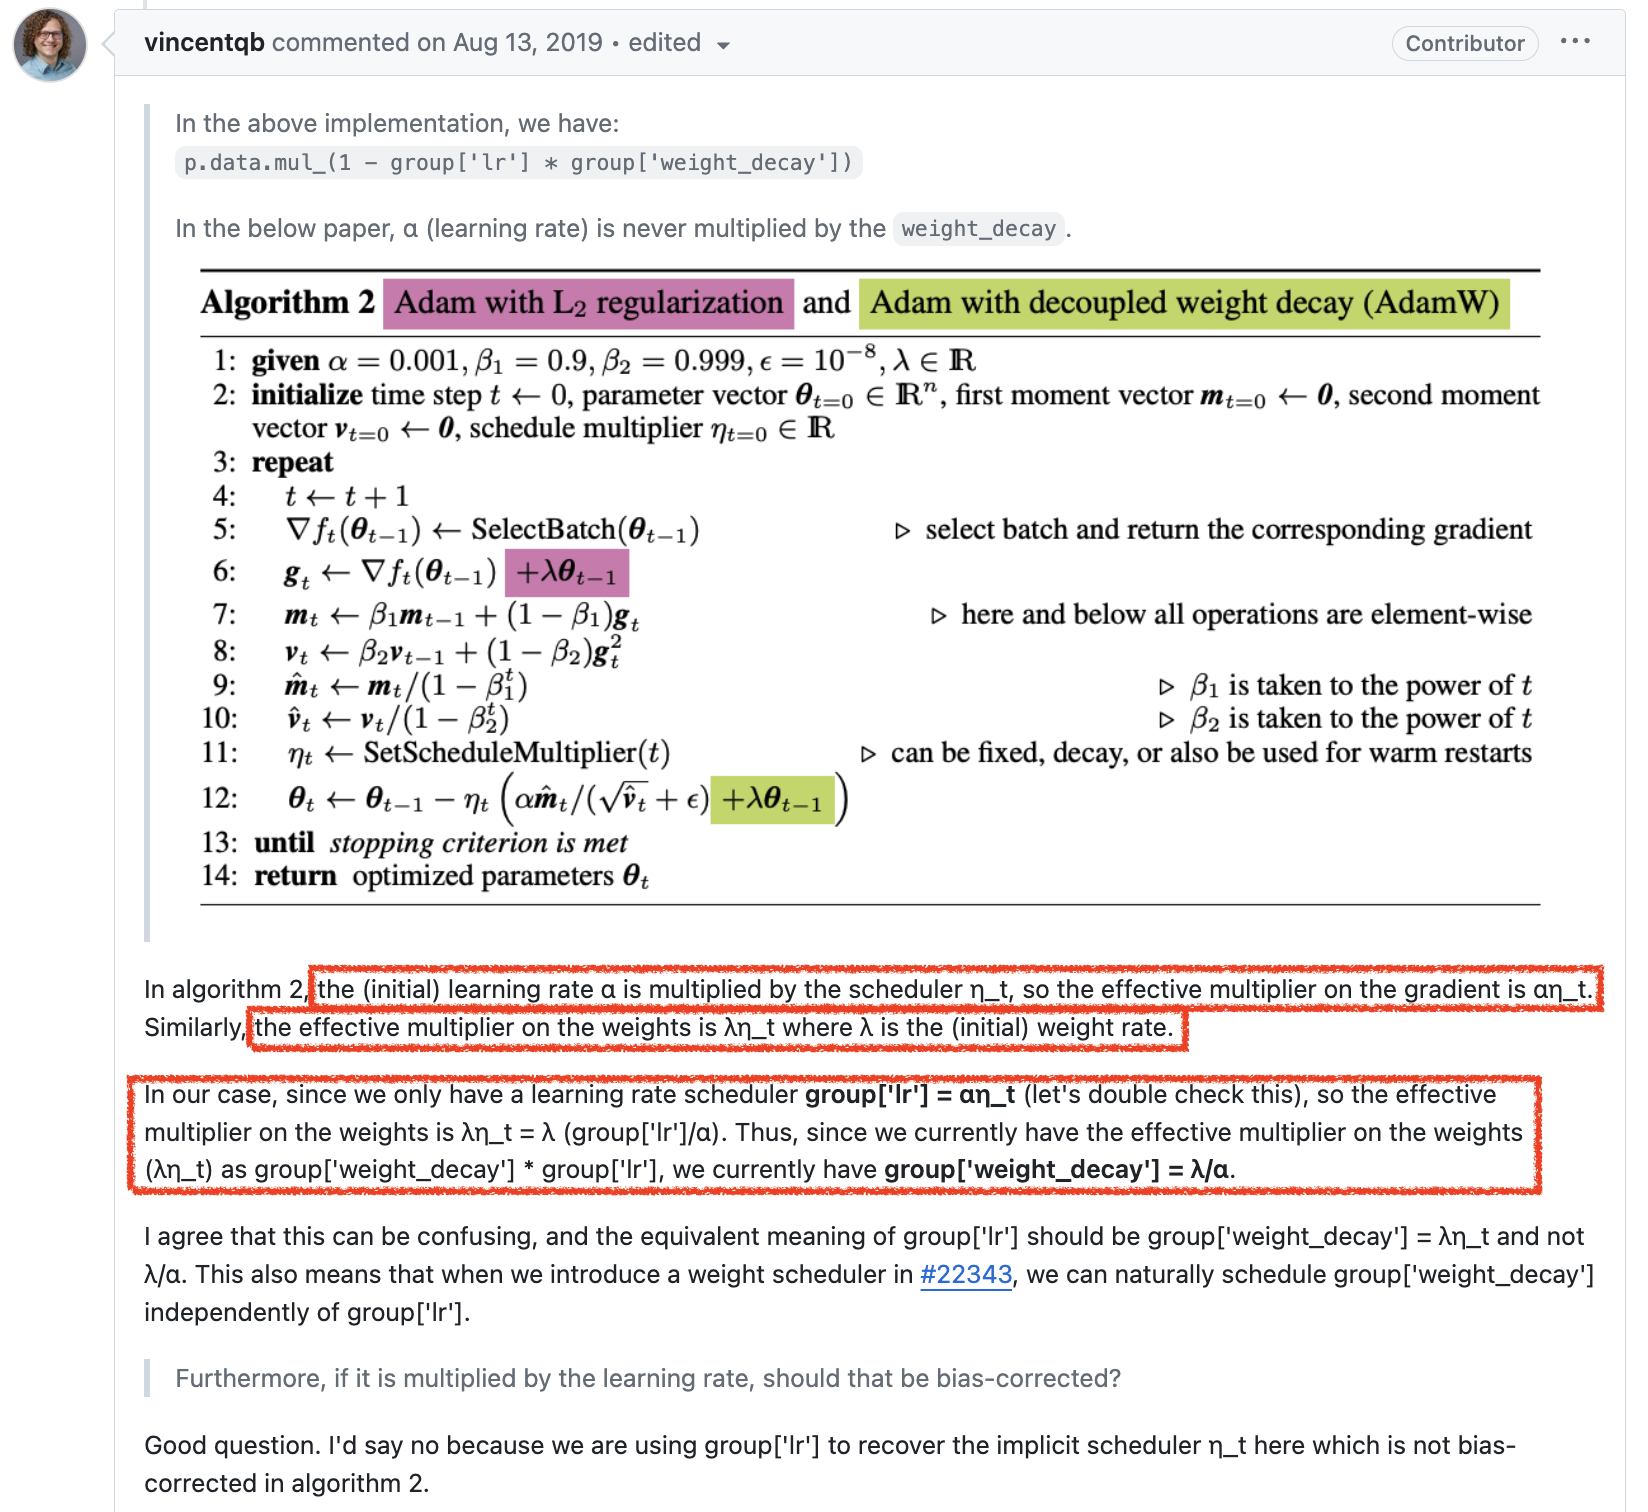 Fig.
Fig.
요약하자면 현재 pytorch scheduler에서 지원하는 것은 LR Scheduler밖에 없어서 그렇다는 것이다. AdamW에서 원하는 것은 다음의 수식이다.
\[\theta_t \leftarrow \theta_{t-1} - \color{red}{\eta_t} ( \color{blue}{\alpha} \hat{m_t} / (\sqrt{\hat{v_t}} + \eta) + \color{green}{\lambda} \theta_{t-1})\]그런데 우리가 optimizer에서 얻을 수 있는 것은 scheduling multipler가 곱해진 LR인 group['lr']= \(\color{red}{\eta_t} \cdot \color{blue}{\alpha}\) 뿐인 것이다.
우리는 weight decay factor, \(\color{green}{\lambda}\)에 \(\color{red}{\eta_t}\)만 곱해주고 싶은데,
구현상 이것이 불가능 한 것이다.
그래서 생각해낸 방법이 group['lr'] * weight_decay * \theta_{t-1}을 곱해주는 것이 된것이다.
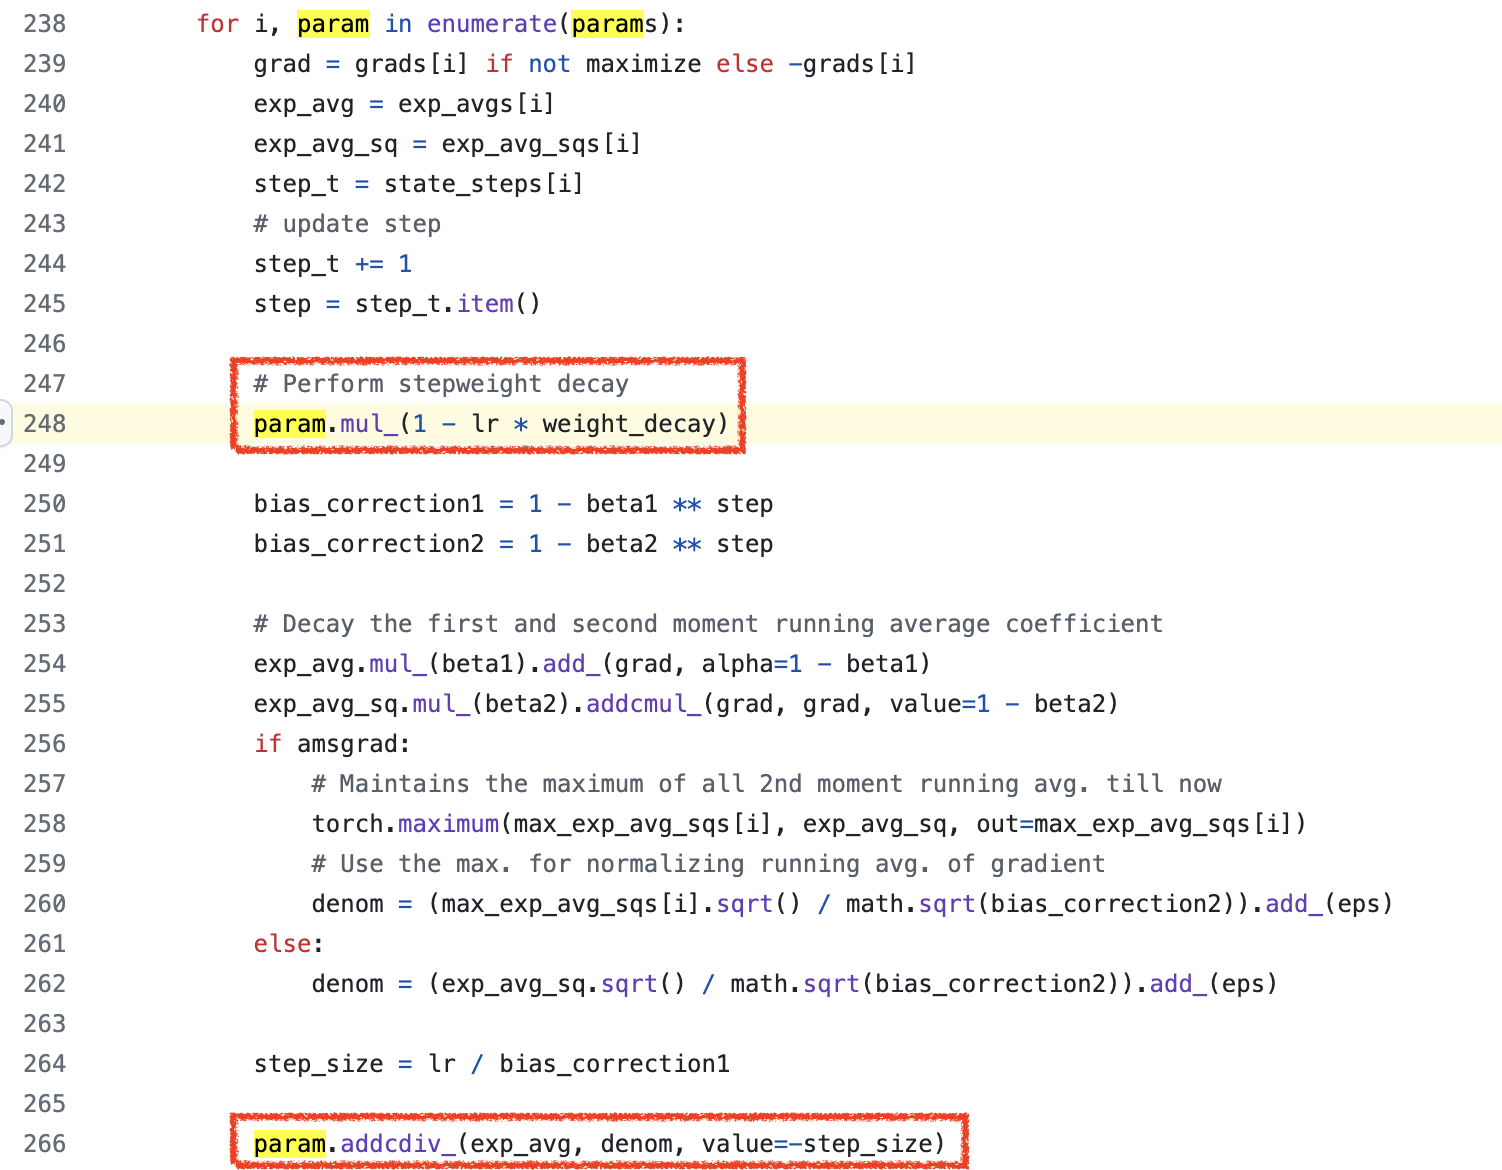 Fig.
Fig.
다만 이렇게 하면 \(\lambda\)에 엉뚱하게 LR, \(\alpha\)까지 곱해진 셈이 되므로,
우리는 weight decay를 \(\lambda\)가 아니라 \(\color{green}{\lambda}/\color{blue}{\alpha}\)로 설정해줘야만 하는 것이다.
생각에 따라서 이게 문제가 될 수도 있고 아닐 수도 있을 것 같은데,
예를 들어 대부분의 paper에서 AdamW optimizer를 썼고 beta 1,2는 (0.9, 0.95), weight_decay는 0.1 썼어요라고 할 때,
이를 재현하려고 하면 실제로는 LR이 1e-2냐 1e-4냐에 따라서 weight_decay가 1e-3, 1e-5를 기준으로 scheduling 될 수도 있기 때문에 경우에 따라서 재현을 아예 못 할 수 있는 심각한 문제를 초래할 수도 있다.
즉 weight decay가 몇이다 라고 할 때 이게 LR곱한거 까지 고려한 decay factor인지? 아닌지?가 불분명 한 것이다.
다른 말로 하자면 LR과 weight decay가 coupling 되어 있어서 이 둘 Hyperparameters (HPs)를 튜닝하는데 어려움이 있을 수 있다.
Fabian Schaipp의 tweet thread의 실험 결과를 보면 아래 heatmap에서 알 수 있듯이 LR이 바뀔 때 마다 weight_decay distribution이 shift되는 것을 볼 수 있다. 즉 LR에 dependent한 것이다.
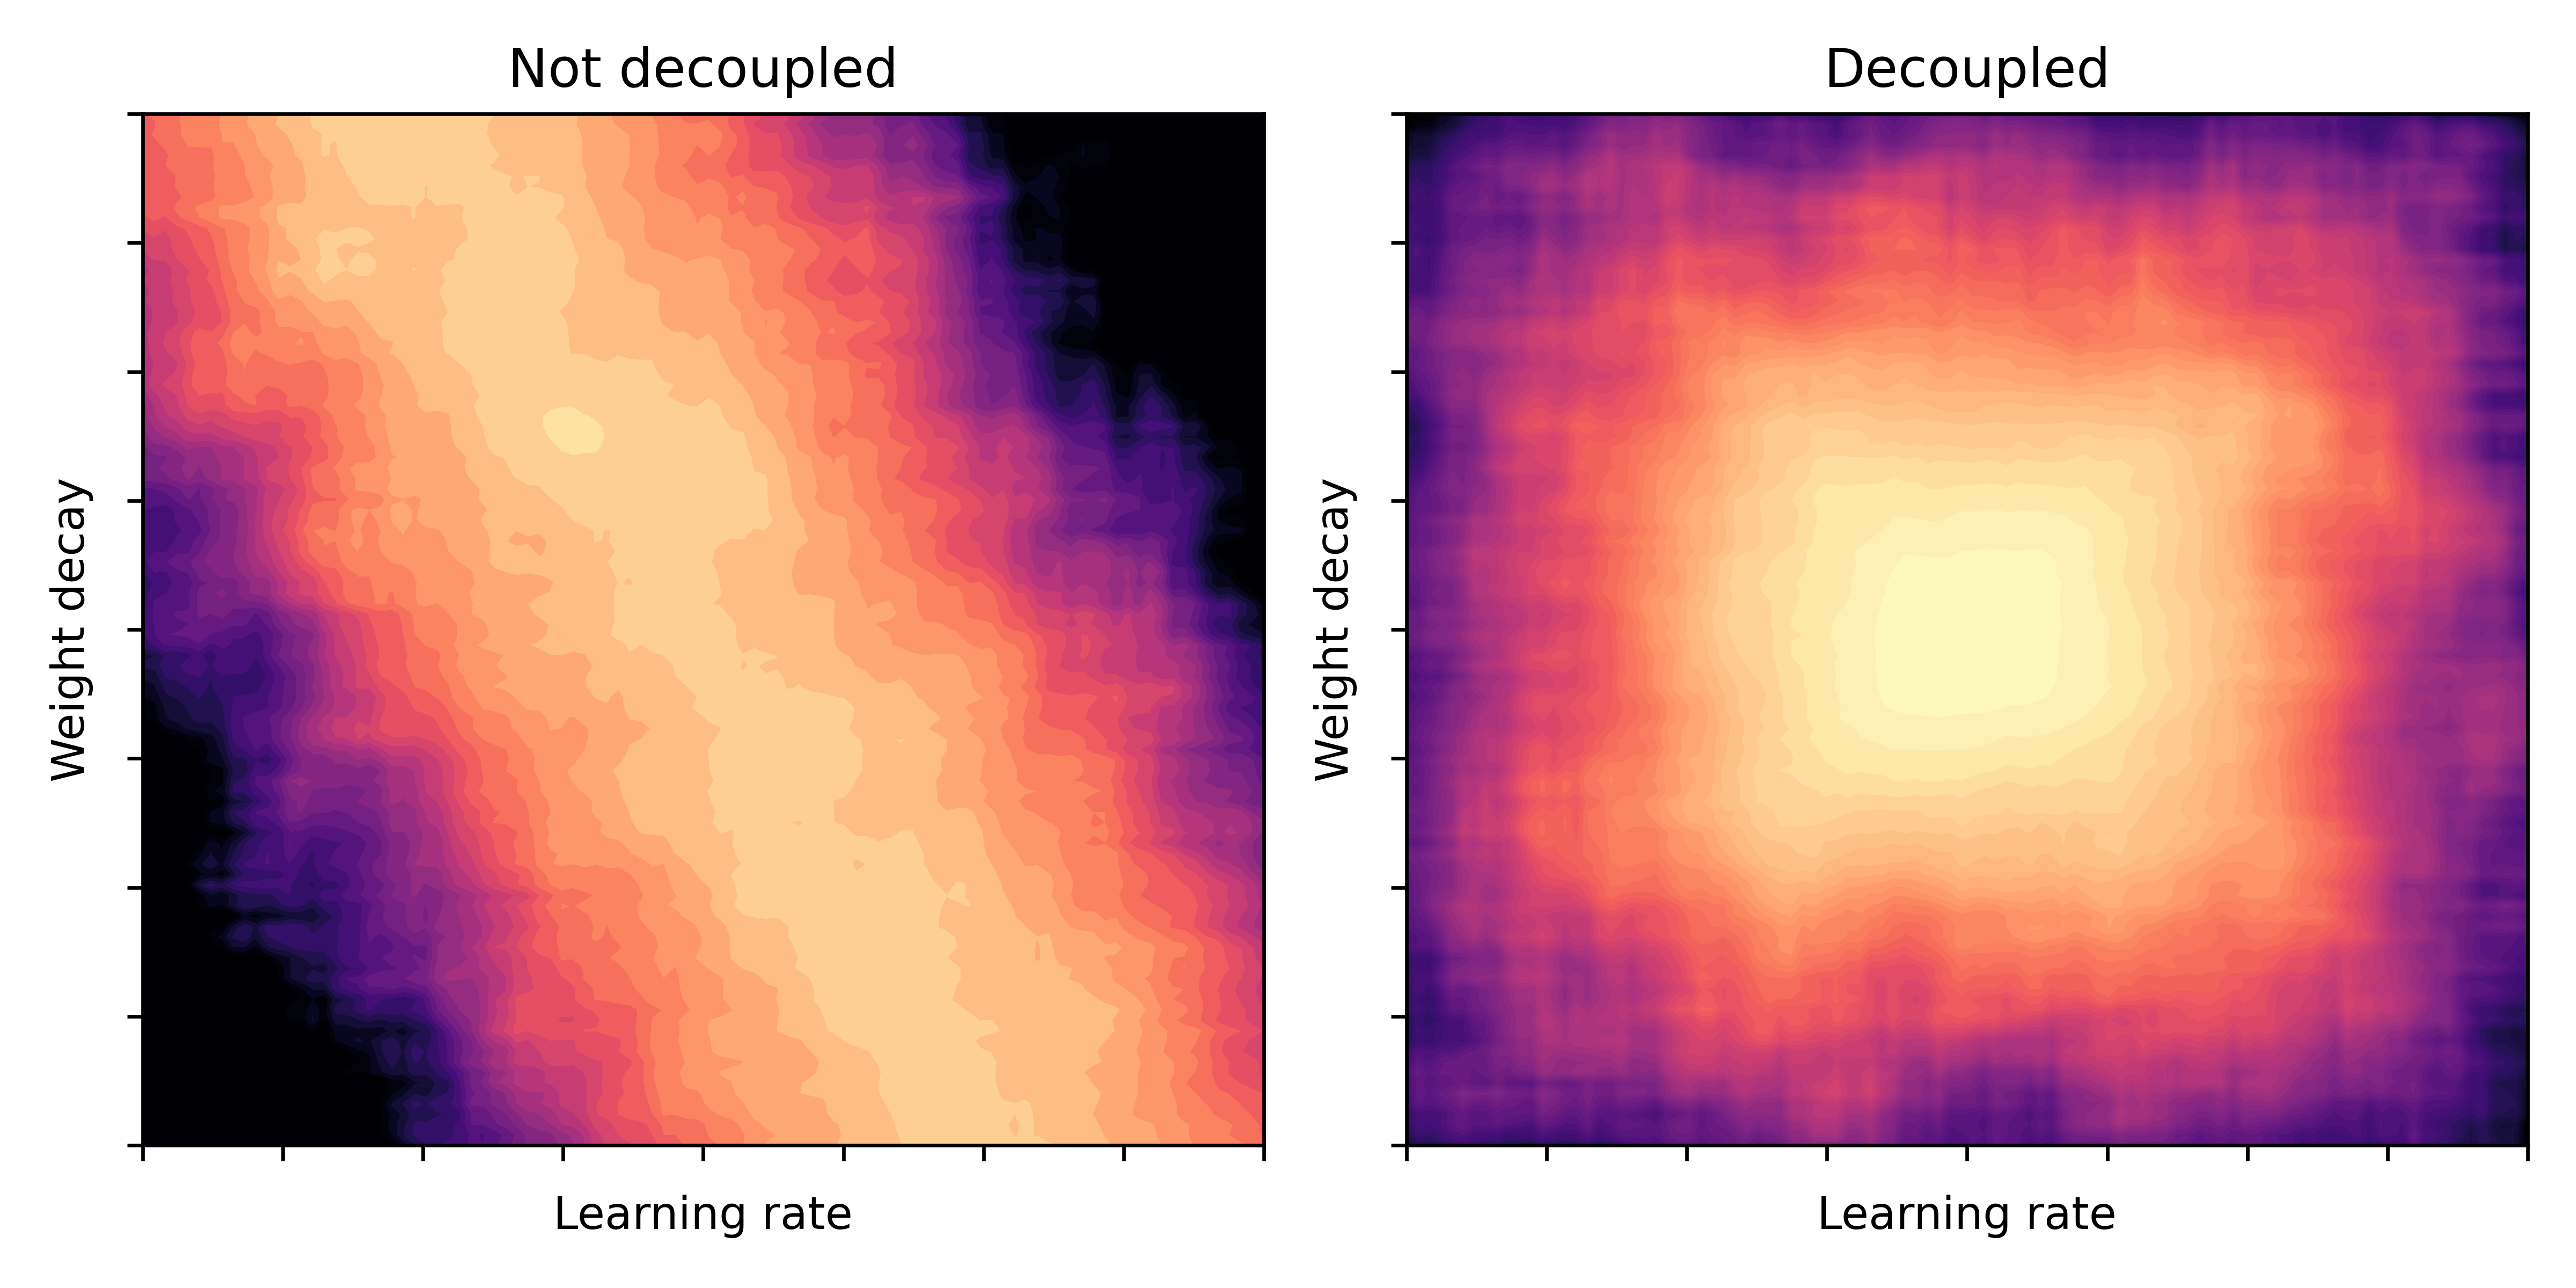 Fig. (left) pytorch default. (right) truly decoupld AdamW. Source from link
이에 Lucas Bayer는 일반적으로 pytorch user들이 Adam을 쓸 때 weight_decay 값을 0.1~0.01정도로 주는데, Adamw를 쓴다고 그 값이 확실히 변하면 안되니까 consistency를 위해 이런 조치를 취한 것이 아닌가 하는 추측을 했다.
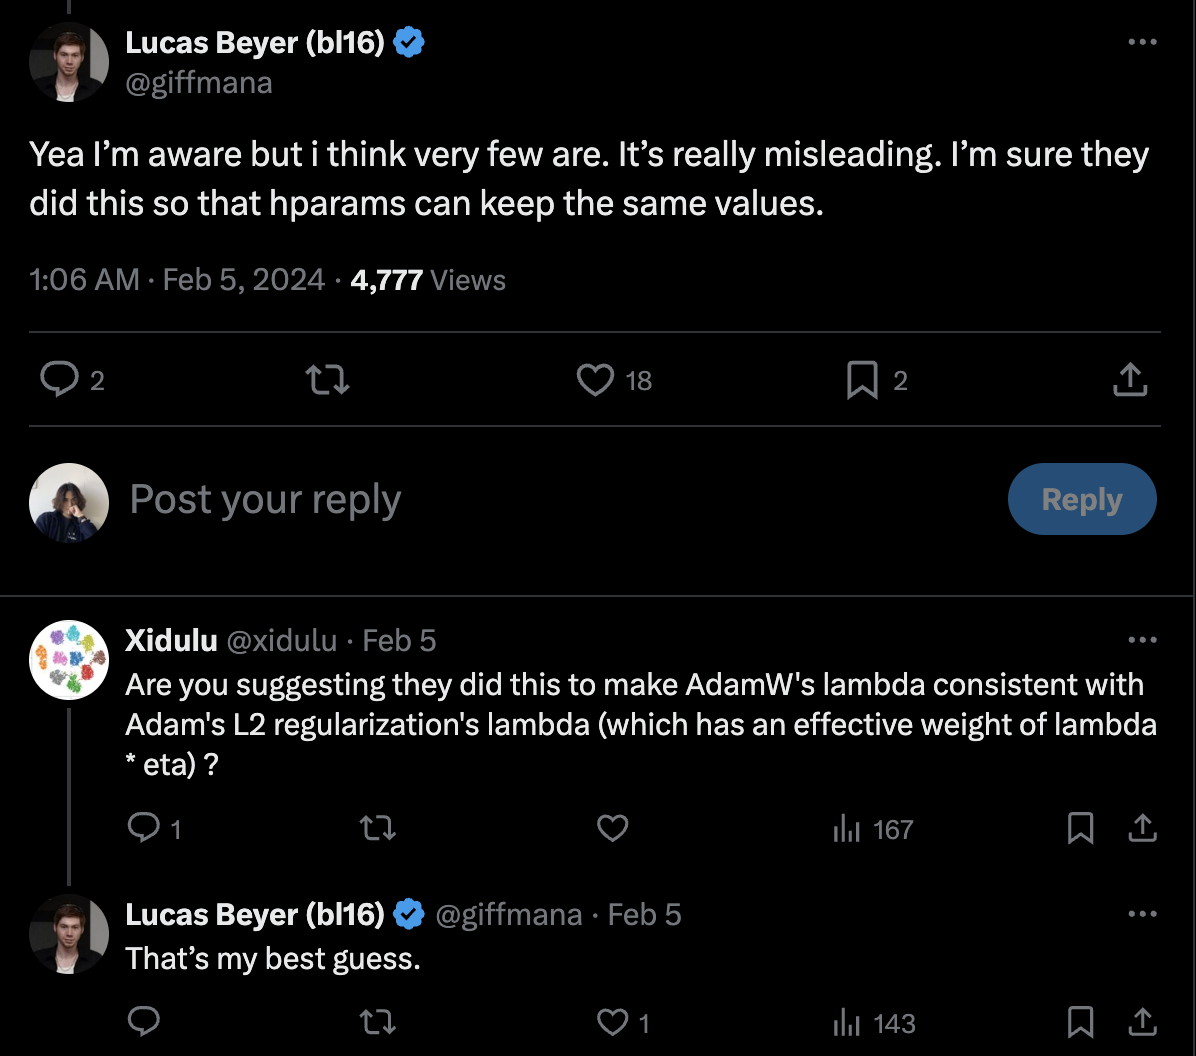 Fig. Source from link
그러나 google의 구현은 그렇지 않기 때문에, Google의 paper를 참고해서 weight_decay를 적용하려고 할 때는 이 점을 반드시 고려해야 할 것이다.
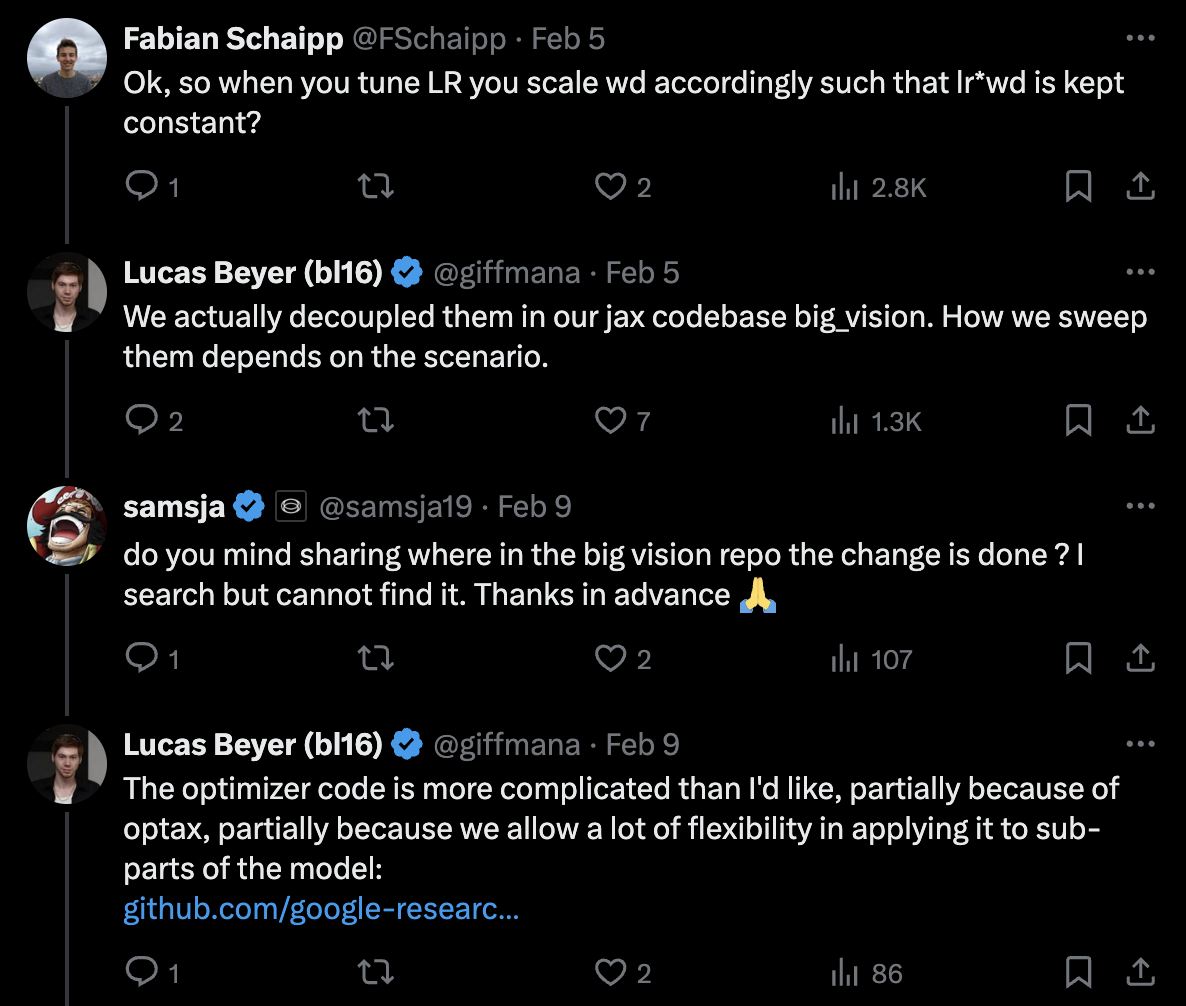 Fig. Source from link
한 편, DBRX라는 very large scale LLM으로 유명한 Mosaic ML의 Composer도 이 문제를 지적하고 직접 구현한 Truly Decoupled AdamW를 구현했는데,
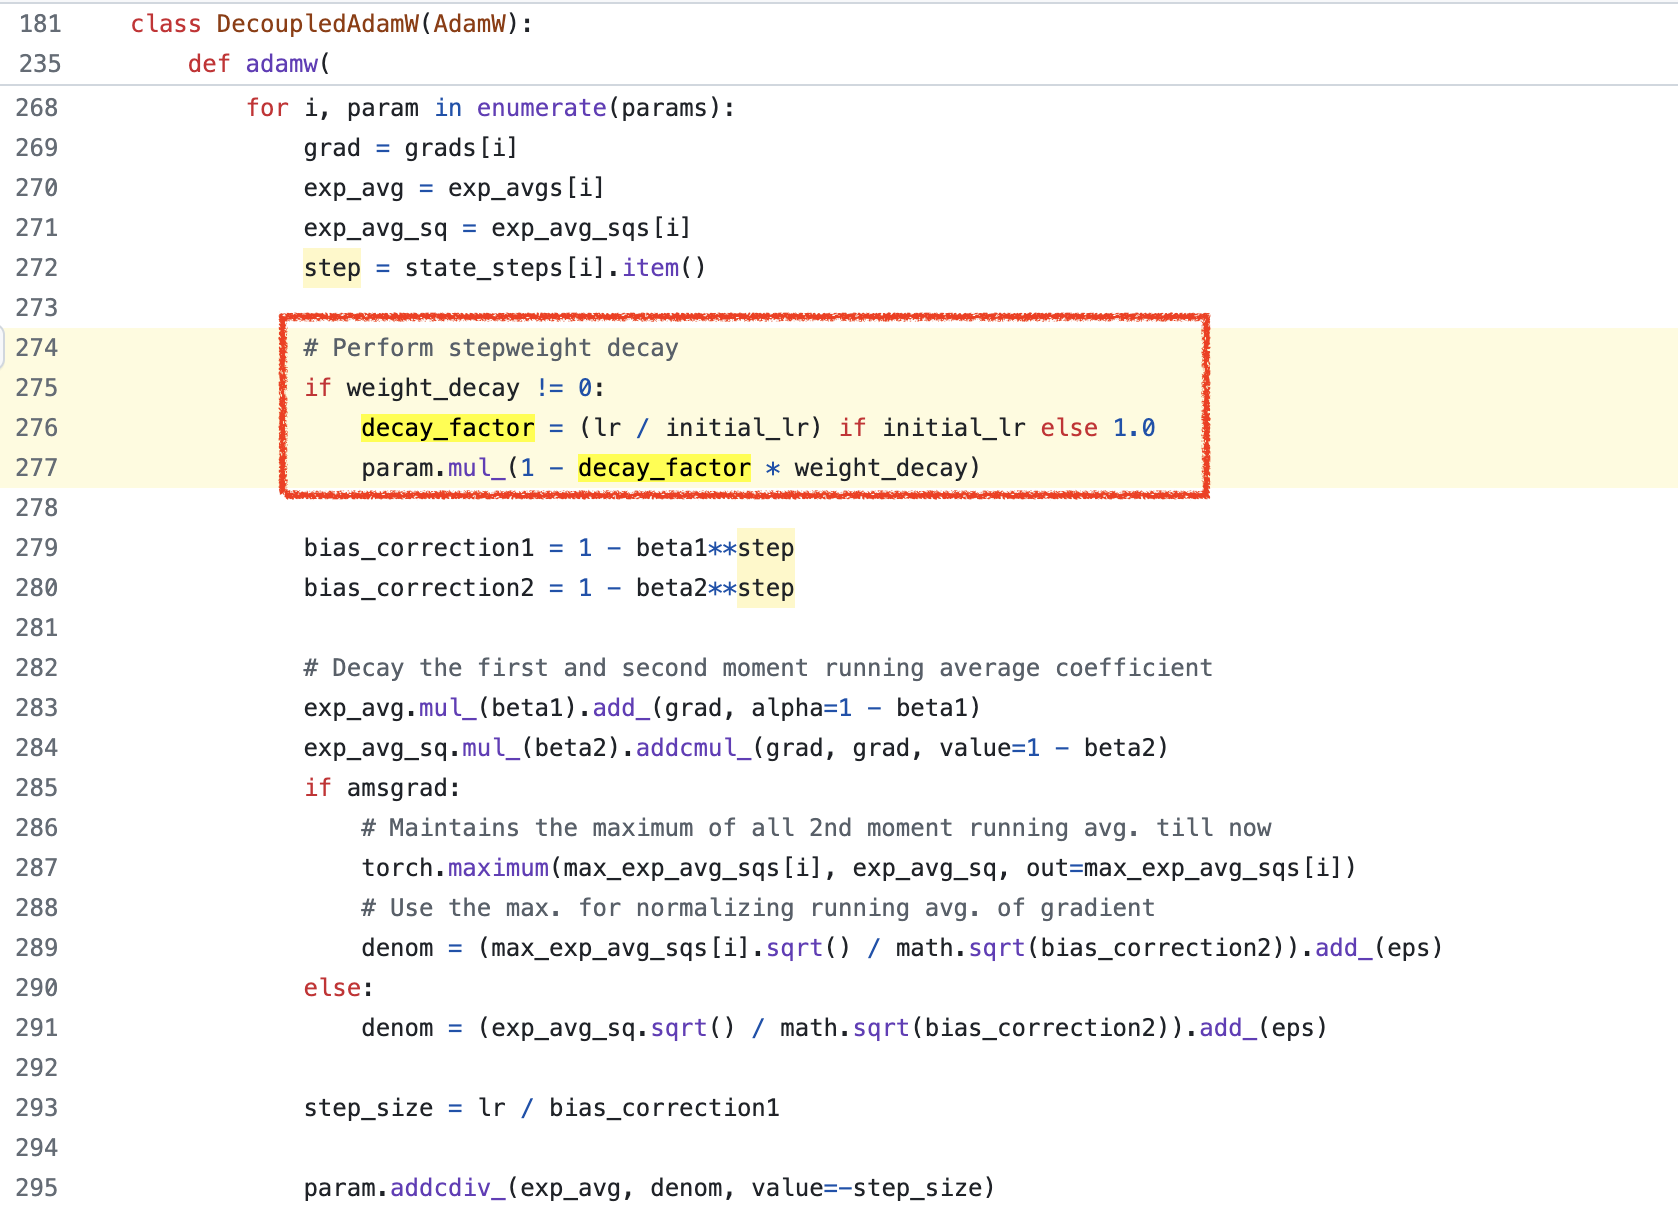 Fig.
Fig.
실제로 decay factor (LR scheduling mutliplier)를 따로 계산해서 그것만 weight_decay에 곱해주는 것을 볼 수 있다. argument 설명을 보면 다음과 같은 문구를 확인할 수 있다. 여기서 initial_lr은 아래와 같이 optimizer init시 설정이 되는데, 아마 master LR (initial LR)을 의미하는 것으로 보이며, 현재 LR과 initial LR의 비율을 계산하면 decay factor를 구할 수 있는것은 당연할 것이다.
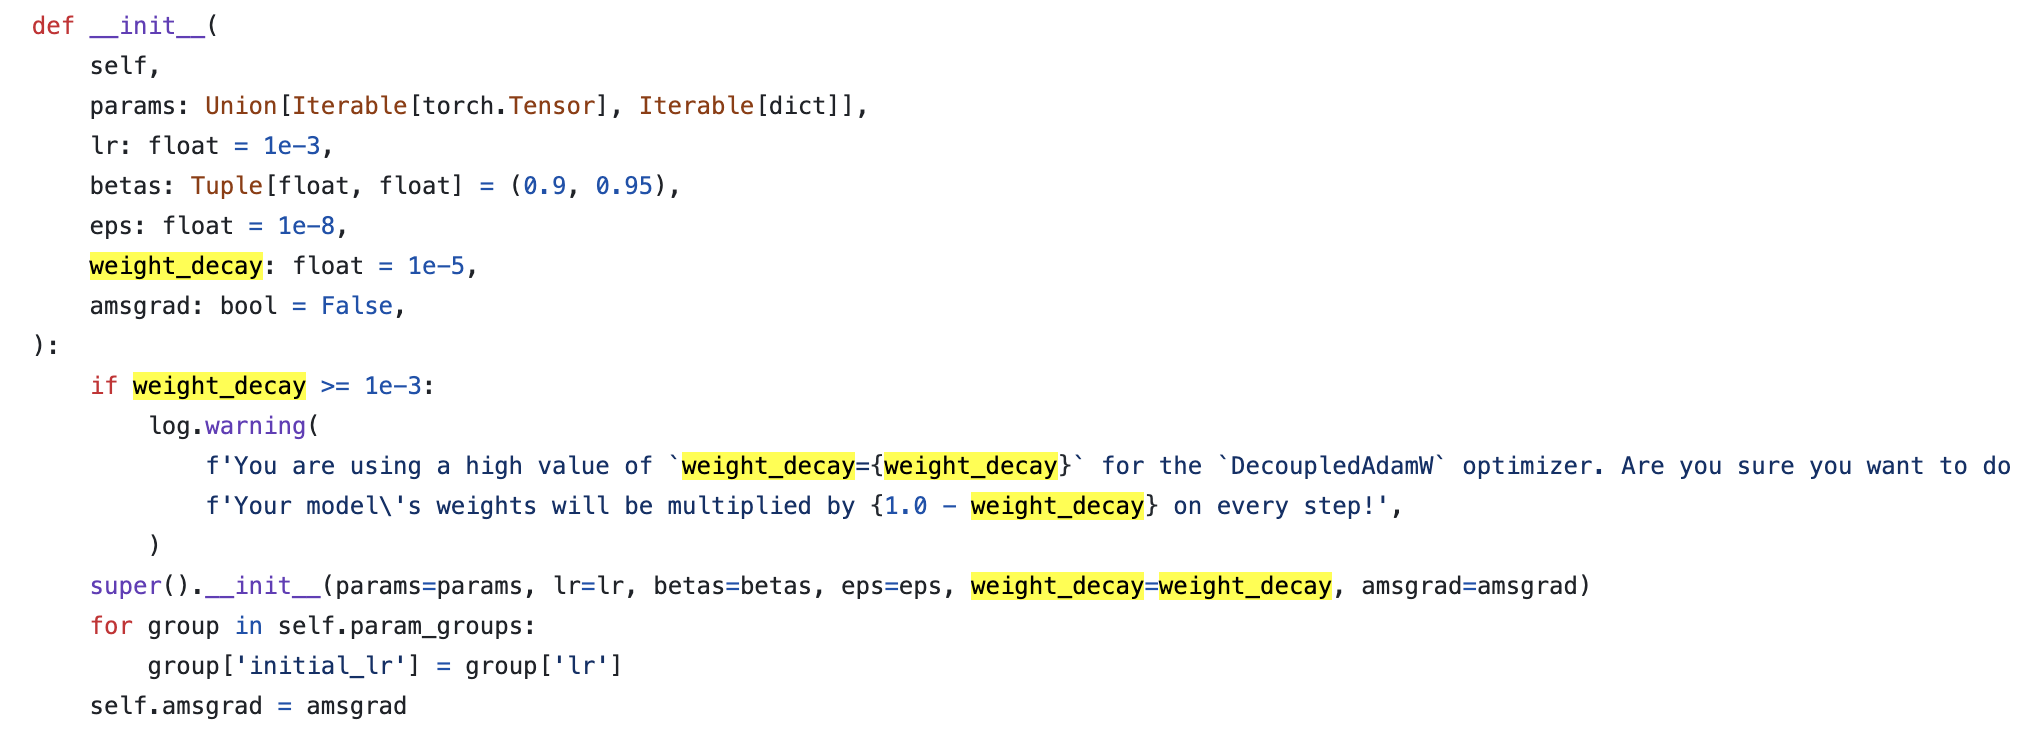 Fig.
Fig.
그런데 이것을 쓸 때는 주의할 점이 있는데,
더이상 weight_decay가 lr로 discount되지 않기 때문에 1e-5 정도로 설정해줘야 한다는 것이다.
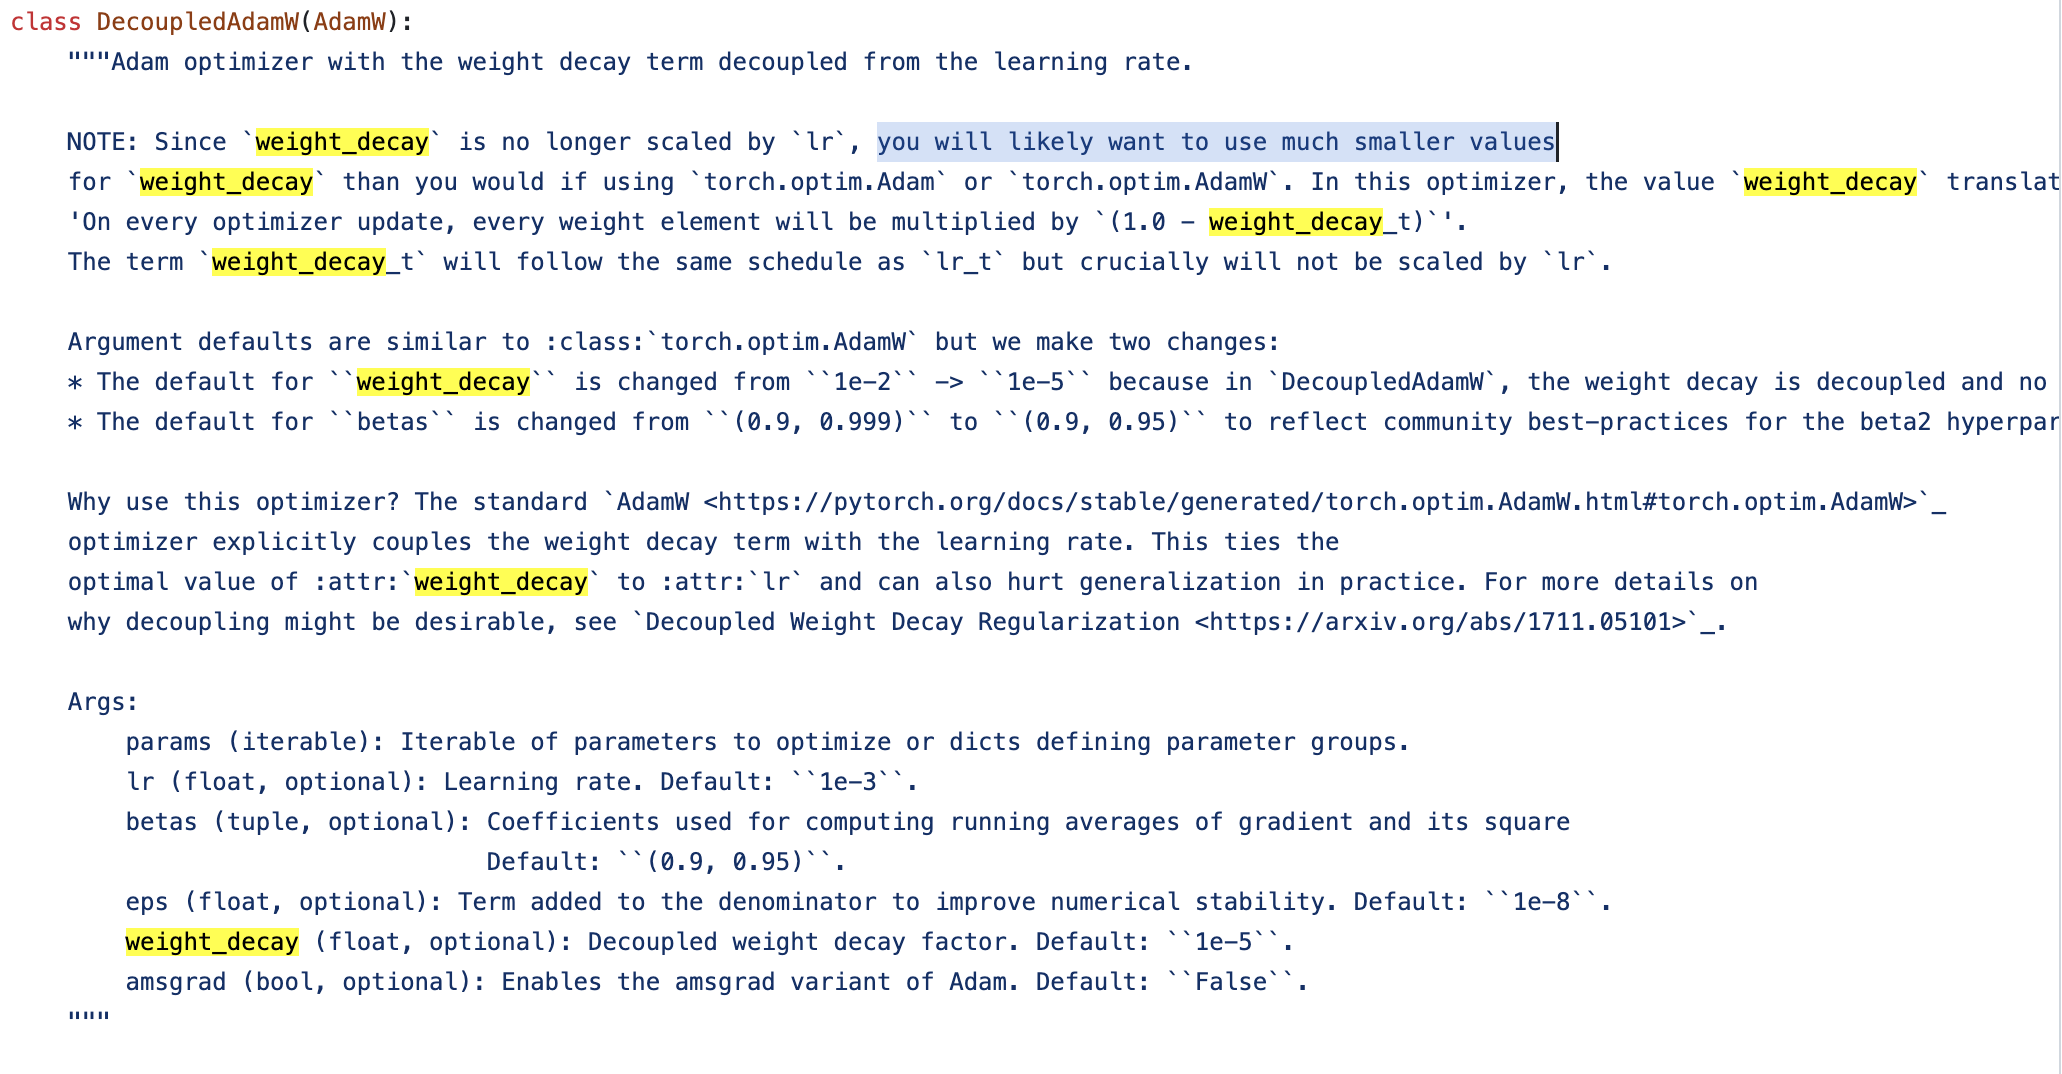 Fig.
Fig.
Let's Think bout Optimizer Hyperparmeters (HPs) for LLM
여기서 우리가 생각해볼 수 있는 것은 예를 들어 LLM을 학습할 때 LR을 1e-2, weight_decay을 1e-1로 줬다면 1e-3으로 composer에서 제시한 값에 비해 너무 크게 decay가 됐을 수도 있다는 것이다. 그런데 뭐 composer를 사용했을 때가 더 좋았다던가 report를 따로 못찾겠어서 뭘 사용하라고 권장하기가 어렵다. 사실 weight decay가 lr만큼 scaling이 되냐 안되냐 이기 때문에 지금 같은 경우에는 이 값을 크게 주냐 작게 주냐 정도의 차이가 날 뿐이라서 우리가 weight_decay를 LR과 함께 2dim HP search를 통해 optimal HP를 찾고 해석하지 않는이상 큰 문제가 없을 수도 있다.
아래 현재까지 optimizer HP를 포함한 training detail들이 공개된 정보를 보자.
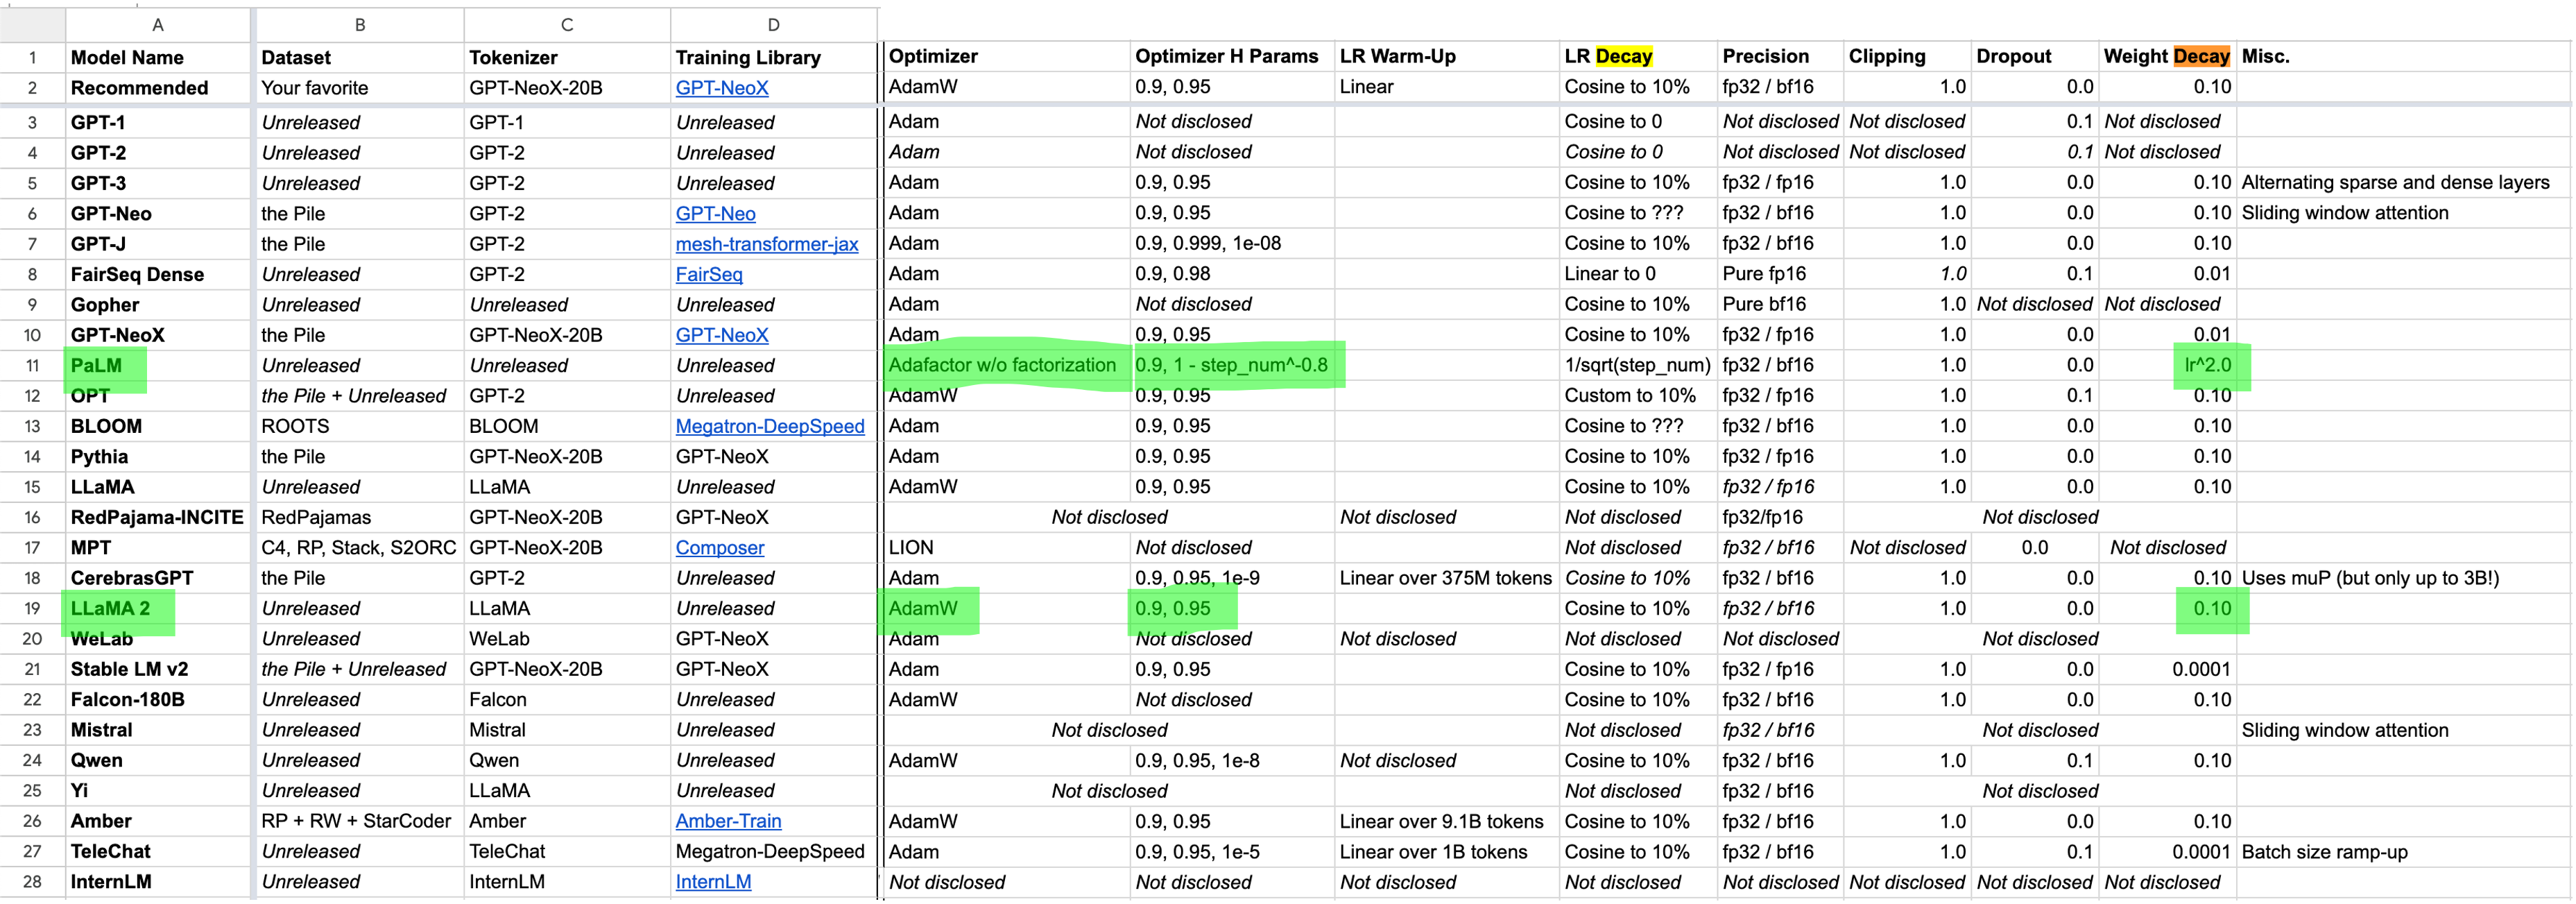 Fig. Source from link
이 중, Meta의 LLaMa 2를 보면 weight_decay=0.1을 썼고, 이는 Meta의 work이기 때문에 당연하게도 Coupled AdamW를 썼을 것이다. 하지만 LR로 몇을 썼는지 모르기 때문에 이 값을 무작정 신뢰하긴 어려울 수가 있다. 가령 얘네는 1e-2 LR을 썼는데, 우리는 1e-4를 쓰는 경우 이는 참고할 만한 값이 아니게 된다.
 Fig.
Fig.
그 다음은 위 Google Sheet에서 Google의 PaLM을 보자.
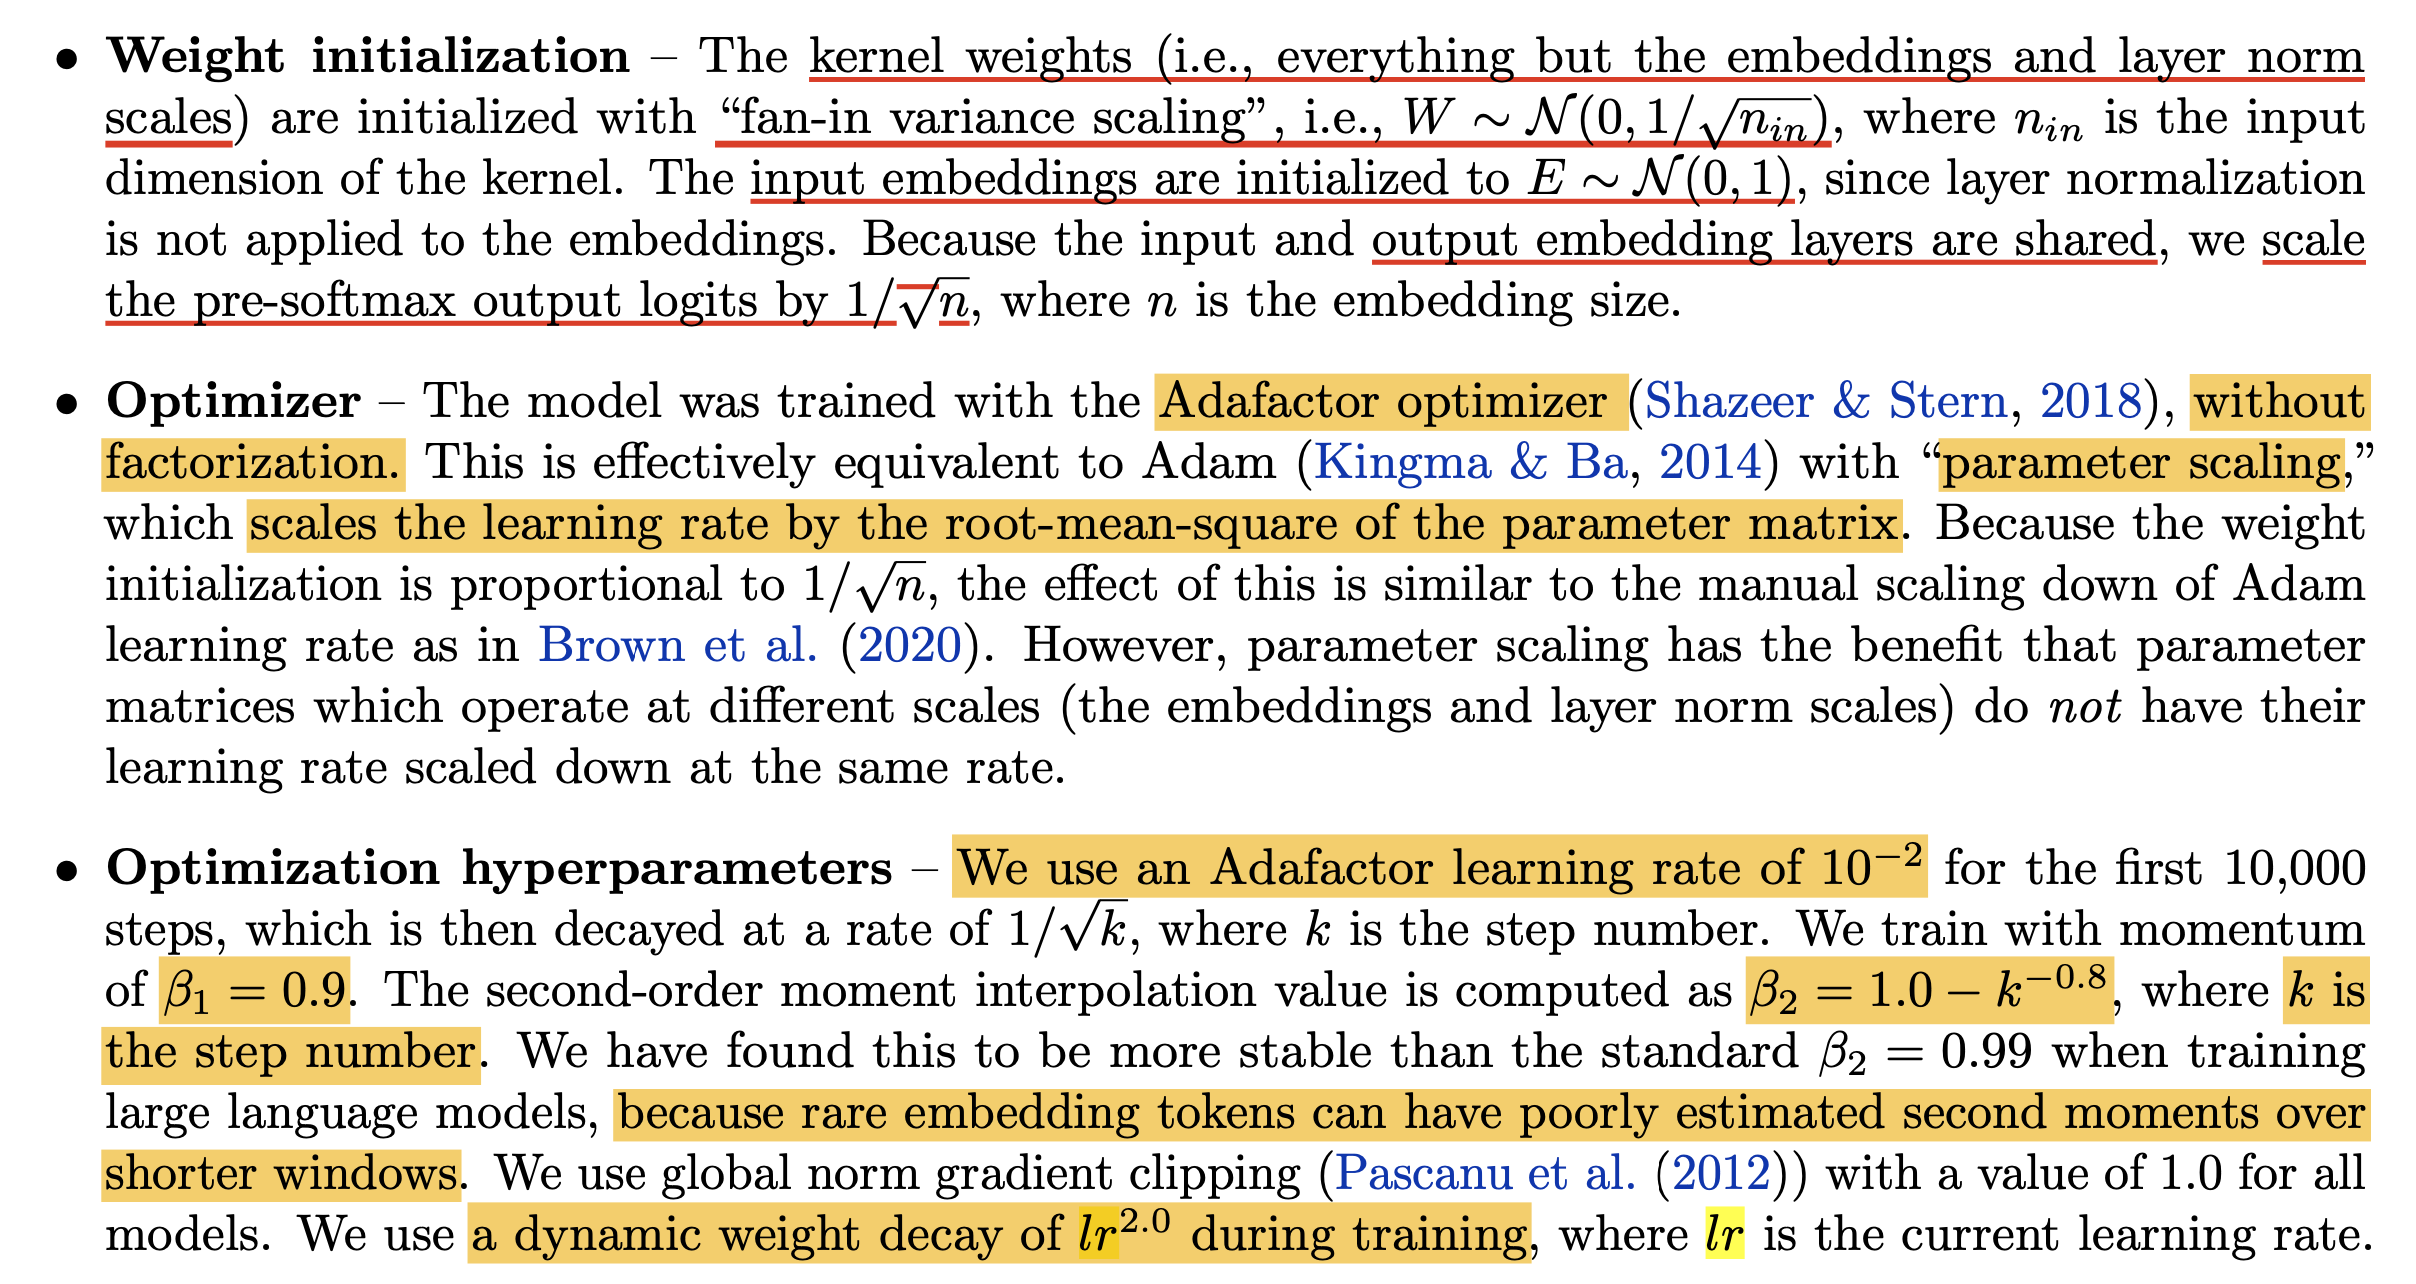 Fig.
Fig.
사실 PaLM은 곧 알아볼 Adafactor Optimizer를 쓰기 때문에 Adam, AdamW와 behavior가 좀 다르긴 한데,
Google의 Adafactor가 decoupled weight_decay로 구현이 되었을 것이라고 해도 전략 자체를 current timestep의 LR의 제곱인 dynamic weight_decay를 쓰는 것으로 보인다.
즉 놀랍게도 pytorch default AdamW처럼 peak_LR * step_multiplier * weight_decay의 LR coupled weight_decay를 쓴다는 것으로 보인다 (?!).
그리고 이들을 제외하고 sheet에서 1e-5정도의 값을 쓴 model들은 아마 truly decoupled AdamW를 쓴 것으로 보인다.
Maximal Update Parameterization (muP)
마지막으로 Maximal Update Parameterization (muP)에서의 issue를 보자.
TL;DR 하자면 muP는 학습 안정성 (training stability), feature learning 측면에 있어 model width (hidden dimension)가 커져도 이 특성이 유지될 수 있도록 parameter별 initilization method를 새롭게 정의하고, global LR이 아니라 per layer LR를 적용하는 방법론을 의미한다.
즉 model width가 커질수록 MLP의 hidden weight의 LR을 1/width로 discount해주면 identical dataset에 대해서 small size model의 LR이 large size model로 transfer가 가능해지게 된다.
여기서 중요한 점은 LR같은 것들은 width가 커지면 자동으로 scaling되므로 똑같은 LR을 써도 되지만,
다른 Optimizer HP는 그렇지 않을 수 있다는 것이다.
가령 Adam의 경우 weight_decay (or L2 regularization)는 width가 커지면 weight_decay / width 를 하는 것이 의미가 없다.
즉 width말고는 이론적으로는 transfer가 보장되지 안된다는 것이다.
그런데 구현은 어떻게 되어있는가?
아래 code를 보면 decoupled_wd=False인 경우,
즉 Adam Optimizer class를 쓸 경우 weight_decay에 LR이 1/width 만큼 곱해진 것을 보상하기 위해 width를 곱해준다.
즉 원 저자들의 의도는 L2 regularization을 width와 invariant하게 만드는 것이었음으로 보인다.
 Fig. Source from link
그런데 paper에 보면 AdamW에 대해서 아래와 같은 언급만이 있다. 즉 AdamW는 자동적으로 weight_decay를 correctly scaling하기 때문에 문제가 없다는 것이다.
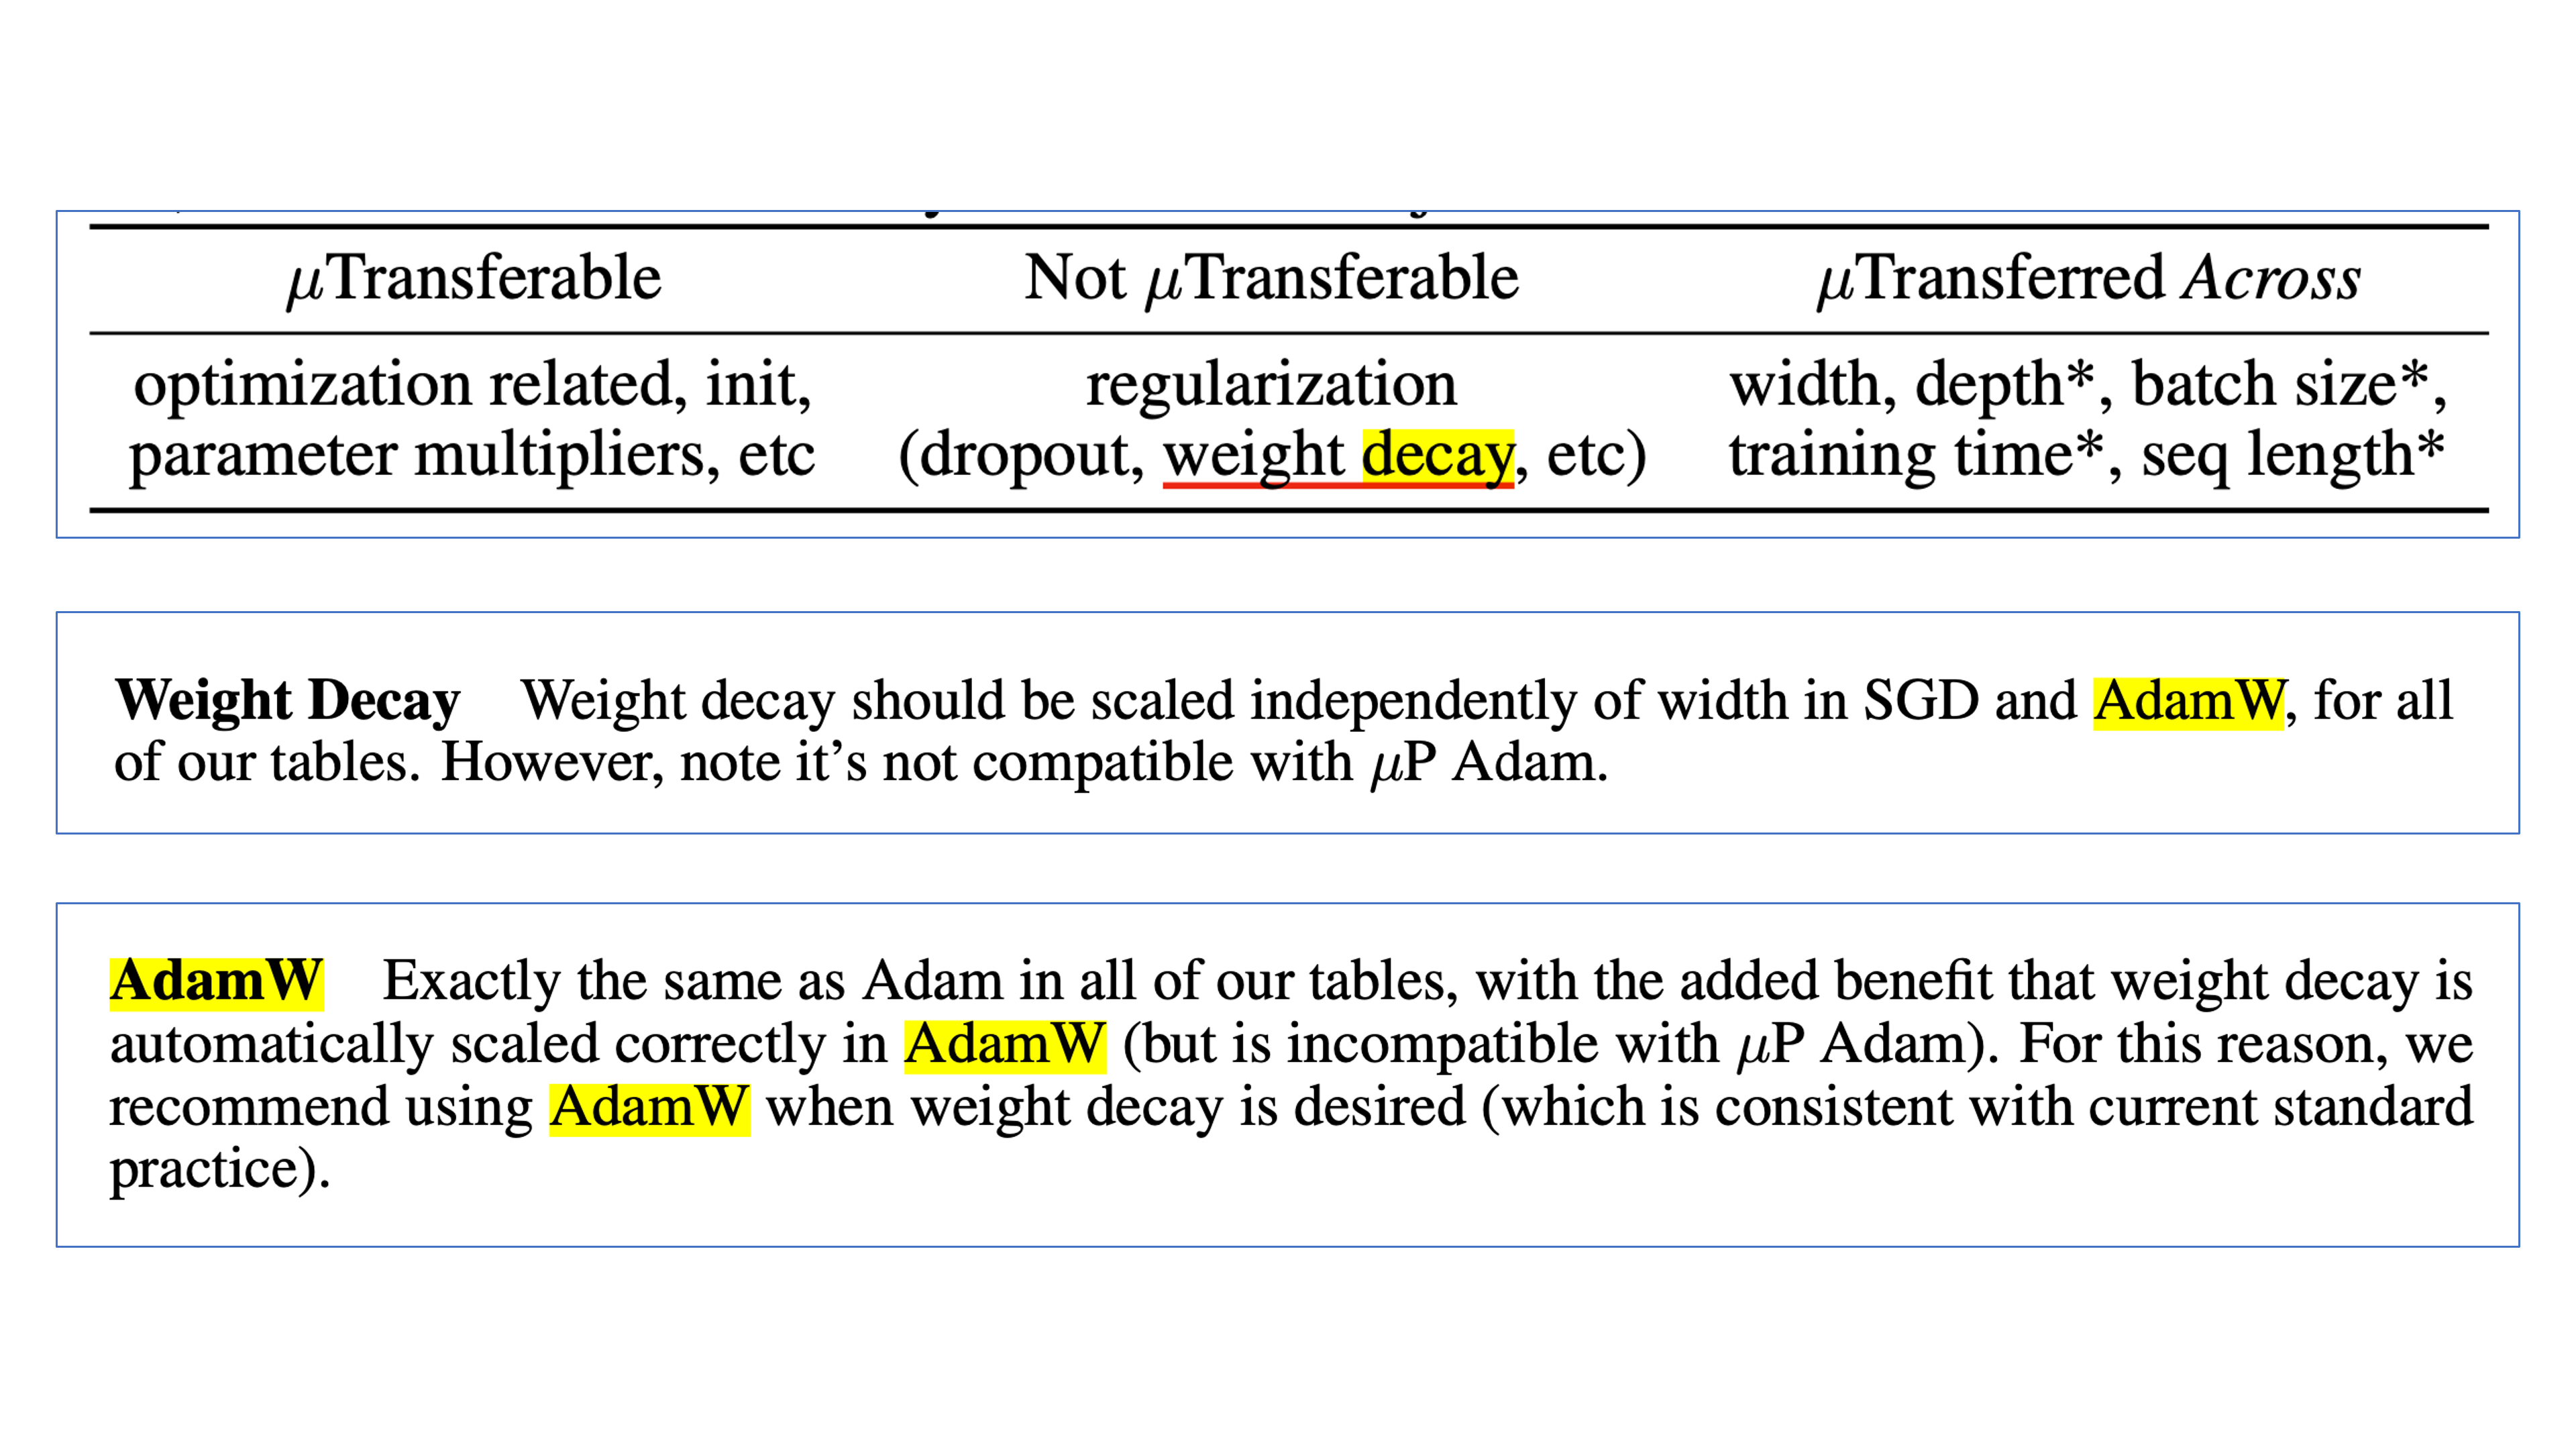 Fig.
Fig.
그래서 Edward hu의 PR을 보면 decoupled_wd=True인 경우 weight_decay값을 따로 건드리지 않게 된다.
그런데 이렇게 하면 AdamW는 weight별로 per layer LR만큼이 discount 된 것이 된다.
사실 이 부분에 대해서 매우 헷갈리고 필자는 뚜렷한 해답을 찾지 못했는데, 아래 Scaling Exponents Across Parameterizations and Optimizers라는 paper에서 muP를 포함한 다양한 parameterization에 대한 실험을 하는데, 이들은 weight_decay를 적용할 때 LR이 곱해지지 않는 version을 썼다고 한다.
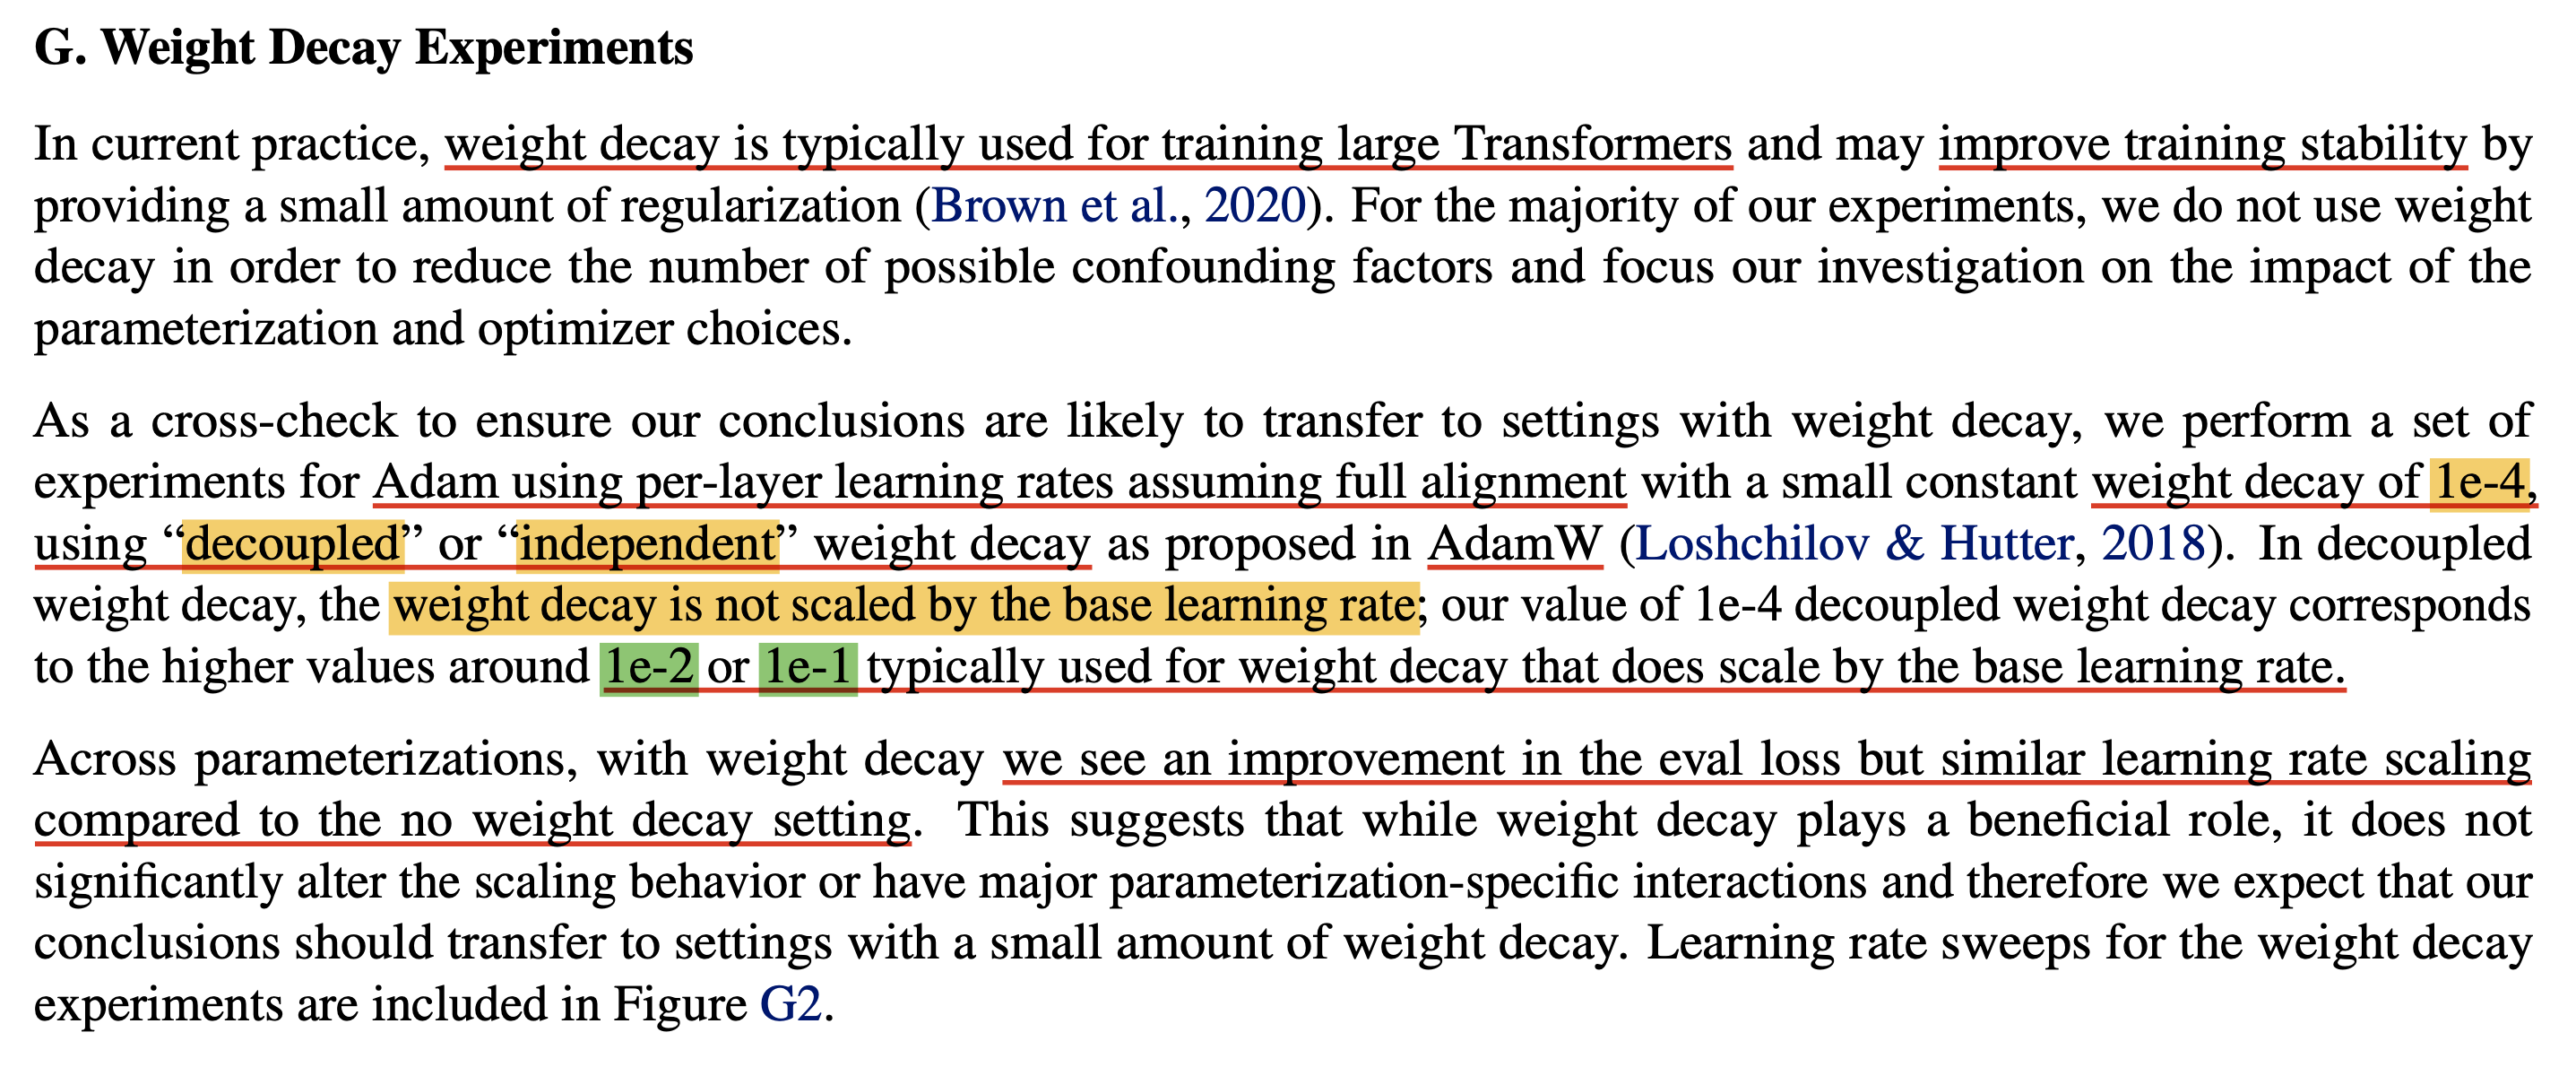 Fig.
Fig.
아마 여러 정황을 고려해 볼 때,
Greg이 weight decay is automatically scaled correctly in AdamW라고 얘기한 이유는 AdamW의 paper상 구현이 그렇다는 것을 얘기하는 것 같다.
즉 pytorch impl을 생각하지 않은 것이며,
개인적으로는 weight_decay가 width scaling과 관련이 없어야 하며 weight_decay = lambda * width_mult / lr로 setting 해줘야 하는 것으로 보인다.
(그런데 AdamW에 대한 issue를 보면 누군가 정확히 이 부분을 지적했는데,
왜 이런 solution이 나왔는지는 모르겠다)
PyTorch Adam optimizer numerical issues w.r.t RLHF from Costa Huang
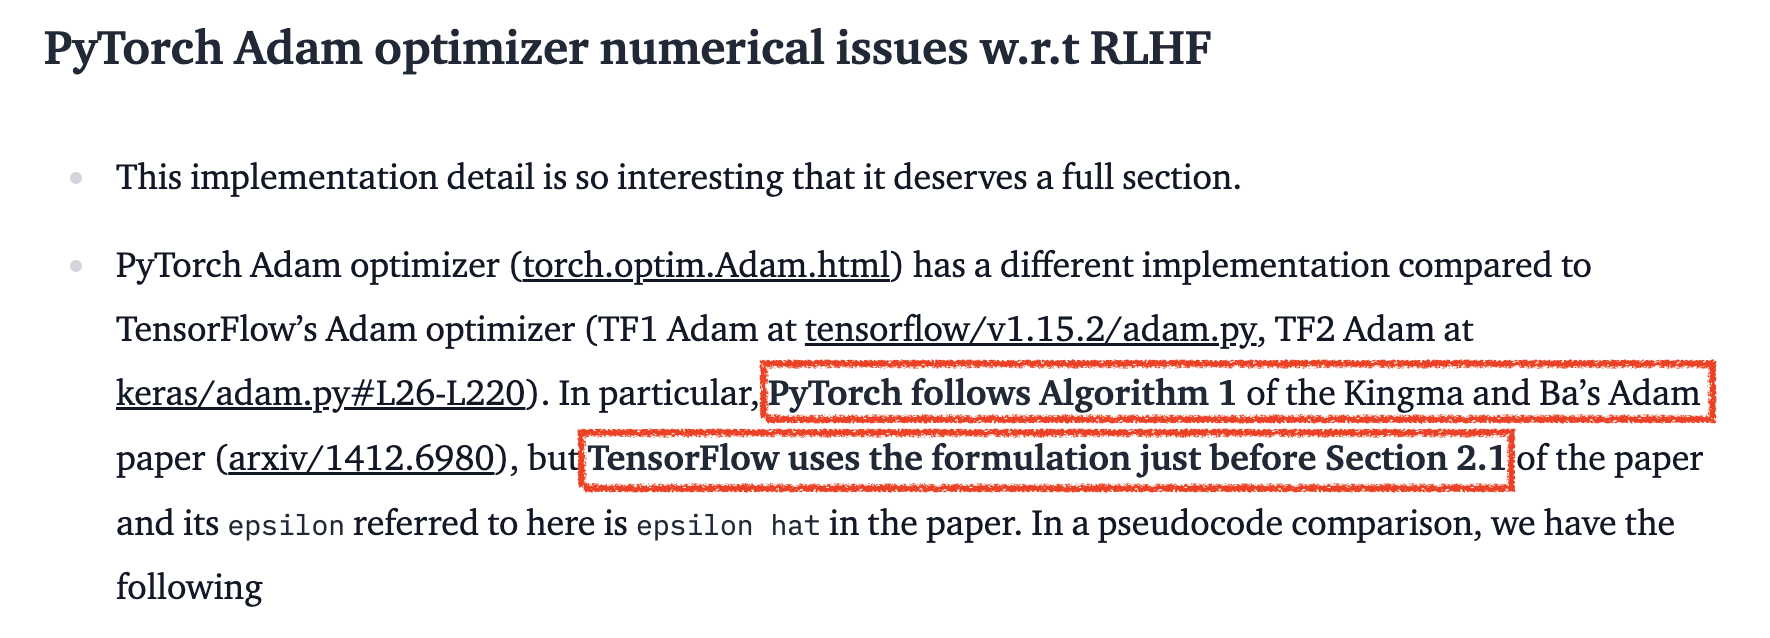 Fig.
Fig.
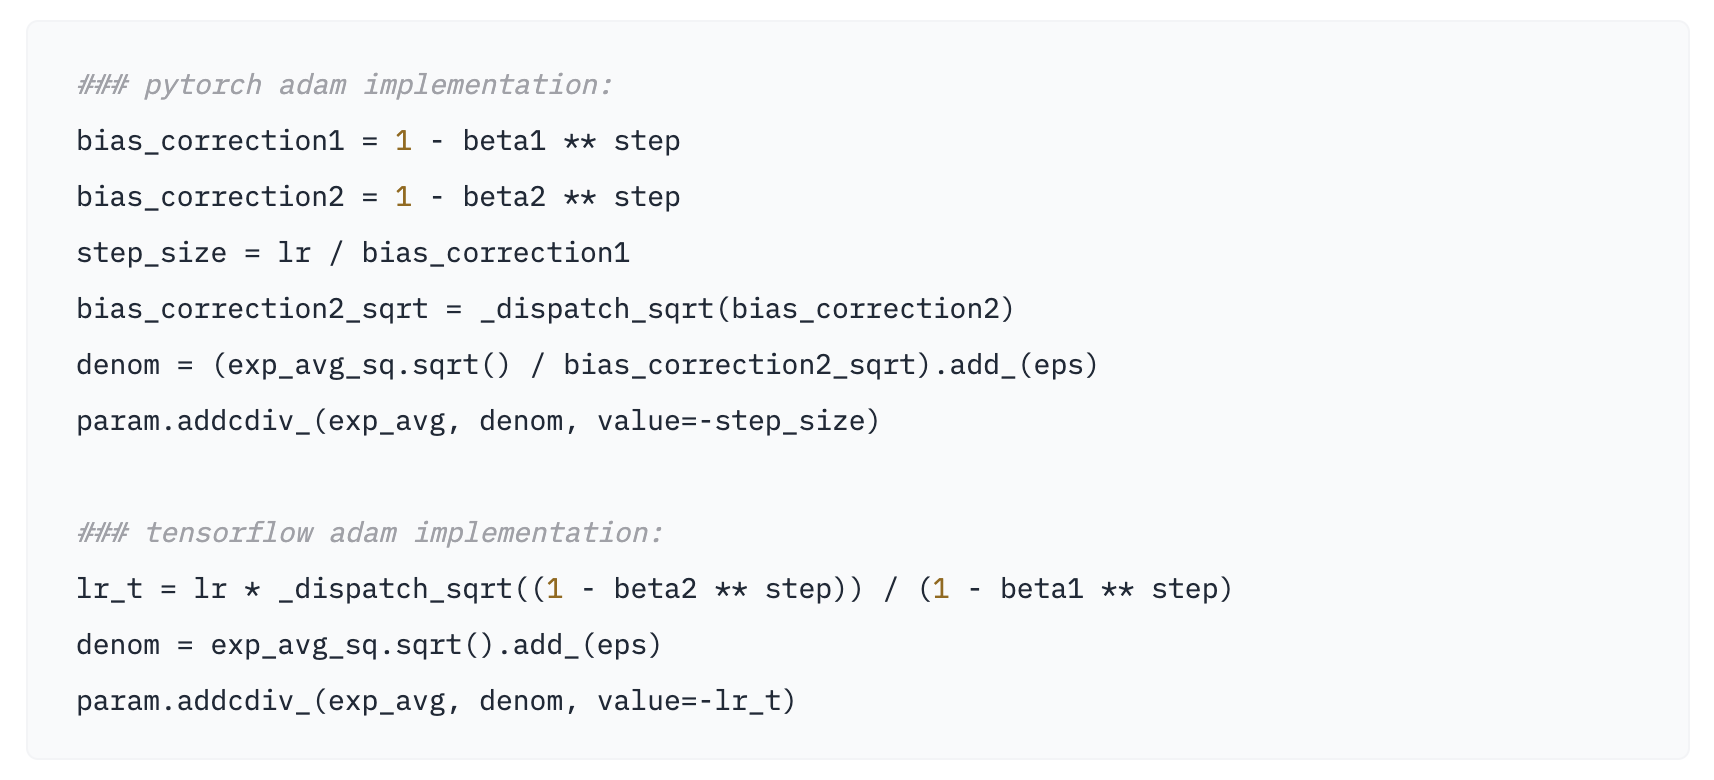 Fig.
Fig.
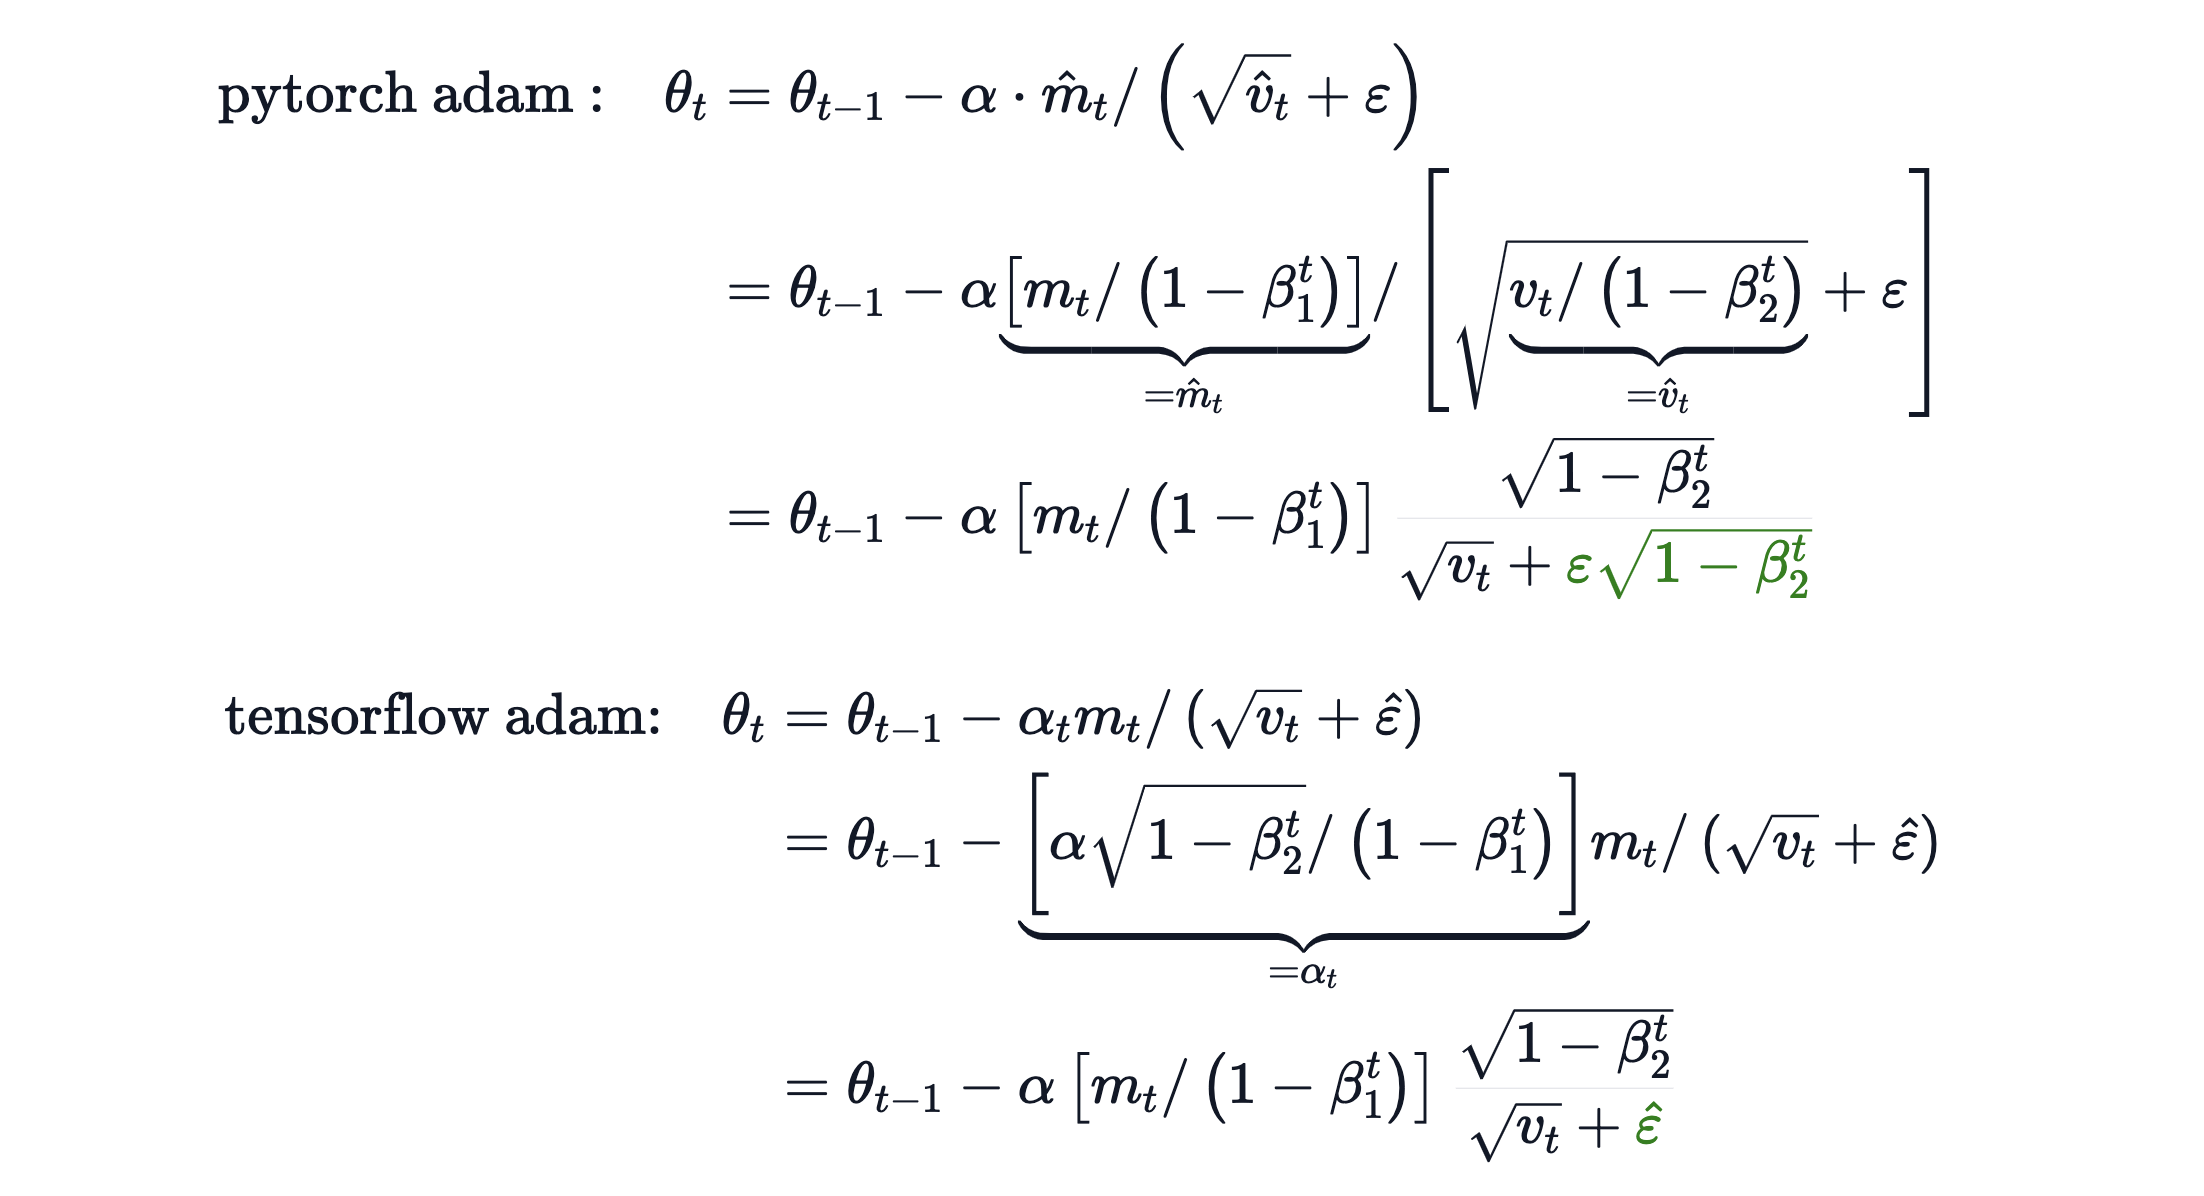 Fig.
Fig.
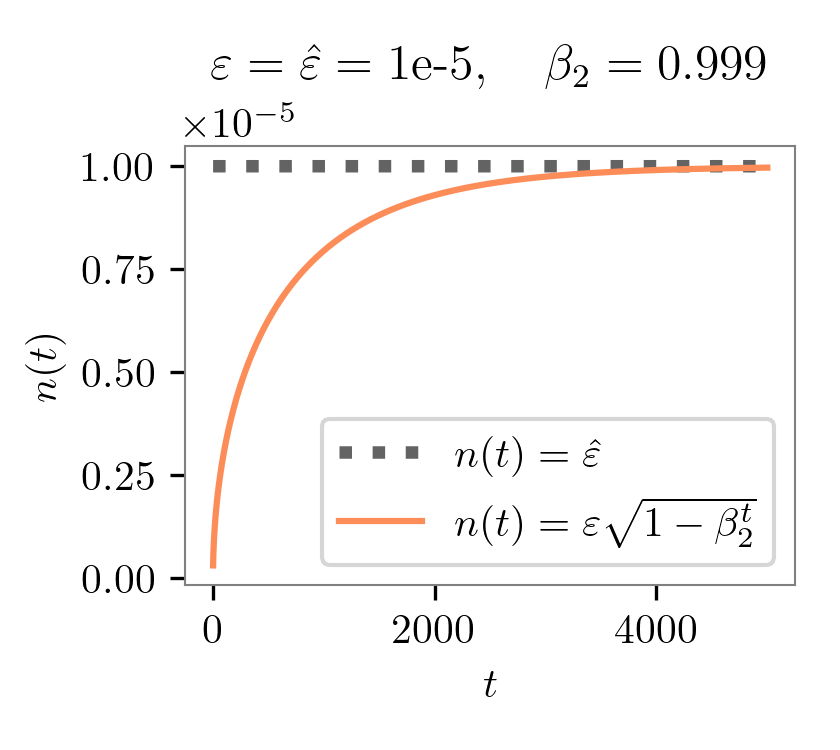 Fig.
Fig.
 Fig.
Fig.
 Fig.
Fig.
 Fig.
Fig.
 Fig.
Fig.
 Fig.
Fig.
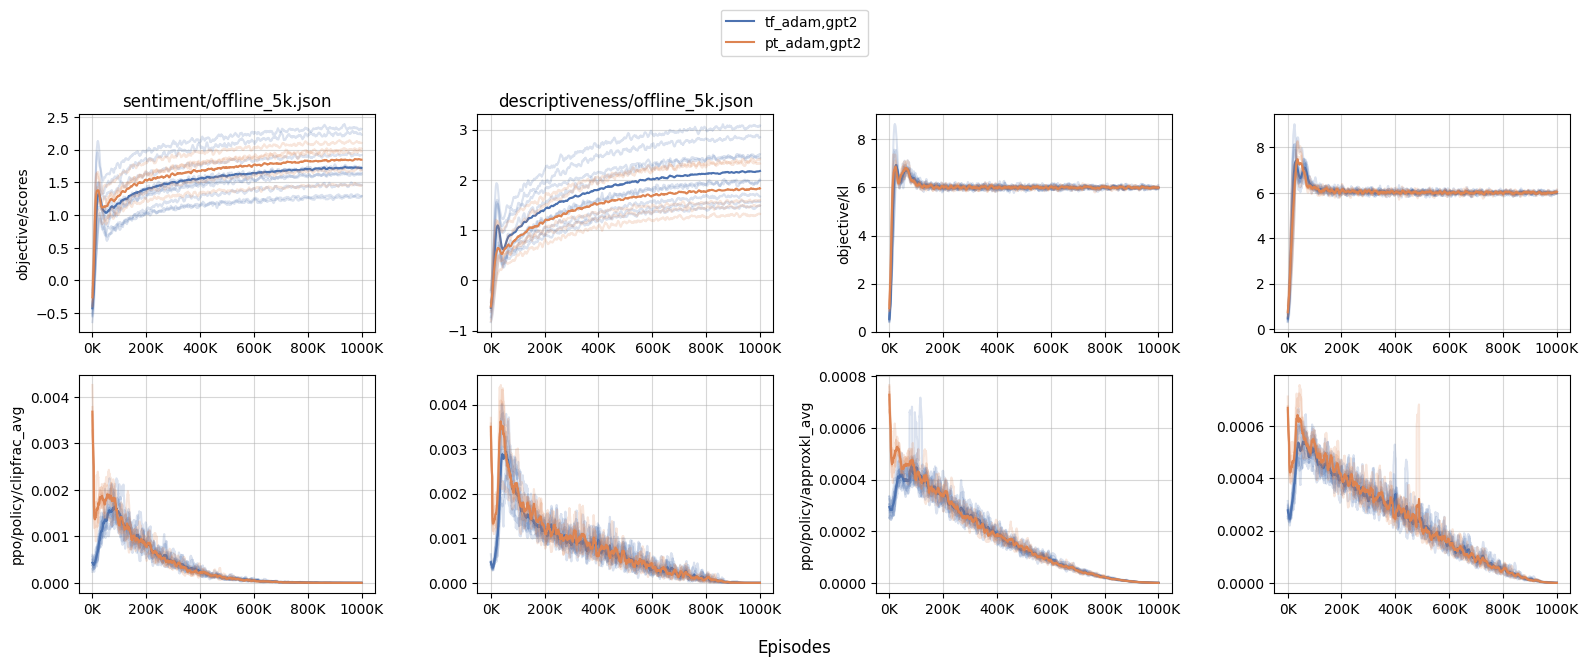 Fig.
Fig.
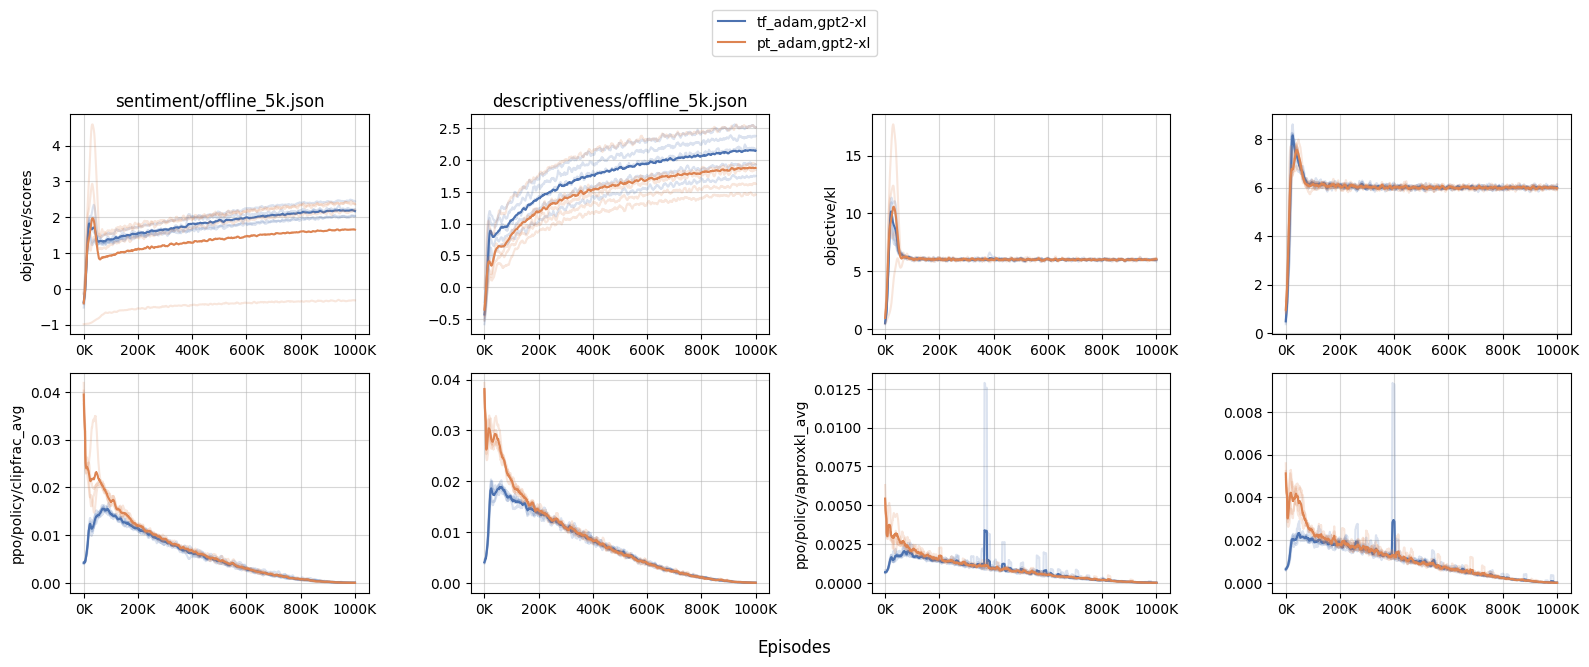 Fig.
Fig.
Adafactor Implementation from Fairseq
References
- Some Lecture Slides for Adaptive Optimization Methods
- Papers
- Blogs and Others
- Notes on the Limitations of the Empirical Fisher Approximation from Ferenc Huszár
- Natural gradients from Andy Jones
- Why Momentum Really Works from Distill
- google-research/tuning_playbook
- Tweet Threads about Pytorch AdamW Implementation
- Intuitive explanation for Adam’s epsilon parameter (Reddit post)
- Using larger epsilon with Adam for RL? (Reddit post)
- post from Zack Nado
- Codes
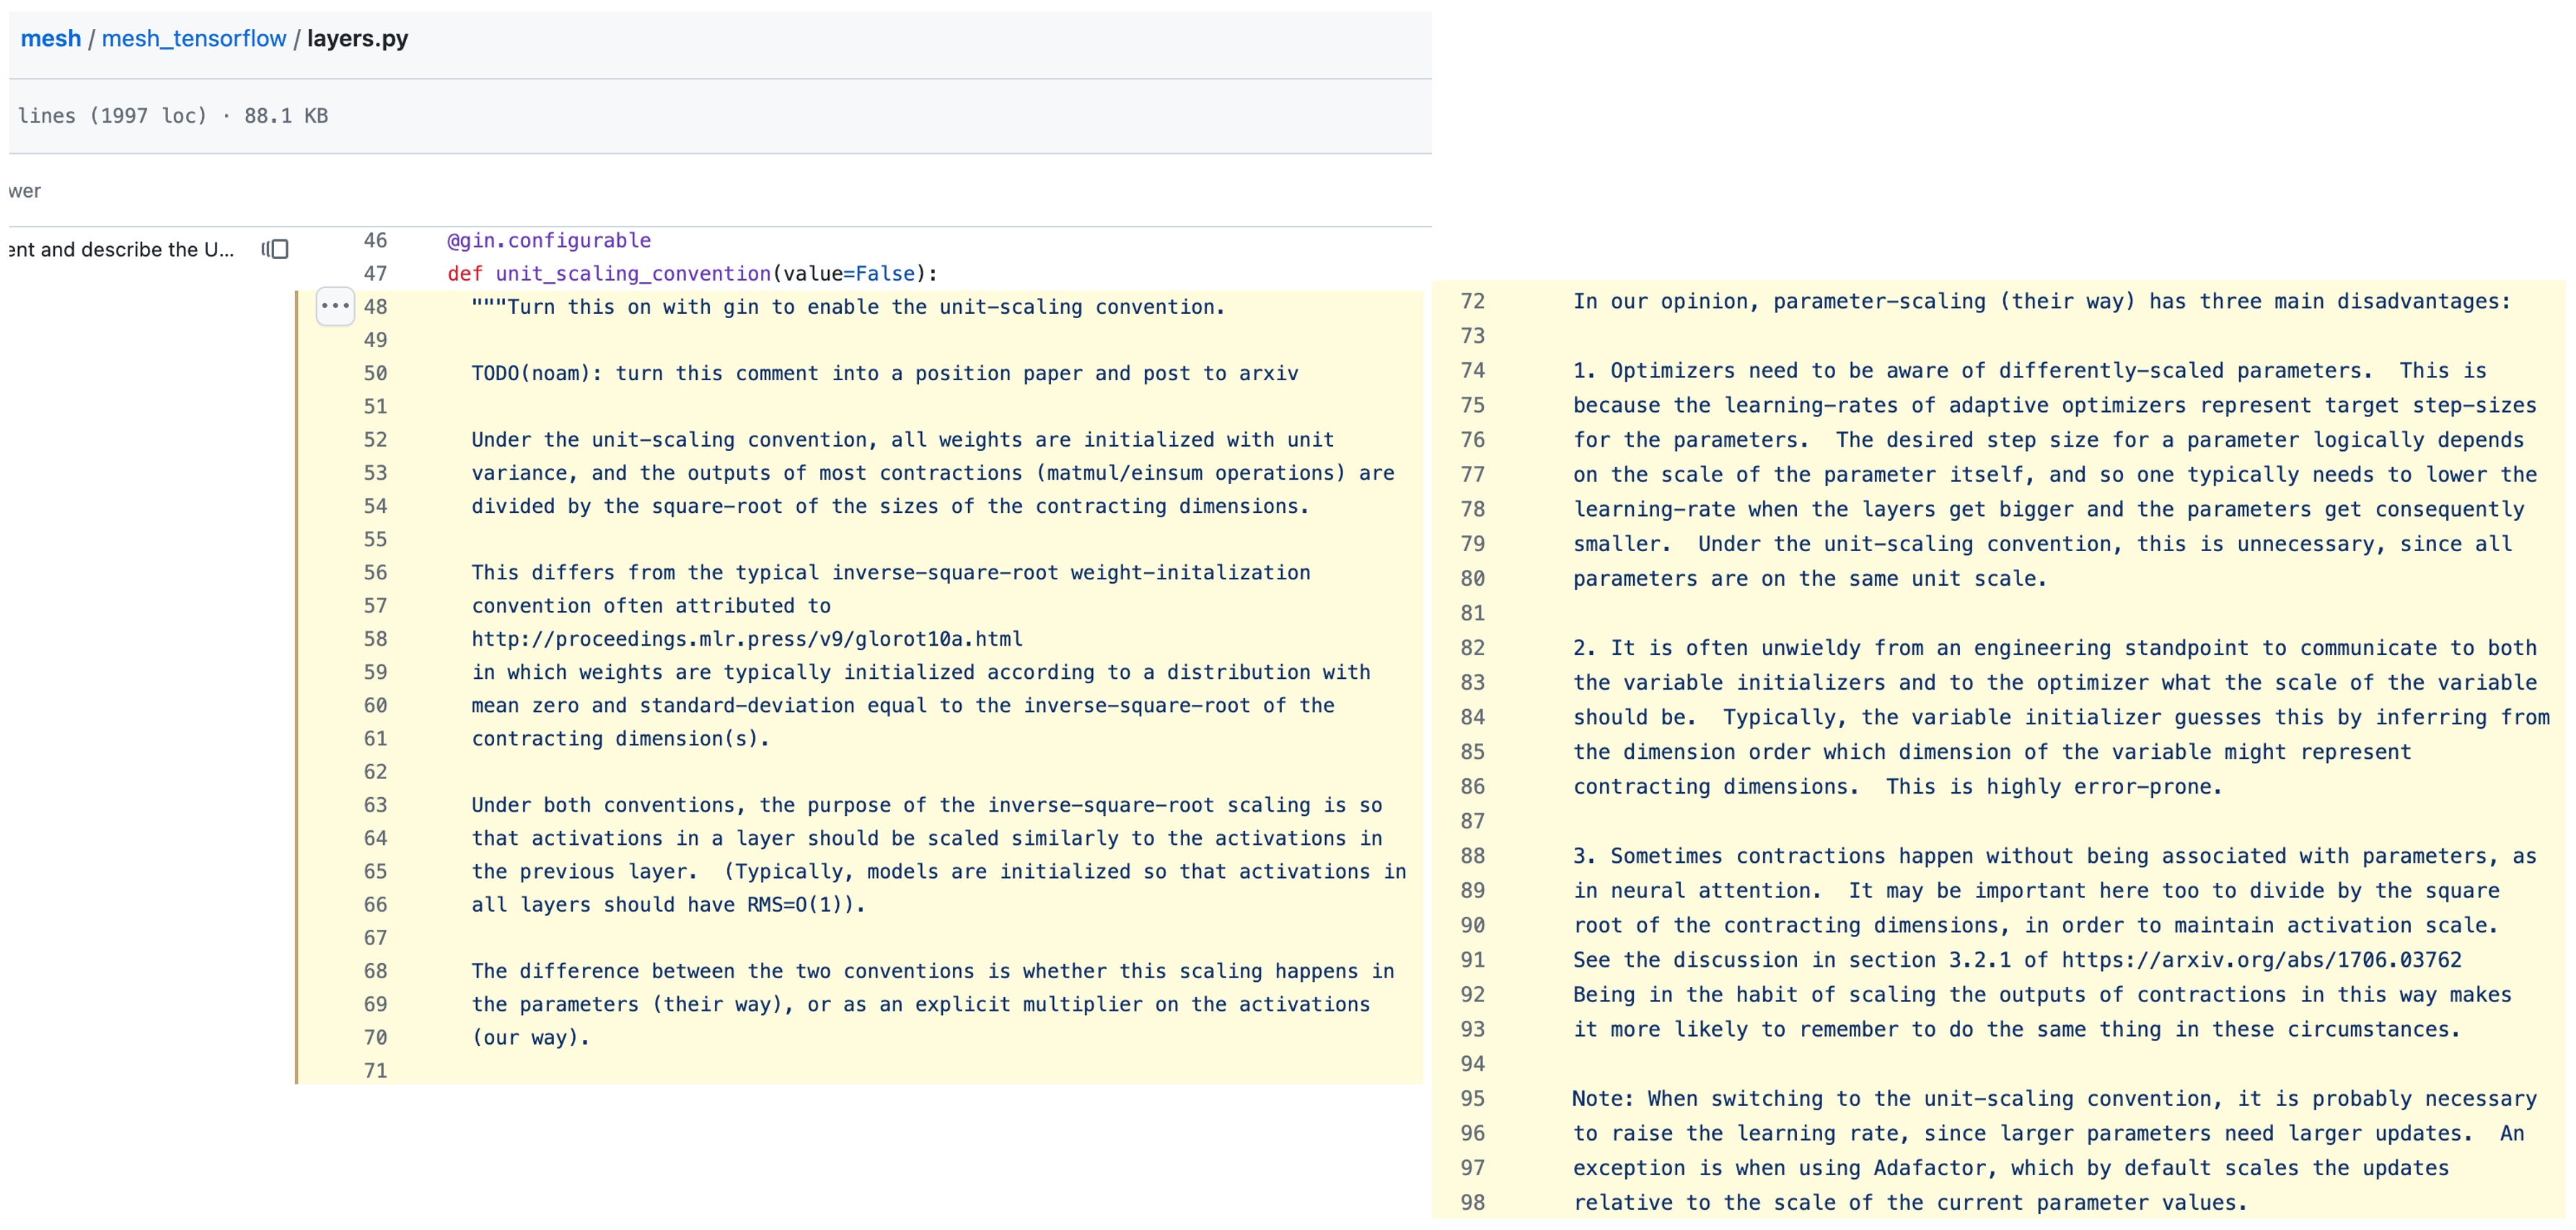 Fig.
Fig.